To avoid these ads, REGISTER NOW!

MIG Welding Critique

Right Angle

Member
Joined
Jul 23, 2011
Messages
14
Hello everyone.

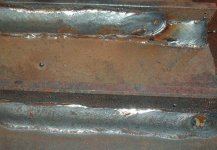
I've had access to MIG welder for some time, and after reading a lot about it, I decided enough was enough and I would just try it out. The three pictures show my first attempts.

These were all welded right to left (I'm left-handed).

In the first one, I started and realized that the wire speed and the heat were both too low. The left half of the weld was completed with a faster wire speed and more heat.

The second picture is a weld on the reverse side of the piece right after completion.

The third and final picture is the same weld after a little brass brushing.

A couple of quick questions:

  • Is that some sort of oxidation on the weld in the second picture that I ended up brushing off?

    What can I do to improve? I think my hand movement speed could be a little more consistant.

I also have the "Modern Welding" textbook, so I'll be spending a little more time in that.

This forum has always been a great place, thanks for the help.
 

Attachments

  • 1st Welding Attempt (1 of 3).jpg
    1st Welding Attempt (1 of 3).jpg
    62.8 KB · Views: 570
  • 1st Welding Attempt (2 of 3).jpg
    1st Welding Attempt (2 of 3).jpg
    60.7 KB · Views: 579
  • 1st Welding Attempt (3 of 3).jpg
    1st Welding Attempt (3 of 3).jpg
    55.2 KB · Views: 621
To avoid these ads, REGISTER NOW!

aka Larry

Well-known member
Joined
May 2, 2012
Messages
8,009
Location
Eastern, NC
Not bad at all for your first time. One question though, were you using two hands? If not, you should be as it will help steady the gun and make the bead more consistent.
 

koditten

Well-known member
Joined
Apr 10, 2008
Messages
5,528
Location
Midland, Michigan
Looks like you got the basics down. The residue is just smoke/fumes left over from welding.

Mig welding is the way to go, isn't it? You were smart to start with clean, bare metal. Takes the work right out of welding.

KO
 
OP
R

Right Angle

Member
Joined
Jul 23, 2011
Messages
14
Not bad at all for your first time. One question though, were you using two hands? If not, you should be as it will help steady the gun and make the bead more consistent.

Yes, two hands. I've read here that it's a good idea. It seems like the ideal method.
 
OP
R

Right Angle

Member
Joined
Jul 23, 2011
Messages
14
Looks like you got the basics down. The residue is just smoke/fumes left over from welding.

Mig welding is the way to go, isn't it? You were smart to start with clean, bare metal. Takes the work right out of welding.

KO

MIG is great. I'd love to learn TIG, but first things first. :D

I've learned a lot just from reading here. Including starting with clean material.
 

383 240z

Well-known member
Joined
Dec 4, 2006
Messages
4,295
Location
Findley Twp. Allegheny Co.
Was that a steady bead? Or were you pulsing the weld? IE: Weld a spot, move forward and make another spot? I only ask because of pic #3. Pics #1 and #2 look good. That pulse style (fake TIG look) weld looks nice but is very weak. NEVER to be used. Keith
 
OP
R

Right Angle

Member
Joined
Jul 23, 2011
Messages
14
Was that a steady bead? Or were you pulsing the weld? IE: Weld a spot, move forward and make another spot? I only ask because of pic #3. Pics #1 and #2 look good. That pulse style (fake TIG look) weld looks nice but is very weak. NEVER to be used. Keith

They were all done with a steady bead except for the right hand side of pic #1. I may have stopped and started on that side. I was still trying to figure out settings on the welder there. Pic #2 and #3 are the same weld.
 

Jagmandave

Well-known member
Joined
Nov 6, 2011
Messages
6,299
Location
Overland Park, Ks.
It's hard to say for sure even tho your pics are pretty good, but it looks to me that you need a little more wire speed to get a little more filler. The weld should stand slightly proud of the base metal, not be cut in.....

I'll be interested to hear what the experts think.
 
OP
R

Right Angle

Member
Joined
Jul 23, 2011
Messages
14
In that case Kudos! Good looking fillet welds. Keith

Thanks. Still lots to learn.

It's hard to say for sure even tho your pics are pretty good, but it looks to me that you need a little more wire speed to get a little more filler. The weld should stand slightly proud of the base metal, not be cut in.....

I'll be interested to hear what the experts think.

Good to know. Could I accomplish the same thing by slowing down my hand speed, or does that risk getting the metal too hot?

Thanks for the pointers.
 

Spectre32

Member
Joined
Sep 20, 2011
Messages
19
Was that a steady bead? Or were you pulsing the weld? IE: Weld a spot, move forward and make another spot? I only ask because of pic #3. Pics #1 and #2 look good. That pulse style (fake TIG look) weld looks nice but is very weak. NEVER to be used. Keith

Whats wrong with Pulse GMAW Welding??
 
To avoid these ads, REGISTER NOW!

TwoSmoke

Member
Joined
Oct 17, 2012
Messages
17
Inclusions, poor heat signature, insufficient penetration and list goes on. Back to the weld: your off to a great start but try and keep a consistent stick out and a fluid motion thought out the weld. Remember on a fillet as you wash the puddle up an down the filler wire is at a different distance away from the material causing lumpy welds. Setup is key with mig welding should sound like bacon frying and after a weld the tip of the wire should look like you cut it with a set of welpers and not having a small ball on the end.
 

SlappyWhite

Well-known member
Joined
Oct 3, 2012
Messages
1,819
Location
Upper Canada
For practice I recommend a couple of things.

1) Weld together some scrap steel and then cut it apart to see how well you are penetrating. You can also weld together some flat steel end to end this may save cutting (just flip it to see how well you did). Try some different thicknesses. The weld may look great on the surface but it may only be on the surface... Ugly and strong is better than pretty and weak!

2) Weld together some joints on steel tube (1") and then see if you can break them (does the weld or the steel fail first). Use a press of come up with some other method (cheater bar and some way to secure the other end). And be VERY careful!
 

Journaler

Well-known member
Joined
Apr 25, 2012
Messages
572
...
2) Weld together some joints on steel tube (1") and then see if you can break them (does the weld or the steel fail first). Use a press of come up with some other method (cheater bar and some way to secure the other end). And be VERY careful!

I just use my vise and a BFH!
 

FunkyfullWidth

Well-known member
Joined
Oct 3, 2011
Messages
1,238
Location
Three Rivers, ma
I can't tell if it's the pictures or not, but it does look like a little bit of under cutting. Depending on what your welding, you could turn down the heat and move a little slower, or turn up the wire speed slightly. All in all, they look like clean consistent welds. Everyonce in a while it looks like it may have gotten away from you. For example on picture three towards the end, it almost looks like the bottom edge of the weld has a slight gap in between beads. don't be afraid to roll that trigger back. sometimes you have to run c's with the occasional e, or figure 8. Just keep an eye on everything in front of you, the wire, the puddle and where you just left.
 
OP
R

Right Angle

Member
Joined
Jul 23, 2011
Messages
14
looks like you want to mig like a tig... check out this article. it helped me get cleaner

http://www.thefabfoundry.com/showthread.php?56-Basic-Welding-Technique-(-quot-Mig-Like-A-Tig-quot-)

You are after fusion, melting both pieces together.

Inclusions, poor heat signature, insufficient penetration and list goes on. Back to the weld: your off to a great start but try and keep a consistent stick out and a fluid motion thought out the weld. Remember on a fillet as you wash the puddle up an down the filler wire is at a different distance away from the material causing lumpy welds. Setup is key with mig welding should sound like bacon frying and after a weld the tip of the wire should look like you cut it with a set of welpers and not having a small ball on the end.

For practice I recommend a couple of things.

1) Weld together some scrap steel and then cut it apart to see how well you are penetrating. You can also weld together some flat steel end to end this may save cutting (just flip it to see how well you did). Try some different thicknesses. The weld may look great on the surface but it may only be on the surface... Ugly and strong is better than pretty and weak!

2) Weld together some joints on steel tube (1") and then see if you can break them (does the weld or the steel fail first). Use a press of come up with some other method (cheater bar and some way to secure the other end). And be VERY careful!

I can't tell if it's the pictures or not, but it does look like a little bit of under cutting. Depending on what your welding, you could turn down the heat and move a little slower, or turn up the wire speed slightly. All in all, they look like clean consistent welds. Everyonce in a while it looks like it may have gotten away from you. For example on picture three towards the end, it almost looks like the bottom edge of the weld has a slight gap in between beads. don't be afraid to roll that trigger back. sometimes you have to run c's with the occasional e, or figure 8. Just keep an eye on everything in front of you, the wire, the puddle and where you just left.

Thanks for all the replies. Everything helps.

I was able to get some pointers from a welder. He basically told me what some have said here, those welds were pretty terrible. :D

I watched him weld a few things, and then he watched what I was doing. Two major things stood out. The first was that I was going way too fast. I was never getting the metal anywhere near hot enough for good penetration. Secondly I was starting with way too much stick out and keeping the tip too far away from the work. Addressing those has helped greatly.

The other thing to note, is I was pretty much going in a straight line in those pics that I posted. I wasn't moving in a "e" or "u" motion. This was probably partly related to me trying to speed through the weld.

Another thing that has helped is moving my second hand further away from the tip of the gun. This allows me to move the tip in a more fluid motion. On top of that, I've started to make sure I'll be comfortable for the duration of the weld so that my hand motions are a lot cleaner.

I'll make sure to post up some pictures of my progress for more input.

Thanks again for all the help.
 

sberry

Banned
Joined
Jun 18, 2005
Messages
35,747
Location
Brethren, Michigan
The other thing to note, is I was pretty much going in a straight line in those pics that I posted. I wasn't moving in a "e" or "u" motion. This was probably partly related to me trying to speed through the weld.
In many cases, maybe most especially for light work using some kind of moption isnt required, I do wiggle a little to "wash" or melt the surface off especially with small machine on thicker materials, on sheet mostly just run straight.
 

Attachments

  • Hob set test.JPG
    Hob set test.JPG
    79.7 KB · Views: 144

mattdwelder

Well-known member
Joined
Oct 16, 2012
Messages
73
Location
so-il
check out weldingtipsandtricks.com they have a variety of welding processes on video while looking through a welding lens. Might help you out
 

Flash and Flare

Well-known member
Joined
Oct 23, 2011
Messages
118
Location
Central, Wisconsin.
In most if not all cases your tip to work distance should never exceed the dimensional equivalent to the ID of the nozzle.

What type and ratio of shielding gas were you using in the above 3 photo's ?
What type of wire and size wire were you using ?

That brown smoke/oxidation that you speak of is indicative of not enough wire for the heat range.

puddle control
Puddle Control
PUDDLE CONTROL

It's all in the wrists

Lock your elbow to the side of your torso when your weave, it will greatly help with your consistency and control.


I burn up hundreds of pounds of wire each week gluing steel together that meets or exceeds AWS d1.1 structural.

F&F
 

Flyboy101

Member
Joined
Sep 21, 2012
Messages
24
Location
southern NJ
Was that a steady bead? Or were you pulsing the weld? IE: Weld a spot, move forward and make another spot? I only ask because of pic #3. Pics #1 and #2 look good. That pulse style (fake TIG look) weld looks nice but is very weak. NEVER to be used. Keith

I am a bit confused. Just because it looks like a tig weld why does it mean it is weak? Have seen this done then cut apart and it is a full penetration. How can you tell from that picture? Asking as a novice welder that is..
 

mattdwelder

Well-known member
Joined
Oct 16, 2012
Messages
73
Location
so-il
Hes talking about triggering a weld. It can be used to create a good weld on light material when your worried about burning through.But you must remember that every time you stop the arc by letting off the trigger you are creating a layer of impurities in the weld therefor weakening the metal.
 

jrod60

Well-known member
Joined
Apr 11, 2006
Messages
75
Location
Katy TX
Whats wrong with Pulse GMAW Welding??

I suspect you know the answer is "nothing", but I'll add to the conversation for the folks that may not know about it.
GMAW-P (pulsed mig) involves a different type of power source that pulsates the current, changing the behavior of the weld and its penetration. What 383 240Z is talking about is basically stacking a bunch of tack welds together in the hopes of making something look "pretty". As discussed, this is terrible practice when you actually want things to be stuck together with any sort of strength. The heat input is not sufficient to create a good bond between the base metals. I can't imagine a situation where it would be the right way to weld. If you're burning through thin sheet sections, adjust the voltage, wire feed, travel speed, wire size, gas mixture, or operator.

nbc_the_more_you_know1-300x197.jpg
 
To avoid these ads, REGISTER NOW!
Top Bottom