To avoid these ads, REGISTER NOW!

Mini-split A/C Shopping...

OP
M

mpire

Well-known member
Joined
Nov 21, 2008
Messages
1,837
Location
Florida
So anyways... I need to follow up on the garage A/C unit.

Basically, the refrigerant leaked out yet again from the unit.

So Sean came out again and looked over the whole system.

He seems to think the flare on the pipe was not done properly and a small burr was causing a poor seal.

So re-worked the connection and didn't charge me.

So far its still blowing cold again. I don't use it that often, so hopefully it will continue without losing any refrigerant.

That goes to show you, install is everything.
 
To avoid these ads, REGISTER NOW!

RKA

Well-known member
Joined
Jun 9, 2010
Messages
1,744
Location
NJ
Did you find any oil trace on that connection to indicate that was the source of the leak? If not, have you inspected inside the outdoor unit for oil trace? Seems like it would be an worthwhile/easy/cheap thing to do. Spray something on every copper connection (factory and installer performed) you can find until you see bubbles.
 

ConcreteAce

Well-known member
Joined
Aug 25, 2012
Messages
46
Location
Spring Texas
mpire I just ran across your thread. I have a question for you, first off gotta say nice work on your install I was real fascinated to learn that there is a line set cover that I can buy for outside, so first thing monday Ill be tracking that down for my install. Back to my question....When you came out of the wall with your line set and made that 90 degree turn to go to your outside unit what did you do to keep from kinking the line? Just trying to find out if there is a trick to that I am about to run mine. Thanks
 
OP
M

mpire

Well-known member
Joined
Nov 21, 2008
Messages
1,837
Location
Florida
With the 3/4 ton unit, the lines are so small that kinking wasn't really an issue. I just went really gentle on the bending. You can also get a spring that wraps around the tube and then prevents it from kinking when you bend it. Its at home depot in the pipe tools section. I got a set for 10 bucks.
 

RKA

Well-known member
Joined
Jun 9, 2010
Messages
1,744
Location
NJ
If you have pre-made flares on those lines, you'll need to cut them off to slide the spring bender into place. You're probably better off doing that anyway, provided you have a good flaring tool (or a decent amount of practice making them).
 

Jackfre

Well-known member
Joined
Dec 26, 2010
Messages
4,406
Location
N CA
You need to cut off the factory flares in any case. They are not reliable. The benders are "spring benders". I found them for short money at Home Depot when my local Johnstone Supply was out of stock. The right flaring tool is either the Ritchie or Ridgid. Ream the copper and be very careful making your flares. Oh, and not to be insulting, but don't forget to put the flare nut on first. I, of course, have never made that mistake. I have heard of others doing so.:p
 

briantompo

Member
Joined
Aug 26, 2011
Messages
11
Location
central Florida
I ordered a 12k BTU LG mini last week so I'm planning the conduit, wiring and lineset layout while I wait for delivery. I want to mount the condenser about 8' off the ground and drop a single 3/4" conduit down to the disconnect. Can I run the 3 THNN #12's from a j-box down to the disco then back up in the same conduit or must I run two conduits to two separate j-boxes?

I can't find any pics online of high-mounted condensers where the wiring is done on the outside of a block wall. Does anyone have pics of a similar setup?

Thanks, Brian
 
OP
M

mpire

Well-known member
Joined
Nov 21, 2008
Messages
1,837
Location
Florida
I would just run everything inside the lineset cover. You only have to run power to the outside unit, and the inside unit runs off of 18 gauge wire to the outside unit.

With the LGs you need to have a funny loop or something for the lineset if the condenser is above the evaporator, so make sure you read the directions.
 

briantompo

Member
Joined
Aug 26, 2011
Messages
11
Location
central Florida
I shouldn't need a lineset cover since the condenser and evap will be at the same height about 9' up. Can I mount the service disconnect right next to the condenser at 9' high or do I have to make it accessible from the ground? From a service/troubleshooting standpoint, it seems more useful (fewer trips up and down the ladder) to have the disconnect right next to the condenser.

Thanks, Brian
 

Jackfre

Well-known member
Joined
Dec 26, 2010
Messages
4,406
Location
N CA
Brian, be sure you check the manuf specs for MINIMUM line set lengths. Not sure how LG deals with that but make sure you have it right before you pipe it up.
 

briantompo

Member
Joined
Aug 26, 2011
Messages
11
Location
central Florida
Hmmm, good call. I ordered a 15' lineset from PexSupply. I didn't see a minimum length when I read the online LG installation manual but I'll doublecheck when the actual unit arrives. Thanks for the heads-up. Brian

edit 8/29: I read the install manual again and the minimum lineset length is 2m (6.6')
 
Last edited:

briantompo

Member
Joined
Aug 26, 2011
Messages
11
Location
central Florida
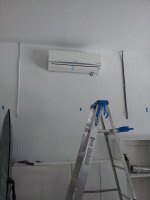
The 12k BTU LG minisplit is up and running so I thought I'd relay my experience and costs. I've got just under $1700 invested and two full days of labor. Overall, I'm thrilled to finally have AC; I wish I could have done it sooner.
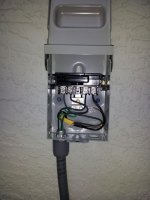
I bought the LG LS121HSV2 inverter heat pump from AJ Madison for a little over $1200 with free shipping. They knocked 5% of their price when I ordered over the phone. The 15' lineset was $90 after shipping from PexSupply. I wall-mounted the condenser and the bracket was $55 from hvacguysonline on Ebay. Additionally, I spent about $150 at HD for the breaker, Romex, THHN, disconnect, flex conduit plus Liquid Tight fittings, sleeve anchors, dryer vent, vinyl gutter downspout and clips, plus a couple new bits for the hammer drill. HVAC dude was $150 to cut, flare and connect the lineset then evac and start up. Yeah, I could have put that towards tools and a vac pump+gaugeset. Hindsight...

I'm in central Florida. I love it but it's a humid, bug-infested swamp. Leaving the doors open only works for a few months of the year. The space is 20x24x12 with one overhead door and one fiberglas swing door. No windows. Construction is uninsulated block but the roof is foamed with 3" of closed-cell. The attic stays within 10°F of the garage temp during the hottest days. The east-facing overhead door is insulated and gets full morning sun for 3 hrs. South and West walls are mostly shaded. I figured 12k BTU would do it since I'm mostly trying to dehumidify while knocking the temp down a little. For reference, the garage stayed low/mid 80's this summer but humidity is often over 80%. A portable dehumidifier would dry it out but heat it to 90F by afternoon. If 12k (actually rated 11.3k BTU) proves inadequate, I'll get on here and admit it.
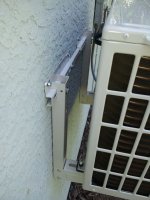
Installation was as described earlier in this thread and others. My only real challenge was routing the electrical and copper around the block cells that are concrete filled. Where I chose to put the condenser and evap preserved wall space for my particular needs but the installation took longer and isn't as elegant as I would have liked.
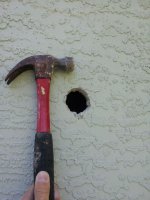
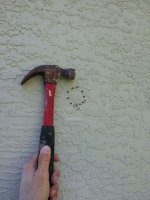
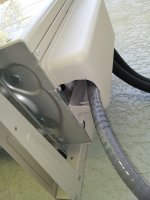
I predrilled the hollow block then knocked perfectly round, neat holes thru it with a hammer. Then I beat and chiseled much larger, irregular holes after trying to stuff the lineset, condensate drain and 14-3 Romex thru it. The outside hole is about 6" below the inside hole for drainage and ease of bending the lineset. The lineset and drain are hidden inside a 2x3 vinyl gutter downspout that I slit full-length with a utility knife and sleeved over the lines. It's secured with plastic gutter clips tapcon'd to the wall and topped with a dryer vent that's butyl caulked to the stucco. I foamed around the block penetrations before adding the vent cap. I'll scuff the vinyl, prime it with some Grip-n-Seal, then make it disappear with house paint. Momma won't even see it.

The condenser wall mount bracket was easy to install with four 5/16" x 1-1/2 Redhead sleeve anchors. The condenser ends up 5" from the wall but I didn't find any brackets that provided the 12" mfg suggested clearance. The copper lineset was much easier to bend than I expected and came preflared and capped. Two surprises: I didn't know the evap was shipped pressurized so when you remove the caps, it hisses. I had a brief, "ohshit" moment thinking I'd released refrigerant. Second, there was an uncomfortably long, 2-3 min delay before the condenser fan and compressor started. The evap fan came on instantly but the outside unit had me concerned.

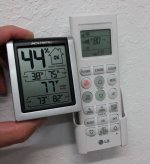
So, how's the thing work? Money! On a humid 88° day the garage started at 81° and 74% RH and was at 79° and 52% RH in 30 mins. Water POURED out the drain. Both units are unbelievably quiet in high and barely noticeable when it throttles back. The condenser sounds like a mini fridge and from 10' away I can't hear it over the cicadas. Initial performance is exactly what I'd hoped for and the installation is discreet. Plus, there are no large holes that could be security concerns.
I'll update with pics later and any noteworthy performance specs. BrIan
 

briantompo

Member
Joined
Aug 26, 2011
Messages
11
Location
central Florida
I left the LG in dehumidify mode for the weekend and when I got home the garage was at 73F and 38%. Yikes! It felt great but probably ran more than I need so I switched from "dehumidify" to "cooling" and engaged "economy" mode. I'll keep increasing the thermostat so it runs the minimum amount to stay below 60%RH. It's so humid here that anything 60%RH or less feels fantastic and keeps the mildew at bay.
I did cut the bottom of the plastic cover on the condenser so that I could route the electrical in from the bottom. I put a belly in the flex conduit so rainwater doesn't run down it and pool in the cover. Brian

http://www.garagejournal.com/forum/attachment.php?attachmentid=207958&stc=1&d=1347389730
http://www.garagejournal.com/forum/attachment.php?attachmentid=207959&stc=1&d=1347389730
http://www.garagejournal.com/forum/attachment.php?attachmentid=207960&stc=1&d=1347389730
http://www.garagejournal.com/forum/attachment.php?attachmentid=207961&stc=1&d=1347389730
http://www.garagejournal.com/forum/attachment.php?attachmentid=207962&stc=1&d=1347389730
 

Attachments

  • 08.jpg
    08.jpg
    76.8 KB · Views: 81
  • 09.jpg
    09.jpg
    44.2 KB · Views: 76
  • 10.jpg
    10.jpg
    37.9 KB · Views: 104
  • 11.jpg
    11.jpg
    44.7 KB · Views: 84
  • 12.jpg
    12.jpg
    52.3 KB · Views: 88

JakeKohl

Well-known member
Joined
Feb 23, 2012
Messages
1,365
Location
Greenville, SC
Do you find that your thermostat (remote) setting and the actual temperature varies quite a bit? I have to set my LG units (both of them) at 68 degrees to get the room to 74 where it holds well. Lower temperatures get lower, high temperatures go higher, and the units will absolutely chunk ice cubes in "jet" mode. I don't suspect anything wrong with the units - just something out of adjustment between the indoor unit thermostat and the handheld remote. Do you have anything similar?
 

briantompo

Member
Joined
Aug 26, 2011
Messages
11
Location
central Florida
Do you find that your thermostat (remote) setting and the actual temperature varies quite a bit?

Right off the bat it looks like a 3 degree split in cooling mode but my evap is much higher in the room than my thermometer. It probably IS 3 degrees warmer up near the ceiling. Dunno, I'll check tomorrow. Brian
 

Jackfre

Well-known member
Joined
Dec 26, 2010
Messages
4,406
Location
N CA
Do you find that your thermostat (remote) setting and the actual temperature varies quite a bit? I have to set my LG units (both of them) at 68 degrees to get the room to 74 where it holds well. Lower temperatures get lower, high temperatures go higher, and the units will absolutely chunk ice cubes in "jet" mode. I don't suspect anything wrong with the units - just something out of adjustment between the indoor unit thermostat and the handheld remote. Do you have anything similar?

Jake, the actual thermostat sensor is mounted up on the evap coil. Your remote is not a t'stat. It is essentially a communicator. With the inverter units they are sensing temps about 50times/sec and comparing in/out coil temps, fan speed, condenser fan speed and compressor. The only way it can get correct info is with that coil mounted sensor.
 

JakeKohl

Well-known member
Joined
Feb 23, 2012
Messages
1,365
Location
Greenville, SC
Jake, the actual thermostat sensor is mounted up on the evap coil. Your remote is not a t'stat. It is essentially a communicator. With the inverter units they are sensing temps about 50times/sec and comparing in/out coil temps, fan speed, condenser fan speed and compressor. The only way it can get correct info is with that coil mounted sensor.

I understand that - but I'm just saying that what I set the unit at with the remote is not what my room temperature ends up being (on both of my units) - it's off by about 6 degrees in cooling mode. A 68 degree "setting" puts my room at 74 actual. I would presume that the indoor unit has a thermistor reading the incoming air and would work to get that incoming air to whatever temperature it was trying to maintain. Why put a temperature setting on the remote if it's nowhere near accurate? Just make it a scale of 1-20 if it's meaningless.
 
To avoid these ads, REGISTER NOW!

RKA

Well-known member
Joined
Jun 9, 2010
Messages
1,744
Location
NJ
Is there anything in the manual about adjusting that so it was more "accurate" (which I suspect was nothing more than applying a correction factor of your choosing)?
 

battmain

Well-known member
Joined
May 7, 2009
Messages
192
I understand that - but I'm just saying that what I set the unit at with the remote is not what my room temperature ends up being (on both of my units) - it's off by about 6 degrees in cooling mode. A 68 degree "setting" puts my room at 74 actual. I would presume that the indoor unit has a thermistor reading the incoming air and would work to get that incoming air to whatever temperature it was trying to maintain. Why put a temperature setting on the remote if it's nowhere near accurate? Just make it a scale of 1-20 if it's meaningless.

I recall reading somewhere during my research a similar issue. It had to do with the conversion from Celcius to Farenheit. Certain F numbers were more accurate than others. When I get some time I'll see if I can dig up the info. I think the person also had an LG unit too.
 

JakeKohl

Well-known member
Joined
Feb 23, 2012
Messages
1,365
Location
Greenville, SC
I recall reading somewhere during my research a similar issue. It had to do with the conversion from Celcius to Farenheit. Certain F numbers were more accurate than others. When I get some time I'll see if I can dig up the info. I think the person also had an LG unit too.

I didn't think to check and see if the Celsius number were more accurate...I'll check that tonight.
 

JakeKohl

Well-known member
Joined
Feb 23, 2012
Messages
1,365
Location
Greenville, SC
Here you go:

The thread over on this forum is lengthy, but this is the specific post I recall...
Post - Ecorenovator.org

I believe that whole thread is linked somewhere in here too. :)

I turned the units to heat recently and setting "60" degrees F on the remote puts both units maintaining between 74 and 76 degrees in the rooms....which is definitely too high for the lowest setting I can achieve in the winter...particularly for rooms that will not be regularly occupied. After calling LG customer support, it turns out there was a known issue with the remotes supplied with my units. Apparently they don't send the correct temperature setting to the unit. The wall mounted unit in this model doesn't have a temperature read-out display (only a couple of subtle lights indicating "on", "preheating", or "plasma" filter on)...so you can't tell if it's actually set to the correct setting (which, apparently, neither could their engineers and QC folks).

LG customer support sounded US based, were quick to answer the phone, and decisive with their response. They assigned a case number and gave me the part number I needed. However, I have to order the warranty replacements through the distributor I ordered the units through and am working on that now. AC Wholesalers has no contact phone number and only a website form for warranty work - we'll see how that goes. So far, I have confirmation that they're contacting LG for availability of the remote in response to one of the two warranty claims I filed for one of my two units...no response on the other yet (but I'm hopeful they're considering both since I noted such in both warranty claims). They seem to have their act together....fingers crossed.
 
OP
M

mpire

Well-known member
Joined
Nov 21, 2008
Messages
1,837
Location
Florida
I can't edit the old posts to put pictures up, so I can't fix the links. Sorry.

However, I did snap a few pictures of everything just to tag them on here.

Here is the unit in the master bedroom over the bed.


This is the lineset cover and compressor on the outside of the house.


Here is the bushes in front of the outside compressor.


Close up of the wiring box and lines going to the compressor:


This is the garage inside unit:


Here is the outside lineset cover for the garage unit:


Outside compressor unit:


If there are any specific pictures you want, just ask and I will go re-take those.

Its been over 2 years now since I put the system in. I average $80-100 less than my bill was before the Mini-split. Most of that is NOT running the main AC at night, but my power bill is consistently below $100 a month, so I really can't complain. I don't get much use out of the garage unit, but it is super nice to have when I have a long car project going so I don't regret installing it one bit.
 

Randy Forbes

Active member
Joined
Oct 20, 2005
Messages
40
Location
SWFL
That LCA looks similar to my E36 front LCA I just replaced a few months ago. :beer:
Yep, they may even be the same part number! I recently discovered that the '95 and earlier LCAs are a different pt #, based on a revised castor setting (?)...

Going to be playing with some in a little while, as I "steal" the Stoptech BBK off a '95 M3 i'll be selling, and putting them (and if all goes well, the entire stub-axle assembly) onto a '99 ///M Coupe (with a Eurosport Twinscrew supercharger :shocking: )
 
OP
M

mpire

Well-known member
Joined
Nov 21, 2008
Messages
1,837
Location
Florida
# Randy-Forbes
# Thread-Jack

Keep in mind that the M Cars have offset LCAs vs the non-M cars.
 

CWO4GUNNER

Well-known member
Joined
Aug 17, 2014
Messages
229
Location
BHC AZ
"mpire" Please correct me if Im wrong but according to your photo above did you wire your Mini-split in parallel with with your main central AC outside unit? If so are your AC's set up so that potentially both unit's circuit can be made at the same time! If so are both units therefore relying on the same main line circuit breaker with potentially different loads? Im asking because I'm planning on doing something similar but plan to incorporate a special 230V switch that will only allow one unit to be made live at one time, and the mimi-split having its own local circuit breaker near the unit. This to save on wiring to the main line circuit breaker box.
 
Last edited:
OP
M

mpire

Well-known member
Joined
Nov 21, 2008
Messages
1,837
Location
Florida
Nope, I don't think that would have been to code. I just re-used the hole in the wall to run the wire. So the 12/2 for the mini-split wire just passes through the box for the main house AC.

Each AC has its own dedicated wire and breaker.

I figure the less holes in the outside of my house the better.
 
Last edited:

CWO4GUNNER

Well-known member
Joined
Aug 17, 2014
Messages
229
Location
BHC AZ
Oh wow... that explains why it otherwise caught my attention. I just hate running more wire since I plan on running them independently (emergency Mini-split AC) and need to fined a type of 230V "A/B" switch. Iv thought about also using a 230V outside rated plug-in connector so that only one unit at a time can possible be connected. But I suppose all that that would be just as much work as fishing another set of 10/3 wiring through that same hole "as you did", up to the attic, then attached the the end of wiring to a spool of fishing string. Then shoot the fishing string with toy bow and arrow 60ft across the length of the fluff filled inaccessible portion of the attic landing it near the breaker box location. Then use the 2nd attic access point to fish it down to the breaker box with its own dedicated breaker.
 

CWO4GUNNER

Well-known member
Joined
Aug 17, 2014
Messages
229
Location
BHC AZ
I found out that I can use a load transfer safty switch for switching between loads but will need a local breaker as well. Thanks
 
To avoid these ads, REGISTER NOW!
Top Bottom