To avoid these ads, REGISTER NOW!

Moai kind of

royce

Well-known member
Joined
Jun 22, 2014
Messages
3,111
Location
fairbanks ak
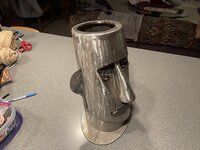
Got a request from our daughter to submit a piece for an art show at our grange hall.
The theme for this month's show is faces.
The first thing that came to mind was a Moai from Easter Island.
Knowing it would be out of reach to get all the detail one would need to replicate one, I thought maybe a more simple and basic one might work.
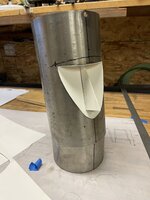
Started with a piece of 6" SS tube, here we go.

Royce
 

Attachments

  • Moai_Rano_raraku.jpeg
    Moai_Rano_raraku.jpeg
    774.7 KB · Views: 258
  • IMG_6766.jpeg
    IMG_6766.jpeg
    549.1 KB · Views: 170
To avoid these ads, REGISTER NOW!
OP
R

royce

Well-known member
Joined
Jun 22, 2014
Messages
3,111
Location
fairbanks ak
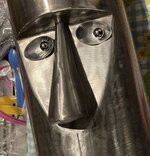
Got the brow and cheeks welded in and partially let in the eye sockets.
Pulled a couple bearings out of the pile for eyeballs.
Getting the expression of the eyes right, maybe tricky.

Royce
 

Attachments

  • IMG_6799.jpeg
    IMG_6799.jpeg
    880.2 KB · Views: 111
  • IMG_6812.jpeg
    IMG_6812.jpeg
    857.9 KB · Views: 128

slowtwitch73

Well-known member
Joined
Apr 18, 2019
Messages
5,876
Location
Hellgate
Wow timely.. A Maoi is on my list for the winter. There are many good line drawing on the web... I decided that was better to go off of than an actual picture.

A Maoi vice stand would be pretty cool.
 

Bodj Built

Well-known member
Joined
Feb 3, 2016
Messages
1,167
Location
Moorpark, CA
Got the brow and cheeks welded in and partially let in the eye sockets.
Pulled a couple bearings out of the pile for eyeballs.
Getting the expression of the eyes right, maybe tricky.

Royce
If you drill into the spoons to allow the bearings to seat in, it will probably get closer to the look you're going for. Also, maybe if you recessed the spoons into the plate they sit in?
 
OP
R

royce

Well-known member
Joined
Jun 22, 2014
Messages
3,111
Location
fairbanks ak
If you drill into the spoons to allow the bearings to seat in, it will probably get closer to the look you're going for. Also, maybe if you recessed the spoons into the plate they sit in?
Yes, partially let in the socket and ball, I like the effect of leaving it a bit proud.

Royce
 

Attachments

  • IMG_6835.jpeg
    IMG_6835.jpeg
    1.1 MB · Views: 102
OP
R

royce

Well-known member
Joined
Jun 22, 2014
Messages
3,111
Location
fairbanks ak
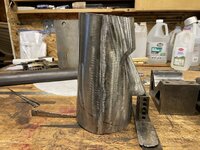
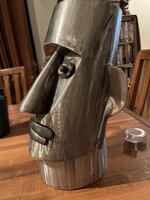
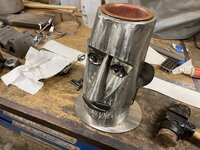
Today, trimmed the jaw line and top of head, made the mouth from a couple butterknife handles, tacked up eyes, nose and lips.
Finished the day, starting on the ears by spitting a busted serving spoon, I'm digging the long ear lobes.

Royce
 

Attachments

  • IMG_6837.jpeg
    IMG_6837.jpeg
    981.1 KB · Views: 107
  • IMG_6840.jpeg
    IMG_6840.jpeg
    754.7 KB · Views: 145

Lassen Forge

Well-known member
Joined
Apr 26, 2014
Messages
15,399
Location
The romantic hills of central Umbria, Italy,
Freaking awesome!! I'm loving this whole build...

I had a bizarre idea falling asleep last night.... Mount a small roundstock pin in the back of the bearings (welded? Drilled & epoxied? IDK), drill a hole in the spoon "eye sockets"... that would locate the eyes where you want them, leave them proud, and then you can peen the pins in back to hold them in place or weld them from the back.

Thats the problem with GJ.... see others projects and they keep you awake at night!
.
 

Monza Harry

Well-known member
Joined
Dec 29, 2018
Messages
1,433
Location
Windsor ON
Those subtle little changes like the forhead tilt, looks so small from the pic's but make such a visual difference it's all in the eye of the artist and you have the eye and then the skill to bring them to fruition! 👍Harry
 
OP
R

royce

Well-known member
Joined
Jun 22, 2014
Messages
3,111
Location
fairbanks ak
Freaking awesome!! I'm loving this whole build...

I had a bizarre idea falling asleep last night.... Mount a small roundstock pin in the back of the bearings (welded? Drilled & epoxied? IDK), drill a hole in the spoon "eye sockets"... that would locate the eyes where you want them, leave them proud, and then you can peen the pins in back to hold them in place or weld them from the back.

Thats the problem with GJ.... see others projects and they keep you awake at night!
.
Thanks Lassen,
it is always inspiring when the work makes a person think.
I feel that is the genesis of creating anything.

Royce
 
To avoid these ads, REGISTER NOW!
OP
R

royce

Well-known member
Joined
Jun 22, 2014
Messages
3,111
Location
fairbanks ak
Those subtle little changes like the forhead tilt, looks so small from the pic's but make such a visual difference it's all in the eye of the artist and you have the eye and then the skill to bring them to fruition! 👍Harry
Thanks Harry,
Never know when something may work or not.
With that said, I'm wanting to put an asphaltum finish on it.
While I don't generally like bright stainless, there is something appealing about it, on this project.
Another decision to be made.

Royce
 
OP
R

royce

Well-known member
Joined
Jun 22, 2014
Messages
3,111
Location
fairbanks ak
Royce, I feel like I should ship you up a volcanic rock to display that beauty on. Don’t hesitate to ask if that sounds like something that would work.
Thanks Cam,
That is so generous of you, but I am thinking of a small ratio ellipse for the base, in keeping with the geometry of the head.

Royce
 

Monza Harry

Well-known member
Joined
Dec 29, 2018
Messages
1,433
Location
Windsor ON
Thanks Harry,
Never know when something may work or not.
With that said, I'm wanting to put an asphaltum finish on it.
While I don't generally like bright stainless, there is something appealing about it, on this project.
Another decision to be made.

Royce

Royce, with your ratio of wins/losses that doesn't wash! We haven't see a loss yet, and we are pretty sure you don't pull those kind of punches. Or you need a "Powerball" ticket because you are the luckiest ... on the planet! Either way PLEASE keep sharing. For your finish brushed stainless, half(ish) way in between? Harry
 
OP
R

royce

Well-known member
Joined
Jun 22, 2014
Messages
3,111
Location
fairbanks ak
Royce, with your ratio of wins/losses that doesn't wash! We haven't see a loss yet, and we are pretty sure you don't pull those kind of punches. Or you need a "Powerball" ticket because you are the luckiest ... on the planet! Either way PLEASE keep sharing. For your finish brushed stainless, half(ish) way in between? Harry
Harry,
There's plenty of projects that did not work out for a multitude reasons.

Not sure I understand your question but I won't polish it before the asphaultum.

Royce
 

Monza Harry

Well-known member
Joined
Dec 29, 2018
Messages
1,433
Location
Windsor ON
Harry,
There's plenty of projects that did not work out for a multitude reasons.

Not sure I understand your question but I won't polish it before the asphaultum.

Royce
Sorry I read my response before posting and realized I didn't respond to the remark about the finish. So my rushed not fully expounded response was to suggest a brushed stainless finish [you mentioned polished would be cool AF for sure], while a proper brushed finish should be polished I'm feeling a brushed over the patina/fab base would fit the theme better. Just grab a wire cup on your favorite right angle grinder and "stroke it" [with a little less than moderate concern for parallelism] it doesn't "fit" you should have a good "grippy" surface for the finish you picked which is also a great fit to the theme. No second guessing here just leaning on one of your thinking out loud remarks. Harry
 
OP
R

royce

Well-known member
Joined
Jun 22, 2014
Messages
3,111
Location
fairbanks ak
Royce you’re amazing. That is so cool. Had to Google asphaultum And can’t wait to see how this finish looks on your Moai weldment.
Thanks Kevin,
Should get some finish on it this afternoon, I got high hopes the finish suits it.

Royce
 
OP
R

royce

Well-known member
Joined
Jun 22, 2014
Messages
3,111
Location
fairbanks ak
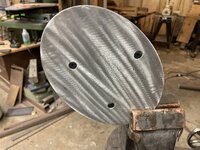
This morning, made the neck to base a bolted connection for a clean, no weld appearance.

Royce
 

Attachments

  • IMG_6878.jpeg
    IMG_6878.jpeg
    781.8 KB · Views: 82
  • IMG_6879.jpeg
    IMG_6879.jpeg
    1 MB · Views: 76
OP
R

royce

Well-known member
Joined
Jun 22, 2014
Messages
3,111
Location
fairbanks ak
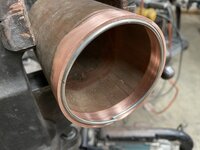
Also got the copper pot made.
After annealing some 4"K tube, started pecking the flange on the edge of the table and finished pecking in place.
Formed a ring of solder to fit the ID and crowned the bottom to let gravity take the solder to the joint.
This a good way to not have to feed solder and it even made a .215 psi hydrotest!!

Royce
 

Attachments

  • IMG_6873.jpeg
    IMG_6873.jpeg
    625.2 KB · Views: 72
  • IMG_6874.jpeg
    IMG_6874.jpeg
    710.9 KB · Views: 70
  • IMG_6871.jpeg
    IMG_6871.jpeg
    692.8 KB · Views: 65
  • IMG_6865.jpeg
    IMG_6865.jpeg
    603.6 KB · Views: 65
  • IMG_6870.jpeg
    IMG_6870.jpeg
    623.6 KB · Views: 87
OP
R

royce

Well-known member
Joined
Jun 22, 2014
Messages
3,111
Location
fairbanks ak
Disolved a couple teaspoons of asphaltum in a bit of turpentine, then added a few tablespoons of linseed oil.
Warmed up the work to 250F, brushed on coat.
Took it outside to flash it off with a weed burner.
Then 2 hours at 450F in an oven.
Raised the oven temp to 550F and will hold that for a few hours.

Royce
 

Attachments

  • IMG_6900.jpeg
    IMG_6900.jpeg
    745.8 KB · Views: 116
To avoid these ads, REGISTER NOW!
Top Bottom