To avoid these ads, REGISTER NOW!

Model A Ford garage

OP
B

bolensboneyard

Well-known member
Joined
Nov 22, 2013
Messages
3,074
Location
South East
Rat Rod is complete picture on page 14. I am putting an alternator 12v in that I purchased that has been built inside a model a generator as the whole Truck is vintage speed equipment or original A/B. Bobby
 
To avoid these ads, REGISTER NOW!

BRENT in 10-uh-C

Well-known member
Joined
Jan 28, 2006
Messages
212
Location
Tennessee
Bobby, do you have (-or need) a manual for your Wheel Straightener? If you do not have one, I will scan a copy of mine and e-mail it to you.
 

wallster

Well-known member
Joined
Jan 29, 2013
Messages
169
Great post, love my '29 Tudor affectionately known as "Pearl"

Wally

IMG_1171.jpg


IMG_1141.jpg
 
OP
B

bolensboneyard

Well-known member
Joined
Nov 22, 2013
Messages
3,074
Location
South East
She's purrrty! Hope to get more pictures on soon and get back to model A's. This mustang is killing me as I am having to weld, sand and paint on my back. I just finished a second coat of primer on the bottom, floors and trunk. Had to use poly primer as industrial grade sealer reacts with the etching primer. Who knew? Bobby
 
OP
B

bolensboneyard

Well-known member
Joined
Nov 22, 2013
Messages
3,074
Location
South East
Here are some pictures of the 66 GT mustang it has been finished primed inside and on the bottom. I am currently awaiting seam sealer. Next is to finish paint bottom and floors/trunk Bobby
 

Attachments

  • 025.jpg
    025.jpg
    134.8 KB · Views: 134
  • 028.jpg
    028.jpg
    148.7 KB · Views: 133
  • 029.jpg
    029.jpg
    132.3 KB · Views: 129

Martin XJ

Well-known member
Joined
Jan 21, 2012
Messages
78
Location
South Gloucestershire UK.
Hi love your thread. It seems we have some things in common. Model As and Mustangs, although my involvement with As was back in the 60s. I helped a friend restore a 29 and a 31, I did the body and paint. In 1990 I restored my own 66 Mustang and at this moment in time I am restoring my stepsons 65 Mustang, that had sat outside for around 20 years, one heck of a task. Looking forward to more pics of your Mustang.
Martin.
My garage build
www.garagejournal.com/forum/showthread.php?t=271477
 

rmalkow2

Well-known member
Joined
Jun 26, 2009
Messages
4,087
Location
Brighton, MI
Just finished your thread. Some cool Model A work and loving the older tools and equipment. You get a lot done in that space. I'll be subscribed and looking forward to future posts.
 
To avoid these ads, REGISTER NOW!
OP
B

bolensboneyard

Well-known member
Joined
Nov 22, 2013
Messages
3,074
Location
South East
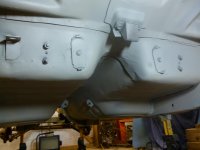
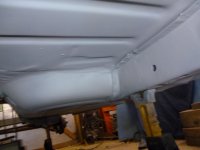
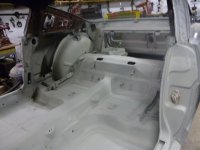
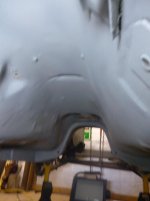
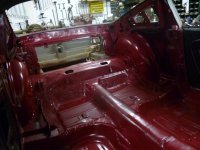
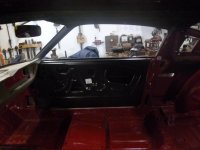
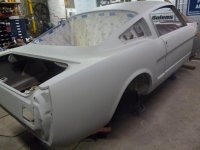
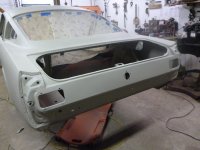
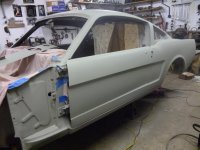
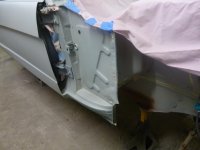
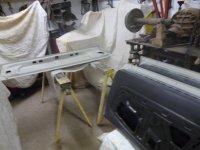
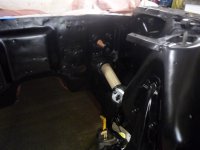
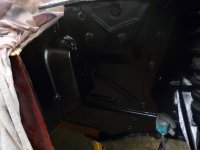
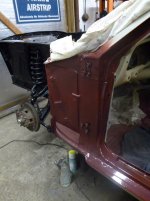
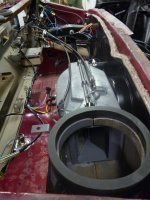
Thanks I am currently trying to get all the body color work done in the trunk, door jambs, under deck lid etc. so that I can do some wiring etc. Believe it or not I have both doors, the deck lid and the front fenders in this same shop that I am painting prime so I can do the color on the areas that do not show out. I just painted the fenders prime laying them across the engine compartment on an old sheet. No room for another set of saw horses! Sorry to all that I do not post more as right now I am trying to get as much done as possible while the dollar still buys something.
 
OP
B

bolensboneyard

Well-known member
Joined
Nov 22, 2013
Messages
3,074
Location
South East
Thanks will keep you posted. I am still debating weather or not I will paint the mustang. It is Burgundy metallic and at $800 a gallon I am not sure my pride in saying I did ALL the work is worth me doing a paint job that is less that quality. I have never painted metallic before and my eye sight is not what it used to be. Bobby
 
OP
B

bolensboneyard

Well-known member
Joined
Nov 22, 2013
Messages
3,074
Location
South East
pre fit up of doors prior to painting of jambs and installation of wire etc.
 

Attachments

  • 004.jpg
    004.jpg
    136.4 KB · Views: 105
  • 003.jpg
    003.jpg
    133.5 KB · Views: 105
  • 002.jpg
    002.jpg
    134.2 KB · Views: 109
  • 001.jpg
    001.jpg
    138.3 KB · Views: 117
OP
B

bolensboneyard

Well-known member
Joined
Nov 22, 2013
Messages
3,074
Location
South East
Rear is loaded on bench with simple set up of a chain fall on a trolley. The I beam runs length wise with the bench at the end under the beam. I will get a few pictures added once I move some of the body parts from painting the mustang and take down some of the drop cloths (sheets) Bobby
 

Attachments

  • 005.jpg
    005.jpg
    134.6 KB · Views: 118
  • 006.jpg
    006.jpg
    133 KB · Views: 113
  • 007.jpg
    007.jpg
    132.6 KB · Views: 124
OP
B

bolensboneyard

Well-known member
Joined
Nov 22, 2013
Messages
3,074
Location
South East
Finally I get to stand up and work on this car. Finished the engine compartment today. Next is to start wiring and installing fixtures behind the dash so I can install and weld the upper and lower cowel back in.
 

Attachments

  • 012.jpg
    012.jpg
    136.5 KB · Views: 111
  • 010.jpg
    010.jpg
    136.8 KB · Views: 112
  • 009.jpg
    009.jpg
    133.8 KB · Views: 114
  • 007.jpg
    007.jpg
    129.7 KB · Views: 119
OP
B

bolensboneyard

Well-known member
Joined
Nov 22, 2013
Messages
3,074
Location
South East
Pictures of pre-painted door jambs and dash showing colors of burgundy and parchment. These are the original colors this car came with. Estimate that only 5 GT fastbacks with 4speed trans. and 289 4V were built in this color combination in 1966 using figures and percentages available. All matching numbers but final build will be in pony deluxe interior. Car was original built with standard interior. Bobby
 

Attachments

  • 014.jpg
    014.jpg
    132.8 KB · Views: 129
  • 022.jpg
    022.jpg
    129.6 KB · Views: 130
  • 023.jpg
    023.jpg
    134.3 KB · Views: 133
  • 024.jpg
    024.jpg
    133.7 KB · Views: 141

48fordnut

Well-known member
Joined
Apr 4, 2006
Messages
307
Location
mid ga
The colors of Vintage Burgundy and Parchment are really good.
I had a 66 fairlane with those colors.
Keep up the good work.
 
OP
B

bolensboneyard

Well-known member
Joined
Nov 22, 2013
Messages
3,074
Location
South East
Thanks! Other than touch up I have only to paint the rear wheel wells and I will be able to start putting things together instead of pulling them apart. Have also to repaint the parchment on the doors as I got three different colors when ordering the "exact" color match from a major supplier. Anywhere from coffee to Boston Cream. I know parchment by nature is a color that varies a little from piece to piece but it's not supposed to look like a checker board. This is why I painted the interior ahead of time so as not to run into something that did not even come close to the dash. Only then to find out that the color batch for parchment was now hot pink!
 
OP
B

bolensboneyard

Well-known member
Joined
Nov 22, 2013
Messages
3,074
Location
South East
Now starts the long tedious task of wiring and making sure that everything is where Henry put it. Took some preliminary pictures to record the process for future reference. Not so much to do it again as to get a look see where to look for a specific wire before screwing my tired old *** up underneath the dash in order to fix something I messed up on.
 

Attachments

  • 005.jpg
    005.jpg
    139.4 KB · Views: 143
  • 003.jpg
    003.jpg
    135.9 KB · Views: 139
  • 004.jpg
    004.jpg
    140 KB · Views: 151
OP
B

bolensboneyard

Well-known member
Joined
Nov 22, 2013
Messages
3,074
Location
South East
I usually just buy whatever Snyders sells as they supply many others. I apologize to all who have not gotten a reply to a question. My brain is so locked into mechanical things lately that I just realized that apparently when someone responds to an earlier post it does not necessarily appear on the last page is that correct? I have been checking the last page in order to read any new posts. I will probably answer my own question as I am reading the entire site in order to establish weather or not I have missed any ones comments or concerns. I believe I missed this question so I am answering it. If I am repeating myself please do not tell my wife as she already thinks I am a mess. Bobby
 
OP
B

bolensboneyard

Well-known member
Joined
Nov 22, 2013
Messages
3,074
Location
South East
Brent never did get an email from you about the manual for the wheel straightner? Did you send it? Maybe it got kicked? thanks Bobby
 
OP
B

bolensboneyard

Well-known member
Joined
Nov 22, 2013
Messages
3,074
Location
South East
The cowl is spot welded in two separate pieces. The lower piece is the one that catches the rain that falls through the grill between your windshield and hood. Frequently the leaves and trash that fall through also eventually block off the drain trougths that exit on either side through the inner fender well and out. The second piece is spot welded over the first and it is the piece that contains the grill. All this causes the lower cowel pan to rust out over time which usually results in people globing sealer around the windshield believing they have a leak in the windshield rubber. I bought this car knowing that I would have to repair or replace the damage but did not know what it would take to do it properly. When I removed it I felt it was a trade off as it would make it a lot easier to replace all the wire etc. standing up instead of lying down. Bobby
 
OP
B

bolensboneyard

Well-known member
Joined
Nov 22, 2013
Messages
3,074
Location
South East
Finally got to install my dash. I love the fact that you pay good money for a piece of plastic then you get it almost all the way in and find out you have to rip it out to grind about 3/8 inch off in some areas to fit it right. What does the guy do that attempts this as the most major project he has ever undertaken and he is just a kid. He gets discouraged and goes back to punching a little box with his thumbs that's what. So much for my opinion. Feels great to see something looking finished ( even though finish is still a year away.) Bobby
 

Attachments

  • 007.jpg
    007.jpg
    140.8 KB · Views: 143
  • 011.jpg
    011.jpg
    134.3 KB · Views: 143
  • 012.jpg
    012.jpg
    129.6 KB · Views: 143
To avoid these ads, REGISTER NOW!
Top Bottom