To avoid these ads, REGISTER NOW!

Model A Ford garage

OP
B

bolensboneyard

Well-known member
Joined
Nov 22, 2013
Messages
3,074
Location
South East
Laying out the foundation/slab for my brick shed. The pour will be 10x10x4" but I doubt I can do it in one shot. It's about three times what I mixed in the back of the cottage and it was no where near as hot. I need drives!!! Last picture is of a rare color of Oleander flower.
 

Attachments

  • P1030686.jpg
    P1030686.jpg
    146.7 KB · Views: 40
  • P1030685.jpg
    P1030685.jpg
    158.9 KB · Views: 41
  • P1030684.jpg
    P1030684.jpg
    145.8 KB · Views: 38
To avoid these ads, REGISTER NOW!

RickP

Well-known member
Joined
Jan 15, 2013
Messages
1,548
Location
Annapolis, MD
That foundation is looking good. I think you're smart to plan for a concrete slab - that's definitely the way to go. It's brutal working in that heat isn't it? We were seeing 90s here, so I do not envy your 100s one bit - way too hot and humid for May! I've been working through it, but at least my shed foundation is in the woods so I'm in the shade most of the day. 4 or 5 hours is about my limit though - I'll bet you're getting up at the crack of dawn to make that much progress by 10am!
 

drivesitfar

Well-known member
Joined
Oct 23, 2013
Messages
35,999
Location
Pacific Northwest
BB: I wish I was close so i could help, but honestly pouring concrete at those temps is not only hard on you and your body, but it also dries so fricken fast I'm not sure how you'll do it. GOOD LUCK!!

BTW I was sweating pretty good yesterday at 70 degrees putting in forms for my next 20 bag (80 pound bags) pour and ordering 100 more bags to be delivered for next week.

I bet the new brick shed will be AWESOME!!
 
OP
B

bolensboneyard

Well-known member
Joined
Nov 22, 2013
Messages
3,074
Location
South East
That foundation is looking good. I think you're smart to plan for a concrete slab - that's definitely the way to go. It's brutal working in that heat isn't it? We were seeing 90s here, so I do not envy your 100s one bit - way too hot and humid for May! I've been working through it, but at least my shed foundation is in the woods so I'm in the shade most of the day. 4 or 5 hours is about my limit though - I'll bet you're getting up at the crack of dawn to make that much progress by 10am!

Thanks Rick. I watch the horizon with a cup of coffee then get to it. I do have some progress but the camera is never in my focal point. I also have a hard time wrapping my head around why anyone would want to look at some dirt I moved but I do understand pictures put you with friends you otherwise cannot be with so bare with me friends. Bobby
 
OP
B

bolensboneyard

Well-known member
Joined
Nov 22, 2013
Messages
3,074
Location
South East
BB: I wish I was close so i could help, but honestly pouring concrete at those temps is not only hard on you and your body, but it also dries so fricken fast I'm not sure how you'll do it. GOOD LUCK!!

BTW I was sweating pretty good yesterday at 70 degrees putting in forms for my next 20 bag (80 pound bags) pour and ordering 100 more bags to be delivered for next week.

I bet the new brick shed will be AWESOME!!

Thanks drives. I have decided to brake it down into quarters and keep it wet, covering it when set with a tarp. I also have to accept the fact that a 100 square foot area is 80 plus bags and too much for one back on one day.
 
OP
B

bolensboneyard

Well-known member
Joined
Nov 22, 2013
Messages
3,074
Location
South East
100F in Charleston? Way too hot.

Looking good on the foundation. Will this be all used brick potting shed?

Thanks Andy. Yes all used brick but there is a small chance it may be used as a wood wright's shop. No electricity needed to push chisels and planes :) A nice bench and a shaving horse could keep a guy busy in a small space. Might even weave a few baskets if I can find something I can scavenge off the land to make them out of. I also saw an episode of the Wood Wright's Shop where he had a guest say he had developed a method of splitting inner hickory bark in straight parallel lines to use for weaving chair seats. Like to know more about that as I could save the bark from the trees I get for making handles.
 
OP
B

bolensboneyard

Well-known member
Joined
Nov 22, 2013
Messages
3,074
Location
South East
Got the first pad poured before 9 AM and had to move everything by hand as the forklift would not keep running. Got it running before 10 AM and am now running the clock with book editing changes. Yikes!
 

Attachments

  • P1030688.jpg
    P1030688.jpg
    154.3 KB · Views: 45
  • P1030689.jpg
    P1030689.jpg
    152.6 KB · Views: 279
  • P1030690.jpg
    P1030690.jpg
    150.6 KB · Views: 40

drivesitfar

Well-known member
Joined
Oct 23, 2013
Messages
35,999
Location
Pacific Northwest
BB: is it my eyes or is the fence in the middle of your new foundation and building? looks like you are well on your way to getting the foundation finished and looking good so far.

do you make your own cement and mortar or buy in bags from the local store?

I hope you get a few cooler days while you are building this and i'm sure you are drinking plenty of water to hydrate too.

i'm really looking forward to seeing you build a small building out of bricks!!

cheers
 
OP
B

bolensboneyard

Well-known member
Joined
Nov 22, 2013
Messages
3,074
Location
South East
Thanks drives. I am drinking plenty of water and we finally got rain so it is cooler today. However I have to work on the final changes of my book as we just got a price from the printer and I need to get it to print. I also need a break as I am pushing too hard. Got the forklift running again and the parts for the truck door sitting in the wings.
 

oldironfarmer

Well-known member
Joined
Jun 25, 2016
Messages
6,664
Location
Terlton, Oklahoma
Hickory bark is a traditional chair seat material. Lot's of information on the internet. It needs to be stripped while still green I believe.

No dog prints in your concrete?
 
OP
B

bolensboneyard

Well-known member
Joined
Nov 22, 2013
Messages
3,074
Location
South East
Hickory bark is a traditional chair seat material. Lot's of information on the internet. It needs to be stripped while still green I believe.

No dog prints in your concrete?

Not in the first pad. I poured the second one yesterday then had to cover it before the storm rolled in. Should be fine. I worry about deer and coyote more than dogs.
 

RickP

Well-known member
Joined
Jan 15, 2013
Messages
1,548
Location
Annapolis, MD
Got the first pad poured before 9 AM and had to move everything by hand as the forklift would not keep running.

attachment.php

You do nice work Bobby - that slab is looking good. You are definitely not afraid of a little heavy lifting! 20 bags of concrete are a good way to start the day with a workout, especially without a forklift. Hopefully you got a break from the heat for a few days.

I have a question about the cinder blocks around the perimeter of your foundation. They look like an easy way to hold in the compacted dirt. During the pour, do you fill them with concrete to act as a footer? Are they anchored to the ground, or do they need any other reinforcement?
 
OP
B

bolensboneyard

Well-known member
Joined
Nov 22, 2013
Messages
3,074
Location
South East
You do nice work Bobby - that slab is looking good. You are definitely not afraid of a little heavy lifting! 20 bags of concrete are a good way to start the day with a workout, especially without a forklift. Hopefully you got a break from the heat for a few days.

I have a question about the cinder blocks around the perimeter of your foundation. They look like an easy way to hold in the compacted dirt. During the pour, do you fill them with concrete to act as a footer? Are they anchored to the ground, or do they need any other reinforcement?

Rick I usually fill them with sand or rip-rap made of brick pieces but leave some room for the concrete to seep some into the crevice's when I pour the pad over the top. I have done this for the saw mill with good results. I have also use block without mortar to support metal sheds like the chicken house. Because this shed will be brick I have mortared the blocks together prior to locking everything in with the slab. Most of the 10 by 10 area has little backfill and half bricks are distributed throughout in order to reinforce the pad also. The building weight will rest on the blocks alone and the 4 inches of slab above it. The slab will act like a giant footing to keep movement at bay. We have no frost heaves here but the clay can turn to jello if it rains enough. Short of an earthquake though, any movement would be restricted on the block side by the other half of the building which sits on another slab which is part of the pool apron. As the slab gets away from the walls it does thin out a bit but is unlikely to crack anywhere but along the four seams there for stress relief. Don't forget, the bricks will all tie the walls together in opposing directions.
 

RickP

Well-known member
Joined
Jan 15, 2013
Messages
1,548
Location
Annapolis, MD
Thanks for the into on the block footers - I really like the simplicity and strength of the way you did them. I've dabbled with carpentry for years, but have very little experience with concrete. In the past, I always looked at concrete footers and thought: how hard could they be? Then I had a rude awakening when I tried to pour 12 concrete piers level and flat, in very soft soil. You sir, make it look easy!

Thanks Rick. I watch the horizon with a cup of coffee then get to it. I do have some progress but the camera is never in my focal point. I also have a hard time wrapping my head around why anyone would want to look at some dirt I moved but I do understand pictures put you with friends you otherwise cannot be with so bare with me friends. Bobby

I agree wholeheartedly. We all enjoy seeing what friends are up to, so keep your camera handy!
 

rixtrix1

Well-known member
Joined
Aug 25, 2013
Messages
3,010
Location
Chandler, AZ (from west NE)
763 bricks cleaned and counting. Should end up with over 800 of this color.

Bobby just checkin in and catchin up.

Happy to hear there has been some positive progress with Sarah.

Those used brick all stacked up took me back to a summer in my child hood
My dad would bring home a load of used brick every friday afternoon and it was my jab to clean and stack them so my folks could sell them for extra $$ for our vacation. A hammer, a chisel, and a bucket of water Oh yah a pair of gloves after the first load was cleaned, Man I remember how my hands hurt!!!

Hoping things are still going well for your wife, Bobby! Like Don posted , I did the same when I was 15. 200 bricks at a time cleaned and loaded into the trunk of a 1963 Buick Lesabre( yes it was grossly overloaded) from the landfill a mile from my parents home. Dad used them to lay a 40' driveway, 3 step back porch and 25'x25' patio with a woodburning fireplace with an 8' chimney.

A lot of bricks, but the end result will be well worth the effort!
 
OP
B

bolensboneyard

Well-known member
Joined
Nov 22, 2013
Messages
3,074
Location
South East
Thanks for the into on the block footers - I really like the simplicity and strength of the way you did them. I've dabbled with carpentry for years, but have very little experience with concrete. In the past, I always looked at concrete footers and thought: how hard could they be? Then I had a rude awakening when I tried to pour 12 concrete piers level and flat, in very soft soil. You sir, make it look easy!


I agree wholeheartedly. We all enjoy seeing what friends are up to, so keep your camera handy!

Here is the updated progress on the slab.
 

Attachments

  • P1030696.jpg
    P1030696.jpg
    150.4 KB · Views: 38
OP
B

bolensboneyard

Well-known member
Joined
Nov 22, 2013
Messages
3,074
Location
South East
Hoping things are still going well for your wife, Bobby! Like Don posted , I did the same when I was 15. 200 bricks at a time cleaned and loaded into the trunk of a 1963 Buick Lesabre( yes it was grossly overloaded) from the landfill a mile from my parents home. Dad used them to lay a 40' driveway, 3 step back porch and 25'x25' patio with a woodburning fireplace with an 8' chimney.

A lot of bricks, but the end result will be well worth the effort!

Ric your story reminds me of the time when my kids were small and I loaded down an old Rambler station wagon we had with rough sawn lumber to build a barn. I had it so full I only got halfway up the dirt drive for the mill and stopped to check the load on solid ground. The tires were flatter than the were in the mud next to the saw. As I stood there looking at my dilemma, a worried look on my face I am sure, the old sawyer walked over to me, spat a mouthful of tobacco on the ground, and said; " why don't you unload half of that lumber boy right here and come back for it? Don't worry I won't pick it up and sell it back to you again. It will be right where you left it." Guess I wasn't a very difficult read!
 

RickP

Well-known member
Joined
Jan 15, 2013
Messages
1,548
Location
Annapolis, MD
That is looking good - that is a whole lot of work! I hope you got your forklift working again.

Ric your story reminds me of the time when my kids were small and I loaded down an old Rambler station wagon we had with rough sawn lumber to build a barn. I had it so full I only got halfway up the dirt drive for the mill and stopped to check the load on solid ground. The tires were flatter than the were in the mud next to the saw. As I stood there looking at my dilemma, a worried look on my face I am sure, the old sawyer walked over to me, spat a mouthful of tobacco on the ground, and said; " why don't you unload half of that lumber boy right here and come back for it? Don't worry I won't pick it up and sell it back to you again. It will be right where you left it." Guess I wasn't a very difficult read!

Oh man, your story brings back memories for me too. I hope you took his advice! That old Rambler was probably well past its limit with only half a load.

I worked in a lumber yard for a summer job and a customer once asked me to load a couple pallets of siding into his old pickup truck. But the truck already had a camper on the back, so I checked his leaf springs after the first pallet and they were horizontal already. He said he took complete responsibility for the second pallet, so we loaded that as well. Now his leaf springs were inverted, and he started to drive off. He didn't even make it out of the yard before the springs broke and he just decided to drive home like that, saying that he was planning to scrap the truck anyway. I wish he'd taken my advice!
 
Last edited:
OP
B

bolensboneyard

Well-known member
Joined
Nov 22, 2013
Messages
3,074
Location
South East
That is looking good - that is a whole lot of work! I hope you got your forklift working again.


Oh man, your story brings back memories for me too. I hope you took his advice! That old Rambler was probably well past its limit with only half a load.

I worked in a lumber yard for a summer job and a customer once asked me to load a couple pallets of siding into his old pickup truck. But the truck already had a camper on the back, so I checked his leaf springs after the first pallet and they were horizontal already. He said he took complete responsibility for the second pallet, so we loaded that as well. Now his leaf springs were inverted, and he started to drive off. He didn't even make it out of the yard before the springs broke and he just decided to drive home like that, saying that he was planning to scrap the truck anyway. I wish he'd taken my advice!

I did.
 
To avoid these ads, REGISTER NOW!

RickP

Well-known member
Joined
Jan 15, 2013
Messages
1,548
Location
Annapolis, MD
Bobby, I know you start work pretty early every morning, but have you ever looked at those 10x10 pop-up tents to give you a little shade? I use one when I really need to work in the afternoon sun. Something like this:

31wOisB63VL._AC_SY200_.jpg


https://www.amazon.com/Z-Shade-Instant-Portable-Shelter-Carolina/dp/B079Z9DRDX

The local auto parts store often has them on sale for half price, and mine has been well worth it.
 
Last edited:
OP
B

bolensboneyard

Well-known member
Joined
Nov 22, 2013
Messages
3,074
Location
South East
Bobby, I know you start work pretty early every morning, but have you ever looked at those 10x10 pop-up tents to give you a little shade? I use one when I really need to work in the afternoon sun. Something like this:

31wOisB63VL._AC_SY200_.jpg


https://www.amazon.com/Z-Shade-Instant-Portable-Shelter-Carolina/dp/B079Z9DRDX

The local auto parts store often has them on sale for half price, and mine has been well worth it.

Rick my latest plan is to build a post and beam frame first and set a steel roof over it in order to keep the weight off of the brick. To use brick alone would require me to build a double wall and that much mud slinging I do not want to do. It would also get a roof over my head at certain times of the day. First I would like to find some timber that is dry to use for everything above the sill. However I do want it to be hardwood and not pine. it would make a nice inside to hang stuff on.
 
OP
B

bolensboneyard

Well-known member
Joined
Nov 22, 2013
Messages
3,074
Location
South East
I have decided to build post and beam with brick on the outside. It's a learning curve and I am fighting the sun. I had to opt for a wider joint to level the first course and am over halfway. Because the apron around the pool/pond is tapered I elected to not pour forty more bags of concrete just to avoid the heavy joint to level. It is slow going because I have to wait for the joint to stiffen in order to handle the weight of one brick. I did find some more old bricks though. I moved one hundred sixty yesterday after being up at four AM to sling mud.
 

Attachments

  • P1030701.jpg
    P1030701.jpg
    153.8 KB · Views: 50
  • P1030702.jpg
    P1030702.jpg
    155.6 KB · Views: 47
OP
B

bolensboneyard

Well-known member
Joined
Nov 22, 2013
Messages
3,074
Location
South East
I have the leveling course in and everything connected perfectly (difference between 1/2 inch and 1 1/8 on height of mortar.) I plan to build the corner posts over the next few days and design a movable way to secure my lines off of the corner posts. Rain will increase after tomorrow. I moved another 240 bricks today so I now have 400 added to my pile for projects. Too much work for an old steam engine in one day.:beer: 
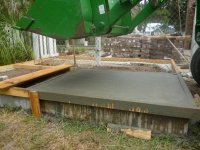
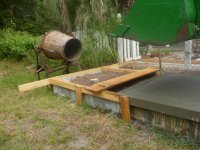
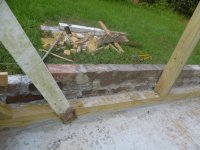
Sorry I got the pictures backwards.
 

Attachments

  • P1030702.jpg
    P1030702.jpg
    155.6 KB · Views: 49
  • P1030703.jpg
    P1030703.jpg
    154.3 KB · Views: 53

drivesitfar

Well-known member
Joined
Oct 23, 2013
Messages
35,999
Location
Pacific Northwest
BB: your pad looks great. nice work.

can I ask you a question about mortar? do you make your own or buy premixed bags at the store?

i'm thinking of mixing 1 part Portland cement with 1 or 2 parts sand to maybe make a little stronger mix than the S mortar mix you can buy at HD's or Lowe's. or do I need lime too?

keep up the great work and still not sure why you have the fence across the middle of your pad, but guessing to maybe keep a furry friend enclosed until the new walls are built?

cheers
 
OP
B

bolensboneyard

Well-known member
Joined
Nov 22, 2013
Messages
3,074
Location
South East
Going to be very nice!

I may have to drop by one of these days.

Andy you know you are always welcome. I have been working on the wood wright's shed but I also expect my shipment of books to leave on July 3 so it has been hectic.

I am trying to get half cup's quality shop time logo seal on my posts but I must be missing something. Can't remember how to add anything to the bottom and have nothing that prompts me to edit?? I have been clicking on view public profile but that gets me nowhere. I believe that is where I am missing something and it has been in the high 90's here and I have been out in the sun with this project. I did read your post about browse button but I can't even get to where I can see a button and, unfortunately, time is of the essence right now.
 
OP
B

bolensboneyard

Well-known member
Joined
Nov 22, 2013
Messages
3,074
Location
South East
BB: your pad looks great. nice work.

can I ask you a question about mortar? do you make your own or buy premixed bags at the store?

i'm thinking of mixing 1 part Portland cement with 1 or 2 parts sand to maybe make a little stronger mix than the S mortar mix you can buy at HD's or Lowe's. or do I need lime too?

keep up the great work and still not sure why you have the fence across the middle of your pad, but guessing to maybe keep a furry friend enclosed until the new walls are built?

cheers

Thanks drives. I am no expert but you need lime to make mortar. Sand is expensive here and it is no cheaper to mix it than to buy it. I do however use the mix that is for brick, stucco and stone also. It is a stronger mix. Be sure to soak your brick or whatever, depending or course on how hot it is, before you bond. Otherwise, the sun/heat will **** all of the water out of the mix before it can get a good bond.
 

Bob Heine

ALLIANCE MEMBER
Joined
Oct 24, 2009
Messages
10,703
Location
Boca Raton, Florida
Bobby, in one of my lucid moments I remembered how to edit my signature.

  1. Click on User CP in the bar under The Garage Journal logo.
  2. Look under Your Control Pane for the third category: Settings and Options.
  3. Click on the Edit Signature item.
  4. Your Signature should show under Preview, along with an Edit Signature editing window.
  5. At the bottom there’s a Signature Picture section where you can link to a copy of the QST logo. Gazza posted a set of them here:
    https://www.garagejournal.com/forum/showpost.php?p=7924176&postcount=9304
 

oldironfarmer

Well-known member
Joined
Jun 25, 2016
Messages
6,664
Location
Terlton, Oklahoma
Bobby, in one of my lucid moments I remembered how to edit my signature.

  1. Click on User CP in the bar under The Garage Journal logo.
  2. Look under Your Control Pane for the third category: Settings and Options.
  3. Click on the Edit Signature item.
  4. Your Signature should show under Preview, along with an Edit Signature editing window.
  5. At the bottom there’s a Signature Picture section where you can link to a copy of the QST logo. Gazza posted a set of them here:
    https://www.garagejournal.com/forum/showpost.php?p=7924176&postcount=9304

What he said.
 
OP
B

bolensboneyard

Well-known member
Joined
Nov 22, 2013
Messages
3,074
Location
South East
Bobby, in one of my lucid moments I remembered how to edit my signature.

  1. Click on User CP in the bar under The Garage Journal logo.
  2. Look under Your Control Pane for the third category: Settings and Options.
  3. Click on the Edit Signature item.
  4. Your Signature should show under Preview, along with an Edit Signature editing window.
  5. At the bottom there’s a Signature Picture section where you can link to a copy of the QST logo. Gazza posted a set of them here:
    https://www.garagejournal.com/forum/showpost.php?p=7924176&postcount=9304

Thanks Bob and Andy! As The Beaver would say, you guys are SWELL!
 
OP
B

bolensboneyard

Well-known member
Joined
Nov 22, 2013
Messages
3,074
Location
South East
Some progress pictures. Will have many more soon. Books will ship on the third of July. Anyone wishing to discuss please email me direct. Bobby
 

Attachments

  • P1030704.jpg
    P1030704.jpg
    156.4 KB · Views: 58
  • P1030705.jpg
    P1030705.jpg
    149 KB · Views: 56

drivesitfar

Well-known member
Joined
Oct 23, 2013
Messages
35,999
Location
Pacific Northwest
BB: did you build that entire frame of your new building without a nail or a screw and all OLD SCHOOL with mortise and tenon I think they call it? looks great so far.

best of luck with the book sales and congrats for getting it to this point.

i'm watching a lot of YouTube videos and Googling brick building and one guy on YouTube (Mike Hadduck) from Pennsylvania is good with using Portland cement and play sand for most if not all of his brickwork. one part Portland and 2 parts sand and he likes to wet the brick a bit before installation.

curious to see how you build your brick building and i'm guessing you are buying pre mixed Mortar S bags or are you mixing your own mortar mix?

cheers
 
OP
B

bolensboneyard

Well-known member
Joined
Nov 22, 2013
Messages
3,074
Location
South East
BB: did you build that entire frame of your new building without a nail or a screw and all OLD SCHOOL with mortise and tenon I think they call it? looks great so far.

best of luck with the book sales and congrats for getting it to this point.

i'm watching a lot of YouTube videos and Googling brick building and one guy on YouTube (Mike Hadduck) from Pennsylvania is good with using Portland cement and play sand for most if not all of his brickwork. one part Portland and 2 parts sand and he likes to wet the brick a bit before installation.

curious to see how you build your brick building and i'm guessing you are buying pre mixed Mortar S bags or are you mixing your own mortar mix?

cheers

drives I built most of the structure mortise and tenon. All sills (upper and lower) are mortise and tenon. Angle braces and window and door uprights are screwed in with 3 inch deck screws. The work to cut the mortises on those would take too much time out in the hot sun to warrant the gain. I may mortise and tenon the horizontal braces again for strength and looks. No sheathing will be put on anything. The brick veneer will show as inside walls.
 
OP
B

bolensboneyard

Well-known member
Joined
Nov 22, 2013
Messages
3,074
Location
South East
More details on construction of post and beam structure.
 

Attachments

  • P1030714.jpg
    P1030714.jpg
    163.7 KB · Views: 54
  • P1030713.jpg
    P1030713.jpg
    158.6 KB · Views: 49
  • P1030711.jpg
    P1030711.jpg
    160.4 KB · Views: 47

drivesitfar

Well-known member
Joined
Oct 23, 2013
Messages
35,999
Location
Pacific Northwest
BB: I forgot to ask are those timbers some that you cut on your mill's saw or did you just buy them? I love that style of framing and the heft of it and with the bricks showing thru the open walls this is going to be an amazing building.

good luck and please take lots of pictures cause I for one might learn more than a few things from watching your talent.
 
OP
B

bolensboneyard

Well-known member
Joined
Nov 22, 2013
Messages
3,074
Location
South East
BB: I forgot to ask are those timbers some that you cut on your mill's saw or did you just buy them? I love that style of framing and the heft of it and with the bricks showing thru the open walls this is going to be an amazing building.

good luck and please take lots of pictures cause I for one might learn more than a few things from watching your talent.

Thanks drives. Garden timbers ground contact acceptable from big box stores. Wish I could have gotten some cypress or live oak to mill up. I am going to try and find a safe way to age them.
 
OP
B

bolensboneyard

Well-known member
Joined
Nov 22, 2013
Messages
3,074
Location
South East
I have been hauling more brick for a different project but progress is being made on the wood right shop. Four courses of brick near completion but I have been so beat I keep forgetting to take more pictures. I will get some today and post.
 
OP
B

bolensboneyard

Well-known member
Joined
Nov 22, 2013
Messages
3,074
Location
South East
The last picture is of the inside. I chose not to point the joints as this is the way it would have been done on the inside wall unless the wall was double. I did go around and fill in any pockets I thought would be better strengthened. The wooden corner device is something I came up with (probably been done before) to space the joints and level the line. I fill in the corners later (the reverse of what is usually done) using a level and framing square. This is the first building I have attempted.
 

Attachments

  • P1030717.jpg
    P1030717.jpg
    154.4 KB · Views: 58
  • P1030718.jpg
    P1030718.jpg
    152.3 KB · Views: 51
  • P1030719.jpg
    P1030719.jpg
    151 KB · Views: 51
To avoid these ads, REGISTER NOW!
Top Bottom