To avoid these ads, REGISTER NOW!

Model A Ford garage

OP
B

bolensboneyard

Well-known member
Joined
Nov 22, 2013
Messages
3,074
Location
South East
Bobby, starting to really take shape. Well done.:thumbup:

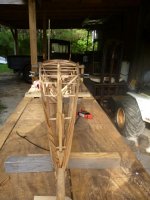
Thanks Steve. Today should be slow but will be a pinnacle point in shape and form. I have a lot of carving to do on the underside of the gunwales and holes must be precisely opposite each other. Once I can lock in shape and form at the deck I will be able to form the lower curve. Cabin rib structure is critical to the hydrodynamics and lines for the rest of its build and I have little measurements to go by. I was forced to use pictures and basic linier dimensions as the old canvas covered much of my access as did the cabin itself. All curves will have to be created to form the rest of the body. Unlike a drawing, cut out of oak and riveted in, there is little room for error; lest I end up with a sleek form with bloat or worse in the bowels. Ribs intersect here with the runners with less than 1/2 an inch of wood in some places. The structure has enough bracing to be sound when finished but is very fragile in its formation.
 
To avoid these ads, REGISTER NOW!
OP
B

bolensboneyard

Well-known member
Joined
Nov 22, 2013
Messages
3,074
Location
South East
OH Bobby! It needs it's shakeout cruise :evil:

An engineer and you could cover such a marvel of engineering??? I will build another boat for fishing. I have been invited to draw a cypress boat. Never saw another of these either and the man will not sell it. Made from one inch squares of wood but not the typical boat you see made like that.
 

Bob Heine

ALLIANCE MEMBER
Joined
Oct 24, 2009
Messages
10,703
Location
Boca Raton, Florida
An engineer and you could cover such a marvel of engineering??? I will build another boat for fishing. I have been invited to draw a cypress boat. Never saw another of these either and the man will not sell it. Made from one inch squares of wood but not the typical boat you see made like that.
Bobby, do you mean something like this?
attachment.php


http://brunerlumber.com/sinker-cypress-motorboat/
 

Attachments

  • Bobby's Boat.jpg
    Bobby's Boat.jpg
    69.2 KB · Views: 355
OP
B

bolensboneyard

Well-known member
Joined
Nov 22, 2013
Messages
3,074
Location
South East

In some ways, at least as far as the lamination. These boats are built similar to a john boat, pram or piero if you will. Low profile and make to negotiate the small title creeks. It's been a while since I saw it but when this one is done I plan to see if it is still available for sketching.
 

oldironfarmer

Well-known member
Joined
Jun 25, 2016
Messages
6,664
Location
Terlton, Oklahoma
Watching with interest.

Even as an engineer I greatly respect the traditional proven designs which in many ways seem to be superior to modern computer driven designs.

Any chance you'll get around to building an inboard with a Model A engine?

When I was a kid we lived on Narragansett Bay. My dad and I built a pram. Fun project and worked very well.
 
OP
B

bolensboneyard

Well-known member
Joined
Nov 22, 2013
Messages
3,074
Location
South East
Watching with interest.

Even as an engineer I greatly respect the traditional proven designs which in many ways seem to be superior to modern computer driven designs.

Any chance you'll get around to building an inboard with a Model A engine?

When I was a kid we lived on Narragansett Bay. My dad and I built a pram. Fun project and worked very well.

As I am reverse engineering this project I have learned a good bit about engineering. I have changed a few small things as I feel I can add a few ounces of weight in favor of a little more "meat" in a few areas. I agree with the proven designs and they are so much more eye appealing. It was a challenge creating the center ribs and making them fit the measurements, pictures, and function of the originals from sketches, and limited views I had photographed two years ago. Some pieces just placed for verification of fit for now. Jamestown boat builder would like to see pictures when done; that's where I got the copper nails and roves. Check out the next post. I would love to build a Model A Aircraft engine and the plane to go with it! Experimental; no license to fly!:D
 
Last edited:
OP
B

bolensboneyard

Well-known member
Joined
Nov 22, 2013
Messages
3,074
Location
South East
This is a stern shot. Runner on the starboard side is temporary to check for placement alignment. All scalloping, don't know if it shows in pictures but the dowel placement is lower on the gunwale and requires a lobe to hang down an extra quarter inch. I coped the spaces in between the lobes by hand also. The oak ribs in the cabin/hatch were cut on a band saw as my forearms needed a rest from the coping saw.
 

Attachments

  • P1030022.jpg
    P1030022.jpg
    84.9 KB · Views: 36
OP
B

bolensboneyard

Well-known member
Joined
Nov 22, 2013
Messages
3,074
Location
South East
This picture shows the lobes. I cut them in place so the dowels would be in alignment with the upright supports. Look carefully and you can see the temporary runner twisted and placed halfway up on the starboard side into one of the notches in the cabin reinforced ribs; cut for that purpose, and to support the cabin floor slats. I spent an entire day trying to shape the lower hull bending the runners in such a way as to match several meager dimensions I was able to pic from the originals. It was an exercise in frustration. Finally, while eating a late supper, I put it all down on paper, along with estimated dimensions from the pictures of the floor, and proved it out with a sketch of what the rib design must have looked like. I cut out a template, tweaked it a few times, and everything fit perfectly; aside from the changes in the next two ribs for the taper of the hatch. It also matched what I could see in my original photos.
 

Attachments

  • P1030023.jpg
    P1030023.jpg
    147.4 KB · Views: 40

oldironfarmer

Well-known member
Joined
Jun 25, 2016
Messages
6,664
Location
Terlton, Oklahoma
X2, looking great!!

Interesting thing about strengthening joints. As you know lots of old designs were well balanced and allowed flexure of the entire item. Reinforcing one joint would make it rigid and then either cause it to fail or the adjoining pieces. It's late and I can't think of a good example just now, but it's a little like putting a stiff piece in the middle of a fishing rod. If it can't all flex together it won't stay together.

Hmmm, kind of like marriage...
 

1/2 Cup

Member Emeritus
Joined
Apr 28, 2012
Messages
19,283
Location
Shepparton. Victoria. Australia
X2, looking great!!

Interesting thing about strengthening joints. As you know lots of old designs were well balanced and allowed flexure of the entire item. Reinforcing one joint would make it rigid and then either cause it to fail or the adjoining pieces. It's late and I can't think of a good example just now, but it's a little like putting a stiff piece in the middle of a fishing rod. If it can't all flex together it won't stay together.

Hmmm, kind of like marriage...

Andy now that is a great analogy.:thumbup:
 
OP
B

bolensboneyard

Well-known member
Joined
Nov 22, 2013
Messages
3,074
Location
South East
Ginny's MRI looks good. The Doc. says he does not expect to find any surprises only what they know is there and needs removal. Operation is next Thursday, keep you posted.
Thanks for the complements and the prayers. Bobby
 

drivesitfar

Well-known member
Joined
Oct 23, 2013
Messages
35,997
Location
Pacific Northwest
BB: great news about GINNY'S results and sending prayers for her and you that the surgery goes well. GOOD LUCK TOO!!

I think Handy is on to something cause the Woodworkers are always mentioning that the dovetail or maybe any joint needs to have a little gap so the wood can dry and expand and not explode the joint. i'm not doubting I said that wrong, but i'm sure you'll figure it out or ask questions and we'll try to help.

if you might need a few tips i think TriJeff who's about 40 years old built a couple when he was living close to San Fransciso's bay that he posted a picture of outside Candlestick park (where the Giant's play baseball).

have a great Mother's day and best of luck with the surgery and kyak.
 
OP
B

bolensboneyard

Well-known member
Joined
Nov 22, 2013
Messages
3,074
Location
South East
BB: great news about GINNY'S results and sending prayers for her and you that the surgery goes well. GOOD LUCK TOO!!

I think Handy is on to something cause the Woodworkers are always mentioning that the dovetail or maybe any joint needs to have a little gap so the wood can dry and expand and not explode the joint. i'm not doubting I said that wrong, but i'm sure you'll figure it out or ask questions and we'll try to help.

if you might need a few tips i think TriJeff who's about 40 years old built a couple when he was living close to San Fransciso's bay that he posted a picture of outside Candlestick park (where the Giant's play baseball).

have a great Mother's day and best of luck with the surgery and kyak.

Thanks drives I will check it out.
 
OP
B

bolensboneyard

Well-known member
Joined
Nov 22, 2013
Messages
3,074
Location
South East
Check out this little set up for moving barrels. It is great for moving heavy items around the shop and elsewhere. I picked it up when a local business was folding a few days ago.
 

Attachments

  • P1030008.jpg
    P1030008.jpg
    110.6 KB · Views: 48
To avoid these ads, REGISTER NOW!

drivesitfar

Well-known member
Joined
Oct 23, 2013
Messages
35,997
Location
Pacific Northwest
BB: looks like the little dolly might come in handy. i'd probably wipe it down with WD40 to remove the surface rust, let it dry then put on a coat or two of BLO and spray the wheels with triflo and it should work and look great until you find another use for it. nice find.

good luck on the Kyak and hope it's not getting too hot for you to work outside.
 
OP
B

bolensboneyard

Well-known member
Joined
Nov 22, 2013
Messages
3,074
Location
South East
BB: looks like the little dolly might come in handy. i'd probably wipe it down with WD40 to remove the surface rust, let it dry then put on a coat or two of BLO and spray the wheels with triflo and it should work and look great until you find another use for it. nice find.

good luck on the Kyak and hope it's not getting too hot for you to work outside.

Drives had one day at 90 degrees but I built my layout table between the north side of my barn and the grain bin/wood shop. No sun except for reflected light and a breeze blows there frequently. Thanks for your concern. Good progress so far but much steam bending to come and I have a funeral today and Ginny's operation tomorrow so probably Friday before I can get back to it. I will try to update pictures tomorrow.
 
OP
B

bolensboneyard

Well-known member
Joined
Nov 22, 2013
Messages
3,074
Location
South East
Another score is this camp stove I have to clean up and get going. I had been looking for one in unbroken condition for a fair price. Now I have lots of options. Got to make a steam kettle first. Too bad I started using that old gasoline can again. It would have been perfect. Not interested in purging fumes though; too persnickety for my taste.
 

Attachments

  • P1030003.jpg
    P1030003.jpg
    149.7 KB · Views: 28
OP
B

bolensboneyard

Well-known member
Joined
Nov 22, 2013
Messages
3,074
Location
South East
Took a few quick pictures. All linier ribs are in. I will show them in the next few days. I made and installed the stern angle braces yesterday and one set of vertical braces. Measurements are dead on and the stern deck is perfectly level. I chose to use brass screws and glue in some areas instead of copper nails as the original pics showed most nails had worked loose (not the ones with roves). I also chose to wrap my linier ribs where they terminate at bow and stern to encourage stability for the attachment screws. Ribs are half inch square tapered to 1/4 inch and splitting is apparent also in the original. It also looks much better.
 

Attachments

  • P1030033.jpg
    P1030033.jpg
    148.5 KB · Views: 47
  • P1030034.jpg
    P1030034.jpg
    95.5 KB · Views: 44

oldironfarmer

Well-known member
Joined
Jun 25, 2016
Messages
6,664
Location
Terlton, Oklahoma
Kayak is looking great! From your comments, I'm getting the idea you do not plan to skin it to show off the framework. Is that correct?

I like your gas stove. You call that a camp stove, but I thought it was just an early countertop stove for people who did not want a full gas oven, or would use their wood oven for baking but gas for quick heating tasks.
 
OP
B

bolensboneyard

Well-known member
Joined
Nov 22, 2013
Messages
3,074
Location
South East
Kayak is looking great! From your comments, I'm getting the idea you do not plan to skin it to show off the framework. Is that correct?

I like your gas stove. You call that a camp stove, but I thought it was just an early countertop stove for people who did not want a full gas oven, or would use their wood oven for baking but gas for quick heating tasks.

Andy I believe you are right and that is what I have always thought. The antique dealer I got it from called it a camp stove so I just went with that. You are also correct about no skin on this marvel of engineering. Almost makes me wish I was an engineer; Almost. :lol_hitti
 
OP
B

bolensboneyard

Well-known member
Joined
Nov 22, 2013
Messages
3,074
Location
South East
Bobby you really don't need that frontal lobotomy trust me, I work with engineers on a daily basis..

The kayak is looking great.:thumbup:

Steve, Andy, in my experience the line of demarcation would be weather a Sheepskin or a Diaper hung on his office wall. We can only listen after the sound of our own whining has subsided enough for us to hear!
 
OP
B

bolensboneyard

Well-known member
Joined
Nov 22, 2013
Messages
3,074
Location
South East
This is the industrial Singer I picked up. It was froze up and I found a bent shaft was the main problem. Seems to run well. I did this while I was waiting for kayak hardware. Now I have to learn how to run and adjust it; not to mention how to sew with a machine. Back to riveting ribs tomorrow. I also have a friend who wants to put a spindle sander and a drum sander in my shop so they will get used more. We will move them tomorrow afternoon and try to find space.
 

Attachments

  • P1030004.jpg
    P1030004.jpg
    137.6 KB · Views: 39

drivesitfar

Well-known member
Joined
Oct 23, 2013
Messages
35,997
Location
Pacific Northwest
BB: nice find on that sewing table and i'm guessing if the sewing machine didn't work after you took a look at it that you still liked the table it's sitting on. looks like a great welding table and i've never seen a sewing machine on something quite that stout before.

good to keep learning some new skills even at our age. keep it up.

I'm guessing Ginny's surgery went ok and all is well in your household again?

have a great rest day while I do a little more demo.

cheers
 
OP
B

bolensboneyard

Well-known member
Joined
Nov 22, 2013
Messages
3,074
Location
South East
BB: nice find on that sewing table and i'm guessing if the sewing machine didn't work after you took a look at it that you still liked the table it's sitting on. looks like a great welding table and i've never seen a sewing machine on something quite that stout before.

good to keep learning some new skills even at our age. keep it up.

I'm guessing Ginny's surgery went ok and all is well in your household again?

have a great rest day while I do a little more demo.

cheers

Drives surgery went well all that is left is to wait for pathology end of next week to see that all the bad stuff is gone. Will keep all posted thanks for the prayers and support. Bobby and Ginny
 

oldironfarmer

Well-known member
Joined
Jun 25, 2016
Messages
6,664
Location
Terlton, Oklahoma
Great news Bobby! We'll still pray for completely clear report.

I suggest you make Ginny some new outfits on your sewing machine. Learn on thin cloth then you can get to the upholstery. My dad used to sew for my mom. She loved it. He said it was pretty easy to buy a pattern and follow it. All I ever made was a 6 ft by 10 ft Stars and Bars.
 
To avoid these ads, REGISTER NOW!
Top Bottom