To avoid these ads, REGISTER NOW!

Model A Ford garage

OP
B

bolensboneyard

Well-known member
Joined
Nov 22, 2013
Messages
3,074
Location
South East
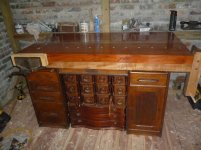
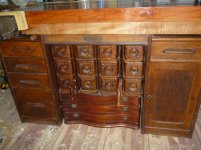
Sorry Bob. Three quarters of the build has been figuring out how to combine features from several other pieces of furniture into the whole. Structural integrity, function, reliability and repair/modification were strong factors; not to mention disassembly if I ever wanted to move it. That being said, to show pictures of everything involved would have given up so much of the finished piece the climax would have been a let down. Not unlike the unveiling of a new car model but more like taking the negligee off of a new/old bride before the light was dimmed; in reverse; or, perhaps, looking in the mirror. Sometimes, anticipation is the best source. Plus, most of the assembly structure pictures that could have been taken would not have been clear or helpful, even to me for future reference. Due to the small space in the little shop, and the large size of the workbench, I was forced to build it inside where taking pictures would have been difficult at best. No place for a ladder or distance to provide prospective.
 
To avoid these ads, REGISTER NOW!

Bob Heine

ALLIANCE MEMBER
Joined
Oct 24, 2009
Messages
10,703
Location
Boca Raton, Florida
Bobby, I completely understand. Given the glacial pace of my shed rehab, you are flying through this project. I know it's going to be a fitting piece for the Brick Shedhouse.
 

drivesitfar

Well-known member
Joined
Oct 23, 2013
Messages
35,999
Location
Pacific Northwest
BB: if you wouldn't mind and if you have time to take a bunch of during pics of your bench build to post up after you show us your finished bench i'm sure more members than I would appreciate it cause from what i've seen so far it looks amazing.

good luck!!!
 
OP
B

bolensboneyard

Well-known member
Joined
Nov 22, 2013
Messages
3,074
Location
South East
Bob and drives you sure are right about my flying through the first part of the project. I have planned for some time to gather the proper things in order to come up with the design I had in my head. As the fit-up consisted of tying the pieces together and modification of them I took no pictures. It was all engineered as I went along. I did take pictures of the fitting of my wood for the top. A large part of the construction was cutting three inch timbers, plaining, and picking out the best parts of the wood; i.e. no cracks, knots etc. Hard to justify taking pics of a top planed vs milled or hand planed for level. Pure simplicity can revel the purest form of genius. Unfortunately, sometimes the work and thought pass on only in the mind and aching muscles of the craftsman. Consider a marble masterpiece. What good would it do to take pictures of piles of chips other than to showcase the ego of the artist?
 
Last edited:

drivesitfar

Well-known member
Joined
Oct 23, 2013
Messages
35,999
Location
Pacific Northwest
BB: while you might consider it BRAGGING, most of us never had the opportunity to do this or learn from the skilled woodworkers of the past. now that we have the time we get to try at least and for young kids that might see your thread they don't have shop class anymore and some of these skills are not used anymore.

so if you want to show some planing or putting together joints or whatever you do to make the final project i'm sure even the woodworkers would love to see the pics and hear how you did it and maybe the challenges you were thinking about.

again that one partial picture looked terrific so hoping you are having a bit of fun making a bench that should last the rest of your life.

cheers
 
OP
B

bolensboneyard

Well-known member
Joined
Nov 22, 2013
Messages
3,074
Location
South East
BB: while you might consider it BRAGGING, most of us never had the opportunity to do this or learn from the skilled woodworkers of the past. now that we have the time we get to try at least and for young kids that might see your thread they don't have shop class anymore and some of these skills are not used anymore.

so if you want to show some planing or putting together joints or whatever you do to make the final project i'm sure even the woodworkers would love to see the pics and hear how you did it and maybe the challenges you were thinking about.

again that one partial picture looked terrific so hoping you are having a bit of fun making a bench that should last the rest of your life.

cheers

drives here it is.
 

Attachments

  • P1030884.jpg
    P1030884.jpg
    148.3 KB · Views: 74
  • P1030881.jpg
    P1030881.jpg
    150.1 KB · Views: 68
  • P1030888.jpg
    P1030888.jpg
    133.3 KB · Views: 58
  • P1030886.jpg
    P1030886.jpg
    61.7 KB · Views: 60
  • P1030885.jpg
    P1030885.jpg
    84.8 KB · Views: 57

y'sguy

Well-known member
Joined
May 1, 2010
Messages
1,309
Location
Tulsa, Oklahoma
BB, Everything about this looks just like it should. Great job on the reusing of the sewing machine drawers. Me like.
Also I see a hint of the cedar plank floor. Also brilliant.
 

drivesitfar

Well-known member
Joined
Oct 23, 2013
Messages
35,999
Location
Pacific Northwest
BB: is your new woodworking bench top only 3 inches thick cause it looks like closer to 4 or 6 inches?

i've never seen a sewing machine base like that and the most of the ones i've seen only had/have 4 drawers. nice way to store a couple hand saws and I bet those drawers will fill up with good supplies and a few tools in no time.

since your bench top should be in an art show i'm not sure i could work on it, but I know it will bring you a lot of pleasure.

thanks for sharing and WELL DONE SIR!!
 
OP
B

bolensboneyard

Well-known member
Joined
Nov 22, 2013
Messages
3,074
Location
South East
BB, Everything about this looks just like it should. Great job on the reusing of the sewing machine drawers. Me like.
Also I see a hint of the cedar plank floor. Also brilliant.

y'sguy thanks for the kind words. I was hoping to put my planes in those draws but the bench planes will not fit. The smaller block planes and scrapers will though; and a lot of other goodies.
 
OP
B

bolensboneyard

Well-known member
Joined
Nov 22, 2013
Messages
3,074
Location
South East
BB: is your new woodworking bench top only 3 inches thick cause it looks like closer to 4 or 6 inches?

i've never seen a sewing machine base like that and the most of the ones i've seen only had/have 4 drawers. nice way to store a couple hand saws and I bet those drawers will fill up with good supplies and a few tools in no time.

since your bench top should be in an art show i'm not sure i could work on it, but I know it will bring you a lot of pleasure.

thanks for sharing and WELL DONE SIR!!

drives thanks for the accolades. The top is 3 inches but the support band, that would be the waist band made of burley maple, is also 2 3/4 inches thick. I had to tie the whole together with beams and an oak plank but wanted to bolt the top, which is cherry and maple, to something wider and give it some contrast at the same time, and also allow me to break it down and move it if necessary. In this way, I can also remove the top without sacrificing the structural integrity of the bench. It also gives me unbelievable support and eliminates the shake found in even the best of benches. It is empty at present and I was still able to hand plane the whole top without an ounce of movement. My bench in the woodshop is a top quality Swedish bench and has a table saw for ballast but I still have to steady it when planning or sawing. I still have another panel saw to clean up and place in the center of the draws. Also note the gentleman's saw in the slot where the pullout used to be. The block at the end is removable and notched for level placement with the top if I need to use the end vise. It is the same block I used to drill holes and can also be used for that. I already have a plan in my head to build a base for my dad's old miter saw that will be anchored with the front vise and dog holes in a few seconds if needed. Otherwise it will hang on a beam.
 

Bob Heine

ALLIANCE MEMBER
Joined
Oct 24, 2009
Messages
10,703
Location
Boca Raton, Florida
Bobby, I would change the handle on the end vise. I had a capped piece of pipe on mine for a long time and ended up with blood blisters on the web between my thumb and index finger way too many times. Lacking the skills to make wood caps I threaded the end of a dowel and screwed on PVC pipe caps. I bet you could do better with just hand tools in the Brick Shedhouse.
attachment.php
 

Attachments

  • Wood Vise 6.jpg
    Wood Vise 6.jpg
    96.3 KB · Views: 300

drivesitfar

Well-known member
Joined
Oct 23, 2013
Messages
35,999
Location
Pacific Northwest
BB: thanks for the 411 and yep you've got a plan/idea and it's all coming together nicely.

one thing for you to watch for is the quick release old Columbian or Record (made in England) wood vises. i'm not sure where exactly mine are at the moment, but they are tucked away ready to use in my woodshop once I build it.

here's a few picture and the quick release lever on the Record I like a little better than the Columbian that might have more of a vintage look like the ones you already mounted.

congrats and keep up the good work.
 

Attachments

  • WP_20160303_005.jpg
    WP_20160303_005.jpg
    57.2 KB · Views: 21
  • WP_20160303_002.jpg
    WP_20160303_002.jpg
    149.7 KB · Views: 20
  • WP_20160303_007.jpg
    WP_20160303_007.jpg
    53.3 KB · Views: 22
OP
B

bolensboneyard

Well-known member
Joined
Nov 22, 2013
Messages
3,074
Location
South East
Bobby, I would change the handle on the end vise. I had a capped piece of pipe on mine for a long time and ended up with blood blisters on the web between my thumb and index finger way too many times. Lacking the skills to make wood caps I threaded the end of a dowel and screwed on PVC pipe caps. I bet you could do better with just hand tools in the Brick Shedhouse.
attachment.php

Bob I had two plastic caps like yours but when the bench was done I planned to replace with a nice maple handle. I even made the handle. HOWEVER. The vise was made up from pieces I pulled out of a deceased friend's scrap pile. I was missing the lift lock and the T where the handle goes through. I made up both along with the pipe which is only one inch OD. It is pinned with a 1/4 inch roll pin and was supposed to be a in case I ever needed one vise. When I went to remove the T in order to finish weld/grind and bore it for a larger handle I could not hammer the pin out, even with a 2 1/2 lb hammer. I decided to avoid all the work of drilling out with a carbide drill for now and replaced the caps with BRASS caps (5bucks ea.) It will be used only for planning and gluing mostly. If that changes, or if I get bored, I'll bring out the drill or buy another vise. First blister, it goes. Thanks for the heads up. Old hands have enough to deal with now.
 
OP
B

bolensboneyard

Well-known member
Joined
Nov 22, 2013
Messages
3,074
Location
South East
drives a Columbian is what I have on the front of the bench. I really like the crank style handle. My dad had a craftsman quick release when I was a kid and while it was convenient on the one hand I found it was awkward, too many turns, on the light touch/fragile pieces. The Columbian was a bear to cut in on a bench with two tiers of 3 inch. I would take another though is I could get one for under 100 dollars shipped.
 

drivesitfar

Well-known member
Joined
Oct 23, 2013
Messages
35,999
Location
Pacific Northwest
BB: just as all cars are not built the same under the same name/brand the same goes with vises. Wilton is a good example cause they sell a $600 vise with a 4 inch wide jaw and maybe a $75 or $100 one. If I find the Columbian that is a quick release i'll check to see if it has the lever like the made in England Record vice does cause that feature really makes it worth having and using.

I bet it wasn't easy to mount your vises AND I be you measured 2 or 3 times before cutting into that amazing piece(s) of wood.

have a great day!!
 
OP
B

bolensboneyard

Well-known member
Joined
Nov 22, 2013
Messages
3,074
Location
South East
BB: just as all cars are not built the same under the same name/brand the same goes with vises. Wilton is a good example cause they sell a $600 vise with a 4 inch wide jaw and maybe a $75 or $100 one. If I find the Columbian that is a quick release i'll check to see if it has the lever like the made in England Record vice does cause that feature really makes it worth having and using.

I bet it wasn't easy to mount your vises AND I be you measured 2 or 3 times before cutting into that amazing piece(s) of wood.

have a great day!!

Three time for sure drives. Putting in those elevated bench stops was a treat. Five different depth levels within a few inches and 1/8 inch room for error in the area where the two screws are located. Miss that and the screws are too short to bite with no room for larger screws. On chip at a time.
 
OP
B

bolensboneyard

Well-known member
Joined
Nov 22, 2013
Messages
3,074
Location
South East
Slowly setting up my little shop. I made this overhead rack for the block planes above the bench vise. They are angled down and locked in with custom cut slots so they do not fall on my head; can't afford the damage. I just picked up two large white oak trees. It took two loads with the trailer but I have them at the mill. Pictures tomorrow.
 

Attachments

  • P1030899.jpg
    P1030899.jpg
    121 KB · Views: 34
  • P1030898.jpg
    P1030898.jpg
    116.5 KB · Views: 39
To avoid these ads, REGISTER NOW!

drivesitfar

Well-known member
Joined
Oct 23, 2013
Messages
35,999
Location
Pacific Northwest
BB: looking good!! did you design that plane holder to have the cutting blades hold the planes up there or am I missing something.

congrats on the new haul of timber for your mill and for future projects. :thumbup:
 

don long

Well-known member
Joined
Mar 31, 2012
Messages
8,841
Location
southern california
Thought I'd check in since it has been a while
LOVE the sewing machine/ wood working bench. It's a beauty.
I've never used a plane even though I own several

Looks like Bob Hines and Drives have been all over this project.

Thanks for showing it all finished

Don
 
OP
B

bolensboneyard

Well-known member
Joined
Nov 22, 2013
Messages
3,074
Location
South East
BB: looking good!! did you design that plane holder to have the cutting blades hold the planes up there or am I missing something.

congrats on the new haul of timber for your mill and for future projects. :thumbup:

drives the blades do not hold the planes. I cut a notch the shape of the front or back of the plane then mounted a shelf at an angle so the weight of the plane would lean into the notch. The plane sits below the surface of the shelf.
 
OP
B

bolensboneyard

Well-known member
Joined
Nov 22, 2013
Messages
3,074
Location
South East
Thought I'd check in since it has been a while
LOVE the sewing machine/ wood working bench. It's a beauty.
I've never used a plane even though I own several

Looks like Bob Hines and Drives have been all over this project.

Thanks for showing it all finished

Don

Thanks Don. My dad owned one plane and it was an exercise in frustration for me. He did not sharpen it often and I don't believe either of us knew how to adjust it for different wood types. As a result of one or the other or both I vowed to learn all the intricacies of sharpening hand tools. What a difference that has made in use. When I first started to learn I found some of the planes I bought had the blades in upside down on purpose. Who knew.
 
OP
B

bolensboneyard

Well-known member
Joined
Nov 22, 2013
Messages
3,074
Location
South East
This is just half of the load of white oak I have hauled to the mill. The Red Oak log I have on it now is slipping my belts and they have been tired for some time. I can't get the old belt dressing and the no rubber cotton style that are on it now are not affected by the new stuff. I have a case of it. It works well on the planer as the belt has some rubber on it I guess. I will not be able to cut it until new belts arrive. I spent an entire afternoon trying to adjust the tension so I could make up the difference. No good. Just have to spring for new.
 

Attachments

  • P1030902.jpg
    P1030902.jpg
    156.5 KB · Views: 63
OP
B

bolensboneyard

Well-known member
Joined
Nov 22, 2013
Messages
3,074
Location
South East
Been trying to stay warm building my daughter a jewelry box. The box is made from red cedar and southern magnolia. The long divider is persimmon as are the Camelia (hand carved) and the white divider inset on the cover. All corners are box joints. The back joints cannot be seen as I doubled the back to strengthen the hinge joint. Joints were cut by hand with backsaw and chisel. Thought I would get started learning how then work up to a dovetail. Not so sure it is any easier. All was made from scrap pieces except for the hinges. I did not fuss with it too much as it is ka ka cold out there.
 

Attachments

  • P1030905.jpg
    P1030905.jpg
    100.6 KB · Views: 47
  • P1030904.jpg
    P1030904.jpg
    117.4 KB · Views: 45
  • P1030903.jpg
    P1030903.jpg
    125.3 KB · Views: 43

Matias

Well-known member
Joined
Feb 28, 2015
Messages
616
Location
Finland
I think this thread has pictures with an awesome spectrum related to wood working. With huge logs in big trailers to excellent woodworking regarding the bench and this beautiful box. Really nice work and I'm sure you're daughter will appreciate the jewelry box!
 
OP
B

bolensboneyard

Well-known member
Joined
Nov 22, 2013
Messages
3,074
Location
South East
I think this thread has pictures with an awesome spectrum related to wood working. With huge logs in big trailers to excellent woodworking regarding the bench and this beautiful box. Really nice work and I'm sure you're daughter will appreciate the jewelry box!

Thanks Matias. It has been quiet on the Journal over the last few months. People are probably just burned out over the holidays and the cold begs you to stay by the fire. I just can't sit too long. Good hearing from you. Bobby
 
OP
B

bolensboneyard

Well-known member
Joined
Nov 22, 2013
Messages
3,074
Location
South East
I just got this little gem in yesterday. It is a Dexter saw file holder. I plan to set it up today so I can use it on the mill. When I get my new drive belts and the blade is sharp who knows what is possible. This tool will allow me to sharpen my saw in 10 minutes as opposed to 1/2 an hour and should upgrade my skills considerably.
 

Attachments

  • P1030916.jpg
    P1030916.jpg
    147.3 KB · Views: 48

drivesitfar

Well-known member
Joined
Oct 23, 2013
Messages
35,999
Location
Pacific Northwest
BB: is that for the mill's saw blade?

nice looking box and just curious is that 1, 2, or 3 pieces of wood that the top is made from? not sure how you made the flower or how you attached it, but it looks nice.

hope you have a great weekend!!!
 

y'sguy

Well-known member
Joined
May 1, 2010
Messages
1,309
Location
Tulsa, Oklahoma
Very nice little boxes you made! THis reminds me I need to get to work on four small finger joint trays or boxes for my four little grandaughters.
:bowdown:
:beer:
 
OP
B

bolensboneyard

Well-known member
Joined
Nov 22, 2013
Messages
3,074
Location
South East
BB: is that for the mill's saw blade?

nice looking box and just curious is that 1, 2, or 3 pieces of wood that the top is made from? not sure how you made the flower or how you attached it, but it looks nice.

hope you have a great weekend!!!

thanks drives. The file guide is for the saw mill blade and it works great. The box cover is made of three pieces of wood. Two are of red cedar and the center strip is persimmon as is the flower in the middle.
 
OP
B

bolensboneyard

Well-known member
Joined
Nov 22, 2013
Messages
3,074
Location
South East
Very nice little boxes you made! THis reminds me I need to get to work on four small finger joint trays or boxes for my four little grandaughters.
:bowdown:
:beer:

Thank you y'sguy. Glad I could help jog your memory about the small trays. Little girls grow up so fast.
 
OP
B

bolensboneyard

Well-known member
Joined
Nov 22, 2013
Messages
3,074
Location
South East
Made a mount for my dad's miter box. Works great. Less than a minute to add or remove. It's just as stable as if lag bolted.
 

Attachments

  • P1030925.jpg
    P1030925.jpg
    147.9 KB · Views: 45
  • P1030917.jpg
    P1030917.jpg
    147.6 KB · Views: 39
  • P1030918.jpg
    P1030918.jpg
    92.7 KB · Views: 40
  • P1030919.jpg
    P1030919.jpg
    75 KB · Views: 37
OP
B

bolensboneyard

Well-known member
Joined
Nov 22, 2013
Messages
3,074
Location
South East
This project is a shelf/chest of drawers to be set above and behind the bench. It is custom made to fit between the upright support beams and slightly deeper than the width of a beam. Ten drawers altogether for wood screws, finish nails, etc. The top will shelve a boxed set of auger bits and my large jointer plane. All joints are mortise and tenon glued together. Drawer fronts will be red oak. It is just over 4 feet long. I may put one on the other side one day but this project is labor intensive and tedious so it will have to wait until I outgrow my rambunctious stage.
 

Attachments

  • P1030923.jpg
    P1030923.jpg
    119.5 KB · Views: 27
  • P1030922.jpg
    P1030922.jpg
    74.6 KB · Views: 26
  • P1030924.jpg
    P1030924.jpg
    73.8 KB · Views: 23
  • P1030925.jpg
    P1030925.jpg
    147.9 KB · Views: 26
OP
B

bolensboneyard

Well-known member
Joined
Nov 22, 2013
Messages
3,074
Location
South East
Picked up a nice level the other day at an antique shop along with an old wood plane, my second. I beginning to appreciate them. Pictures to come.
 
OP
B

bolensboneyard

Well-known member
Joined
Nov 22, 2013
Messages
3,074
Location
South East
New belt and lacing is in for the mill. Weather has been lousy here so I have been waiting to varnish the drawer assembly. Hope to get some knobs for the drawers turned down today. Looks like things are slow everywhere.
 

Attachments

  • P1030926.jpg
    P1030926.jpg
    149.3 KB · Views: 25
  • P1030927.jpg
    P1030927.jpg
    149.6 KB · Views: 27
To avoid these ads, REGISTER NOW!
Top Bottom