To avoid these ads, REGISTER NOW!

Model A Ford garage

don long

Well-known member
Joined
Mar 31, 2012
Messages
8,841
Location
southern california
Hi Bobby

Hope all is well with you. I just dropped in to thank you for the many contributions to my thread over the past year and to wish you a very merry Christmas

Don
 
To avoid these ads, REGISTER NOW!
OP
B

bolensboneyard

Well-known member
Joined
Nov 22, 2013
Messages
3,074
Location
South East
Just a note to say I am still here and still working on the kitchen remodel. It takes a long time when the lumber has to be planed and squared before doing the work. I will have pictures of all when the job is done. As the boss has been doing without counter space, stove, sink etc. at various times, she is not too tolerant of me playing on the computer. Hope all are still well and am looking forward to getting back to normal; if we ever see that again.
 

drivesitfar

Well-known member
Joined
Oct 23, 2013
Messages
35,988
Location
Pacific Northwest
BB: i agree that you should take a ton of pictures and save them to post later if you are on a mission to get the kitchen done. AND if you might happen to have a sleepless night and you want to post pics at 3 or 4am then we would all love that too.

GOOD LUCK and can hardly wait to see what you have been doing since you have a mill, maybe plenty of good wood and more than a few skills.
 
OP
B

bolensboneyard

Well-known member
Joined
Nov 22, 2013
Messages
3,074
Location
South East
BB: i agree that you should take a ton of pictures and save them to post later if you are on a mission to get the kitchen done. AND if you might happen to have a sleepless night and you want to post pics at 3 or 4am then we would all love that too.

GOOD LUCK and can hardly wait to see what you have been doing since you have a mill, maybe plenty of good wood and more than a few skills.

Thanks drives. No sleepless nights here. I sleep like the dead after hand woodworking all day.
 
OP
B

bolensboneyard

Well-known member
Joined
Nov 22, 2013
Messages
3,074
Location
South East
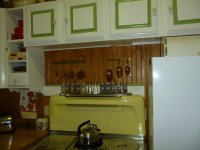
These are the only pictures I have to show the progress of this renovation in its early/mid stages. Note the counter top and sink with the gray Formica as they are original and as of the date if this pic not removed (sink is cast iron weighs 150lbs). The counter being glued has been in production for several weeks as I had to plane and select Pecan from the tree I milled 20 months ago. Pecan is very hard (about as hard as ebony) and tear out is a problem so some select cuts had to be replaced if the milling would have brought them below the one inch thickness I chose to be minimum; as the main counter top is eight feet long and I wanted no **** joints.
The system you see for clamping the boards down is something I came up with and worked very well; much better than biscuits. I selected cups and bows to be opposite each other, inherent forces working in favor of cancelling each other out. Wood was also selected for figure. No boards were cut over six inches wide and no butcher block fit up as I wanted the wood to show its beauty.
The shelves you see are to occupy the space where the modern stove was. They are thirty inches wide and pull out to expose cooling racks and for ease of removing the larger appliances such as waffle iron, mixers, etc.
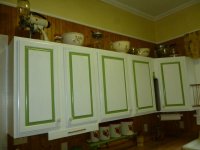
The entire kitchen was involved. Paint was changed or renewed, cabinets were hand crafted, removed, added, changed; as was the sink and stove. Microwave and dishwasher were discarded in favor of mid century replacements which work better and are more efficient; unless you consider the formulas used to sell snake oil to cure everything that ails you. Think plowing with the 20 HP box store lawn mower.
More pictures to come. I just installed the new/old cast iron sink. This one weighted in at just under 200 lbs. has two drain boards and a cast backsplash. I am recovering from installing it ,using my seventy one year old 175 pound **** as lifting mechanism while trying not to damage the ledge it sits on. I have to seal the sink and repair one chip in the porcelain and I am finished. Ginny still has some painting to do. I did the wood finish and all of the plumbing, wood work, elect., design, interior décor etc. She did the brush work.
 

Attachments

  • P1040334.jpg
    P1040334.jpg
    120.1 KB · Views: 75
  • P1040335.jpg
    P1040335.jpg
    116.3 KB · Views: 68
  • P1040336.jpg
    P1040336.jpg
    138.9 KB · Views: 66

drivesitfar

Well-known member
Joined
Oct 23, 2013
Messages
35,988
Location
Pacific Northwest
I noticed the clamping before I read your thread and OMG why doesn't everyone use that method. i'd love to see and hear and learn more about the how you match the grain and flip flopping the cupping to make things look great so if you would when you have time i'd be grateful.

wow lifting that 200 pound sink onto a lip with no room is a job for 2 or 3 guys or some sort of lift. did you put anything under it with a couple jacks or how did you do that. WOW!!

it's gonna be nice that is for certain so i'm getting the popcorn ready and a good mug of ice tea ready for show.

thanks for sharing!!

speaking of lumber maybe you know if I should put anything on the ends of some 4x6x16 foot fir beams i'm getting directly from a local mill. i'm hearing anchorseal is a good option and wondered if you do anything to yours to keep it from checking or cracking. i've dried cedar from the mill here for years and hardly had an issue, but this is FIR and I don't want them to twist, crack or check.
 
OP
B

bolensboneyard

Well-known member
Joined
Nov 22, 2013
Messages
3,074
Location
South East
I noticed the clamping before I read your thread and OMG why doesn't everyone use that method. i'd love to see and hear and learn more about the how you match the grain and flip flopping the cupping to make things look great so if you would when you have time i'd be grateful.

wow lifting that 200 pound sink onto a lip with no room is a job for 2 or 3 guys or some sort of lift. did you put anything under it with a couple jacks or how did you do that. WOW!!

it's gonna be nice that is for certain so i'm getting the popcorn ready and a good mug of ice tea ready for show.

thanks for sharing!!

speaking of lumber maybe you know if I should put anything on the ends of some 4x6x16 foot fir beams i'm getting directly from a local mill. i'm hearing anchorseal is a good option and wondered if you do anything to yours to keep it from checking or cracking. i've dried cedar from the mill here for years and hardly had an issue, but this is FIR and I don't want them to twist, crack or check.

drives I will provide more information at a later time. However. any good paint on the **** ends will slow down the drying process. That will help the cracking/checking. Selecting your cuts from the mill with concentration on the relationship of the cut relative to the rings will help avoid twists and cupping in individual boards. Look up quarter sawn, rift sawn etc and it will explain in pictures. Go to a lumber/logging site if possible.
 
OP
B

bolensboneyard

Well-known member
Joined
Nov 22, 2013
Messages
3,074
Location
South East
More pictures to come.
 

Attachments

  • P1040346.jpg
    P1040346.jpg
    108.8 KB · Views: 67
  • P1040347.jpg
    P1040347.jpg
    112.8 KB · Views: 69
  • P1040348.jpg
    P1040348.jpg
    121.9 KB · Views: 65
  • P1040349.jpg
    P1040349.jpg
    117.2 KB · Views: 59

Bob Heine

ALLIANCE MEMBER
Joined
Oct 24, 2009
Messages
10,703
Location
Boca Raton, Florida
Bobby, you have captured a mid-century look perfectly. It would be hard for me to work in there with that countertop -- I'd spend way too much time admiring it. Even harder after lifting that sink into place. That's also an amazing Chambers you have. Was it restored or just well cared for? I assume Ginny is happy with your work.
 
OP
B

bolensboneyard

Well-known member
Joined
Nov 22, 2013
Messages
3,074
Location
South East
Bobby, you have captured a mid-century look perfectly. It would be hard for me to work in there with that countertop -- I'd spend way too much time admiring it. Even harder after lifting that sink into place. That's also an amazing Chambers you have. Was it restored or just well cared for? I assume Ginny is happy with your work.

Thanks Bob. I have been a sweetheart for three? days now.
 
OP
B

bolensboneyard

Well-known member
Joined
Nov 22, 2013
Messages
3,074
Location
South East
Sorry Bob I didn't realize I had not answered your other question. The Chambers was well taken care of. However Ginny did use a lot of elbow grease on the cleaning of it. I had to put it back together and still have to make some adjustments to the thermostat and try to rebuild the timer. Bulbs for the lite are no longer available. It would have to be retrofitted.
 

drivesitfar

Well-known member
Joined
Oct 23, 2013
Messages
35,988
Location
Pacific Northwest
Well done sir!!

I’m still wondering how you place that big old sink in it’s spot? It looks perfect by the way!! Great looking stove and if you are able to repair the issues to make it work maybe better than new even better. I agree the old ones are worth repairing cause the new stuff is made to be thrown away after about 5 years.

AND your pecan countertops look amazing!!
 
OP
B

bolensboneyard

Well-known member
Joined
Nov 22, 2013
Messages
3,074
Location
South East
Well done sir!!

I’m still wondering how you place that big old sink in it’s spot? It looks perfect by the way!! Great looking stove and if you are able to repair the issues to make it work maybe better than new even better. I agree the old ones are worth repairing cause the new stuff is made to be thrown away after about 5 years.

AND your pecan countertops look amazing!!

Thanks drives. I took a piece of seasoned red oak 1x12 and placed it across both counters and in front of the sink base. Then stood the sink up on end and leaned it on the plank at a slight angle. With great difficulty I picked up the bottom end and slid it to its center. Turning it 45 degrees, it came to rest upside down on the counter. This left me to figure out how to flip it without damaging anything, especially me. Several trial and movement repositioning's left me to realize I would have to skid the sink on the plank slowly away from the base until the basin would just make rest in the very front of the hole provided once I flipped it. This was only possible at a point plus or minus one quarter inch forward or back and two and one half inch side to side. One way, the drop would damage the counter. The other, would not allow it to clear the overhead cabinets. As for the side to side movement, off center more that two and one half inches would dump the sink on the ground as it would slide off of the counter on that side. Once completely in the backsplash on the flip would clear by 1/4 inch at which point I could slide it back 1/8 inch to rest against the wall. It had to be slid on a moving blanket which added to the problem by hiding the hole. It was like sliding a piano without striking a note.
 

drivesitfar

Well-known member
Joined
Oct 23, 2013
Messages
35,988
Location
Pacific Northwest
the entire time I was reading about your method of putting your 200 pound sink in place I was worried it was going to break, destroy your countertop or worse hurt you so happy you got it in place without any of that happening.

i'm not certain if you have anybody in your area selling like new table lifts, but these are great for that sort of job and might help you in other areas if you have flooring or cement to roll it around.

again a BIG SHOUT OUT of WOW cause that kitchen looks like it will function for another 50-100 years.

WELL DONE!!
 

Attachments

  • 37308_700x700.jpg
    37308_700x700.jpg
    40.3 KB · Views: 18
OP
B

bolensboneyard

Well-known member
Joined
Nov 22, 2013
Messages
3,074
Location
South East
the entire time I was reading about your method of putting your 200 pound sink in place I was worried it was going to break, destroy your countertop or worse hurt you so happy you got it in place without any of that happening.

i'm not certain if you have anybody in your area selling like new table lifts, but these are great for that sort of job and might help you in other areas if you have flooring or cement to roll it around.

again a BIG SHOUT OUT of WOW cause that kitchen looks like it will function for another 50-100 years.

WELL DONE!!

drives I have been trying to justify getting one of those lifts however the sink is five feet long and would have to have been slid without the lift tipping.
 

drivesitfar

Well-known member
Joined
Oct 23, 2013
Messages
35,988
Location
Pacific Northwest
any way you slice it that kitchen sink install was a tough one that is for certain. I was thinking in combination with the lift to maybe make a shelf held up by jacks under the hole where the sink was to be installed. then pushing the sink onto that shelf and then lowering it in place with the jacks under the board holding up the sink after it's transferred.

i'm still amazed you installed the sink so a HUGE WELL DONE SIR!

speaking of your cool Pecan countertops did you mention what sort of finished you used and how often do you need to put on something (do tell what) to maintain it so it doesn't get wet?

again super job!!
 

jar944

Well-known member
Joined
Jul 26, 2010
Messages
5,893
Location
Northern VA
The system you see for clamping the boards down is something I came up with and worked very well; much better than biscuits.

. I just installed the new/old cast iron sink. This one weighted in at just under 200 lbs. has two drain boards and a cast backsplash.

Nice work on the kitchen.

Clamping cauls like that work well for counter top glueups. I have a pile of curved ones for gluing up wide panels/countertops or table tops. They work especially well if you didn't joint everything perfectly flat as they will persuade the boards into alignment.
View media item 110282
Also amusingly I have a very similar sink Iirc its a 1938 model. I still have to built a entire vintage looking laundry room around it. My wife is going for a 1920s look (with a modern washer and dryer) one thing I can say is they are not friendly to your back.
View media item 110281
 
To avoid these ads, REGISTER NOW!
OP
B

bolensboneyard

Well-known member
Joined
Nov 22, 2013
Messages
3,074
Location
South East
any way you slice it that kitchen sink install was a tough one that is for certain. I was thinking in combination with the lift to maybe make a shelf held up by jacks under the hole where the sink was to be installed. then pushing the sink onto that shelf and then lowering it in place with the jacks under the board holding up the sink after it's transferred.

i'm still amazed you installed the sink so a HUGE WELL DONE SIR!

speaking of your cool Pecan countertops did you mention what sort of finished you used and how often do you need to put on something (do tell what) to maintain it so it doesn't get wet?

again super job!!

thanks drives. I used stain prep/stain/then water based polyurethane. I do not know how it will wear but suspect, as it is used on floors, tuff stuff. Didn't worry about the food friendly angle as we use cutting boards and a roll out silicone mat for dough/baking. If it doesn't come off while cleaning I doubt dropping a toast on it will kill anyone. When I was living in New England I had to add a radon detector because rocks and stones were in the ground below the house and the foundation concrete. Twenty years later people were installing granite counter tops with inspection approval.
 
OP
B

bolensboneyard

Well-known member
Joined
Nov 22, 2013
Messages
3,074
Location
South East
Nice work on the kitchen.

Clamping cauls like that work well for counter top glueups. I have a pile of curved ones for gluing up wide panels/countertops or table tops. They work especially well if you didn't joint everything perfectly flat as they will persuade the boards into alignment.
View media item 110282
Also amusingly I have a very similar sink Iirc its a 1938 model. I still have to built a entire vintage looking laundry room around it. My wife is going for a 1920s look (with a modern washer and dryer) one thing I can say is they are not friendly to your back.
View media item 110281

Thanks. My daughter has a kitchen one similar with one drain board. If I had known how heavy mine would be to handle, I would have used hers. I may buy it any how just in case my wife wants another place to play; as I have too many shops to argue.
 

drivesitfar

Well-known member
Joined
Oct 23, 2013
Messages
35,988
Location
Pacific Northwest
isn't it amazing the stuff that goes on with society. have you even watched an ad for some medicine and heard all the WARNINGS. OMG that **** should be ILLEGAL.

i wasn't worried about your health with the wood countertops cause i know you have some common sense and good to know you won't be using them as a cutting board cause they are BEAUTIFUL.

take care and hope you are not too sore to work on something else cause always a pleasure watching you make something.

cheers and have a great day!!

btw it's snowing here today. how about your weather which i bet is almost perfect?
 
OP
B

bolensboneyard

Well-known member
Joined
Nov 22, 2013
Messages
3,074
Location
South East
Bobby
I admire your wood working ability and can only wish I had some of that talent

that counter top is very impressive.

Thanks Don. Your talent stands alone. Now I know what it must feel like for a beautiful young girl to step on stage for the first time with all the equally stunning talent. Intimidating; especially while wondering if anyone is noticing one jowl hangs lower than the other.:lol_hitti
 
OP
B

bolensboneyard

Well-known member
Joined
Nov 22, 2013
Messages
3,074
Location
South East
isn't it amazing the stuff that goes on with society. have you even watched an ad for some medicine and heard all the WARNINGS. OMG that **** should be ILLEGAL.

i wasn't worried about your health with the wood countertops cause i know you have some common sense and good to know you won't be using them as a cutting board cause they are BEAUTIFUL.

take care and hope you are not too sore to work on something else cause always a pleasure watching you make something.

cheers and have a great day!!

btw it's snowing here today. how about your weather which i bet is almost perfect?

I wish it were perfect. We have only seen the sun one day out of the last seven and don't expect to see it again until next Wed. Rain for the next four but not enough to help the garden, which can only be planted when it stops. I feel like I am in the Pacific Northwest. At least there we could visit. Enjoy the snow. Bobby
 

drivesitfar

Well-known member
Joined
Oct 23, 2013
Messages
35,988
Location
Pacific Northwest
you wouldn't believe we had over a foot of snow fall here and with the wind blowing it around some drifts were 3 up to 5 foot deep and 3 days later it was 50's and sunny and barely any snow at all.

I hope all is well with you and your bride and I bet you are loving your new kitchen and your cool sitting area on the porch.

any new projects? find any more logs to follow you home?

not that you might know this, but since you now own a mill i thought i'd ask. if I need 16-20 foot FIR support beams for my deck wouldn't quartersawn have a better chance of getting straight boards or could i get straight boards out of the heart if I waxed the ends and dried them in the shade?

take care!!
 
OP
B

bolensboneyard

Well-known member
Joined
Nov 22, 2013
Messages
3,074
Location
South East
you wouldn't believe we had over a foot of snow fall here and with the wind blowing it around some drifts were 3 up to 5 foot deep and 3 days later it was 50's and sunny and barely any snow at all.

I hope all is well with you and your bride and I bet you are loving your new kitchen and your cool sitting area on the porch.

any new projects? find any more logs to follow you home?

not that you might know this, but since you now own a mill i thought i'd ask. if I need 16-20 foot FIR support beams for my deck wouldn't quartersawn have a better chance of getting straight boards or could i get straight boards out of the heart if I waxed the ends and dried them in the shade?

take care!!

drives you didn't say what size board 2x or 4,6,8X
 

drivesitfar

Well-known member
Joined
Oct 23, 2013
Messages
35,988
Location
Pacific Northwest
Sorry I guess I didn't. I was thinking 4.5 x 6.5's for upper beams and 4.5's and 8.5's for lower support beams. i'd plane and stain and put either flashing or a weather type product on the top edge maybe get 20+ years out of them.

I was thinking FIR cause that's what we have a lot of around here, but open to suggestions if another wood might make better support beams.
 
OP
B

bolensboneyard

Well-known member
Joined
Nov 22, 2013
Messages
3,074
Location
South East
Sorry I guess I didn't. I was thinking 4.5 x 6.5's for upper beams and 4.5's and 8.5's for lower support beams. i'd plane and stain and put either flashing or a weather type product on the top edge maybe get 20+ years out of them.

I was thinking FIR cause that's what we have a lot of around here, but open to suggestions if another wood might make better support beams.

Fir is good support wood. We used Douglas Fir for years on the East cost when we can get it we still do. It should be adequate unless you have more than average weight above it. Look at the end of your beam/lumber. Too much curved growth ring to either side etc. will cup or curve and twist as the distance gets larger. Hard to explain in words. Look at the quarter sawn pics in my post a page or so back.
 
OP
B

bolensboneyard

Well-known member
Joined
Nov 22, 2013
Messages
3,074
Location
South East
Got this cool knife from the wife for my birthday. It was made early on during WWII by a GI as knives were not issued right away by the government. Blade takes a great edge is razor sharp now. I made the case out of a strip of belting left over from my planer. The outside is cow hide. All is lashed together with waxed string. The bottom opens up to accept a pocket stone to keep it sharp. The strings that hang down will carry wood beads painted for decoration which can be used to float fishing line in a pinch. Can is kitchen trash can painted to match stove. Base I made at the bottom is to keep the hinge on the can from hitting the wall and the can from moving when you step on the peddle.
 

Attachments

  • P1040373.jpg
    P1040373.jpg
    105.2 KB · Views: 37
  • P1040374.jpg
    P1040374.jpg
    107.4 KB · Views: 35
  • P1040370.jpg
    P1040370.jpg
    76.2 KB · Views: 39
  • P1040371.jpg
    P1040371.jpg
    126.4 KB · Views: 40

drivesitfar

Well-known member
Joined
Oct 23, 2013
Messages
35,988
Location
Pacific Northwest
I've asked a mill that I get my cedar from about cutting up a few fir logs and the owner said there is too much waste for him to cut me quarter sawn 20 foot 4.5x6.5 foot beams and he doesn't have a source for trees that big any more.

since he usually has cedar logs big enough I guess I was hoping fir logs would be too, but he doesn't have those available to him with other huge mills getting those.

I probably should try to talk to an owner of one of the huge mills that has huge piles of lumber, but not sure that's possible.

could I get straight beams with 1/4 to full heart wood that wouldn't crack? or maybe I'll just keep looking for a stack of beams out of an old barn to use.

I also think I own a knife like that, but yours sounds tuned up and ready to go. nice work on that homemade sheath.

great looking little garbage can too. I think we need to get one like that for our compost cause it seems I empty our small one under the sink about every 2 days.
 
OP
B

bolensboneyard

Well-known member
Joined
Nov 22, 2013
Messages
3,074
Location
South East
I've asked a mill that I get my cedar from about cutting up a few fir logs and the owner said there is too much waste for him to cut me quarter sawn 20 foot 4.5x6.5 foot beams and he doesn't have a source for trees that big any more.

since he usually has cedar logs big enough I guess I was hoping fir logs would be too, but he doesn't have those available to him with other huge mills getting those.

I probably should try to talk to an owner of one of the huge mills that has huge piles of lumber, but not sure that's possible.

could I get straight beams with 1/4 to full heart wood that wouldn't crack? or maybe I'll just keep looking for a stack of beams out of an old barn to use.

I also think I own a knife like that, but yours sounds tuned up and ready to go. nice work on that homemade sheath.

great looking little garbage can too. I think we need to get one like that for our compost cause it seems I empty our small one under the sink about every 2 days.

drives have you considered making the beams or do they need to be solid for looks? You could laminate two buys with plywood for something good and strong. You can also get ready made structural I beam made of wood.
 

drivesitfar

Well-known member
Joined
Oct 23, 2013
Messages
35,988
Location
Pacific Northwest
if I can't find real wood beams for my deck i'll probably just use the old 2x10's and spiff them up cause the supports of my old deck are still solid.

I was just going for a better look from below cause i'm planning on building a small woodshop down there. it's not a huge deal using the old supports though and probably will save me some money so I can buy another tool or supplies or material for the woodshop.

are you calling the kitchen done now cause it sure looks great!!
 
To avoid these ads, REGISTER NOW!
Top Bottom