To avoid these ads, REGISTER NOW!

Model A Ford garage

To avoid these ads, REGISTER NOW!
OP
B

bolensboneyard

Well-known member
Joined
Nov 22, 2013
Messages
3,074
Location
South East
Don thanks. The lamp was my grandmother's and I took the milk glass shade off so it would not get broken. The stove is a wonderful stove. Ginny was not convinced when I told her we needed it. Now, I believe she stays with me because she knows she cannot take it with her if she goes. There is a griddle under the stainless cover the lamp is sitting on. It cooks the best pancakes she has ever made (her words not mine) and allows us to eat together because there is enough room to cook them all at once.
 

Bob Heine

ALLIANCE MEMBER
Joined
Oct 24, 2009
Messages
10,703
Location
Boca Raton, Florida
Bobby, that Chambers stove is beautiful. Does the right rear burner drop down or is it a permanent well burner for soup pots? My parents had an electric stove in the early '50s with the drop-down burner but I don't think they used it in that position more than half a dozen times in 25 years.
 

drivesitfar

Well-known member
Joined
Oct 23, 2013
Messages
35,999
Location
Pacific Northwest
Bobby: I hope you are enjoying your summer even amid a few storms and a lot of heat and humidity. your kitchen really does look great and i'd love a vintage stove here, but my bride likes cooking on the newer versions that seem to need replacing a lot more often.

take care!!
 
OP
B

bolensboneyard

Well-known member
Joined
Nov 22, 2013
Messages
3,074
Location
South East
Having gas appliances are wonderful things. Hope things are going well otherwise.
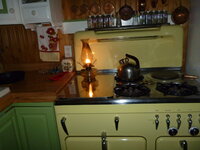
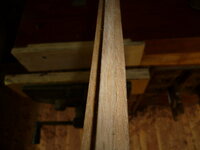
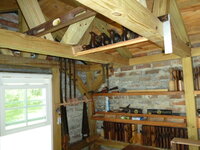
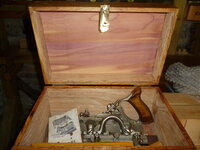
Things are well thanks. Been real humid here so what little energy I have is taxed to the max. I got some new/old wooden planes and have been practicing/learning how to use them. This is a window mullion. The double rabbit is for the glass side. The inside is cut on each side. Red oak in these pics. Takes about half hour now for me to cut one side of a four foot piece. Once I get a few holdfasts things should go faster. The learning curve is now a meandering mountain road where it used to be a hairpin turn.
 

Attachments

  • P1040467.JPG
    P1040467.JPG
    265.8 KB · Views: 82
  • P1040468.JPG
    P1040468.JPG
    146 KB · Views: 45
  • P1040469.JPG
    P1040469.JPG
    146.8 KB · Views: 58
OP
B

bolensboneyard

Well-known member
Joined
Nov 22, 2013
Messages
3,074
Location
South East
Bob it is a permanent well. I have all the special pots, warming, and baking attachments for it except for the pudding pot which is a small pot that slides into the lid of one of the bigger pots. We have not used that yet but once Ginny gets rolling I'm sure she will experiment on me until she thermowell master
 
OP
B

bolensboneyard

Well-known member
Joined
Nov 22, 2013
Messages
3,074
Location
South East
The circular scroll work on one of these panels was broken out. I remade and stain matched it, on different wood, and repaired this antebellum screen. Can you tell which one was made by me using only hand drill, egg beater type, and a coping saw plus paring chisel. Next is to replace one top ball and a corner piece. I have to make the ball. Once the woodwork is done I will reupholster the screen. Note panel only includes circles and upper and lower bar. It fits into a frame so do not judge the frame or other wood. Look at all the pictures some will make the circles look larger in some panels. They are not. Bobby
 

Attachments

  • P1040470.JPG
    P1040470.JPG
    367.9 KB · Views: 40
  • P1040471.JPG
    P1040471.JPG
    326.4 KB · Views: 39
  • P1040472.JPG
    P1040472.JPG
    414.3 KB · Views: 37
  • P1040473.JPG
    P1040473.JPG
    363 KB · Views: 49
Last edited:

Sweet Old Bill

Well-known member
Joined
Mar 20, 2009
Messages
362
Location
N. California
Bobby,

No matter which panel is the new one, you have done a wonderful job on repairing the screen. My guess is that the panel on the right side is the repaired panel. In the pictures the small openings on the bottom looked slightly different to me. Your work reflects the patience that you put into the repair.
 

y'sguy

Well-known member
Joined
May 1, 2010
Messages
1,309
Location
Tulsa, Oklahoma
I can only think it is the right panel. But only because of the lack of "original dust". But beyond this it is perfect and a job well done. Perfect, really.
 
OP
B

bolensboneyard

Well-known member
Joined
Nov 22, 2013
Messages
3,074
Location
South East
Thanks guys. It is the right side and the dust is still heavy on the rest. The wife said she should dust it. Guess she's letting it rest in peace. After all it is in the bedroom.
 

drivesitfar

Well-known member
Joined
Oct 23, 2013
Messages
35,999
Location
Pacific Northwest
from my chair I didn't see any noticable difference and even with screen enlarged and my readers on I didn't see the extra dust (or lack of). WELL DONE!!

also I loved your QUOTE over on Don Long's thread so feel free to post up a few more of your originals here on your thread or in your sig line.

hope you are doing well and enjoying your summer.
 
OP
B

bolensboneyard

Well-known member
Joined
Nov 22, 2013
Messages
3,074
Location
South East
Drives am doing fine. Would be on more if my mouse would cooperate but going to town and fighting the traffic is not worth another line in Walmart. Thanks for keeping me checking my thread. I hope to get back to checking it every day but a certain auction site has been keeping me occupied and I pledged to only spend so much time on the computer.
 
To avoid these ads, REGISTER NOW!

Sweet Old Bill

Well-known member
Joined
Mar 20, 2009
Messages
362
Location
N. California
Bobby,

With work like that, I would expect a lovingly hand crafted dessert could be in your future!

Congratulations, I am sure that Ginny will appreciate your work.
 

drivesitfar

Well-known member
Joined
Oct 23, 2013
Messages
35,999
Location
Pacific Northwest
You do amazing work. Best of luck on the shopping and if you are looking something that maybe (planes, chisels or …) that I’ll never have the skills or use for my store is a bit better customer service than most and very friendly too.
Not sure you watch you tube but if you have time watch a few Essential craftsman videos and maybe you and he can compare notes cause he’s a pretty handy guy too. He built a saw mill out of bits and pieces of an old one about 35 years ago and powered his with a Chevy.
 
OP
B

bolensboneyard

Well-known member
Joined
Nov 22, 2013
Messages
3,074
Location
South East
Thanks X.
I Always wanted to make a connection with my dad. I was the black sheep who, dare I say it, worked with cars and was greasy all the time. Dad thought I had no interest, or no developable skills, with wood; as did I as a result. Not trying to prove him wrong. Just trying to give myself, and my children, someone to behold, something with a living spirit, after I am gone. Something to physically embrace when the days of November grow weary.
 
OP
B

bolensboneyard

Well-known member
Joined
Nov 22, 2013
Messages
3,074
Location
South East
I am building an oak box for my Stanley 45 plane. Close up pictures when it is more complete. 3/16 box joint corners all wood milled from a log in my yard. The new addition vise is a dovetail vise which I love. It will take 24 inches between the screws and closes with sprocket and chain. Dog it down with hold down clamps in a few minutes, remove and swap with my miter box and saw then back again in less that five. I also built a drop in chopping block, for cutting the base of box joint mortars/flat surface on the other side, for honing chisels on some emery cloth, out of a scrap piece of cherry, which pops in and out of my front vise. Joints were all cut with a backsaw. Room left on the bench to use a sticking board or a shooting board.
 

Attachments

  • P1040486.JPG
    P1040486.JPG
    327.4 KB · Views: 38
  • P1040487.JPG
    P1040487.JPG
    306.6 KB · Views: 37
  • P1040490.JPG
    P1040490.JPG
    379 KB · Views: 37
  • P1040491.JPG
    P1040491.JPG
    334.7 KB · Views: 39
  • P1040492.JPG
    P1040492.JPG
    331.3 KB · Views: 52
OP
B

bolensboneyard

Well-known member
Joined
Nov 22, 2013
Messages
3,074
Location
South East
X I agree. Have you seen the rest of this thread :) Lots and lots of metal. Lots of fixed mistakes, holes seams etc. ahhh welding is my second love in the shop. Thanks for the complement. Wish I could repair my own body.
 

xtremek

Well-known member
Joined
Apr 13, 2012
Messages
11,603
Location
St. Johns, Mi
I'm still playing catch up. I have a couple of threads I've started and playing catch up. Bodies, yeah, well, about that.
 
OP
B

bolensboneyard

Well-known member
Joined
Nov 22, 2013
Messages
3,074
Location
South East
Whew. Just got in under the wire guy. Didn't want you to wait through lunch.
The top has a double cover the inner one being Cedar. The bottom is Cedar. The Cedar is cut square to keep the sides square and glued in when the corner joints are glued. Cedar is light, strong for its weight, and will help keep bugs out of the box. All work was done with hand tools. The rear hinges are salvaged from the silver ware chest under the bench that is now a chisel chest. Hasp is new but solid brass; not easy to find.
 

Attachments

  • P1040502.JPG
    P1040502.JPG
    297.7 KB · Views: 34
  • P1040503.JPG
    P1040503.JPG
    297.9 KB · Views: 30
  • P1040505.JPG
    P1040505.JPG
    289.2 KB · Views: 29
  • P1040504.JPG
    P1040504.JPG
    340.5 KB · Views: 28
  • P1040506.JPG
    P1040506.JPG
    363.4 KB · Views: 29

drivesitfar

Well-known member
Joined
Oct 23, 2013
Messages
35,999
Location
Pacific Northwest
I love the box and always enjoy seeing what you can build using the OLD SCHOOL METHODS and tools. WELL DONE !!!!!

hope all is well in your world. any logs to cut when weather cools off a bit?
 
OP
B

bolensboneyard

Well-known member
Joined
Nov 22, 2013
Messages
3,074
Location
South East
Thanks drives. Got one log on the mill right now. 25 inches oak and heavy. Been flipping it for two days and have cut two sides but the excess heat and humidity ***** all my strength so I have taken several days off before I hurt myself.
 
Last edited:

y'sguy

Well-known member
Joined
May 1, 2010
Messages
1,309
Location
Tulsa, Oklahoma
The box turned out great and I'm glad you're willing to share it with us. Love the direct way you work. Did you cut all the finger joints?
 
OP
B

bolensboneyard

Well-known member
Joined
Nov 22, 2013
Messages
3,074
Location
South East
Thanks guy. I cut all the joints after making a template out of plywood by hand; even the template. Used an old Disston backsaw and a 3/16 mortise chisel the cut a box joint. Every thing was done and a small block plane. Of course the lumber was cut on the sawmill then planed to 3/8 inch with power. Not enough energy left in this old horse to mill that much wood by hand. It was my first attempt at building a fingered joint. Even the clamps used were older that me and there's a certain amount of gratification in that.
 

Bob Heine

ALLIANCE MEMBER
Joined
Oct 24, 2009
Messages
10,703
Location
Boca Raton, Florida
Bobby, it might be the time we grew up in, when home power tools were primitive and when there were lots of craftsmen using hand tools but I do find myself reaching for the hand tools, even the ones that aren't antiques. In 1953 I watched a bunch of carpenters build a house and every one of them was using a hand saw to cut the lumber. As I recall, their saws were sharp enough to keep pace with an electric circular saw of the time. I'm going to try my hand at a box with box joints and do them by hand with a Japanese pull saw (my Stanley backsaws are too thick).
 
To avoid these ads, REGISTER NOW!
Top Bottom