To avoid these ads, REGISTER NOW!

Model "T" twin post jack

don long

Well-known member
Joined
Mar 31, 2012
Messages
8,856
Location
southern california
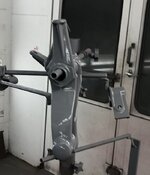
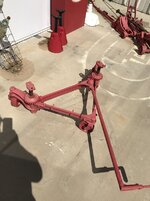
The first time I saw this jack I wanted one so I went on the hunt for one.
2019-05-25 10.07.46.jpg


Some time later I picked up one. An old twin post manual jack. I started to research it to find out what it was.
It turned out to be a shop jack used back in the 1920's to roll cars around the shop when working on the car with the wheels off

101.jpg

The jack has been sitting under my work bench for a couple of years. A few weeks ago I decided to pull it out and give it some love.
I started by taking it apart

2020-09-02 17.39.59.jpg

First the handle

2020-09-02 17.38.17.jpg

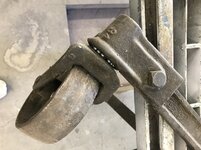
Then the wheels and then the bars holding the wheels together.
1.jpg

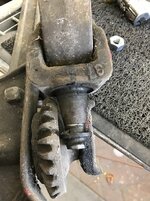
Had to be careful not to lose the ball bearings

2.jpg
4.jpg
 

Attachments

  • 2020-09-02 17.40.55.jpg
    2020-09-02 17.40.55.jpg
    243.4 KB · Views: 9
  • 5.jpg
    5.jpg
    242.9 KB · Views: 7
Last edited:
To avoid these ads, REGISTER NOW!

LXCam

ALLIANCE MEMBER
Joined
Apr 23, 2013
Messages
19,178
Location
AZ
Dang Don, you find all the cool stuff. It’s gotten so bad if I google “how to find cool stuff” google says ask Don Long. It’s just not fair 🤔
 
OP
D

don long

Well-known member
Joined
Mar 31, 2012
Messages
8,856
Location
southern california
Now the work can begin.
The jack was very dirty and crusty making a mess as I scraped each piece.
The left and right lift mechanisms needed to be taken apart and that consisted of grinding down the top of the shaft where it had been folded down over the foot of the jack to hold it together

2020-09-02 17.38.49.jpg

Using my die grinder a wheel puller and my acetylene torch it finally came apart
Now the parts are ready for the sand blaster

2021-09-10 15.40.46.jpg

One side down and one more to take apart then I can start getting parts ready for the chrome shop.
 
OP
D

don long

Well-known member
Joined
Mar 31, 2012
Messages
8,856
Location
southern california
Dang Don, you find all the cool stuff. It’s gotten so bad if I google “how to find cool stuff” google says ask Don Long. It’s just not fair 🤔

Come on Cam
It's not that bad. I do have a few treasures stuffed away in my containers though.
Thanks
 
OP
D

don long

Well-known member
Joined
Mar 31, 2012
Messages
8,856
Location
southern california
Knowing that the chrome shop would take a while to do my parts I went after the wheels and lift pads and got them ready to go out
That meant that the parts needed to be sand blasted, the mold marks and nicks ground down and because the wheels were so rusty and had sat in water for some time the pits were really bad. I decided to make sure the parts would come back clean I needed to send them out clean/smooth So after the sand blast and examination I needed to fill the pits that were making the wheels look so bad

2021-08-21 15.31.01.jpg

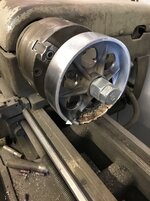
I put the wheel on the lathe, Took out the torch and some brazing rod and filled the wheel with brass

6.jpg

After turning the wheel smooth on the outside I went after the inside of the wheel

7.jpg

Since I'm working on another project at the same time and it has the same problem with the wheels I did the same process to all 5 wheels before sending them out to the plater.
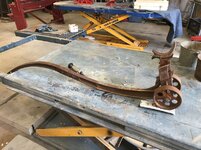
The other project is a Model "T" hand dolly

2021-08-21 15.05.39.jpg
 
OP
D

don long

Well-known member
Joined
Mar 31, 2012
Messages
8,856
Location
southern california
All 5 wheels and the 2 lift pads went out to the plater the other day and now I will get the other pieces into primer while waiting on the chrome.

Here are 4 of the 5 wheels just before sending them away. I did a little more polishing on them but this will give you an idea of the work involved to be sure of getting back a good chrome product.

2021-09-06 18.09.12.jpg

Next I went after the bolts. They are the square ones that are hard to replace. I sand blasted them then wire wheeled the threads and started the grinding process to make them smooth for chroming. I forgot to send them out to plate when I sent out the wheels so I'll clean up the handle and put it and the bolts out to plate next week.

2021-09-17 20.34.19.jpg

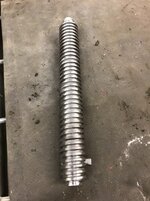
With the main screw shafts apart I was able to give them some attention too. I cleaned all the dried grease from the threads then sand blasted them and thinking that it would be too hard to grind them I just spent some time with the wire wheel and polished one of them

2021-09-17 20.34.35.jpg
 
OP
D

don long

Well-known member
Joined
Mar 31, 2012
Messages
8,856
Location
southern california
I'll be pushing this project forward again this week.
Horse
I didn't know anything about this jack til I saw the first one too. then I had to have one so I planted the seed in my little brain and waited!
 
To avoid these ads, REGISTER NOW!
OP
D

don long

Well-known member
Joined
Mar 31, 2012
Messages
8,856
Location
southern california
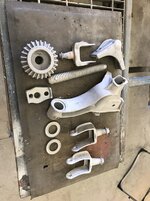
I've made a little more progress on this project. Today I grabbed the crank for the jack and worked at getting it apart.

2021-09-21 16.51.07 - Copy.jpg

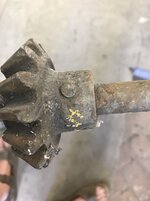
The gears were held on the shafts by blind rivets so I had to grind one end of the pin and drive it out of the hole with a punch and a B I G hammer

2021-09-21 16.55.11 - Copy.jpg


After getting the 3 gears off the axles it was time to scrape as much of the old grease off the parts. Then into the sand blaster to get them clean.

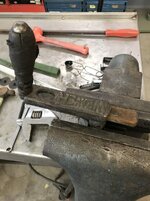
The main crank tube had a bow in it so I had to straighten it by clamping it in the vice and squeezing the bow out as best I could then smacking it with the big hammer on both sides of the vice. The tube looked much better after that.

The main knuckle was a pretty rough cast so with my die grinder and a 60 grit 2" disc I smoothed off the casting marks then smoothed out the grinding marks with an 80 Grit disc then 150 grit sand paper on my pistol grip sander.

All the parts look pretty good now. The crank handle will go to the chrome plater along with all the square bolts in the morning so I smoothed it out some and it looks much better

2021-09-21 17.45.26 - Copy.jpg

2021-09-21 21.22.38 - Copy.jpg

2021-09-21 21.22.55 - Copy.jpg

I will need to find a new wood handle for it later

Here are the parts to the crank tonight mostly cleaned up

2021-09-21 21.21.56 - Copy.jpg
 
Last edited:
OP
D

don long

Well-known member
Joined
Mar 31, 2012
Messages
8,856
Location
southern california
anxiously awaiting for the finished project:)

I'm slowly making headway on this jack.
The wheels and lift pads are in the chrome shop along with the hardware and it should be ready to pick up soon.
While waiting on the chrome to return I've ground down ALL the bad casting marks and filled the pits. I've primed the parts once and rough sanded the primer to get the parts smooth and tonight I reprimed the parts

first prime

2021-09-28 13.14.51 - Copy.jpg

Primed again after coarse sanding and filling pits in the metal

2021-09-30 20.27.24 - Copy.jpg

2021-09-30 20.27.30 - Copy.jpg

Thanks for the interest in my project Cobbler
 
OP
D

don long

Well-known member
Joined
Mar 31, 2012
Messages
8,856
Location
southern california
To give you guys an idea of how far I'm taking this jack I thought I'd post a couple of shots of the work

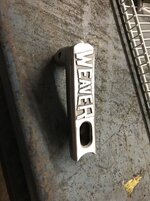
Here is the front yoke in its original condition (Pretty rough)2020-09-02 17.38.34 - Copy.jpg

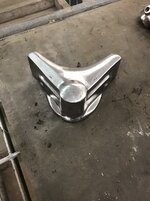
And here is the same piece after removing all the casting marks (very smooth)
This is before I give the piece a glaze coat of bondo to fill in those pin holes you see in the top of this piece

1633153381510.jpeg

After sanding the bondo they get a thick coat of primer

2021-09-30 20.27.24.jpg

The parts will be sanded again with a 220 grit paper hopefully all the imperfections will be gone after block sanding, Then I reprime the parts and a final sanding with 600 grit paper before color is applied
 
OP
D

don long

Well-known member
Joined
Mar 31, 2012
Messages
8,856
Location
southern california
I finally found enough time to get all the parts ready for paint. The chrome should be ready later this week so progress will be good.

2021-10-11 16.57.10 - Copy.jpg
 
OP
D

don long

Well-known member
Joined
Mar 31, 2012
Messages
8,856
Location
southern california
Well guys the day has finally come that this jack is finished. It was a real test of patience and determination.
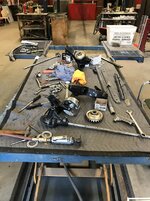
I finally got the parts painted and started putting the jack together only to have to take it apart time after time for dumb mistakes like putting the gear on the wrong end of the shaft or not getting enough paint on the lower sides of some parts. Well this morning my bench looked like this

2021-10-21 17.24.03.jpg

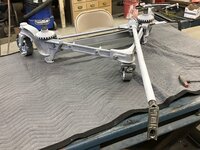
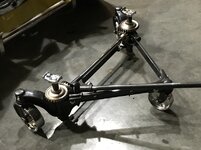
And tonight the jack looks much better

2021-10-22 16.17.33.jpg2021-10-22 16.19.05.jpg2021-10-22 16.19.48.jpg2021-10-22 16.20.12.jpg
 
To avoid these ads, REGISTER NOW!
Top Bottom