
You are using an out of date browser. It may not display this or other websites correctly.
You should upgrade or use an alternative browser.
You should upgrade or use an alternative browser.
Between 485 & 705 SQ/FT Modern House - Eastern Shore
- Thread starter Brian R
- Start date
Workspaces between 485 and 705 squarefeet.
Great boats.. I have a 17 Montauk.
The place is really coming together. Great effort and you hard work is showing.
Scooter - Agreed and my friend sold his 17 Montauk several years ago and really laments that decision.
Thanks for following along and the kind words.
Brian
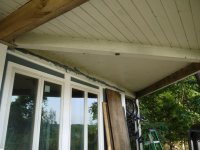
I’m going to post before and after paint pictures of the porch ceiling. But the before pictures includes unpainted replacement beams which reminded me of why they needed replacement and so I thought I would post a few pictures of how they failed and how they were replaced.
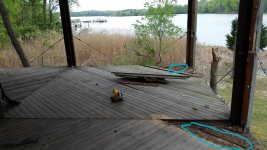
They failed because the original builder developed was an extremely poor way of getting water away from the outside decks. The decks were covered with a wooden floor on sleepers (circled in blue). Underneath the sleepers was flashing (circled in red) that slope away from house and to edge of each deck. The edges had a slit about 1 ½ inches wide that was covered by a 1x4 (circled in yellow) that was mounted approximately one inch away from the edge.
The failures were catastrophic and caused water to be forced back to the house and rotted out the posts and beams.
Attachments


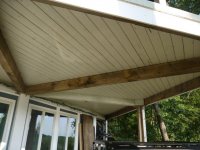
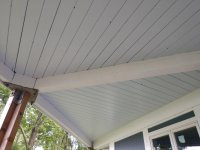
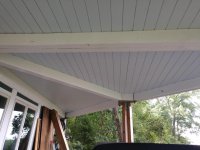
Last weekend I finally got around to paint on the ground floor porch.
I'm very happy with the results.
I debated looking for materials that are maintenance free but liked the wood look here and since it is mostly out of the weather I'm ok with paint since it should last a decent time.
I'm very happy with the results.
I debated looking for materials that are maintenance free but liked the wood look here and since it is mostly out of the weather I'm ok with paint since it should last a decent time.
Attachments


Ground Floor Utility / Bath
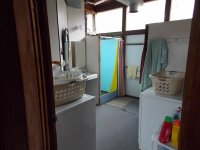
The original setup left much to be desired. First and foremost the bath and w/d are in the same room. We actually had that setup in our other cottage. Maybe things were different 50 years ago when these were built but right now it is best if you don’t have to do your laundry in between people using the bathroom.
In addition, as you can see in the first picture the washer and dryer are separated by the door which is also not an efficient way to do your laundry. The shower is on the left (blue wall with plastic curtain) and the toilet is behind the wall next to dryer on the right.
The second picture shows the demo completed and most of the interior walls removed.
The third picture reveals how we are separating the bath and utility area (also note that you can still see the outline of the original walls on the cement floor) The w/d will be on the wall on the right-hand side of the picture. The bath is the 4x12 foot space at the back of the picture. If you look closely you can see that the shower and toilet are in the exact same spot as they were originally (see first picture).
Pictures 4 and 5 reveal the continued renovation. Some things have not changed as you can see we are using similar duct work to deliver HVAC.
Finally - shower before and how it appears this afternoon.
I’m pretty happy. The tile is a big improvement and I really like the color scheme we came up with. Two of the walls will be regular white tiles but the accent wall adds some needed color.
Attachments


Bob Heine
ALLIANCE MEMBER
Brian, you are making great progress on the house. Nice to see you aren't afraid of a little color.
Our house was built in 1988 and has the laundry in the master suite. It's a separate room but accessed from inside the master bath. Wouldn't be ideal for a family with children but it's perfect for a retired couple. All the linens and clothes that need washing are steps away from the laundry. Only my everyday stinking filthy garage clothes, rags and microfiber stuff has to travel. My stuff often makes a stop in a toxic chemical bath in the garage sink or a 5-gallon bucket before making the trip to the laundry. Best not to bring creatures or nasty bodily fluids into SWMBO's sanctuary (a project with no blood-letting is not a real project).
Our house was built in 1988 and has the laundry in the master suite. It's a separate room but accessed from inside the master bath. Wouldn't be ideal for a family with children but it's perfect for a retired couple. All the linens and clothes that need washing are steps away from the laundry. Only my everyday stinking filthy garage clothes, rags and microfiber stuff has to travel. My stuff often makes a stop in a toxic chemical bath in the garage sink or a 5-gallon bucket before making the trip to the laundry. Best not to bring creatures or nasty bodily fluids into SWMBO's sanctuary (a project with no blood-letting is not a real project).
Bob.
I have not seen that (w/d in master suite) but that makes a lot of sense. Especially since most of the clothes, sheets, towels are distributed w/in a short distance.
I toyed w/ putting w/d on third floor near bedrooms but didn't find a way to make it work.
As to original plan of w/d in bath makes little sense when it is 2nd bath that is used by guests and when you are on the water and beach seem to go through lots of towels, etc.
BTW you have an epic thread and I've especially enjoyed how you've recorded your spectacular travel excursions.
Thanks for stopping by.
Brian
GirlnAgarage
Well-known member
Brian, I thought I'd have a look at you place after you commented on mine, and wow I'm glad I did. What you've got going on that really neat house is gorgeous. I'm only on post #130 reading through and I'm going to be late for work if I don't quit. I wanted to leave these thoughts here while I had them. Great job so far on your place, I can't wait to keep reading! 
The photos you have with this post are absolutely grabbing, at least for me anyway. The photos speak, the place speaks. I like to hike and camp, and what I see in your setting there, if I was hiking and ran across it, I'd probably have lingered for an hour just resting, having a snack and taking it in before moving on. There's history there. I can feel it just by looking at it.
So your house is that house in the 'hood huh? And you answered great. And probably to the right neighbor too. Sounds like she'll spread the good news to the cove
Real breath of fresh air, its just beautiful the photos here. Makes me feel the cozy and comfort that is present when everything is right.
The colors of your siding. See I knew there was a reason you ended up checking in on my thread. You got all this going on and I'm simply organizing my garage. But when I saw your house, location and you started talking siding, I was like, "That's what it is, the colors!" The color I used in the garage I think hits close to the paint color pallet that I really like out of the old northeastern cottages and homes. Sealed the deal in my mind when I saw you're a bit of a vintage kinda guy with the motorcycle.
Anyway, I better go! Can't wait to get back and read more of your progress.
A little more about the property -
It sits on 5 acres that have been neglected for a long time. The original owner who build this place in 1966 moved to Hawaii sometime ago and had been renting the property for the last 25 years or more.
There was no sign of any work being done on the house or the property and I'm guessing that landscaping will be a project almost as great as renovating the house. We have lots of plans to make the place look better but not much money to invest in landscaping until the house and garage are complete.
However, we have completed a few jobs just to try and stay a little in front of mother nature.
1. Added stone to driveway in order to make it easier for work trucks to get in and out.
2. Hired state to spray phragmites. This is a non-native grass that is very invasive. MD has a program that you can use to spray on an annual basis to rid your property. They spray and then you can either leave it or have someone cut it. You sign up on a 5 year basis.
3. We removed some tree limbs to improve the view.
The pictures below are somewhat deceiving since they were taken in the summer and late fall but you can tell where we have removed limbs and a portion of the phragmites from the right side of the dock (picture from the dock).
The photos you have with this post are absolutely grabbing, at least for me anyway. The photos speak, the place speaks. I like to hike and camp, and what I see in your setting there, if I was hiking and ran across it, I'd probably have lingered for an hour just resting, having a snack and taking it in before moving on. There's history there. I can feel it just by looking at it.
Phragmites is also the background to a funny story. When I met one of my neighbors for the first time we explained backgrounds and stories for a few minutes and then she kind of shocked me by asking, “What’s you stance on the phragmites?”
It was an odd question and I’m thinking to myself what else could be an answer than, like, “It’s a very invasive grass that has negative effects on the Bay and I want to do everything I can do get rid of it.”
But again, her tone was weird. Come to find out the previous owner loved the stuff so she was really happy to hear we were not going to cultivate it like he did. The neighboring lots have little of it so we remain hopeful we can rid our 'crop'.
Here is what we are trying to rid of it.
So your house is that house in the 'hood huh? And you answered great. And probably to the right neighbor too. Sounds like she'll spread the good news to the cove
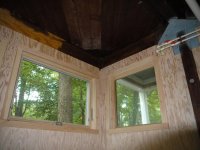
Windows Part 3 – Adding Windows Upper Floor
Just like the ground floor the 3rd level rooms also do not take advantage of potential water views.
I wonder what the original owner/builder was thinking. This room not only faces that water but also faces southwest and has spectacular sunsets views. However, the original room (see below) had a solid wall between a row of windows. Maybe this was to save money on windows?
Anyway, we decided to knock out this wall and open up the room with additional windows. It is an odd shaped octagon room but there is still enough wall space for a desk and a bed and will serve as a guest bedroom.
Real breath of fresh air, its just beautiful the photos here. Makes me feel the cozy and comfort that is present when everything is right.
Siding Before / After
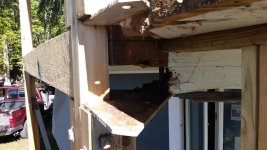
After demolition we were basically left with a shell. As already stated most of the windows were replaced with the same sized windows made by the same company. Siding was different animal all together.
The old method had the siding inside each 4x4 post. The panels that were approximately 1 ½ inch thick and cut these to fit within the 4x4s. I’m not certain of what they were made of but I assume that since it was the middle ‘60s they are some sort of asbestos type product (and were disposed of accordingly). Each panel was cut to fit and then they created nailers to keep it fixed in place. The nailers on the interior (1x2s) were cut so they were flush with the 4x4. The nailers (1x3s) on the outside were mounted so they were proud of the 4x4s. Although it gave the exterior some architectural detail it also became a trap for water.
We wanted something that was low maintenance, did not trap water and would replicate the look of the building. We chose 4x10 foot Hardie board panels with white Aztek trim boards. After installing Tyvek we installed panels. Then we sealed gaps and added trim boards to replicate old patter.
I’ll provide more pictures of this process but I think now is a good time to show before and after pictures.
The colors of your siding. See I knew there was a reason you ended up checking in on my thread. You got all this going on and I'm simply organizing my garage. But when I saw your house, location and you started talking siding, I was like, "That's what it is, the colors!" The color I used in the garage I think hits close to the paint color pallet that I really like out of the old northeastern cottages and homes. Sealed the deal in my mind when I saw you're a bit of a vintage kinda guy with the motorcycle.
Anyway, I better go! Can't wait to get back and read more of your progress.
Girl,
Thanks so much for the kind words and thoughtful response. GJ is an amazing place and I'm always amazed at the places that are built and then how well everybody documents their work AND then also writes passages like you do to keep pikers like me motivated.
Happy New Year and I'm so glad you jumped back on GJ and I can't wait to see what you do in your space.
2018 Updates
Over the past several months I’ve only been out at the property twice (two long weekends). The first weekend was in September and the reason for that trip was to receive kitchen cabinets and get installation going. However, 48 hours before delivery contractor got spooked by Hurricane Florence and delivery and installation was called off. I already had my airplane ticket so off I went. I didn’t have any travel issues and all my area got was rain.
More on the kitchen cabinets later but in the mean time I was able to complete a few small projects (and there are plenty to do) and so it wasn’t a total waste.
Outdoor Shower
Contractor had failed to finish trim at top of shower. If you look at the first picture you can see where Tyvek is exposed at top of blue siding. I caulked gaps and installed trim pieces. Note that I used leftover pieces and so they look pretty grungy but they cleaned up fine. I also cut a few pieces to fashion a shelf for shampoo and soap. The shelf is about two inches from the white corner trim piece and the gap allows the water to drain and not pool.
Attachments


Hole in Ceiling
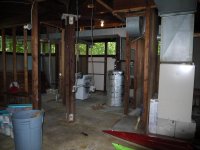
Every remodeling / renovation / addition / garage build I’ve ever been involved in includes some stupid thing that should have been solved in the middle of the job but for some reason it is not and I have to figure out what do to with it. Granted, half the time it’s my fault but this one was a mess left by the contractor (don’t get me wrong, I’m very happy with his work overall but this one really bugged me).
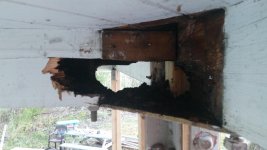
Back story, as posted earlier, original homeowner built house with a poorly planned system of getting rain water away from house and many structural beams failed. In this corner of ground floor it also caused some of the 3x6 floor pieces to rot. As you can see in the first picture this whole area was apart to replace beams and you can see where plywood has been added as the subfloor above the 3x6 tongue and groove pieces that form the ceiling.
But instead of doing some work when this area was all open my contractor just cut the 3x6 pieces on a straight line instead of doing it right. I mean it wasn’t like he didn’t a) have it open and b) have material to do it since the 3x6 tongue and groove was already bought to replace large holes in flooring from where original chases were for duct work etc.
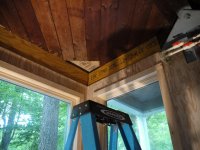
So contractor kept on saying he was going to fix it and I just decided to do it myself. No big deal but kind of a pain because the ceilings are 10 feet high, the tongue and groove pieces had to be removed from the existing material in the ceiling, the tongue and groove pieces on the replacement material had to be shaved and then I needed to fit it like a jigsaw puzzle over new beams. Second picture includes finished work and me testing stain on replacement pieces and beams. I not going for 100% perfect since this is a corner of the ground floor storage area. I’m calling it good enough and moving on.
Every remodeling / renovation / addition / garage build I’ve ever been involved in includes some stupid thing that should have been solved in the middle of the job but for some reason it is not and I have to figure out what do to with it. Granted, half the time it’s my fault but this one was a mess left by the contractor (don’t get me wrong, I’m very happy with his work overall but this one really bugged me).
Back story, as posted earlier, original homeowner built house with a poorly planned system of getting rain water away from house and many structural beams failed. In this corner of ground floor it also caused some of the 3x6 floor pieces to rot. As you can see in the first picture this whole area was apart to replace beams and you can see where plywood has been added as the subfloor above the 3x6 tongue and groove pieces that form the ceiling.
But instead of doing some work when this area was all open my contractor just cut the 3x6 pieces on a straight line instead of doing it right. I mean it wasn’t like he didn’t a) have it open and b) have material to do it since the 3x6 tongue and groove was already bought to replace large holes in flooring from where original chases were for duct work etc.
So contractor kept on saying he was going to fix it and I just decided to do it myself. No big deal but kind of a pain because the ceilings are 10 feet high, the tongue and groove pieces had to be removed from the existing material in the ceiling, the tongue and groove pieces on the replacement material had to be shaved and then I needed to fit it like a jigsaw puzzle over new beams. Second picture includes finished work and me testing stain on replacement pieces and beams. I not going for 100% perfect since this is a corner of the ground floor storage area. I’m calling it good enough and moving on.
Attachments
Junk Piles
I admit that I really mishandled the disposal of the building materials as we renovated. There were two problems: 1) there was more material than I estimated and 2) starting and stopping the project over the various components of the renovation meant that I had to call out dumpsters before they were full. In all I’ve called in nine 30-yard dumpsters at $450 a pop and spent over $4,500 when you add in overage charges.
I then gave up on dumpsters and started piling the junk on the edge of tree line. I ended up with 5 piles that would probably only cost one $450 dumpster but now I’m just pissed enough to say no more and would rather hall the debris away on separate trips to the local dump at $3 per load. I figure for around $45 dollars (15 trips) the last remnants of the reno will be gone. The dump is only 15 minutes away. When I add in my time loading junk it’s not worth it but I admit I’m stubborn and will pick at it over the next several trips. After the weekend was over and I made three trips to the dump and I removed two of five piles.
Attachments


Wildlife
I asked for this project but it has been a bear and there have been multiple episodes that have borught me close to a breakdown and curing at myself for days on end. It has cost more (in time and money) than I anticipated and there were certain jobs that were way more complicated than I had imagined. In addition I have clashed with my wife on certain aspects of the build that I should have figured out a way to resolve without causing her so much stress.
But all of those problems are significantly reduced when I focus on what I see when I look out from the house. It is almost like magic. So much so that when things are worse as I work on the house I can just turn toward the river and look outside and my blood pressure goes way down.
Here are a few pictures of what I found around the place this fall.
The snake was located in a pile of debris that I cleaned up.
The turtle was sunning near the firewood pile.
That eagle was eating a deer (sorry for the poor quality but it was in the middle of a field and all I had was the phone on may camera). I spotted this on the way to the dump and saw it out of the corner of my eye. Funny thing also is that I was on my way to town 6 miles away and when I came back ½ hour later the eagle was sitting about 50 feet away from the three vultures were eating the deer.
Attachments


jimmie jam
Well-known member
I've done the trash thing both ways. If it's not THAT much "heavy" stuff, I just take advantage of the bulk pickup that I get every month or dole the smaller stuff in the twice a week bin. Getting ride of heavy deconstruction materials gets very expensive today because the cities and counties have figured out another revenue stream.
Those "finish" details are the most difficult after the "fact" typically just as you've experienced in your project. Just keep plugging away at it and ENJOY it when its done....
Those "finish" details are the most difficult after the "fact" typically just as you've experienced in your project. Just keep plugging away at it and ENJOY it when its done....
Last edited:
I've done the trash thing both ways. If it's not THAT much "heavy" stuff, I just take advantage of the bulk pickup that I get every month or dole the smaller stuff in the twice a week bin. Getting ride of heavy deconstruction materials gets very expensive today because the cities and counties have figured out another revenue stream.
Those "finish" details are the most difficult after the "fact" typically just as you've experienced in your project. Just keep plugging away at it and ENJOY it when its done....
Jimmie, funny thing about the trash and counties figuring it out is when I went to dump a load a worker came over and kind of searched the load. He basically said that it is $3 per load but $3 per tire and people were 'hiding' tires in the trash to save money.
That's a huge snake!
GRN - yeah, gave me pause for sure.
Thanks for stopping by and commenting.
BR
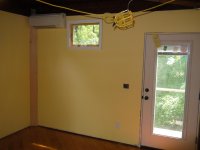
Mini-Duct Unit
HVAC is complete!
We decided on using two systems. Ground floor and second floor is forced air with exposed duct work. Third floor is a mini-duct system with head units in the master bedroom (yellow room) and the family room area (blue room). I went back and forth on how to heat and cool this place and although I don’t think this was the cost-efficient system I really liked that we did not have to build a chase between 2nd and 3rd floor and there is no duct work on the top level. I’ve only spent a few weekends there and it was not super hot or really cold but so far so good and this is another item I can check off my punch-list.
Completing the HVAC was extra sweet since final bill was only 1/2 of what I budgeted for when I decided to by the place.
Attachments

RickP
Well-known member
Wildlife
... when things are worse as I work on the house I can just turn toward the river and look outside and my blood pressure goes way down.
Here are a few pictures of what I found around the place this fall.
The snake was located in a pile of debris that I cleaned up.
The turtle was sunning near the firewood pile.
My sentiments exactly! We live in the woods and really enjoy seeing the wild animals doing their thing. Turtles laying eggs in the front yard, foxes digging them up at night, black snakes cruising the firewood piles for a quick meal. It helps give us a different perspective on stuff like weekday job stress.
Nice job on getting projects done! I like the mini-split hvac unit - good idea for the top floor.
Last edited:
BoilermakerFan
Well-known member
Mini-Duct Unit
HVAC is complete!
We decided on using two systems. Ground floor and second floor is forced air with exposed duct work. Third floor is a mini-duct system with head units in the master bedroom (yellow room) and the family room area (blue room). I went back and forth on how to heat and cool this place and although I don’t think this was the cost-efficient system I really liked that we did not have to build a chase between 2nd and 3rd floor and there is no duct work on the top level. I’ve only spent a few weekends there and it was not super hot or really cold but so far so good and this is another item I can check off my punch-list.
Completing the HVAC was extra sweet since final bill was only 1/2 of what I budgeted for when I decided to by the place.
Coming in under budget is always a great when you get the results you wanted!
My sentiments exactly! We live in the woods and really enjoy seeing the wild animals doing their thing. Turtles laying eggs in the front yard, foxes digging them up at night, black snakes cruising the firewood piles for a quick meal. It helps give us a different perspective on stuff like weekday job stress.
Nice job on getting projects done! I like the mini-split hvac unit - good idea for the top floor.
Rick, You get it! I spent all of my free time on an April weekend just watching some osprey build a nest, stick by stick.
I think we came up with the best solution for the space and so we are pretty happy with HVAC results.
Coming in under budget is always a great when you get the results you wanted!
Boilermaker, thanks for stopping by and I'm happy with my small victories.
BR
Upstairs Shower
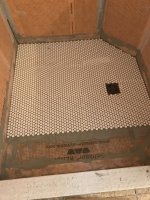
I hired a guy to redo all the floors and the tile work required for the custom showers for the two bathrooms (ground floor and third floor). I have been really pleased with his work. The floors are done but the showers are not (ground floor shower just missing grout – upstairs needs tile, sills, glass doors and grout).
Unfortunately, his wife has been found to have cancer. It is devastating, as these things are but even more so that they have two young kids and she also this is a second recurrence.
I’m patient and he has informed me that he will get this job done and so I’m going to sit tight for a little while and concentrate on some other projects.
In the mean-time please send good vibes their way.
The pictures attached reveals how the upstairs shower looked in July and when I last visited in November. Inch by inch it’s getting done.
Attachments


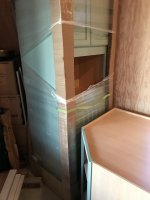
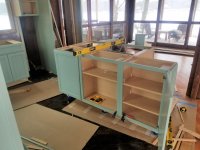
Kitchen Cabinets
As I stated earlier they were supposed to be delivered in September but Hurricane Florence nixed that. They finally came in November but my contractor and I were too busing with other stuff and so they have been sitting there the last two months. Now the stars have aligned again and I’m heading out there this weekend to help with installation and solve some other design issues and last-minute problems.
We’ve got a pretty straight forward L-shaped kitchen (and a 4’ x 6’ island) but it becomes complicated when you have to work around duct work and plumping in addition to the fact that the sliding glass doors will slide into spaces behind cabinetry and fridge.
I’m looking forward to the challenge but they are calling for snow and so worried about flights – I’ll keep you posted.
This picture does not do the color justice. I need a few shots with them in sunlight to really show them off. The delivery guys were telling me that almost 100% of kitchen cabinets ordered and delivered through this firm are Viking Grey or White and so they were pleased to see something else.
Attachments

Finallygotit
ALLIANCE MEMBER
The place is coming along nicely Brian.
Sending good vibes to your tiler and his family.
Sending good vibes to your tiler and his family.
Ole_Red
Well-known member
Well now, that was a fun read. Truly an incredible piece of property and your work is outstanding. When you do finally get your garage built, will you use same architecture as the house? Meaning, plenty of windows facing the water... "The Glass Garage." I think it would be a nice touch to the property. Looking forward to your progress!
BoilermakerFan
Well-known member
This picture does not do the color justice. I need a few shots with them in sunlight to really show them off. The delivery guys were telling me that almost 100% of kitchen cabinets ordered and delivered through this firm are Viking Grey or White and so they were pleased to see something else.
Looks like you went with Cardboard brown?

RickP
Well-known member
In glad to see you're still making progress. Slow and steady wins the race?
Good luck on your travel plans this weekend - we're hoping it's just a rain event in your area (and ours) because last weekend was ten inches of snow. Make sure to bring your boots - all that snow hasn't melted yet. Your place should have a healthy amount of mud when the rain hits it. Can't wait to see the cabinets installed!
Good luck on your travel plans this weekend - we're hoping it's just a rain event in your area (and ours) because last weekend was ten inches of snow. Make sure to bring your boots - all that snow hasn't melted yet. Your place should have a healthy amount of mud when the rain hits it. Can't wait to see the cabinets installed!
The place is coming along nicely Brian.
Sending good vibes to your tiler and his family.
Finally, thanks for the kind words and good vibes.
Well now, that was a fun read. Truly an incredible piece of property and your work is outstanding. When you do finally get your garage built, will you use same architecture as the house? Meaning, plenty of windows facing the water... "The Glass Garage." I think it would be a nice touch to the property. Looking forward to your progress!
Ole_Red - glad you enjoyed it and thanks for the effort of getting through it. I'm always amazed how crazy good people on this forum at both the work they do on their garage and in their garage and then how well they document it. I'm a piker but happy that people follow my feeble attempt to put this place together.
As for garage I've got two ideas right now. One is a modern garage with lots of glass that mimicks house. The other thought is to find a secluded spot away from house and build something that looks old and could have been built before the house. Don't know which one will happen but I will keep GJ posted.
Looks like you went with Cardboard brown?
That made me laugh!
In glad to see you're still making progress. Slow and steady wins the race?
Good luck on your travel plans this weekend - we're hoping it's just a rain event in your area (and ours) because last weekend was ten inches of snow. Make sure to bring your boots - all that snow hasn't melted yet. Your place should have a healthy amount of mud when the rain hits it. Can't wait to see the cabinets installed!
That was a good tip and I followed it. You were right there was lots of mud. As for cabinets - here they are. I'm going to do a proper post when I have a little more time.
Attachments
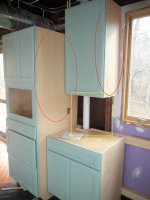
Kitchen Cabinets - Continued
I’m pretty happy with how the cabinets turned out. For some reason the development of the layout caused more friction between my wife and I than any other area of renovation. I mean it’s not like it was that complicated (12 x 12 area with L-shaped area an island) but factoring in the limitations of windows and having to work around pockets for sliding doors (that go behind microwave and fridge) created lots of sharp words. Add to this the combination of appliance options and it got somewhat testy at time. But here we are and after we resolve the final two issues we can look back and laugh (well maybe not laugh but at least stop curing under our breath at each other") ).
).
One issue is that cabinets were delivered without the outside side-panels or paint (as seen in the posted pictures highlighted in red ovals). The cabinet firm recognized that they made a mistake and will expediate delivery and will pay for the installation. Secondly, and we were aware of this from the get go, is that we need to install some false wall behind the counter next to the microwave and behind where the dishwasher will go next to fridge cabinet (yellow squares in pictures) so that we can install backsplash. These cavities exist because of the sliding glass doors that close into these sections.
I’m pretty happy with how the cabinets turned out. For some reason the development of the layout caused more friction between my wife and I than any other area of renovation. I mean it’s not like it was that complicated (12 x 12 area with L-shaped area an island) but factoring in the limitations of windows and having to work around pockets for sliding doors (that go behind microwave and fridge) created lots of sharp words. Add to this the combination of appliance options and it got somewhat testy at time. But here we are and after we resolve the final two issues we can look back and laugh (well maybe not laugh but at least stop curing under our breath at each other
).One issue is that cabinets were delivered without the outside side-panels or paint (as seen in the posted pictures highlighted in red ovals). The cabinet firm recognized that they made a mistake and will expediate delivery and will pay for the installation. Secondly, and we were aware of this from the get go, is that we need to install some false wall behind the counter next to the microwave and behind where the dishwasher will go next to fridge cabinet (yellow squares in pictures) so that we can install backsplash. These cavities exist because of the sliding glass doors that close into these sections.
Attachments

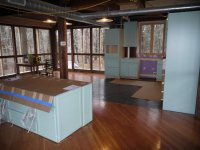
Kitchen Cabinets – Island
We spent a fair amount of time trying to figure out what to do with an island in this kitchen. The kitchen area is a 12x12 corner of the 24x24 open area. We could not really expand the kitchen much since the walls are bordered with walls of sliding glass doors. In addition we didn’t really want to extend past an L shaped counter in the corner since this would impeded access to the kitchen from either the living rrom or the dining area.
Finally, there is a cluster of 4x4 in the middle of the 24x24 second floor that also limits what can be done on the inside area of the kitchen. We toyed with using the posts as an anchor for another counter /island but felt that by doing that it would need to wreck the open feeling of the floor.
So we settled on a 3x6 island built by putting together 6 cabinets. The side that will face the kitchen has additional drawers and cabinets for kitchen stuff. The other side will have an 8” overhang of counter top for stools and cabinets for additional storage for living room items. The cabinets sit on ¾ plywood and casters. We bought Blickle casters based on Tom’s recommendations from his sublime Restore 1930’s Auto Shop thread.
We laid out the kitchen starting with graph paper and then cabinet software but it is still kind of surprising to see how massive it is. Even though it is on casters I doubt it will move much. We will have stools on one side which can provide additional seating for living area or we can spin it around so that it faces dining area.
The first picture is closest to where it will eventually settle (although pushed closer to the post on the right side of picture).
Attachments


Renovation Travails
I’ve been going back and forth about every 6 weeks in order to complete jobs both big and small. I was out there 2 weeks ago and due to some constraining work projects I could only spend 48 hours. One of my tasks was to pick up kitchen sink and bathtub (with faucets and drains). Normally this is a pretty easy thing since I typically order items on line and pick up at Lowes since I pass one on the way to the property from airport. This time the best laid plans turned in to a fair amount of hassle.
Stop at Lowes and need a few items that I did not pre-purchase. Since I’ve never had a problem picking up from online order area I shop first and that turned out to be a big mistake. Anyway ask for help locating something and right away realize that something is different on this Friday. It is training day and every interaction is a learning experience for some new employee. This added a fair amount of time to checking out since it involved training for scanning, register, etc. etc.
Then I walk over to the pickup online counter. Person tells me to wait a second so they can find their trainee. Finally get person and paperwork (sign 4 papers for 4 items) and then after a few minutes they wheel over to me a cart with two items (sink and faucet). I’m like there are four items and they seem really perplexed. They concede there are other items and spend 10 minutes tracking them down. I’m informed they are in back and will retrieve them.
They come back 10 minutes later and tell me they need the pallet truck from front of store to get the tub. I ask if it would be better for me to pick it up from store back and they say that is not possible. They grab pallet truck and are gone for another 10-15 minutes before returning without items since pallet truck can’t pickup tub. It’s plenty strong enough but forks don’t fit package. Then we go back to look at tub and all agree it is not big deal to place on flat cart and we do that and they help me load it onto back of pickup. I look for string to wrap around back so that it won’t slide out and they say I need to go to other end of store for that. Jump in truck, drive to other side and see cart at door is devoid of tie down string. Am told that they ran out and so I need to check the other entrance. That one is bare also so I ask employee. He goes and tells another employee and she motions me over and tells me she has been directed to give me twine. So ok that works and we go to aisle and she hands over a ball and tells me to bring back unused portion. Ok, fine but I will need something to cut it and she has a utility knife but really, really does not want to hand it out since she swears I won’t return it.
Ugh. A deal is reached. She follows me to truck so that I can use twine and knife and return to her directly. At this point a 30-minute trip has turned in to a 2 hour beat down. But I guess I asked for this when I decided to renovate a hopelessly derelict 50-year old home from 1400 miles away.
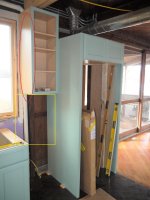
I have a few projects I need to complete and then there are things that just bug me. Since I was already in a bad mood with the Lowes trip I decided to ‘fix’ the PVC and bam problem. We used pvc pipes for a couple of reasons. Number one was to save money. PVC instead of copper (since I owned an old house in PA that had copper pipes and well water and spent a fair amount of time replacing them a pin-holes developed). PVC instead of flex since most of it is exposed in the post and beam house and would have needed some type of suspension system to keep straight.
Before: white PVC pipes, grey metal brackets, and unstained replacement beams
After: brown sprain paint for the PVC pipes and brackets and then Hickory stain for the laminate beam.
It’s a minor thing but makes a world of difference in how it looks. This is all the ground floor so no big deal but a real satisfying job to get out of the way.
Rant over.
I’ve been going back and forth about every 6 weeks in order to complete jobs both big and small. I was out there 2 weeks ago and due to some constraining work projects I could only spend 48 hours. One of my tasks was to pick up kitchen sink and bathtub (with faucets and drains). Normally this is a pretty easy thing since I typically order items on line and pick up at Lowes since I pass one on the way to the property from airport. This time the best laid plans turned in to a fair amount of hassle.
Stop at Lowes and need a few items that I did not pre-purchase. Since I’ve never had a problem picking up from online order area I shop first and that turned out to be a big mistake. Anyway ask for help locating something and right away realize that something is different on this Friday. It is training day and every interaction is a learning experience for some new employee. This added a fair amount of time to checking out since it involved training for scanning, register, etc. etc.
Then I walk over to the pickup online counter. Person tells me to wait a second so they can find their trainee. Finally get person and paperwork (sign 4 papers for 4 items) and then after a few minutes they wheel over to me a cart with two items (sink and faucet). I’m like there are four items and they seem really perplexed. They concede there are other items and spend 10 minutes tracking them down. I’m informed they are in back and will retrieve them.
They come back 10 minutes later and tell me they need the pallet truck from front of store to get the tub. I ask if it would be better for me to pick it up from store back and they say that is not possible. They grab pallet truck and are gone for another 10-15 minutes before returning without items since pallet truck can’t pickup tub. It’s plenty strong enough but forks don’t fit package. Then we go back to look at tub and all agree it is not big deal to place on flat cart and we do that and they help me load it onto back of pickup. I look for string to wrap around back so that it won’t slide out and they say I need to go to other end of store for that. Jump in truck, drive to other side and see cart at door is devoid of tie down string. Am told that they ran out and so I need to check the other entrance. That one is bare also so I ask employee. He goes and tells another employee and she motions me over and tells me she has been directed to give me twine. So ok that works and we go to aisle and she hands over a ball and tells me to bring back unused portion. Ok, fine but I will need something to cut it and she has a utility knife but really, really does not want to hand it out since she swears I won’t return it.
Ugh. A deal is reached. She follows me to truck so that I can use twine and knife and return to her directly. At this point a 30-minute trip has turned in to a 2 hour beat down. But I guess I asked for this when I decided to renovate a hopelessly derelict 50-year old home from 1400 miles away.
I have a few projects I need to complete and then there are things that just bug me. Since I was already in a bad mood with the Lowes trip I decided to ‘fix’ the PVC and bam problem. We used pvc pipes for a couple of reasons. Number one was to save money. PVC instead of copper (since I owned an old house in PA that had copper pipes and well water and spent a fair amount of time replacing them a pin-holes developed). PVC instead of flex since most of it is exposed in the post and beam house and would have needed some type of suspension system to keep straight.
Before: white PVC pipes, grey metal brackets, and unstained replacement beams
After: brown sprain paint for the PVC pipes and brackets and then Hickory stain for the laminate beam.
It’s a minor thing but makes a world of difference in how it looks. This is all the ground floor so no big deal but a real satisfying job to get out of the way.
Rant over.
Attachments


Finallygotit
ALLIANCE MEMBER
Don't you just love going to a big box store to pick up a simple item only to have it turn into a hilarious cluster*** circus? I know I do. You have to laugh otherwise you'll cry. 
Great job again, Brian!
Great job again, Brian!
Bob Heine
ALLIANCE MEMBER
Brian, my wife doesn't understand why a simple trip to L/HD/HF takes so long. Lately I have been searching for items on the Home Depot web site where it tells me which aisle and bay it is located. It turns out I am the new trainee. The place is really coming along.
RickP
Well-known member
Nice looking cabinets! Sorry about the problems with the manufacturer, but at least they're taking responsibility for fixing them.
I don't think I've ever seen a kitchen island on wheels before. That will be some serious mass when you get them all loaded up with stuff.
You must be down to the last few big items on your list before the summer. The smaller items can get finished over time, but I'll bet you and your family are really looking forward to using it soon.
Nice work!
sponaugle
Well-known member
I just stumbled upon this thread, and what a great read! This is such a fascinating project. There are so many interesting and different problem sets when rebuilding a house as compared to new construction.
Jeff
Jeff
paredown
Well-known member
Excellent progress Brian--lots of careful choices to keep the character, but build it better.
I hope you get to kick back a little this summer and enjoy the place!
I'm still plugging away on mine--one of these days I need to start a thread of my own...
I hope you get to kick back a little this summer and enjoy the place!
I'm still plugging away on mine--one of these days I need to start a thread of my own...