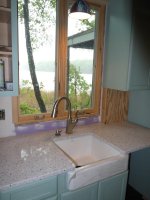
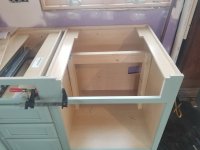
Toolfool politely PM’d me to say it was not a good idea to have sink front rest on that little bit of cabinet. I really appreciate that and if anyone spots anything I do that looks wrong – PLEASE CHIME IN. In case you haven’t noticed I have no idea what I’m doing ½ of the time.
Good catch ToolFool. I agree, your cabinet probably only has 2-4 pocket hole screws and a little glue on that horizontal piece that is supporting the sink. Add a center support at a minimum to avoid repair or replacement work in the future.
Think about the weight of the sink combined with the weight of water (8.35 lbs. per gallon), and possibly leaning into it to scrub a pot/pan or simply using it to steady yourself. That's a lot of weight on that thin horizontal support which was originally only holding false drawer front panels, if I'm not mistaken.
If I were you, I'd measure the vertical distance and buy 1x2 or possibly even a piece of hard wood 1x3 to put under the center of the sink. It won't restrict the opening much and it's not like you're constantly under there, right?
This next step depends on the hinges used but if they're flat face hinges I'd also put 1x1 or 1x2 pieces on each side cutting them for clearance over the hinges and using 3-4 screws into the cabinet face frame. That way it's easily removeable (no glue, simply working as jack studs to support the weight like under a window or door opening). Of course, this doesn't work if you have Blum type hinges instead of the flat type like you find on a door.
Also, I've not chimed in before but I am REALLY enjoying watching your progress. Nice work!


")