
This may be old news to some of the crowd here but after a question in a recent thread I posted I thought I’d share some modifications I made to this brake.

 www.harborfreight.com
This is the brake mounted to my bench. It‘s a five minute job to grab it from the shed and bolt it up solid. I don’t have the room to leave it set up permanently.
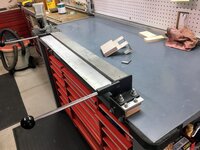
In the above picture, you can see on the bench, a security light bracket I easily made with this brake.
The brake does not come with C clamps to hold down the clamp bar. Get yourself a pair of the biggest clamps you can find.

Below is shown the one modification that IMO is a must!
So much so, that the designers should have included something like this.
I drilled the clamp bar at each end for an 1/8” roll pin. I then drilled a slightly larger hole in the base so the pin is a slip fit.
There is only one pin in the below pic. This pin locates the clamp bar a fat 1/16” from the edge of the base. I’ve since added another pair of holes that located the bar an 1/8” from the edge. These distances are what sets your min. radius of a 90* bend.
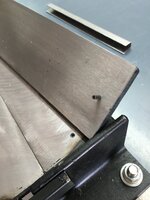
These roll pins are a huge help in lining up the edge of the clamp bar with the bend line marked on your metal.
They also make the clamp bar much less likely to slip when bending a bigger piece of metal that is at or near the limit of the brake.
The other modification is a lot more difficult unless you have access to a milling machine. I traded some custom wood planning for time on a local guy‘s Bridgeport. I milled an angle on apiece of bar stock and then cut “fingers“ in one, two, three, and four inch lengths. These fingers allow you to bend the ends of a pan or box that would be almost impossible with the full length clamp bar.

This brake has served me well on a number of projects. Given the cost I think it’s well worth a look especially if you use the roll pin idea.
I posted one project done on my brake in this thread:
 www.garagejournal.com
30 in. Mountable Bending Brake
Amazing deals on this 30In Bending Brake at Harbor Freight. Quality tools & low prices.
www.harborfreight.com
This is the brake mounted to my bench. It‘s a five minute job to grab it from the shed and bolt it up solid. I don’t have the room to leave it set up permanently.
In the above picture, you can see on the bench, a security light bracket I easily made with this brake.
The brake does not come with C clamps to hold down the clamp bar. Get yourself a pair of the biggest clamps you can find.
Below is shown the one modification that IMO is a must!
So much so, that the designers should have included something like this.
I drilled the clamp bar at each end for an 1/8” roll pin. I then drilled a slightly larger hole in the base so the pin is a slip fit.
There is only one pin in the below pic. This pin locates the clamp bar a fat 1/16” from the edge of the base. I’ve since added another pair of holes that located the bar an 1/8” from the edge. These distances are what sets your min. radius of a 90* bend.
These roll pins are a huge help in lining up the edge of the clamp bar with the bend line marked on your metal.
They also make the clamp bar much less likely to slip when bending a bigger piece of metal that is at or near the limit of the brake.
The other modification is a lot more difficult unless you have access to a milling machine. I traded some custom wood planning for time on a local guy‘s Bridgeport. I milled an angle on apiece of bar stock and then cut “fingers“ in one, two, three, and four inch lengths. These fingers allow you to bend the ends of a pan or box that would be almost impossible with the full length clamp bar.
This brake has served me well on a number of projects. Given the cost I think it’s well worth a look especially if you use the roll pin idea.
I posted one project done on my brake in this thread:
Different Way to Make an Aluminum Tray
Before Xmas my wife bought herself a CampChef flat top grill. (she loves it) She asked me if I could come up with a tray that would hang off one of the side shelves. She was worried about heat if it was close to the grill This is what I came up with. Because I no longer have a way to weld...
www.garagejournal.com

