To avoid these ads, REGISTER NOW!

Mohawk System 1 Restore

Goldhawg

Well-known member
Joined
Nov 27, 2010
Messages
363
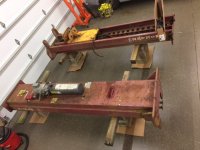
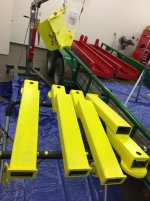
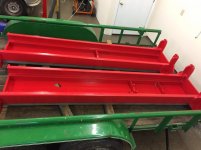
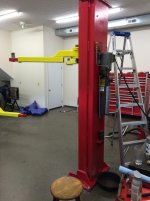
I wanted a Mohawk lift and found this system one in Elkhart IN C/L for $800. Its been outside under a tarp for 10 years. But I think I can strip/paint and do a lot of repairs for the difference in price between the almost $8k installed new price. I just ordered some POR-15 paint in yellow and red. Unfortunately the dark red they used to have is NLA, so safety red and safety yellow it will be. It was working before disassembly (and allegedly only 6 years old--owner lost his shop bldg and new one didn't have room for the two lifts he had; this one was stored at his house for him to get around to--one of these days!).

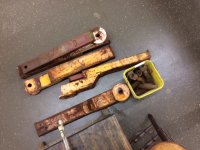
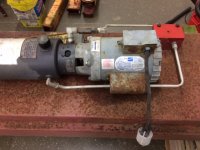
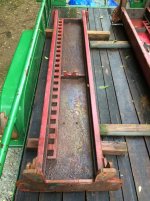
Any thoughts as to items that I should replace just 'cuz of the age and being outside? I'm thinking of taking the hydraulic ram to a shop and have them replace all the seals and check out. Should I replace the bearings? Other thoughts on how to go about this? I have never had one of these things before.

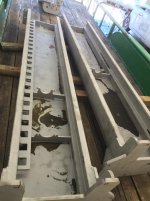
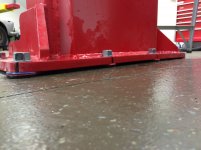
Did I tell you that this is some seriously heavy steel?
 

Attachments

  • IMG_1632.JPG
    IMG_1632.JPG
    124.1 KB · Views: 273
  • IMG_1633.JPG
    IMG_1633.JPG
    140.2 KB · Views: 222
  • IMG_1634.JPG
    IMG_1634.JPG
    118.3 KB · Views: 225
  • IMG_1635.JPG
    IMG_1635.JPG
    118 KB · Views: 209
  • IMG_1636.JPG
    IMG_1636.JPG
    118.9 KB · Views: 222
To avoid these ads, REGISTER NOW!
OP
G

Goldhawg

Well-known member
Joined
Nov 27, 2010
Messages
363
Anybody know good sources for replacement parts or do you just have to go back to Mohawk?
 
OP
G

Goldhawg

Well-known member
Joined
Nov 27, 2010
Messages
363
Well, I've got the pieces back from the blaster and am painting with POR15. Unfortunately the red and yellow (especially the yellow) are much brighter than the stock color. But I wanted a tough finish. I'll get the hydraulic cylinders back from the shop today (they disassembled and replaced seals), turns out they were probably fine but after 10 years outside I wanted to be sure nothing was messed up.
 

Attachments

  • IMG_1732.jpg
    IMG_1732.jpg
    134 KB · Views: 178
  • IMG_1731.jpg
    IMG_1731.jpg
    145.4 KB · Views: 176
  • IMG_1730.jpg
    IMG_1730.jpg
    113.8 KB · Views: 176
  • IMG_1726.jpg
    IMG_1726.jpg
    128.9 KB · Views: 167
  • IMG_1723.jpg
    IMG_1723.jpg
    148.1 KB · Views: 162
OP
G

Goldhawg

Well-known member
Joined
Nov 27, 2010
Messages
363
Well, that rubicon is crossed; I already had the seals replaced. He did not go into the main cylinder's internals cuz he said that can't be done w/o potentially messing up the balancing of the pressure between the two. Anyhow I'm painting the cylinders today.
 

Todd.Brock

Well-known member
Joined
Jul 15, 2008
Messages
4,250
Location
Cincinnati
I bought a Nussbaum 2 post that had peeling powder coat sitting out side for a spell. I found a rustoleum color that was close, but it wasn't perfect. Your going full tilt with blasting and painting! Care to share a rough estimate of where you will be all in when you are finished? If I guess. 1500 to2k - you will still be money ahead Vs new!! Looks good!
 
OP
G

Goldhawg

Well-known member
Joined
Nov 27, 2010
Messages
363

Attachments

  • IMG_1734.jpg
    IMG_1734.jpg
    94.8 KB · Views: 219
  • IMG_1735.jpg
    IMG_1735.jpg
    94.5 KB · Views: 181

Jarhead0408

Well-known member
Joined
Apr 1, 2012
Messages
5,734
Location
Who knows?
Looking good man.

I should be picking up my first two post lift on Wednesday. It's a 9k Western. Not nearly as nice or well built as yours, but it should get the job done.

Looking forward to seeing how yours comes along.
 
OP
G

Goldhawg

Well-known member
Joined
Nov 27, 2010
Messages
363
Got the anchors in and system almost installed today; still need to shorten the overhead lines to fit my 11'2" ceiling.

However I'm not sure I'm in the clear. The concrete floor was not that level, and one of the posts I had to shim pretty good (1/2" in one corner). Unfortunately when I finished shimming and installing the 2nd post, my distances are no longer even. What started out as 10' on both sides before I drilled the second post anchor bolt holes is now 1/4" short on one side at the bottom, and it grows as you go up (about 1/2" shy at the mid point, with the other post being 1/4" shy). I think tomorrow I can reduce the shim of the first post to get the upper measurement back down to where the lower one is, but I'll still have the problem that the one side is 1/4" closer than the other. I've loosened all the anchor bolts and whacked the base with a sledge (2X4 in between), but that hasn't done anything--I think the base is against an anchor bolt).

Thoughts as to how much 1/4" difference between the two sides of the post matters?
 
OP
G

Goldhawg

Well-known member
Joined
Nov 27, 2010
Messages
363
Well I took some shims out (1/16) of the back of the non-power side post, and now I have good consistency as the lift goes up. You can still see the significant shims I had to put in on the power side, but I guess they make them for a reason.

Now I'm having some trouble getting the hydraulics right. I initially put in just a bit over a gallon of ATF in the lift and it spilled out the breather (this was late last nite). So I gave it a try knowing I needed more and the pistons would have to fill up and I'd still need to bleed it. The power side lifted (see pic) erratically but steadily. The non-power side did nothing. Further, the power side would not come down when I pulled the pressure release rod (mechanical stop was out). I got back to it tonight and the system took over a gallon and a half, now I have 3 gallons total and it was full. I tried the system to see if it would work with complete fluid. The power side finished its way up and then stopped; still would not release. The non-power post would not work, so I tried the diverter knob, and the piston then started slowly rising. But when it got to the point of lifting the carriage assembly it stopped.

So current situation is as you see it. I think on the power side the piston just isn't releasing the fluid internally, because the mechanical stop is pulled and as I was putting it together I could manually get it to slide up and down the C-channel. Should be easier w/gravity I would think.

Thoughts? How would you go about bleeding the system at this point?
 

Attachments

  • IMG_1740.jpg
    IMG_1740.jpg
    106.2 KB · Views: 171
  • IMG_1739.jpg
    IMG_1739.jpg
    107.3 KB · Views: 150
  • IMG_1738.jpg
    IMG_1738.jpg
    115.3 KB · Views: 137
OP
G

Goldhawg

Well-known member
Joined
Nov 27, 2010
Messages
363
I called the Mohawk tech line today; problem was easily solved. It really matters which line is which going across to the other side! Yes, mine were wrong. I disconnected and reconnected properly, and all good. Only remaining issue is that when I start with the ATF level at the half-inch below the fill line, it dumps out a bunch thru the breather port when I lower the lift right when it gets down at the very bottom. I'll call the tech line tomorrow and ask what I need to do to stop this (think I'm not getting all the air out).

On the bright side I attached all my stickers, and I just touched up the yellow now that I'm finished. I'm going to order some new door guards for around the carriage assembly since mine look like junk (I did find out the lift was built in 1992, one of the first new System 1A's), which is not surprising given its age. At this point (before I order the door guards) I have the following in ~ expenses (which doesn't include many days of my time):
Lift $800
Sandblasting $450
POR-15 $150
New seals for hydraulic pistons: $160
Sticker kit $100 (shipped)
Misc Home Depot supplies (paint brushes, rollers, 220V SOOW wire) $150
Anchors/shims: $50
So total ~ $1900, but I still need door guards. Should be no more than $2k when done. But a LOT of work. I'm happy with it.
 

Attachments

  • IMG_1742.jpg
    IMG_1742.jpg
    106.7 KB · Views: 146
  • IMG_1741.jpg
    IMG_1741.jpg
    107.5 KB · Views: 153
To avoid these ads, REGISTER NOW!

Bee Jay

New member
Joined
Dec 31, 2013
Messages
1
Good job! I'd like to see pictures of the door guards installed. I may need that.
Bee Jay
 
OP
G

Goldhawg

Well-known member
Joined
Nov 27, 2010
Messages
363
Well, I've finished the cleanup and actually used the lift today for the first time with something on it, rotating the tires on my 71 Cutlass. Luv the beefy lift! Feel very secure with its heft.
 

Attachments

  • IMG_1743.jpg
    IMG_1743.jpg
    119 KB · Views: 150
  • IMG_1745.jpg
    IMG_1745.jpg
    110.8 KB · Views: 194

Olafur

Well-known member
Joined
Jun 2, 2011
Messages
2,577
Location
Iceland
Cool project. Lift looks great - and feeling safe and sound working around solid lift is priceless.

:thumbup:
 

S4cruiser

Well-known member
Joined
Sep 11, 2013
Messages
587
Location
NC
Lift looks fantastic - stickers really did the trick to make it all look factory!
 
OP
G

Goldhawg

Well-known member
Joined
Nov 27, 2010
Messages
363
I agree...the stickers really stand out. Hated spending $100 (but $20 was shipping) but they are very high quality. I also don't find myself regretting the brighter red and yellow POR-15 paint.
 

gte610v

Member
Joined
Jul 10, 2012
Messages
20
Great work! I just came across a System II and in the process of setting it up as well. Did you just called Mohawk up for a decal kit?
 

rumblin46

New member
Joined
Mar 24, 2013
Messages
1
Looks good! Question, how'd you stand the posts upright? I just picked up the same Mohawk lift as you and am a bit scetchy on how best to upright them.
 

tonycastec

Well-known member
Joined
Jan 9, 2012
Messages
281
Location
Los Angeles
I have the same lift - superb.
Before you get involved in erecting the posts, I suggest you layout the arms on the floor to get the positioning correct. The rookie mistake is to put the posts too close together to lift short wheelbase cars. So figure out the FULL range of vehicles and their lifting points. For example, my lift easily fits a Jaguar XKE but barely a Porsche Boxster(wider and shorter w/b.
It is a real pain to have to re-position 2 perfectly installed posts !
A hack Alternative is to cut/shorten the the arms. This requires welding the reinforcement on the masters. Not difficult but not reversible.
 
Last edited:

TechSTL

New member
Joined
Oct 14, 2013
Messages
3
It looks like the OP has been gone for more than a year. I tried PMing him yesterday but have not yet heard back. I thought I'd post here just in case he gets post notifications.
 
OP
G

Goldhawg

Well-known member
Joined
Nov 27, 2010
Messages
363
Sorry
Looks good! Question, how'd you stand the posts upright? I just picked up the same Mohawk lift as you and am a bit scetchy on how best to upright them.
Sorry guys I have been gone for a while. I just used an engine crane (HF 2000 lb version). And was VERY careful and had a 2nd person helping me get them upright.
 
To avoid these ads, REGISTER NOW!
Top Bottom