To avoid these ads, REGISTER NOW!

Above 1200 Sq/FT Monitor Style Barn to Auto/Fab Shop

Wokspaces above 1200 squarefeet.

sandrider123

Active member
Joined
Jan 11, 2011
Messages
27
Been following GJ for a lonnnnggggg time and now its finally time to post my Garage/Shop build.

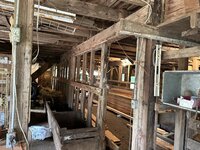
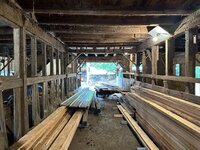
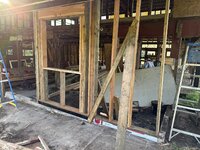
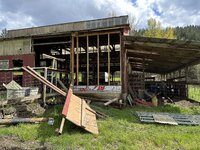
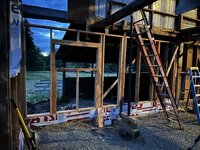
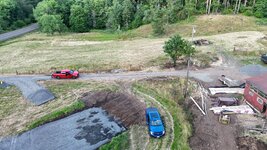
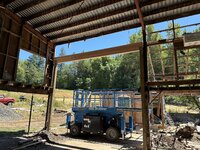
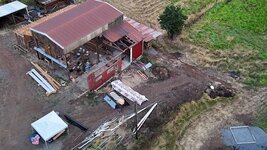
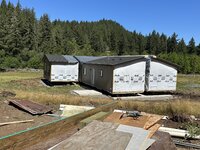
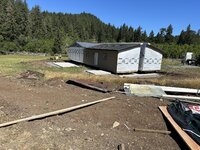
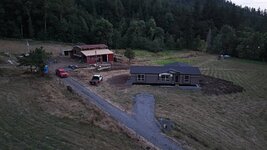
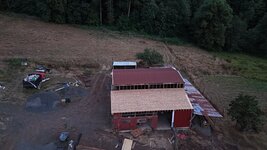
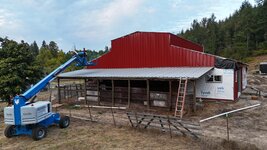
A couple years ago we purchased about 6.5 acres from my Wife's Grandpa, it was mostly cattle pasture and an old barn he used for raising cattle. We decided we are going to convert the old barn to a shop for my workspace over leveling it and building new. The barn is 40x55 with the center section having 20' eaves. The building is kind of a hybrid pole building for the center section with some stick style framing. It has a foundation wall poured around most of the perimeter.

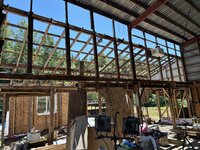
The center section of the barn has 6 primary (still very sturdy) 4x6 creosote poles supporting 3 steel trusses about 20' apart. The narrower wing is about 13' wide and has some Built on site compromised 2x4 mono slope trusses with the other wing being 19' wide and having 2x6 rafters that had been scabbed together after an expansion.

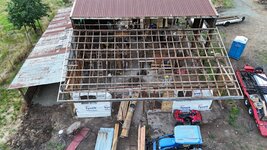
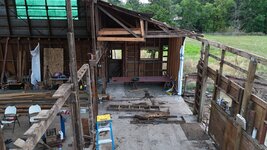
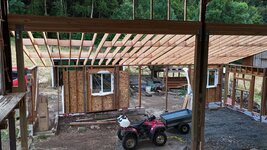
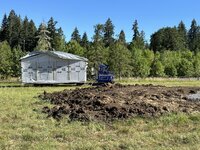
So far we have completely removed the second floor to get all of the additional weight out and get rid alot of the uprights that were supporting the second floor. Our plan is to sister some additional columns in between the 6 primary post and put some glulam beams up in between them to support replacement rafters for the two wings as well as new framing for the step up for the center sections roof. The hope is by doing this we will only end up with 2 posts in the middle to work around, they will be more like 6 posts but 2 areas with bunches of 3. basically glulamsupport/main pole for steel truss/glulam support

Would love to hear feedback or recomendations as this is by far the biggest construction project I have ever taken on
 

Attachments

  • IMG_9293.jpg
    IMG_9293.jpg
    1.4 MB · Views: 348
  • IMG_9294.jpg
    IMG_9294.jpg
    960.9 KB · Views: 294
  • IMG_9295.jpg
    IMG_9295.jpg
    1.2 MB · Views: 257
  • IMG_9296.jpg
    IMG_9296.jpg
    1.1 MB · Views: 252
  • IMG_9309.jpg
    IMG_9309.jpg
    1.5 MB · Views: 248
  • IMG_0068.jpg
    IMG_0068.jpg
    998.2 KB · Views: 262
To avoid these ads, REGISTER NOW!
OP
S

sandrider123

Active member
Joined
Jan 11, 2011
Messages
27
Guess Its time for an update! Since we are installing a manufactured home this summer as well, we decided to run power underground from the pole/transformer on site to the barn where the meter base will be and then from there it will go to the house underground. That meant that one small wall needed to be finished quickly to mount the electrical equipment so we knocked the old rotten stuff out and eliminated the sliding bard door. Framed it in, and then sheathed it as well before putting metal siding on. That will give them somewhere to put the electrical equipment at least. Also got the conduit in the ground. On the other side of the building I started framing up small section of wall using that to support areas where posts had failed or had previous rough repairs that needed to be swapped out. Figured I was going to wall it in anyways rather build temp walls I can just build small wall sections then use that to act as a temp support in the absence of the post while the new one is being put in once the new post is in I am then tying all of it together with large lag screws.

I have also started framing in some of the other openings that were once animal pens as they will not be inside the building. When we purchased the barn there was a lot of good lumber in the loft so a good chunk of that is being used for the building that's occurring. With the plans for the concrete to pour over the top of what exists there was going to be areas where the concrete slab would sit higher then the sill plate/bottom of the wall so I have been building these areas up with 6x6 PT posts that are wrapped in lumber wrap. My wife's grandpa used this lumber wrap on a number of gate posts, fence anchors with this lumber wrap and thus far every post I have pulled out and unwrapped look to be in very good condition/preserved so we are going to do that again.
 

Attachments

  • IMG_1536.jpg
    IMG_1536.jpg
    1.5 MB · Views: 176
  • IMG_1594.jpg
    IMG_1594.jpg
    1.2 MB · Views: 163
  • IMG_1593.jpg
    IMG_1593.jpg
    1.3 MB · Views: 152
  • IMG_1544.jpg
    IMG_1544.jpg
    2.1 MB · Views: 149
  • IMG_1240.jpg
    IMG_1240.jpg
    1.4 MB · Views: 142
  • IMG_1239.jpg
    IMG_1239.jpg
    1.1 MB · Views: 142
  • IMG_1134.jpg
    IMG_1134.jpg
    1.4 MB · Views: 135
  • IMG_1133.jpg
    IMG_1133.jpg
    1.3 MB · Views: 165
OP
S

sandrider123

Active member
Joined
Jan 11, 2011
Messages
27
Update time: A family member helped peel the roof on one side, and another rotten corner has been rebuilt. I also punched some holes in the concrete where the additional post/glulam support are going. I have some heavy equipment showing up today or tomorrow to help with getting the posts and glulam's in position. The power company is disconnecting power tomorrow so we can start tackling the other side and not have to worry about touching the line that's overhead while we work. Was able to get some cool overhead shots yesterday as things are starting to come together, but man what a mess
 

Attachments

  • IMG_1906.jpg
    IMG_1906.jpg
    1,023.6 KB · Views: 100
  • IMG_1894.jpg
    IMG_1894.jpg
    1.5 MB · Views: 96
  • IMG_1873.jpg
    IMG_1873.jpg
    1.3 MB · Views: 95
  • dji_fly_20240701_201800_0019_1719935839417_photo.JPG
    dji_fly_20240701_201800_0019_1719935839417_photo.JPG
    1.1 MB · Views: 96
  • dji_fly_20240701_201656_0018_1719935839981_photo.JPG
    dji_fly_20240701_201656_0018_1719935839981_photo.JPG
    1.2 MB · Views: 111
OP
S

sandrider123

Active member
Joined
Jan 11, 2011
Messages
27
Well time for another update. Two of the big glulam's and most of the rafters are up on one side. Still have some blocking and a few other things to do before we put some sheathing down. I have also started the demo on the small sides roof to give it the same treatment, No overhead shots yet but you can definitely see how much space it freed up in the ground shots.
 

Attachments

  • IMG_2033.jpg
    IMG_2033.jpg
    1.5 MB · Views: 82
  • IMG_2034.jpg
    IMG_2034.jpg
    1.3 MB · Views: 71
  • IMG_2038.jpg
    IMG_2038.jpg
    1.3 MB · Views: 73
  • IMG_2041.jpg
    IMG_2041.jpg
    1.5 MB · Views: 72
  • IMG_2100.jpg
    IMG_2100.jpg
    1.4 MB · Views: 78

isb cornbinder

Well-known member
Joined
Nov 3, 2010
Messages
7,073
Location
Pacific South West, BC, Canada
My wife and I built our garage. Not on the scale of your project. Good job.
I wish I had more room to have a barn like that. We are drowning in city regs.
I had to go through the Board of Variance to get my build permit. I was told there will never be another permit to build 865sf. the maximum now is 400sf
 
Last edited:
To avoid these ads, REGISTER NOW!

john.k

Well-known member
Joined
Jun 4, 2024
Messages
1,093
i had no problem with permits for 1600sq ft,but height couldnt be above houses around ..........so I dont have anywhere near the headroom inside of that barn..............Back in 2016 ,I was looking to move out of town,and one place had two giant barns ,but both were full of abandoned hay .......and Id estimate the barns were 40x100ft x 20 ft high........and thats a lot of mouldy hay.
 
OP
S

sandrider123

Active member
Joined
Jan 11, 2011
Messages
27
well we are about done sheeting the roof, I am hoping to order all the metal for the roof tomorrow so that its ready to go when we come back from an out of state trip. I will also be replacing the tin on the center section which I am not really looking forward to as its like really high up there, just don't look down right? it helps that the weather is cooling down but not looking forward to fighting the rain
 

Attachments

  • DJI_20240820203000_0042_D.JPG
    DJI_20240820203000_0042_D.JPG
    635.9 KB · Views: 80
  • DJI_20240820202855_0040_D.JPG
    DJI_20240820202855_0040_D.JPG
    670.1 KB · Views: 58
  • DJI_20240820202819_0039_D.JPG
    DJI_20240820202819_0039_D.JPG
    661.5 KB · Views: 61

loganb

ALLIANCE MEMBER
Joined
Dec 29, 2011
Messages
5,531
Location
Omaha, NE
Beautiful site and love the build/rebuild. Bit different style, but @tj675 has also repurposed an old livestock barn for new uses. He's got details in his build thread if you haven't seen it.
 
OP
S

sandrider123

Active member
Joined
Jan 11, 2011
Messages
27
Well Metal was ordered and about 5 hours later is ready for pickup, so Monday after work going to get that. Going with a Light gray and brick red. Want to keep the "barn" look but going with gray instead of white to kind of modernize the look a little without going to far away from the traditional look.

Thank you @loganb, it really is a nice location very park like but rural at the same time, we have a decent size creek that serves as a natural boundry between us and the neighbors who are actually family members (wifes uncle and aunt). I will have to take a look at that other rebuild. I did see a few on here before we really started ours looking for ideas. the rebuilds are cool becasue they are all a little different.
 
OP
S

sandrider123

Active member
Joined
Jan 11, 2011
Messages
27
Well I guess its time for an update, quite a bit has changed. The front of the center section has been removed, the center section is almost done being re-roofed which we did over a weekend and actually had to replace some of the 2x10 purlins, unfortunately more then I was hoping to do. The big step was the concrete floor was poured! With the concrete in I ahve started framing up some of the replacement walls, while the building is more pole style building, I am using stick framing between the poles for ease of insulating and finishing the inside, remember most the lumber I am using I have gotten for free from timber logged off my late grandparent's property. Anyways here are some photos enjoy!

IMG_3336.jpgIMG_2448.jpgIMG_3337.jpgIMG_3401.jpgIMG_3399.jpgDJI_20240909192852_0074_D.JPGIMG_3413.jpgIMG_3412.jpg
 
OP
S

sandrider123

Active member
Joined
Jan 11, 2011
Messages
27
Guess its been a bit so definitely time for an update! SO lets see where to start:

1. New Roof Metal is on
2. Front wall and garage door opening has been framed and sided
3. Back wall was leaned in last winter by a strong wind and the flimsy/rotten framing succumbed pretty easily
4. back wall is taken out and reframed and resided
5. Electrical is pretty close to being done, I placed the plasma table, welder and air compressor in the corner oipposite of the panel so rather than doing multiple long runs I placed a 125 amp subpanel in that corner. I managed to get the SER cable for that run on clearance for 1.30/1'. I think I figured between that and some other sale prices I was able to do that whole subpanel setup for less than what 1 50 amp circuit would have cost me
6. Time came to move most of my **** so unfortunately, I have a lot of stuff in the shop now while I try to do the finishing touches
 

Attachments

  • dji_fly_20250504_093532_0132_1746726716253_photo.JPG
    dji_fly_20250504_093532_0132_1746726716253_photo.JPG
    907.9 KB · Views: 5
  • dji_fly_20250830_193832_0181_1756841047637_photo.JPG
    dji_fly_20250830_193832_0181_1756841047637_photo.JPG
    756.9 KB · Views: 4
  • dji_fly_20250830_165222_0153_1756841056439_photo.JPG
    dji_fly_20250830_165222_0153_1756841056439_photo.JPG
    1 MB · Views: 8
  • IMG_6165.jpg
    IMG_6165.jpg
    1.6 MB · Views: 6
  • IMG_4859.jpg
    IMG_4859.jpg
    1.6 MB · Views: 9
  • dji_fly_20250830_130252_0128_1756841062503_photo.JPG
    dji_fly_20250830_130252_0128_1756841062503_photo.JPG
    868.2 KB · Views: 5
  • dji_fly_20250830_165906_0171_1756841050216_photo.JPG
    dji_fly_20250830_165906_0171_1756841050216_photo.JPG
    741.6 KB · Views: 5
  • dji_fly_20250504_093956_0139_1746726621645_photo.JPG
    dji_fly_20250504_093956_0139_1746726621645_photo.JPG
    942 KB · Views: 5
  • IMG_4195.jpg
    IMG_4195.jpg
    1.1 MB · Views: 6
  • IMG_6165.jpg
    IMG_6165.jpg
    1.6 MB · Views: 4

zanyad

ALLIANCE MEMBER
Joined
Apr 26, 2018
Messages
2,775
Location
NE Ohio
Super cool! Did you always have the lean-to on the back of the barn? I don't recall seeing that until this latest round of photos.
 
To avoid these ads, REGISTER NOW!
Top Bottom