To avoid these ads, REGISTER NOW!

Mono Slab EZ Form alternative

WI/MI Border

Well-known member
Joined
Jan 27, 2025
Messages
196
First I want to mention that I want perimeter insulation on my monolithic slab under my 24'x 28' garage. The following is an attempt to create that insulated perimeter with very little wasted material. I don't mind the work to create these forms as I have quite a bit of winter left to build the forms as described below.

I've been looking at the "Mono Slab EZ Form" in their "Mini" foam form. Their EZ form is EPS foam, 12"x12" x 8' long, runs about $130 and is only available in quantities of 12 or 24 units. I need 14. The closest source for these is Toledo; about 20 hours round trip. Not gonna happen. Local vendors (90 miles away) have the 16" x 16" x 8' product in stock but for more money, 12 or 24 unit packages and the difficulty of dragging these home in two trips. A vendor suggested I buy the 16" and bury the bottom with 4" to get my 12" footing. That could work, but not for my purposes and budget.

So looking at the EZ Form it doesn't appear to be very technically difficult to build myself. My initial estimate is I can build one of these with 2" and 1 1/2" XPS rigid foam in 4x8 panels for under $40 each. Check my drawing and feel free to shoot holes in my plan. But please watch a video or two of their EZ Form before shooting the whole thing down. And no, I am not reinventing the wheel. I am attempting to build a knockoff of a proven product.

I would rip a 10" x 8' piece of 2" XPS for the vertical, slab side of the form. Another 2" x 18" x 8' piece would form the bottom which will provide additional perimeter insulation to slow frost from reaching the slab (I might go 24" if the cost isn't too high). Those will be laminated into an L shape. Additionally, inside of the L shape I would rip a 1 1/2" x 4.75" x 8' piece to support a 2x8 treated screed board. Another 10" will be laminated beside that one and then with whatever is left of the 2" or 1 1/2" would be used to further fill the L gap to form an angle toward the grade. I would backfill before the pour giving the forms more bracing; the forms will not be removed after the pour. Only the 2x8s will be pulled.

I'd reuse the 2x8 treated timber after the pour as the bottom base plate on top of two high concrete block. The void created pulling those 2x8s would then be filled with 1 1/2" foam (7 1/4" x 8'). The foam form would be staked into the ground with rebar and 2x form braces would be used to eliminate the chance of a blow out during the pour. Again, I would backfill the form before the pour.

I've worked with XPS quite a bit and feel confident it would hold the pour. The commercial ones are EPS, which I think has less strength than XPS.

PXL_20250206_200853720.jpg
 
To avoid these ads, REGISTER NOW!
OP
W

WI/MI Border

Well-known member
Joined
Jan 27, 2025
Messages
196
After doing more research I've decided to pursue the idea of using EPS instead of XPS. Cost is about half. And EPS, according to one contractor video I watched, describes the ability of EPS to absorb as well as shed water as an advantage over XPS. Not sure I understand that logic but I think they are referring to moisture that naturally moves from under ground into the atmosphere. With XPS it is blocked and help in place, building up over time. With EPS it will move, although slowly, through the EPS and into the atmosphere. Reducing the chance of moisture building up under/beside the slab. A vapor barrier would help there but the contractor doesn't use vapor barrier under the forms.

I was considering 2" XPS from Menards as it is now on sale through tomorrow. Instead, for less than half the cost, I can use 1 1/2" EPS in the form. I may use XPS "250" for the form at the garage door to stand up to traffic even though I will not be driving vehicles inside very often. The shop will see mostly boat and other trailers.
 

billconner

Well-known member
Joined
Jul 20, 2021
Messages
6,971
Location
Thousand Islands NYS
Do compare the r value of XPS to EPS, especially wet EPS. Otherwise, seems sound.

Maybe bevel the vertical piece and add after piece so that flashing is a little sloped for drainage? Wish there was a way to have foam flush with block.

And I was surprised by your price difference. At local HD EPS and XPS are nearly same price - around $45 per 4x8x1.5
 
OP
W

WI/MI Border

Well-known member
Joined
Jan 27, 2025
Messages
196
Do compare the r value of XPS to EPS, especially wet EPS. Otherwise, seems sound.

Maybe bevel the vertical piece and add after piece so that flashing is a little sloped for drainage? Wish there was a way to have foam flush with block.
Yes, plan on doing this.
And I was surprised by your price difference. At local HD EPS and XPS are nearly same price - around $45 per 4x8x1.5
Menards... Today
4x8 x 1.5 EPS, R6 - $17.99
4x8 x 1.5 XPS, R7.5 - $45.22
 

billconner

Well-known member
Joined
Jul 20, 2021
Messages
6,971
Location
Thousand Islands NYS
Yup. No Menards near us and I miss them from when we lived in Illinois. (I don't miss the property taxes!)

EPS absorbs more water faster than XPS, and looses more of its insulation value - like half + than XPS. I don't think what your planning is bad or wrong, just wanted to be sure you knew how water affects EPS R value. And XPS looses som R value over time. It's a balancing act. I'd probably go with the money like you, and just wonder could I add another layer of EPS. Are you planning drainage around footer? That might make a difference too.
 
OP
W

WI/MI Border

Well-known member
Joined
Jan 27, 2025
Messages
196
Yup. No Menards near us and I miss them from when we lived in Illinois. (I don't miss the property taxes!)

EPS absorbs more water faster than XPS, and looses more of its insulation value - like half + than XPS. I don't think what your planning is bad or wrong, just wanted to be sure you knew how water affects EPS R value. And XPS looses som R value over time. It's a balancing act. I'd probably go with the money like you, and just wonder could I add another layer of EPS. Are you planning drainage around footer? That might make a difference too.
Yup, the concrete contractor is also a landscaper and deals with drainage on all his projects. So I'm confident water shouldn't be a problem. Saying that, I have enough 6 mil plastic vapor barrier that I can provide some vapor barrier under as well as over the foam forms. I'll tuck the vapor barrier under the flashing on the wall and then over the foam. I'll have drain tile outside the perimeter as well. The cost difference is enough that I think I'll go with EPS. That saves about what the drain tile will cost me. That was going in regardless of foam choice.
 

dscheidt

Well-known member
Joined
Apr 26, 2017
Messages
2,909
Do compare the r value of XPS to EPS, especially wet EPS. Otherwise, seems sound.

the difference in R value is entirely from the blowing agent. Aged XPS has the same r value as EPS, and much lower global warming potential. Cheaper, too. EPS comes in a number of grades, all but the cheapest grades absorb essentially no water.
 
OP
W

WI/MI Border

Well-known member
Joined
Jan 27, 2025
Messages
196
the difference in R value is entirely from the blowing agent. Aged XPS has the same r value as EPS, and much lower global warming potential. Cheaper, too. EPS comes in a number of grades, all but the cheapest grades absorb essentially no water.
Good points! I looked at an EPS panel today and it is fairly dense. It was unlike the EPS they often use for packaging or other purposes that don't have to deal with exposure to the elements.

To the general public, EPS has earned a bad reputation. I think porosity of the cheap loose grades allows water to permeate deep into its interior. Then, exposed to multiple freeze thaw cycles, it starts to separate. Many people have very little exposure to higher grades of the foam.
 

NUTTSGT

Super Moderator
Staff member
Joined
Sep 14, 2009
Messages
51,093
Location
Northern Central Ohio
Sometimes you can find "seconds" of foam insulation I CL or FBMP.

Being a foundation insulation, I would go with it to save money.
 
OP
W

WI/MI Border

Well-known member
Joined
Jan 27, 2025
Messages
196
For anyone interested in the Mono Slab EZ Form in their Mini size (12x12x8') I was informed via email that the company no longer makes the mini. The 16x16x8' is the next size up. The Mini was something like $130 each plus shipping. The 16x16 is probably significantly more money, though they have them 90 miles away instead of in Toledo (20 hour round trip). $130; another reason I'll look at making my own form with EPS. I haven't calculated the cost with EPS yet but I can easily get materials for one to one and a half out of a single 4x8 panel for $18. Then there is the adhesive cost. Probably a couple tubes for each of 14 forms. Crazy; the adhesive might cost more than the foam!
 

billconner

Well-known member
Joined
Jul 20, 2021
Messages
6,971
Location
Thousand Islands NYS
I don't know what you're doing for excavation but could be simpler to just go deeper with 3" of foam than mess around with the multi part form. My understanding of frost protection is an inch straight down is same as inch horizontal. If that was a foot down and a foot out just go 2' down and be done with it. Fill and stake a 2x8 against it. Less cutting foam and no adhesive.
 
To avoid these ads, REGISTER NOW!
OP
W

WI/MI Border

Well-known member
Joined
Jan 27, 2025
Messages
196
I don't know what you're doing for excavation but could be simpler to just go deeper with 3" of foam than mess around with the multi part form. My understanding of frost protection is an inch straight down is same as inch horizontal. If that was a foot down and a foot out just go 2' down and be done with it. Fill and stake a 2x8 against it. Less cutting foam and no adhesive.
Not sure I follow your explanation.

The design I am attempting to recreate is not only insulating the perimeter of the slab but shedding water away from the edge of the monolithic slab. Frost often goes several feet deep in my area and this year may be an exception. Our snow drought and extreme low temps could have frost much deeper.

When I researched how to insulate the perimeter most of the construction sites suggested insulation against the entire edge of the slab and then another panel from two to four feet out from the edge sloping down to shed water. I'm not an expert but it makes sense to keep water/moisture, and ultimately frost,away from the perimeter of the slab. I'll likely do 18" to 24" away from the slab.
 

billconner

Well-known member
Joined
Jul 20, 2021
Messages
6,971
Location
Thousand Islands NYS
I'm just saying that just for frost protection, going down 32" is same as going down 16" and out 16". Personally, I don't think the horizontal "apron" makes an appreciable difference in terms of water management and freezing, but doesn't hurt.
 
OP
W

WI/MI Border

Well-known member
Joined
Jan 27, 2025
Messages
196
I'm just saying that just for frost protection, going down 32" is same as going down 16" and out 16". Personally, I don't think the horizontal "apron" makes an appreciable difference in terms of water management and freezing, but doesn't hurt.
Gotcha. Makes sense.
 
OP
W

WI/MI Border

Well-known member
Joined
Jan 27, 2025
Messages
196
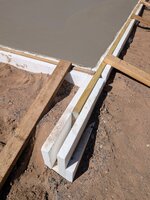
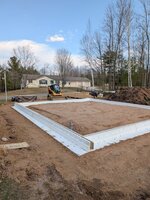
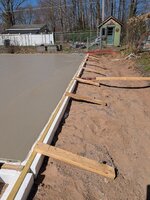
EPS forms were installed and the pour took place today. Contractor liked the process. He was very interested in this method. I don't know if he'll ever use this type of form again but I'm very happy with the results.

The 2x8 treated lumber stiffeners will be pulled out tomorrow and after two rows of block installed that lumber will be used as the sill plate.

1000000389.jpg


1000000390.jpg


Before the horizontal portion was back filled.

1000000391.jpg
 
OP
W

WI/MI Border

Well-known member
Joined
Jan 27, 2025
Messages
196
A quick update for anyone interested in making these foam perimeter forms...

Material cost for 24'x28' monolithic slab foam forms. 12" high on concrete side. 16" on the horizontal base.

$272 17 sheets EPS
$29.75 7 tubes PL300 adhesive
$302 total

Once I leveled the forms on the sand base I drilled a 3/4" hole in the horizontal base and drove a 1x1 stake through and into the ground. Around three stakes per 8' form section. 2x8 screed boards were installed in the foam forms all around to help stiffen the form. Corners were screwed together and "toenailed" screws on **** ends mid form. The concrete contractor then put in 2x4 bracing about every 5 or 6 feet along the outside, fastening the 2x4 to the screed boards. I found out just before leveling that the screed boards did not need to be level, though it was real close. Contractor reads level off the inside foam piece and does not use screed boards to level the concrete. Who knew? Not me! That made for an easier form build than I expected.

The next day as he was removing the bracing he asked me if I'd be interested in making these forms for him. I laughed and said I can show his crew how I did it but I'm not really looking for a job. That and I really don't care to deal with the foam beads and dust that resulted from ripping the sheets to width. Despite using a shop vac on my DeWalt contractor saw which has a pretty good dust collecting system my driveway looked like we had snow flurries.

A suggestion if you are interested in ripping the needed sheets to width in an efficient manner; use a cut calculator/generator such as this...

To get to the Cut Calculator go to https://www.opticutter.com/
At the top of the page select "Free Calculators", then "Sheet Cut Calculator".
On the "Units" select "Decimal Inches".
Don't forget to set the kerf value.


I was lucky I had a contractor who was easy to work with. He was initially eager to see how the foam forms worked. Then very pleased to know he wouldn't have to dig out soil backing up the forms and adding foam after the pour. The other two contractors I rec'd estimates from were not interested in learning a new method nor were they interested in me providing and leveling the forms.
 

Kaizen

Well-known member
Joined
Jan 9, 2015
Messages
6,948
Location
New England
I used insulation on an indoor house slab that i put insulation under and at the perimeter so heat transfer was reduced. In your case I question the effort. If you did the whole slab i'd understand. But just the perimeter seems like a pain although your costs don't seem bad.
The central slab will absorb cold and keep it all winter. While the edge of the slab might not transfer as quick it still seems unnecessary.
The other two contactors you mentioned probably did not want to be on the hook for a blow out due to what you did. First time you did this.....imagine if it went horribly wrong.
 
OP
W

WI/MI Border

Well-known member
Joined
Jan 27, 2025
Messages
196
... In your case I question the effort. If you did the whole slab i'd understand. But just the perimeter seems like a pain although your costs don't seem bad.

1000000338.jpg

...
The other two contactors you mentioned probably did not want to be on the hook for a blow out due to what you did. First time you did this.....imagine if it went horribly wrong.
No doubt. I don't typically think in terms of things going horribly wrong. That's a good way to stifle ingenuity. I measure the risk after listening to the advice of professionals. I chose the professional that I thought I could work with and seemed to have patience with my lack of experience. I'd recommend him to any friend looking for a flat work professional.

I'm mostly a DIYer. If I have the necessary skills or can learn how to do a project on my own. Or obviously, when I can physically handle the task. But when I do use a contractor I prefer to use one that is flexible and open to new ideas. I can't always find that particular quality in a contractor but in this case I did. Nothing risked, nothing gained. After my experience with him I think this young man and his company will be very successful. Mostly due to treating his client with respect and an open mind. That's too rare these days! Especially with something as basic as a monolithic slab.
 

Muzik76

New member
Joined
Feb 11, 2026
Messages
2
EPS forms were installed and the pour took place today. Contractor liked the process. He was very interested in this method. I don't know if he'll ever use this type of form again but I'm very happy with the results.

The 2x8 treated lumber stiffeners will be pulled out tomorrow and after two rows of block installed that lumber will be used as the sill plate.

1000000389.jpg


1000000390.jpg


Before the horizontal portion was back filled.

1000000391.jpg
Hey there! Do you happen to have a larger version of this photo? It shows up pretty small unfortunately. Would love to take a look at this setup closer. Thanks!
 
OP
W

WI/MI Border

Well-known member
Joined
Jan 27, 2025
Messages
196
So I can describe it to you if you want. Send me a direct message and I can do that for you.
 
To avoid these ads, REGISTER NOW!
Top Bottom