To avoid these ads, REGISTER NOW!

Mopar / Wood Shop Cave

OP
M

moparfreak

Well-known member
Joined
Jan 24, 2005
Messages
853
Location
Milwaukee, WI
Getting ready for winter this week w/ the cold front coming in, got my vehicles switched over to winter tires. This was my first chance to use the Quikjack on something other than the Charger. Wow, this makes it easy, no more hauling the jack to all 4 corners!

It fit w/o too much trouble, although I think any much shorter wheelbase car might have trouble on this particular 5000 lb model.

y4mygXzXy9V7k-OEvNDFW80CLw9YEWgeFtSpf4lRegRllyNUtWhewZX2UghCTwj-r7bGy3VfZKdfDiq3aA1cnTiaEDPALFbAb71tKWdgJu3mIGPbnOmCTFWuRABTA_xyzG5dKq3tTQASRAYTphpvQPtSJOZ7YPIWk8HHXb-SWfSsQA_oGL2c3EVrzwHV7-9ZDLoayeZMuEoZ7CsNCUDcBiRxw


y4m2YRUa4du0LZo6TlrVZP0FLOhXZAWUQg3WE9s2Wi90tG13lzyIae2b5dWpNAFUF2A7uvVrQTM9GB5DWF4j1UX4mMCp4Nf8YZHg1Pj6ORubuUNXCdb56_tE2ugeI66RyVKnVzBxqQvA6gM3p2iZc8E20l_EHfTjuUWYVhbT9z58HFFiI0IW9Gqnn_IwI_6lZ3i2U7Y2NtW63YYbb_FTL6eNg


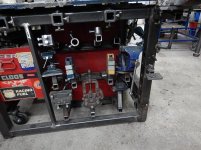
Then once I was done I put the QuickJack away in the storage caddy my SFIL built. Just awesome, the jacks, hydraulic hoses, handles & 12V jumppack below and the toolbox top fits the rubber blocks & pump assembly perfect. Now it's set aside for the next time I'll need it in the spring to switch back to summer tires.

y4muQu6HnaZUfsP7l8vQ_vcfcaPVwq59cFVMkhn_8KLubWDIkGDvR2HGlz8CmJJ046IGxz2XYefUMQYm1iXhXf7LHu4mlU0uF48JWZUzbT4Pm7Etk3nYrSMunWRZPvrRLJFQpphf-AGtvOLQzlsZpZINXqaDT5BeNtYPuZOyshMuzzLxlj2g8XV9EwaN8HbgKCuD89X9Hj5giIzzPPo9d39WA


y4mnFyi8wiPrW-SAWg0akyhgh634jaK6enunhKHJ4qSbtWlUtMBDe2akctKpEVECC0wodmQOnKdGsoK7y2HzWgnDQqPColNOgAB0U6QQ1HnAbX9Sy85hJegEMv1T7Bn8PLt-p_ZMLHJ10opw7fu9Avr01A9YhAB7wymUP4uNMoVP8E2vIP9vaUpkCPMPDvxIiSBbZ1ZG3qOvrtK52zcbsjZzg
 
To avoid these ads, REGISTER NOW!
OP
M

moparfreak

Well-known member
Joined
Jan 24, 2005
Messages
853
Location
Milwaukee, WI
So with the miter saw bench that I built, and with the large hood, it does collect the dust into one space, but since I don't have a large DC hooked up to it yet, it sort of sprays back in my face still quite a bit, so I borrowed some clear vinyl that my SFIL had from a different project, and decided to make those slatted hanging divider things you see sometimes between doorways....this does a much better job of containing the dust, while also easy to move the slats out of the way for when I need to reach in, or tilt the saw, or whatnot...

Very simple to cut w/ an exacto-knife & one of those self-healing mats
nZugzDDc4TAA3cA?width=495&height=660&cropmode=none.jpg

Fastened onto the top of the hood w/ short washer head screws, and made a bit of overlap with each one.
2b9_Isw1nPSx-tg?width=660&height=495&cropmode=none.jpg

I'm excited not only for this to not have dust spraying back in my face, but also for this upcoming week, as I'll have off from work the entire time between christmas and NY, and have a lot of shop time planned. Hopefully plan to get those drawers done and put the final touches on the miter saw, then turn my attention towards installing the compressed air piping system finally.
 
OP
M

moparfreak

Well-known member
Joined
Jan 24, 2005
Messages
853
Location
Milwaukee, WI
Hello folks. Hope you are all having a good holiday season. I get off between christmas and NY so it gives me a nice solid block of time to work on projects. This year I've finally been able to set aside some of that time for my own devices, and mostly been working in the shop, along with a few things around the house.

I'm setting off to get that miter bench finished off completely so that I can move onto other things. Next up was to fashion up some storage method for the various measuring tools I use at the miter saw. Pretty much anything I use for measuring angles. It's filling up fast, so I took a scrap of plywood and fastened it upright to the left side of the bench.

y4m00Mnzi3z3IwKElViiqAuVkH6VyoCHL2KYl8SbxYfUCn-ylXSQrZGwvoF_O3CG0bmxdf5GUvrMX4ySW4RqORNLjf823_0H_n4Es5IGJMNkRasp6MCzbmmyGQWiOfhj7YnRydR5i5UmnWzxXIuHCqr72Nznl8I45CgMZWGlpgloCeFzvuGL0N3jTkeqpbEEZbeb-4Ff7TmCRxcBQKurkpU2g


y4mZ5bLPqlnEXkBbN9kkKnyKliNusVzgetaFfhaAMrh1dN0lC-L6i8QodgSizQ7k4i9wH0Sz7th5p7V7SturSmUrgr1LdVKJ1_OCxRFV9O_THsTWqHkdMs0KuYrdIMggdR0A96xKlTI7CT95aHyGLOM-gb2brSHbZ0MRfQKjaITM1XOh55Z9qu8ua1Dwp2XpOWSBPQcJZElWNtboycIlnEkFQ


Next up it's time to complete the last main stage of this project which is the drawers. Total of 10 of them. Constructing them out of 1/2" MDF cause it's what I have. Not ideal material for drawer construction but after some trial and error on the first one, I got the process down. Pocket holes, small short screws w/ careful clamping.

I use the Grizzly track saw to break down large sheets into something I can manage on the table saw. Great tool, and great value compared to the $1000 track saw systems out there (Festool, dewalt, makita).

y4mBSle1OpnGi_pZ_XjZHC9jC0e5QR6_jnrHNslt4uU0zK6y9KJyTl-TjQNbP3X3qym4a7J8RCsy2QcPBFo6NjsF9EmAadPtWmBRaHsfYORTdxgShkH11DHvrDu-5MeoiVQ3tb8vi0XeFPfyi6UHDfVpIHan3Vhq_Ua_vNgkTmFE7--LvqQ0A9yotdmHeH0OSUax7_deytzZaND44QPqsa4dg


Using the new miter saw station really improves production. Stop block and fence setup helps get consistency on the drawer cross cuts and made it go rather quickly, almost no tape measure use here.:thumbup:

y4mo55XNhq53NbsS7o9k4ZqSpSYg6UZRCkqpQA2glygF2rFwredphwsFVnbmL2lrAvtGz9DFYYoKDHig83z7JLNWAVu0I_G1zGAfob-5gJsxVQURPJ0oW4g1yUBHtKEjjubpusR9d8zlWGMAXK1OqLKM8-MPZ_ovqmZIsmFNLFhmBfao8R5PMwr4x4flRRQa-qVTvePuuD0osXyyI2_1wVIDw


Pocket hole construction on the drawers, took the most time, but also the most important...

y4mqYZMCysbljdIvGY0I-nTE_6lRnWYy-NqPifFN2z9gWDO-vgGV97J2mX2lNTBzDQ5e3nYRgtqolC-rt_ruHqI2UEl94VyLnhh4pEkbnV-Jp0bhjD28zhwAdbe4pXdY2LiuSU3cKNVaDUr2_ly-JEGZAFDnxZpa1pPFWITDQXodgzPARbPkRBUeAQ2sOvPue89L7syfS27Bu08O26JVZFZBA


y4mmjOcRff1sX08tX2kt80vzw7ZF7qDkDLb0otLuYajcrz9_fxGi-Kx2f_aH9sGVJYrIG9pBAqPj-MvHjtFrRH9DcrPMlKdugL1RvP4QsaMVQB1n6eypk0GsbCv_3Mhn4YkvJuGI64PG1mrKTKFvKSrAmMCpeAUC0ZX0VB8V3tbqbsToPESZp5cvgrL8NmiDkZJcpE3FdHPjW1IuWn1Gu-UZg


y4mzCc5webzaAu7gRZGPUJS3YIK_57kHXKa8-GmwAXzR8cP6tK8w-RxnvOVjKZV4vyirJWAQZYl4_T0hOM_pAft7XR_pjKr8S3ib5ibhNwoHUwPCRWGPH2IEBm9GufoMBqve-gYFS3ztQ8gfXL6udhgH6zklTSGFft4URviI3-kheklgDiuqTBTaqahFi_QcIcCGQ-L-W2glA5mgdGnVMmSKA


Starting to look like something, haven't done the drawer fronts yet tho...

y4mg_GMq_eWCxL_kDuxHMcnHgy9EZrK3PbV5Iwl4rgW6V_NicmyMLbB7ZJo0rfJNHQk7Ks5jo4hHsXdlhMDCGzyvM2tisth1xHM7tzueY2yOxI-EFUO8nAhVn2cOnlDEuijZjDTzUAKstcmB9JEHE05nV1HnbdLo1oIyejDDaLb17hZPa3I0H-GuiLj52HQ1A8vlFTfYppU2bXMgMVyi-fy_w


I didn't want to use drawer slides, with that many drawers it would have been at least $100 extra and a lot of extra fussing. For shop stuff, sliding on bottom rails works just fine for me, and allows for me to remove the drawer completely and take it to my bench. To make it slide real smooth, I designed it so it only rides on the sides, and then applied NyloTape I got from Rockler and it's buttery smooth. I like how it turned out, less time investment and $$ investment, same amount of utility. My drawers actually could be a bit bigger too cause of no space needed for slides.

y4mUq7R6pA5xB8v4cEnfFn6YAnSeym5HF_GhXtAv6nasgWoCf8DsdJjSmiKyQFSzZAh6Unt_-77jMYzEI7Mr3VDYqntTqNU9WQzEez8rQx_7lsv9fbvaw1q7Oh2TIU3u79fAiq945RsDfgah4zGhR6OXNeGnmJ-h9x2ATuMEmOpCEciTWJxy8YqUO-fd2lRUbBrkF1kiolP681ny5gfvCOonQ


Then I set to working on the last drawer, the complicated shape in the middle. That one took a bit longer w/ the angles but I think it turned out well. There's actually two drawers in there, a deeper one and shallower one. I didn't want to have a 42" drawer nor did I have the space to pull it out.

y4mzF3ikWRg1E0Y6TSoSXHji23Zwm0We9CEvN_yyxI1GVVKL0X6O_hBgY0op_SETn9XsYbI1SVhOwqVfDcmutkMu5lSkxM7k_YpR4UBTWZ3IBl6d7qpqY-UPfq0Kmqq2YZiRd1EINjtYO9JSwpdxY8iprNRIx7_YvE_87rzwaPljxw0D5QlihdVNZC4cVKl3B9igPU9rHpDxbzFe9vGEFCuFA


Set the depths w/ spacer blocks in the back and it looks real good. Unfortunately the handles I ordered aren't due to arrive until January so for now tape will do. Huge improvement.

y4mfLXh0H6jtD99Io2tWSVgcrh0pvQqQstn-OB-w-TstUt2yu8DqHSOqvaltoa7n6QnI4ZksBCF2hTOg-d8ymO74kAmnlnnhyR7X6ACgM46lXqD9gn--7GU_twMnqe5FfV_zHHobks0as-6FpDRB0oXLFPgbc9MWWRTmVgo-nJNv7k6LOnUkQQxJ1kq2KgMediKtsmWN776Btp5583AmN4Hag
 
OP
M

moparfreak

Well-known member
Joined
Jan 24, 2005
Messages
853
Location
Milwaukee, WI
So, as you can see by putting the bench drill press on this station, it's....rather tall. I'm 6'0" and it's still a bit too uncomfortably high for me to use safely and see what I'm doing. So, using scrap ply, made a quick riser step that I can use to keep things at a reasonable working height, about 7".

y4m2Nuv2dM3ewTb6tPnk-u6_ry6qB6fwPtlQy1nRA45xHMtLsa76r9zz6de6cDuok8QTNHO3npjbG5cMXeuQ9fJcHygHOaWB4ly5MHPVsIi4iVhpyGWZfzdzGWyd_LzTQw-OtWpfJNnigC_-ymcielnlt_uqhwBvjN-IyK3uairysvTPUo10j00E9qnisgrXjtOZSSpZ_Gl_b9uicAB9b4ZHg


Much better. Plan to install the foot pedal switch directly onto this riser.

y4mmxlKPiR8hNI0juHJ6ZY1CA2G3S4DEkgXAn2Br3jjq8v6WFglClaUoH1LzNviC-L8eutPBKSI_AShipygQq9EaxazKRBuKCAU_RL-kX_vOJORXDE5QeDspowK_U0o0NNux6V-ZXkz25I5ppm7SiyMHIpod-83Wv0vV5t74Hs8L8dM4MsLPSwkzSgyKrImDs7sP1Q9Dp69SnO9EuMv0p9i2A


Now w/ the miter bench done, I've started turning my attention to other areas of the shop. I'm getting ready to work on air tool organization and compressed air system. I'm clearing out a cabinet that use to hold most of my drill bits and supplies to hold the air tools. All that stuff is moved over to the drill presses, but what's left is my hole saw supplies, which are bulky and don't fit in there. So, I went up to the attic and pulled down one of the nicer, larger tool cases that I had in storage up there. This one was from a Milwaukee drill/driver M18 kit.

y4mycHQkp0v3W9dOSr7Ivw_R8VZjHQ5KnBxkIi4q-vxu7bwb5T0O_aniMtlTzAZ1kVOt82LJIvUomMhxCbQ3wh4T_jYD_19mIcBfdQkaHjIhQEUpmYXP_4Xgdz0id-bcLA7SwhVmHxMQ8hzwSvqkobiAz4dKL-vkAkuUez7_FnJKKAWgB6FsSOFTR8ZxZvxPJ7nqgV6h9F5cygZfFjds7KIIQ


First used a multitool to cut around the perimeter and start taking out the insert piece.

y4mAdNJbrdnEqMbRqS7PK9LwM0TKnAOMRkKxRJLlPddck6iJkrsXfhEzdHe1Loi2PoIWyzNjW7gXf2O204KXHeO8x7uPV4HwqV5vSKV7bXPAadTmJzeTNQAv1WI7hE5QLCjkwdiyggNDgs9qtztD_yJTrMs_hwUcrC5_n503U_6kG9dHVx0Nx0krsi9LeduZZyL_iWUkdpBG8CWfmFejEk4yQ


Then to get those tricky "welds" on the bottom, used a hole drill that was just the right size to essentially pop them open. Had to be careful here cause too much pressure and the hole drill would just blow right through and out the bottom. Only happened in one corner, which is minor.

y4mZX6JTj8V-WZDgPDdngireaknC-fgyV5ZNA5-xT4TsAiVZClJAxFSRVqjIYBUjfE3OSy2MkyskGvZiarQVw4jaTP8xdkjr6YthHXivcVn7x1ZGh-ZVgNxrlX46qAWfxC14z7XJaVkF7RDIMRAQTisLOlko-KollAyZ2VVo5IWf6k58JdQ5jDwU6ukC9i6zOozv_JzVIuWY6rN5a_lCMvbOA


y4msuIr1F-b6DXzqqquMbYH9haq5deak6axYWeH-jSUmnHPQ7SgAKVeBEyceIG34tt82YFYyWkST6_Fmibs7IWkbl5MxF8nIa6QNCrOX1ER3nodD27Kb8OOOiVB3fIufrVP8Q2tXwzmDKUCACbMTzkrdb-rMJKqG3vt-M0KYP9a0i2LGcqloAYBxR0WNaClARNxr-uL3eGyxs5T-5YHrIpfyw


A quick debur around the edges to clean them up, vacuum and now all the various hole saws I have fit perfectly. Aside from one area that protruded out, the top side really didn't need the same treatment. By keeping most of that insert it helps keep all the contents in place, and also allows for future expansion if I get another hole saw or two, such as an odd size I need for a certain project. I've got lots more of these tool cases and it's a nice way to recycle them.

y4mZHl9elOhMJ3xYLC5-laMglYJUu4bAjzh2oCup5lygQ67yhsIeBjqcDTX3J4x3uQK_QxJA7i4277ptc584HXj_Cj3PJouCMF_CjH_wdZZXbbjs9Cqbh_hQ1krhP0TQPqfjA-QIavOOVR3Jr13JBpPbaqW4-QWaYSuxoDjp-5HJRoXYV9pchy8amkuMp4DoLC4zukrv0gu-KxSP5Ju03C3pg
 
OP
M

moparfreak

Well-known member
Joined
Jan 24, 2005
Messages
853
Location
Milwaukee, WI
Starting to fill up the drawers, those 30" deep drawers are nice and hold a lot of stuff. I saw an idea for adjustable dividers by using foam weatherstripping on the sides, and cutting hardboard dividers to wedge into place. I have to say it worked out really well.

6hMWBpSSy2Zx-VA?width=495&height=660&cropmode=none.jpg

EELIEhaA5U5zTww?width=495&height=660&cropmode=none.jpg

It's nice to see this stuff again, it was buried in boxes and bags underneath my workbench. No more having to fish through it all.

I'll continue to fill up the drawers over time, but for the most part onto new projects. With my biggest house projects behind me, it's time to turn my focus back towards the Charger eventually. That means getting my auto shop and metal working tools back set up again. Compressed air, air tools, sockets / wrenches, welder, torch & grinders.

This cabinet I had picked up at a clinic going out of business. It holds my sockets, but needs attention to organize them a bit. That'll come soon. I put a big Richlite panel I had to give it a solid tabletop, and then put a hutch cabinet I had taking up space on the floor for the last few years.

tc3UQ72ycPDAUQQ?width=660&height=495&cropmode=none.jpg

_VBXHmgRD1ktngg?width=660&height=495&cropmode=none.jpg

a5Xm3093V9yMhSA?width=495&height=660&cropmode=none.jpg

AHcp4v-9f7GgnZw?width=495&height=660&cropmode=none.jpg
 

shortykorte

Well-known member
Joined
Sep 1, 2014
Messages
8,039
Location
Tallahassee, Fl
Good job on getting a lot done on your break. Nice getting lingering projects completed. Have you thought about a false front for the spot where DP base is? Thanks for the tip on using the insulation/hardboard for dividers and the nylon tape for slides.


Sent from my iPhone using Tapatalk
 
OP
M

moparfreak

Well-known member
Joined
Jan 24, 2005
Messages
853
Location
Milwaukee, WI
Shorty,

Yeah I'm starting to think more seriously about that. My wife came out and looked at it and was impressed but then asked, "why didn't you cover up that last drawer opening?" ugh....should be easy enough, I even have an extra handle...

Should have some pics of the handles installed early this week too, it's working out great...
 
OP
M

moparfreak

Well-known member
Joined
Jan 24, 2005
Messages
853
Location
Milwaukee, WI
Well the cold kept me out of the shop a bit in the last week or so. The heater works well, but it does no favors to my utility bill...

Finally finished up all the slides and handles for the miter saw drawers. Took the hint and also made a false cover for the drill press base. It was an odd centerhole distance on the handles so I took some scraps and made up a quick jig, that made the process go real quickly w/o any measurement:

y4myUoSeKdMGjV0vwY9WZIgMjtJEh5eVZpnlELCvJkKFH-AoH9cYasariOr68PvatON9pWU6SzY8HKB8NrGWIbGeqcFqUdXK9xourviPK_U4ujG9s2XdhQED9t2TrSAsqTFwATIz-UUvUMGccVB3g1cCFEw02_3_Eu5CUX-3Y0L2tkM6CuYMN8df4gqYG4jlDMMDDM9fK1tUC9dvfZ7xcv-vw


Here's the finished look:

y4mw31SKHw3xlbwt9PyUuHuX6j7WhAtHLqlcId9UB4pU3UkcUNkAZwiJJcxTFAlW_U-g6bvFzwPTF0QILbyVoGZCez1EInkknOYE_EfGG5rs6GyY2ufOzms8s1jY9vjKSc_4-HfKsYEgbl2cYcMFFDH9qEayJeB11fe0z2reH6OtuY0g15Re-JPHOieJUzRgEMmBXkFUFnI4TN3KaPQ_csZ2Q


Moving on, starting to focus on the air tools and compressed air system. First, I wanted to clear the tools away from crowding around the compressor, since I'd need room to work on it anyways. I have a nice metal cabinet across from the compressor next to the car, and I'm repurposing it to hold all my air tools. Originally thought about trying some of the nifty ideas I've seen here on GJ about hanging the tools out at easy reach, but in the end, I decided I've got enough various air tools and also didn't want them sitting out collecting dust, so I turned to putting them into the cabinet.

Got some really nice bins from Menards real cheap, they were only around $1.50 or so each and one of the mega stores out here had a great selection.

y4mhyanSslHVDfhp6WRMzd5OqVdwxxdfb9jmuyNsV9ANyvqVDiOikB9GPY4mXoWzw8-f8iYaMIpHswPlfUExlcVcFFREgx3VHO9dNbZ9XYSMOkUXPqBgo9HEesHoEfMWZOboj4T8Jn2M9Ionr7a5EeRD32TP1i5Huxx2aPsQdkGvlngNgdfJF6aSoifZI6aNRMuVI8v4cLE1qsYM7tIGMMBzA


The depth of them, about 1' long, makes them perfect for air tools, then it was just making a few simple shelves to maximize space, now all the tools are accounted for and easy to find, along with any tools / accessories to go with, and there's room to grow.

y4m05W_mvPEezwL-PdC1WKDU0wu9KcFtplnVqdHGHI_t-C-bVqGg6naenrU1nUBfxCTTOA-j1UjA5ihnlfkoy35q0v-KbvKp-p2Cdh7BbvO6oJbiys6bznzUNNwvevndVyoeN5mf5asS3vnN4JbRcH-f9xOkRZlKAairtqp4FyWrJnZEnQE86rRh6sQDDWX-frNzbbhmZmv5nk7PKA5il6liQ


Next I've started working on the permanent compressed air. Plan to use PEX for most of the lines, but coming right out of the compressor I am going to use a Hayden 1240 cooler to condense the moisture out, then run it to a separator before it gets to the tank and plastic lines. Should get most of the moisture out of the system before it ever gets to the tools.

Got the Hayden 1240 in. It has a rather odd mounting system with rubber blocks but it'll work for my purposes. Just a bit strange. You compress the rubber till it expands and gets tight to hold the brackets in place. This weekend I'll be fixing it onto the back of the compressor fan grille.

y4m1HsQigRccjlCgaEXAVdpFNaCsHVZv7NJeh9l11k0ZgG21pRu2l0UlwQYACCcFBpTAAagnIbI98ZIhF6rzMtgfw8qsC6IPBwuxIfa_L1cW98sNd043TOXls1tn--TbFLfmQhw-CfmU0pjNOolqmHVitO5ETHSig2n6iNM0R71bpFdW0_rDbc6iyOMZbYc5VQ1Muy390AGOH7K-SL9Hys4tg


y4mzJPUPgstJDHkV42hqZXixxpH590039OHvXiDKIe9cTLJHSfMJOuW9p6vLwgXolEohqg-SZnHz8GATO6ffL0SMa60zIzLzlui_S6TGrBtRHE_r3hIVBR6UAFml3MDBm3VIA5udbYiOPSV1XREfFgMAuy9zC5dbrWlVIQq7OqvQVbHmiFnHIJe_5gq3Kg6WqgBJ77ngLgxjov3sJPRQ44d5g
 

drivesitfar

Well-known member
Joined
Oct 23, 2013
Messages
36,013
Location
Pacific Northwest
Mopar: sorry I've missed posting and watching your thread cause i've only read the last few posts and like it a lot.

nice work on the miter bench and looking forward to seeing more of the ORGANIZATION you do.

thanks for sharing!!
 
OP
M

moparfreak

Well-known member
Joined
Jan 24, 2005
Messages
853
Location
Milwaukee, WI
Drives: Thank you, I will admit I'm OCD a bit especially when it comes to my shop. Always have some sort of shop improvement project going on. It's come a long way so far since I put the shop up in 2014/2015 but I still have more planned projects than I can count.

Did spend a bit of time late today and finally got that heat exchanger mounted onto the A/C panel. Next I'll connect the copper and start getting it plumbed in proper. Pretty excited to see how this turns out....
D38IepiNLkZ7tXg?width=660&height=495&cropmode=none.jpg
 
OP
M

moparfreak

Well-known member
Joined
Jan 24, 2005
Messages
853
Location
Milwaukee, WI
That chop saw bench turned out perfect! I think I am going to have to build me one of those for my shop!:bowdown::bowdown:

TurtleValley: Thanks much, considering it was built over 9 months, and designed bit by bit along the way as it was being constructed, I'm pretty happy with it. I accomplished my general goals of having a nice table for the saw to support workpieces, lots of storage for tools, and even more storage for all my wood scraps. Incorporating the drill press was a change on the fly but I'm happy w/ how that worked out as well, saved me from having to come up with a place to put that somewhere else.

I have a feeling the compressed air system will be similar in how it comes together, but hopefully I can shorten the time period up a bit.
 
OP
M

moparfreak

Well-known member
Joined
Jan 24, 2005
Messages
853
Location
Milwaukee, WI
OK, slowly making some headway on the compressor plumbing. Plan is to get it all plumbed back up into the tank, then air test, then continue on w/ plumbing up the lines onto the wall.

Got the condenser / cooler onto the back of the compressor panel, mostly lines up w/ the fan & grille.

y4meApGdoyamwsHBQ6vtfsKxsGTvF9z2ZO_R402JbYzane7ikqDo58u15QKm4n-lUVyioiZc9zhdLAlGhB8YVuqDucFCBIJ78j8l0J6er6dT4qc07BuBeS2xHuRFRh_wWakz4EtA3akwhATuew4q1GIi766k-1pMlNIlH7386ME1KTUJptCUv8h8cJdCJyZgpyifo9p-v-V4OOrgqU1dgYpeQ


Through work I have a connection to a local hydraulic supply shop, and they made me up some crimped hose assemblies and were even able to come up w/ the bubble end flare fittings, really nice!

y4mS0Ap5pWknNn5HXPaRt0CpI8SV1YTNA2rIV17eA1wQBzAd7iMcCI19-T8YjvD7rHkbJUVVwHJEXlw9YS0oXsVuJHxB1-IZDOVgOwJ6-xv6JlsHXhCkgEl0OhDUOgM1K5jcpjc5OJrufqjh6Bfapq35wICp7zap9TyJLQmbF3nMrOkCBhG_sEYqOFytrt9grsgiMwCZsrXqLz1LOZjwf9uNQ


Also got my water trap filters mounted. I got the Pneumatic Plus setup w/ 2-stage filters and regulator and automatic drains. I just gotta pic up some 1/4" nylon tubing and set it up to drain into a jug or bucket and it should be all set. Got the 1/2" size as well to make sure I didn't put any restriction on the line at this stage.

y4man2dAOTD7UPOpnA_XrH8ucctLZ69b9Q9o8NGZkKjVshZ4XZmcLZFIc9-saGU_OVxSM3NISmKoKVelgdGYx8a5G8QQNOv4Dsm57tkZ5Pg3br8MhstCWwEIm9jEQIcGIG85Dl-3Vp4jFqTzfwV6p9t_DdvWnJr28UnCmQey-MvRu7DN6i8uuqc9_6iCzGBLnyuY54ie2tnUZDIqSQc-6m30Q


I've got a couple more connections to make, put the gage onto the regulator, and then do an air test. Then I'll start acquiring the fittings and PEX I need to start mounting the drops onto the wall.
 

shortykorte

Well-known member
Joined
Sep 1, 2014
Messages
8,039
Location
Tallahassee, Fl
So you have the line out to the square manifold then one of several lines goes to the cooler continuing on to the filter/reg setup?
Looking forward to what you do with the pex.


Sent from my iPhone using Tapatalk
 
OP
M

moparfreak

Well-known member
Joined
Jan 24, 2005
Messages
853
Location
Milwaukee, WI
Shorty,

Actually I plumbed the compressor pump directly to the cooler, to the filter unit (where I hope to drain out whatever condenses thru the cooler) to the tank, then I'll be connecting the PEX lines to the tank.

At the moment trying to decide if I run 3/4" main lines with 1/2" drops or just have 1/2" all the way thru....I'm indecisive at the moment.
 
OP
M

moparfreak

Well-known member
Joined
Jan 24, 2005
Messages
853
Location
Milwaukee, WI
Aw nuts! Got the plumbing all done on the compressor and started it all up, and the tank just wouldn't build any pressure. Disconnected hoses, verified air was blowing through all the components and there were no blockages. I felt air but for a compressor this size it didn't really seem like enough. I even reverted back to the original stock plumbing to pipe the compressor back into the tank directly, still no pressure to be had.

Sadly my next step was starting to go into the compressor. Fortunately I didn't have to go too far. As soon as I pulled the head off, I found this:

y4mUPtssL1zsCpu-t1AKWiJu9i1z1iDXW2Q1c4Oj9c1W3FlW4LSqOJn8Kc4J-Yp0uB9U96LEijUbugVrWS94oqOifH0LU08xjCkk8hGC6uQlhiBz4BQTZfRST7lrMLfGcw3mWydd4XMqOwxI0AwZAvM8N0gtBuUSBFAYk2ClUtMA_7SUz75EoPeU8soWdKvVMaGiO8dgcUJMobj_wUvb1gGsw


There is a significant blow-out of the gasket across the high to low pressure zones. A ~1" area has the graphite completely blown off from both sides, and then metal core is bent away quite a bit. Quite a deformity. Well that would explain why I got barely any high pressure flow, cause it all went out the low pressure side to atmosphere.

It is a setback, and a new gasket will take a week or so to get but I can in the meantime continue working on the plumbing at least & re-set things back to where they were. I'm pulling the regulator out of the filter stack as there really isn't a point for it to be inline before the tank, it's much more useful after the tank. Ah well....
 
OP
M

moparfreak

Well-known member
Joined
Jan 24, 2005
Messages
853
Location
Milwaukee, WI
After the recent setback, finally a bit of good news, got the new gasket in, for $22, installed and torqued the cylinder head back into place and re-plumbed this back up as I originally intended, and sure enough, it will properly build pressure.

I relocated the regulator downstream and will mount it onto the wall coming off the 4' whip hose, and the cooler / condenser seems to do a nice job. The hose fittings going in are quite hot to the touch, but are cold coming out of it. Right now it's winter and the air is pretty dry so not much water is actually coming out and into the filters quite yet, but that will change in the summer, and regardless it should keep the tools in better shape overall, especially with my plan to put up plastic lines.

y4mmz9Ih6M0v3xqT2YA_sv32EUUAtEdv-1c6xbPqMdZWqpqSJ5oTlAIZWeO75bF_HRvqqoUL9NG28590q7hnlNiXztIU8MNQs-1bPvmzqOrB8rWuQP8iOwZ-1qSWlclDbwLKeg7VO_AOYOFh_70Fd-Jkyycrv7xv5BDgvKyXpGVQ6NKUj7i6WKpsAVUA-CyjU1CEMn8_rjrqRO9MI-kZsOu5Q


Once things are really set in place I'll probably neaten things up with all the cords and hoses going everywhere and tie them down a bit.

Also got pretty much all the PEX fittings I need from supplyhouse.com. Hopefully this week I'll start installing it.

y4mc4OxC6Sn6RD7in2TbX6fQhgwK4uf8F8J3nId0R80LkAKOIlGjCdaJ_rEjaD3yjLsznb1IXmCx2tQpFvkcr0pdRDIFl70xHKZ3BoeUFkacYkXIQKtCWWiWn5M_HDwbnSThZtaC4568mualVtPCYru2qpqYggpdJXEQUht_Nen057Nnu8-_RBPAF2BeYjfXjeWPfr6MBdNSQlTMKl0qZE7Fw
 

drivesitfar

Well-known member
Joined
Oct 23, 2013
Messages
36,013
Location
Pacific Northwest
MF: great work finding the issue and fixing it on your nice compressor. WELL DONE!!

looks like you are in for some fun putting all the bits and pieces together and i'll check back in to see how you did. i need a bigger compressor cause i've got 3 smaller ones and it would be nice to have something big enough so i can buy a SkatBlast cabinet.

good luck!!
 
To avoid these ads, REGISTER NOW!
OP
M

moparfreak

Well-known member
Joined
Jan 24, 2005
Messages
853
Location
Milwaukee, WI
yeah, I plan to eventually run a small bench-top cabinet for small parts, and also one of those portable guns that can sandblast panels locally and seal up around the sand, in addition to light painting duties so doing everything I can to minimize water & keep things clean was a must.

Right now mainly with the garage being rather cold, it's a deterrent from me going in there and starting up projects in the evenings. Turning the heater on 10 mins beforehand takes care of it but I always forget. The insulation prevents it from going sub-freezing but still....
 

drivesitfar

Well-known member
Joined
Oct 23, 2013
Messages
36,013
Location
Pacific Northwest
MF: yep the sunshine and heat do help the energy level and surprisingly we are having a heat wave and it might have been 65 here yesterday. it was freezing this morning, but sun is out and it might be close to 60 again. i sympathize with your cold/snow conditions and there are members here mentioning well below zero temps so i guess it could be worse for you.

maybe get all the plans figured out now inside and when it warms up then you'll just get to work.

cheers
 
OP
M

moparfreak

Well-known member
Joined
Jan 24, 2005
Messages
853
Location
Milwaukee, WI
Finally started laying lines up to the wall. I must say it's going to take awhile, with only short bits of time here and there in the evenings. I don't regret going to 3/4" main lines but that also makes it a great deal more difficult because I need to bend and form the lines into the shape I want. Heat gun helps a bit with that. I'll also be picking up some straight tubes today from HD to avoid having to coax a coil into straight runs all the time.

But, all-in-all so far so good. Here's what I got so far...

Here's the Pneumatic Plus regulator that I took off the filter assembly. It's a great modular system, and was able to separate easily, and I got on the phone w/ them and they sent me the appropriate brackets to mount them separately. Great customer service.
y4mVRcfLeyoHjp_Jmim2-Ugbf5MSVY76BRRxP2b93I-Nys7Xht1PLglCogwTvPqagVNnGt2nXGx7BYvANLeEiWnOxnxLI9QK6SPmul12lslFH_pdLVnk-UXYwNrJOPkJ_MF3LnlORp8xUTLQtYoBT8ClMDAG84ujINOYI6eeRpG85nwujfr05Js5vo25sTg-p21crZiOkBXhNq6QKGDaNSc7w


Starting to mount the 3/4" PEX, because of the stiffness I mentioned earlier it needs to be secured to the wall as I go.

y4mjwas2pBB-TG0wAt9XAyfSE33OD0UTCSyFrZSSRsppgMP8gZ0YbzY1ncGx_cyCZ7oHddaVaUi2_oFD224FW5_2k6B8IoGjAvfqs34oHMTmvPjbdAdazRLc4BXUldWaHMc7y_EyyclxSd0UXnvXdZBcPN6VryHWiOShgfxGG7oqxYb3OB2ELsyraLruSqcaVWt4NMY-tPtOm6HS--VVpgTxg


I use this small hand-held Apollo unit that I got from Lowe's years ago. Has a little blue light that pings when the crimp is completed. Quite solid, I haven't had a failed joint yet when used properly, and it's made hundreds of connections. Hopefully I didn't just jinx myself...

y4mBtV2fE96gV0uKODciSJH4q9XJ_SsUk1Jxja87cYo-yLvO8YuVxXsPa42VGd1v2jQ4umyTjSxQMaFr4cDRPTPjREAzgUr4mD269OBuxTfUnrNpD8A1U2ygBAr-MKefNlLaAAWhyEGayNzsW0mMsuBN8gDY8K2_Cp1JUA2Oy64Z1jKzVNuilwmsEw2IEDzIjs7sngnxNMsVZKNBvssseTfrg
 
OP
M

moparfreak

Well-known member
Joined
Jan 24, 2005
Messages
853
Location
Milwaukee, WI
Little bit more progress, albeit slowly, on the PEX lines. Currently bringing a drop across the Charger bay over to the side by the welder...

y4mcstT4rmtLm_EXBQvbApjOsomUNJvP6GclrEQo-D_dhM8NJhSClZwKpCAo91IVuYqRC41Wdx2StpHeCg1JjAROasx-6UV7YgOTW0ywf7XkdB8DmATA1XgfnKTwe8nkuWgYflc5NIgrKgD5fA_5qom03y_Arevoj4GwZKJmKPV4NUMGIPXD9KOsDfEZBkuahDOuL3RAh_3B60IvA05tlK_Jw


y4m7b8ehVXnKMyWMiGbXqObQae2UXXbcvkiTHOSnTIS7LeHfIiq8xoLAKJGb4bdjDN5QHE0M2nsqzntH7DnYpQRWJxCRaXILVnO0l_cyXlkDWMI77V41umoFQJUwQ4k5bqAujgxR0WOgN0rz6toclyASUywSGnEg7ifJ7cOja-obmVkZCCroYXPbBVblCLpa_GDTJ-ezSdAus1URDW9CsXhJg


Once I do the two other drops on the north side of the garage I'll cap the other side w/ a temporary plug and do an air test....too many connections w/o testing for leaks makes me nervous, especially with the threaded portions that if they need another quarter / half turn to seal up, it can become quite a hassle after everything is clamped and cinched into place.
 

drivesitfar

Well-known member
Joined
Oct 23, 2013
Messages
36,013
Location
Pacific Northwest
MF: your compressor new lines look good and I hope the tests work out and I bet having this to use will be AWESOME once you get it set up like you want to.

good luck
 
OP
M

moparfreak

Well-known member
Joined
Jan 24, 2005
Messages
853
Location
Milwaukee, WI
Thanks Drives, it will be a nice upgrade, looking forward to it and finally starting to see it shape up, which is a good feeling....

Didn't get too much done for the shop this weekend but I did spend some time cleaning up a bit, and doing some house projects. Trimmed out a window in the boys' room, and also knocked out a fun little project for my boys who are really into Minecraft, making a wooden sword like the one in the video game.

Got a template off the internet, printed it out and w/ spray adhesive adhered it to a piece of scrap pine.
Pn5v1yv-YKX5bSw?width=660&height=495&cropmode=none.jpg

FQDpXfOEPdxccMw?width=660&height=495&cropmode=none.jpg

Then went to town on it with the bandsaw, followed by the scroll saw for hard to turn / reach areas and then finally a file to finish up the edges & corners. It was a fun project. A bit tedious but not too bad, probably took about half an hour in all.
TS_ysxwp8r9TpOw?width=495&height=660&cropmode=none.jpg

Turned out pretty good!
UZqfKZt5cBEnKWA?width=660&height=495&cropmode=none.jpg

K8BvXoJZpUXEjGw?width=660&height=495&cropmode=none.jpg

As I was cleaning up, I decided to do something about my overstuffed battery storage container, so I grabbed one of the numerous empty tool cases that I keep up in the attic for just such occasion, and with a bit of work w/ the oscillating saw, got everything to fit nicely.

1SJvo4B9LLBB-qQ?width=660&height=495&cropmode=none.jpg

Hope to get some more progress on air lines this week.
 
OP
M

moparfreak

Well-known member
Joined
Jan 24, 2005
Messages
853
Location
Milwaukee, WI
PEX vs Rapidair - my 2c:

1) I don't like the idea of getting a kit that has a certain set of parts and fittings. I need maximum flexibility to make all the right drops and turns, and once you go outside the kit itself and start buying some of the fittings individually to meet the needs of your design, things get expensive very quickly. With PEX I can configure with any type of fitting in any orientation I need rather cost effectively ($1-$2 per fitting rather than $5 - $10 with Rapidair).

2) From my own personal experience in the engineering world, as a pressure vessel I have seen polyethylene to be a tougher material than nylon. The failure mode is also more ductile than brittle for polyethylene, which is good for safety reasons even if there is an issue.

3) In addition to flexibility, to equip the shop with all the lines and drops I want, Rapidair would be a good bit more expensive, mainly due to the rather high cost of fittings, especially when comparing size to size (i.e. I went with 3/4" mainly and 3/4" Rapidair setups are a good deal more pricey than the 1/2" setups, once again cause the fittings are marked up even more so).

Not too much progress the last few days on the air lines, unfortunately. My older son, who previously was "too cool for school" on the minecraft stuff I made for my younger son thought that sword was so great he wanted one of his own. It was a nice opportunity cause he was able to come out and participate in making it. For me that's reason enough to invest in having a shop like this.
 

drivesitfar

Well-known member
Joined
Oct 23, 2013
Messages
36,013
Location
Pacific Northwest
MF: thanks for the 2 cents on the differences cause i might run through my 20 year supply of copper pipe and fittings some day and i'll have to start using that plastic pipe they've been selling as an alternative the past few years.

good to hear at least one of your sons liked the sword. I agree it's great when your boys actually start paying attention to what you are wanting to teach them.
 

C.L S2000

Well-known member
Joined
May 3, 2017
Messages
180
Location
LB, CA
Little bit more progress, albeit slowly, on the PEX lines. Currently bringing a drop across the Charger bay over to the side by the welder...

y4mcstT4rmtLm_EXBQvbApjOsomUNJvP6GclrEQo-D_dhM8NJhSClZwKpCAo91IVuYqRC41Wdx2StpHeCg1JjAROasx-6UV7YgOTW0ywf7XkdB8DmATA1XgfnKTwe8nkuWgYflc5NIgrKgD5fA_5qom03y_Arevoj4GwZKJmKPV4NUMGIPXD9KOsDfEZBkuahDOuL3RAh_3B60IvA05tlK_Jw


y4m7b8ehVXnKMyWMiGbXqObQae2UXXbcvkiTHOSnTIS7LeHfIiq8xoLAKJGb4bdjDN5QHE0M2nsqzntH7DnYpQRWJxCRaXILVnO0l_cyXlkDWMI77V41umoFQJUwQ4k5bqAujgxR0WOgN0rz6toclyASUywSGnEg7ifJ7cOja-obmVkZCCroYXPbBVblCLpa_GDTJ-ezSdAus1URDW9CsXhJg


Once I do the two other drops on the north side of the garage I'll cap the other side w/ a temporary plug and do an air test....too many connections w/o testing for leaks makes me nervous, especially with the threaded portions that if they need another quarter / half turn to seal up, it can become quite a hassle after everything is clamped and cinched into place.


This came out really nice! :thumbup:
 
OP
M

moparfreak

Well-known member
Joined
Jan 24, 2005
Messages
853
Location
Milwaukee, WI
Finally set some more time aside to putter in the shop and got the first drop done. I split it off into two outlets, one that will always have a 1/4" PU coil hose that will pretty much always have a blow gun on it ready to use or could handle other light duty stuff, and then another standard outlet that I can connect a proper hose to run traditional air tools on w/o restricting. The drop ears pretty much make this super-easy, I'm generally pleased w/ how this turns out. The other drops at the workstations in the south end of the shop will be similar.

y4mr7Ulis0vMazt-l1cN2ZJwKdPUGjYxcrk0Jrc3qMaGqTWNOdwDwOKtG4-ImLZDjUP0hRVsc281r2o_1jLEfn6upzFShXmJcuUFVzsYKk-kOvZN-Ay3pOdeJVVwIe3fe-Q_HysZPM2OYb5AmNUF-PJAhe42St8edum8z96JkHxb2cJnT_-F_7Tasoa3whcB61BDl-XH_BoljjKPPTLekFczQ


All I gotta do is add the coupler & blow gun at the end of the coil hose and maybe put a hook to put the blow gun on to prevent it from dragging down too much. Once this one is done, and then turn attention to the opposite side workbench.

y4mB2aSuvsxeyNLqOzN704qV0MLapFffbuBSfrAnGBtrJxYA4nYiLABkywKcnfDhjuhiA35Niv0PevSkI2OgA7b8PL3OU0yWgWP9yFL2T-Q0zL1bNjUK2FnIRiQIu5kA5Irh_2JtdEga7kLnqWHwa3k-whGMfh-AWLXow8tkiP4Yw3S_dhVnpZjsnapppKrs23ucgzeAMxC7PWXYRocsKxeCA


BTW, using the Milton V-style connectors, and they are really nice, never really had any before and with the larger opening and single operation to attach and detach, man are those nice, and still pretty affordable, got them at JBtool.com from a recommendation I saw on here.
 
OP
M

moparfreak

Well-known member
Joined
Jan 24, 2005
Messages
853
Location
Milwaukee, WI
More updates on the painfully slow process, I just haven't had much personal time to devote to this...and here I thought winter was when I was going to spend lots of time on the shop...

Due to spacing of my ceiling rafters and the metal ceiling, and the significant weight of the HF hose reel I'm using for the main auto bay area, I made up a piece of plywood to span across and get good purchase into the ceiling. Allowed me to get some decent size lags and secure the hose reel solidly.

EgP5wyR3HwBAFQw?width=495&height=660&cropmode=none.jpg

IfVvwA3zi3iQ4-A?width=495&height=660&cropmode=none.jpg

Then started running the PEX over to it. Used 90 deg fittings to get around the big header, makes it look a lot neater than using just a big loop. That 3/4" stuff really doesn't bend so easily anyways...

qOI-0fa4Ku7l1ZA?width=660&height=495&cropmode=none.jpg

Bring it across and in the next post I'll get it connected with a short whip hose, which I still have to order or pick up from HF.

0lmkootpU4Lz4JQ?width=660&height=495&cropmode=none.jpg

Next, started setting up the drop to the main middle workbench. I find it's easier to "bench build" the connections then put it up on the wall as a unit.

zwaHSHJOyh10qaw?width=495&height=660&cropmode=none.jpg

HhEisouFwjvnFOw?width=495&height=660&cropmode=none.jpg

_1Amc_Q-3v-R4MQ?width=660&height=495&cropmode=none.jpg

UQ5zX4Uq--IDtAQ?width=495&height=660&cropmode=none.jpg
 
OP
M

moparfreak

Well-known member
Joined
Jan 24, 2005
Messages
853
Location
Milwaukee, WI
Got some new Miltons in and hung up the blow gun on the other side.

y4m3C36wSy4Di-eWt9tyEAeuDYlPN_-wwxDrzuajGbJRtn2v4RdBaWWAL--m75CgYAq9tLxSQxMyNZUuVZBjvS_wP1CppKHxsUgKCAmEljGv6_Yn9q1ILtNmJIL2pgmS81HgT7b9H0IaVvKdMwHXAeBBuMm4nkpOZz_1iux8QNjB42U48zNshAn1RGXvV6gfAm8f3iTLN_rZjvC5AzHYUCgiA


Next I took a pause to build a set of shelves to clear up space on the next workbench drop. Re-used some nice plywood & oak edged shelves I had removed from the house.

y4mTjvviTd8WZGKlYZHRtNMv84nb2jHzF9yhwuZv-EdJl3i4n06ua-nrwfvwnp2C8Dn_LNqevgMJ7Iwm-HbfbqyWjofsu1eWCFzq2uwvgHxJ0jOKGyp7rsa7HgA5l_LiREsu64uZB59jQY_zaXNpQG1y8eMSRL_LGccED_TzmZYD4wjhUlDDwx0yjmqcj9-04rTV2_A9nPWW_LA-tatr94W9w


y4mTQTTpSq9KBcjXO9_GR4MzfGmeHvNXTZ9U0D8rNYe15Y8Oobq5MlyjfbgcBn78es6YJaF3qEqBX0WxNevuQn-HOAAHDQ7UL-F6AT4_dJYDjcwHutx6pW37_4Iz_QWrBcLeloqVbL9MIK9BdUuwDkEi6ANq2bU0LQmxL8mikOgOH8dITnTuAM7VuK5hbZvELWzTn8hmiTxDbLjAOz2pAZ-wg


Then ran the PEX around / through it. This took a bit of futzing around with, I'll admit, but was a lot easier than it would have been running iron or copper. The fact that my walls were all blocked off where I wanted the drops meant having to come up w/ creative solutions.

y4mhKrm-ieXyEQzGmAI-QTxGT4CmNMcPZ7pNGggNty84E2f9cxJ4Eimjhj-Z0ccToa6LckgyGAH9Vo50NMCFd7PzqGlijWG1_Swb-byiNjcN0n6YrqZzuZby4ZJWc1zawAahs_T73d2c6LJK7nBcRijNcTworSzp42z_DS9c3XCnCT3ittjdCh2vcxWBvX6A5-hHlLlsfpNW2lQ9UACZGmt7g


y4mxWN6NUNHpxmubHhhr2me_ffOjxIK2d5FRvaX7pS6ly9H1bZq4xI4xESmIffUQpZFCEvZoJxX_GroRsx7ZqDelIYkovCx5EIKEhmVCiqcu-5Z4aRDRBGY0VUUY74wUP40oZnocg0B5L74dqlvNElPosFzNQDn6gOa_lUFmcAIkco_I7cRMzFIIorZRS1v2_CAmKgU5hEWeB-dokcRTcFUug


y4ml_VbIb8D2JW6KjukGZ7mXF9pKn3LtGeYNkikf3Xln57jqRZ1AxD8FIWNQo3Twp-IZQXX_JHvsB3mT3x_etfE_dKFCWXpof05xMuGu8miQKtZzVPGknh5U-xk2-2FcR2vM0x3pfBfO2IHqDOPEEYiuzl5pUKAJ2DjVSefeo_naTIgLHTGilBv8hHRfbj-HtI0iTlmZV87cgwNyeOal3maUw


Next I'll start filling this shelf up w/ my sharpening tools, and my assortment of bench grinders, buffers and spare wheels.

Next I'll be running air across to the assembly area, and the miter saw area (mainly for blow gun).
 

shortykorte

Well-known member
Joined
Sep 1, 2014
Messages
8,039
Location
Tallahassee, Fl
Thanks for your thoughts on the PEX. Looks like I can use my brand new PVC for something else now. I see using the crimp versus sharkbites definitely lowers the cost. Guess I'll go shopping for PEX this weekend.
 
OP
M

moparfreak

Well-known member
Joined
Jan 24, 2005
Messages
853
Location
Milwaukee, WI
So far so good on the PEX, hope to air test the front half in the next couple days. PVC definitely no good for air lines. Remember supplyhouse.com is going to be about 30% cheaper than most of the local big box stores, even Menards.

Sharkbites are OK in a pinch, and I keep a few around for emergencies. I have a buddy who works as maintenance for a real estate co, he says he keeps several sizes of sharkbite ball valves in his truck. When he has to deal w/ a plumbing issue, he cuts right through the pipe while it's fully pressurized, then slams the sharkbite on real quick. It makes a bit of mess for a split second, but immediately is sealed up. This prevents him from having to shut water off to maybe dozens of units and the hassle that goes along with that (says usually when the water is shut off, crud moves around in the pipes and causes lots of other new problems that he has to deal w/). I wish I knew that trick back at my last house when my copper pipe corroded and burst, and the gate valve was frozen shut....:(
 
OP
M

moparfreak

Well-known member
Joined
Jan 24, 2005
Messages
853
Location
Milwaukee, WI
Connected the ceiling mount hose reel finally w/ a whip hose, and now I've got air hose I can pull to all the tires, no more hand coiling and uncoiling to do tire swaps, just in time for the winter to summer tire switch on the vehicles.

XeBDTGWYqIOmdNw?width=660&height=495&cropmode=none.jpg

Also got all my sharpening tools & grinders put up on the new shelf on the other side, the workbench is now neater than it's ever been. That shelving unit gives me a lot of vertical storage.

GaOQcMIIYJayj3A?width=495&height=660&cropmode=none.jpg
 

drivesitfar

Well-known member
Joined
Oct 23, 2013
Messages
36,013
Location
Pacific Northwest
MF: nice work with all the pipe work for your air tools. your organizing is looking great.

just curious if you might have different wheels on all your grinders or is that the plan? I'm hoping to make a hitch mount for my grinders and buffers so that when i need one I can just pull it off the shelf and put it in a trailer hitch style mount instead of changing wheels cause i don't have enough space to have 5 grinders with 10 different wheels lined up.

have you seen the vises and grinders stand thread? you might get a few ideas here if you are looking so here's the link and i'll post a few pics of a some of my favorites here in case you or others want a quick look:

https://www.garagejournal.com/forum/showthread.php?t=252799&highlight=vise+grinder+stands

keep up the great work!!
 

Attachments

  • 20c25e1a21f1a5f4f1524012ca5f7570.jpg
    20c25e1a21f1a5f4f1524012ca5f7570.jpg
    126.2 KB · Views: 58
  • attachmentVN34XJY9.jpg
    attachmentVN34XJY9.jpg
    123.8 KB · Views: 57
  • ArcStationViseMount.jpg
    ArcStationViseMount.jpg
    13.1 KB · Views: 57
  • Craftsmanhitchmount_zps925450d9.jpg
    Craftsmanhitchmount_zps925450d9.jpg
    92.8 KB · Views: 62
  • null_zps96f6b03c.jpg
    null_zps96f6b03c.jpg
    65.7 KB · Views: 58
  • 16160192715_5599f81887.jpg
    16160192715_5599f81887.jpg
    122.1 KB · Views: 60
  • multiple hitch mounts on welding bench.jpg
    multiple hitch mounts on welding bench.jpg
    123.9 KB · Views: 63
Last edited:
OP
M

moparfreak

Well-known member
Joined
Jan 24, 2005
Messages
853
Location
Milwaukee, WI
MF: nice work with all the pipe work for your air tools. your organizing is looking great.

just curious if you might have different wheels on all your grinders or is that the plan? I'm hoping to make a hitch mount for my grinders and buffers so that when i need one I can just pull it off the shelf and put it in a trailer hitch style mount instead of changing wheels cause i don't have enough space to have 5 grinders with 10 different wheels lined up.

Drives,
Yeah, each grinder has a different wheel on it, picture doesn't show too well. I've got a total of 4 grinders, 3 up on the shelf and one on a Craftsman stand (a sheetmetal one, not particularly sturdy). One has standard grey wheels, one has the more friable white Norton ones, the other two have wire wheels and flap wheels of various grits. Comes in handy cause changing out wheels on a grinder isn't the quickest job. I haven't quite figured out how I'm going to make them "quick change". The trailer hitch idea is a good one, and I'll consider it. I might also just screw each one to a plywood base that can be hooked or clamped onto the workbench easily, which woudl give me more options for where I can position them throughout the shop. I usually always elect for the more adaptable flexible solution in the end.

Onto shop updates...

Starting to run the lines to the south half of the shop, which is more "woodshop" style. Crossing over the metal ceiling presents some challenges, need to find solid mounting points, so in this case had to make cross pieces that could be hard-mounted:

y4mnZqidPmOg5HouOaFNhgfKM9p96iNkVLjAG6pxmbZ26hZYjJSYdpKO4e60f_SmCRJV8lN82P_n7Xu6wmQdX9gzhh0Eex8ikmKvupvXylNNVz4EbMTOSIesSldbYTOoRMk7PPbhXJa7yhDIQZA6RjeHSJb_e3btN2YMBw-QUQaHzVQLPHhi9qHEdDy9PVieP-yqmBQ5FdAp2I1e09MfJ73hQ


Here's a drop for the main assembly workstation, will be used mainly for air hose to blow away dust, and air nailers for assembly work. I love having the stuff at arm's length hanging from the ceiling, helps the workflow.

y4mlNFIvXv1sr2CdIE2nMxOMMqsBa6IKrY0O3-fuTMMptpkzD7S9joeGVonOyrnMlJpsDcTUZhFU1PWqRglKMQ2aIXaZz_n16e6wWvrO_LdgxofW-lXoZLWp2SFUlGwymuy2D7uAP650bUsUDiM09BU1UOHq515uC_RB_mIdMGGSx4t1FPrhvZRPYWtJqDynTGKeb1t3VjnkfcpiSAemtZP9g


Next, I'm stopping at this stage to also build some ceiling mounted racks for my nailers. These usually always live around the assembly area, and till now they've collected and taken up most / all of the space underneath the top of the assembly station. In order to free up that clutter and space, I'm envisioning a hanging rack where I can grab the nailer I want easily. These things don't really "stack" well so hanging up on hooks seems like a good approach. I'll have two, one for the air nailers I use, and another for the Ryobi OneStrike 18V battery nailers that I use.

y4m5wl_DF5TUXpSQWKhSBM8dEbhd8n2x-TkE76btgBZ_iLFMFV9iDWVe4r0oW24nCicaptc4ucF9N5cNVzPh8TSgay4FrxJtkv9t_UFi-kqK3FiwnV-p-oImqDqsuc-cxyZY7jdR17RNc3e9rJ0cCbPQp0jxi7cSGFgjl8OcXPyNZ0PUeITCoY6MWGRpuwEHbsQd-70CgXIKNi_SawV3obthA


Here's the start of it, simple construction, kinda designing as I go (which is typical). To take this further I'll need to make a stop at the hardware store and pick up some hooks.

y4mYfgkylHhDEiXB6E_FiwXc0BFHPduxJYCublbNBHpNgoKurtrLyZRvTJ2-xpjX9S0CpNfLS4lq5oX_joA3xmqYBqTztlmSe5ZzrsEkCKU5mb8EDkpwqv_MD_u-IGICWeZOpClgnk_uT4HuY2Q5dkjlXy4lsXkS8J6Nlh6Q1ixigrRSPAce_7MDAjv9zmAaQJYcL2vUM1QYFI9LqYtabcHiA
 
To avoid these ads, REGISTER NOW!
Top Bottom