To avoid these ads, REGISTER NOW!

Mopar / Wood Shop Cave

PLOWJEEP

Well-known member
Joined
Aug 29, 2009
Messages
147
Location
Youngsville, PA
Thanks, I have often wondered if you could use Pex for air lines. Nice job on the installation . I will be subscribing . Sorry if you have already posted this , but where did you source the Milton couplers. I have been using NAPA brand couplers, and I haven't had very good luck.
My parents always drove Crysler products while I was growing up in the sixties and seventies. If you would have only known.
Good luck, thanks for sharing , Brian
 
To avoid these ads, REGISTER NOW!
OP
M

moparfreak

Well-known member
Joined
Jan 24, 2005
Messages
853
Location
Milwaukee, WI
Thanks, I have often wondered if you could use Pex for air lines. Nice job on the installation . I will be subscribing . Sorry if you have already posted this , but where did you source the Milton couplers. I have been using NAPA brand couplers, and I haven't had very good luck.
My parents always drove Crysler products while I was growing up in the sixties and seventies. If you would have only known.
Good luck, thanks for sharing , Brian

Those Miltons are so nice, highly recommended. They really have good fitment and action on how they connect and disconnect. Honestly now I just have no interest in going back to standard run of the mill stuff. After some light searching around, as well as some tips here on the forum, I went to JBTools as my source for the individual Milton fittings I need for my system. For shipping cost reasons, it's obviously best to be able to bunch it up into one order. Honestly not sure I've really ever seen the Miltons on sale at any of the local hardware stores, which makes it inconvenient if you just need 1 or 2...

Can't wait till I can convert it to 100% mopar garage and get rid of the Mazda for a new chally. But gotta finish paying off the student loans first...
 
OP
M

moparfreak

Well-known member
Joined
Jan 24, 2005
Messages
853
Location
Milwaukee, WI
Got the air nailers put up. Just high enough I won't hit w/ my head, and cleared up the shelf below my assembly table....next up is a similar hanging rack for my Ryobi cordless nailers. I like the Ryobis more for being able to travel around with and in the house, but I find those air nailers still more enjoyable to use when the project is in the shop where I have easy access to air since they are less bulky and lighter.

y4mbesT7_P9aQwvWaghUuLyCQd-JK-C26XynaXv6eHOxDhz8GRYzuYL8oueiyAEoH6O1mSrWhmmx2ooQOlCbnnN2CsfJIIPwvKIA2geyd7AlCsjZbeFcPyQ6MJ8r48vsZAHIozO39ktJhZygdYsK-MBbqLe37aBtUPdVzyDS_N5TCZDQTiqwfNRjYhFJdh3HpvBArwAreNqeXVYXQ0XUizSPA
 
OP
M

moparfreak

Well-known member
Joined
Jan 24, 2005
Messages
853
Location
Milwaukee, WI
Wow, not much time spent on the shop again this month. But, last night I finally knocked out the other half of the nailer storage. I really love the Ryobi AirStrikes. I have three of them (16G, 18G, Stapler) and I plan to get the 23G pinner as well, so I wanted to make the same overhead easy to reach hanging storage like I did w/ the air nailers. The Ryobis are pretty bulky and each of them shaped a bit different, so instead of hooks, I decided to use the existing belt hook that is on each of the nailers. Fortunately the same hook piece is used on each one. I got two pieces of flat steel bar and used the same basic attachment method as the other storage rack. I think it came out pretty good.

7bjQRxCSidaIatg?width=660&height=495&cropmode=none.jpg

IjGsaxtxN_8fAbA?width=660&height=495&cropmode=none.jpg

q9Ec6Tv_GOJpEZA?width=660&height=495&cropmode=none.jpg

Next onto the last workbench and hose reel and then I'll be done with this compressed air project and moving onto different things...
 

drivesitfar

Well-known member
Joined
Oct 23, 2013
Messages
36,014
Location
Pacific Northwest
MF: great job organizing more stuff in your shop. Since I love my Ryobi 18v tools now that their batteries hold a charge how do you like your nailers cause i've never owned or used one?

keep up the great work!!
 
OP
M

moparfreak

Well-known member
Joined
Jan 24, 2005
Messages
853
Location
Milwaukee, WI
The Ryobi nailers are darn awesome. They are one of the first consumer level battery operated ones (not counting the rather expensive paslodes and hitachis and sencos that had been out for a long time for construction trades that cost $300+ per nailer). Ryobis in general are quite affordable and perform well for what you pay, it's no surprise that all the other tool companies have come out with their own versions (Milwaukee, Dewalt, Porter Cable, etc).

I can also tell you that the way these nailers use the batteries, even the smallest battery lasts an awful long time, it's not a continuous use application so they go several projects before needing a recharge. Highly recommended.

I guess my only complaint is they are bulkier and heavier, and probably a bit more so than the newer dewalt. But, then again I'm not invested in the dewalt cordless system so that line doesn't make sense for me.
 
OP
M

moparfreak

Well-known member
Joined
Jan 24, 2005
Messages
853
Location
Milwaukee, WI
ahhh,,,getting closer. put the main drop in that serves my long corner workbench. Only one more to feed a reel that is to be installed at the rear of the shop....

Split off from the main 3/4" line running up ahead:
pikPBuMtu4ngG8A?width=495&height=660&cropmode=none.jpg

Was able to anchor the fittings up underneath the workbench itself, with easy access to the air gun w/ coil hose, plus an outlet if I want to connect a larger ID hose for a grinder or sander.
SvXINhxjtKy3QWg?width=495&height=660&cropmode=none.jpg

I'm happy w/ this, one more drop left then time to test.
AG8-R9JHat9VoOg?width=495&height=660&cropmode=none.jpg
 
OP
M

moparfreak

Well-known member
Joined
Jan 24, 2005
Messages
853
Location
Milwaukee, WI
What a joy, I can finally the compressed air lines are done! I finished up the last hose reel on the south end, where it can reach most places in the shop as well as go outside if needed:

Jpku4xBBNXdgG8Q?width=495&height=660&cropmode=none.jpg

Then I plugged at the north / south transition and air tested the north end. All good, no leaks, held pressure totally fine. Across what is probably a hundred or so connections, the PEX just holds up solid and consistent. All my threaded connections were good as well.

OZhTl6P6YAN4BNA?width=495&height=660&cropmode=none.jpg

So, all in all, a lot of slow tedious work but pretty easy to install. Most of it was just working it around existing stuff on the walls and ceiling. Easy to get the parts, probably have about $400 invested in the entire thing for a 1300 sqft shop, including air fittings and hose reels and the cooler & hoses for the compressor. Not bad! Now onto the next shop improvement project which will be getting my oxy-ac torch set up, and the MIG welder back up and running....
 
OP
M

moparfreak

Well-known member
Joined
Jan 24, 2005
Messages
853
Location
Milwaukee, WI
Lol, thank you! My goal is by the end of the summer to be in shape to start actually working on the Charger. A couple steps I have in front of that:

1) Get a bottle of gas for the Lincoln welder, build a proper weld cart (so many ideas on this forum, I've got to study)

2) Get bottles for the Oxy-acet torch, build a wooden rolling cart for it (already have some ideas on that)

3) Cut & re-frame some attic rafter openings (old to new attic transition) to free up space for storage of car parts upstairs when I start tearing the charger apart.
 
OP
M

moparfreak

Well-known member
Joined
Jan 24, 2005
Messages
853
Location
Milwaukee, WI
It has been awhile....

I sidetracked from shop projects and did a nice windowseat bench for our family room. Turned out nice, I think. Great for storage, now we have something that actually fits all the kids different board games and puzzles and stuff.

I modeled it up in SketchUp which really helped the process along. Required more front-end time but well worth it as I really didn't have to do much "design as I go" or "Fix this stupid design mistake" during the build itself...
y4msiLGvUBEQ2ie9yZWyc7otrwNdg9Beslq9J5Ovyjv4t9CdDGAsdujUTZv9SGdHmGjGpPgPQn542znLgaIU-sQ-etwWkWcyzRqQ2hKWF5FAffPVEJU8mEtFYBkglJHSYvb7IFc4E9bW6kMHRJjo1lxRNU1gWUCiPKWQnZt4iQKkThR0PZlji-AuI8b7yN76zcjIZKtBldLIHZZcQFd8TL_gQ

The real thing:
y4mtl1NACmni6z2NLhPtD0WVFfkOnmUznVnyJ2tm4FtA269mNnpUztia_WN3qAXJLW8HIvc-IjzrxMZacaK73yCcn6FHQkponvTG2_LrPEnvqQUMH7cCqmOZqYNZlbGNtcXxx3Re5XGFmjuRsKd9_aJIzju70OSD6OU4IvCGqu638tAaWPBnJz3RSO-SuChfICKvQwclcygK9a54p8RPkTPfQ


y4mWW-b-ozX0j7y2pBS_Dmx1JZR98DTEqJtp5j-Su7yYQWYFSHUQ-3h31kZomu4GTcCSJc6njIOw9Ha3sgbr9glZFRjibm0m3fqrcVO9kwhv_YVpSJY0GtMarOgqKtpmt-jvQJN9LPejxcIdvQ2a10FyS4yW9qpsGt8fbJ5dFAl24dWndUGMfdC4nsWrY9V9nT9tkIdgzfLTifbLkFO_IGAfg


y4mrjvQn2ajwtWLDtWmM6oM_NvpaKce0ZlxhFI8KH2VytBb33UufdSuLwm2_s7rtqJxEdTSqCnR8PgGG7Jd9s9a7nakwTF6jcXdO6-7h-XjmUxn2D2hDwU6X5qclX35leu5vqNLwkxrKM0ZMjk7bqFHN_PSQwIsSlyg3qqcQAPRmV-4BBDTJyuc4rZQhtu81_R_Fa7n5UgPVOh4nzUTvi5KOQ


y4mnKd57HfQvxYURu-wH_i7MXWopnTcjcGHxYSiUjxntB93sO6OoOZXlqCIJJsWkKHf3vUNzLMjsGKkGURXqeu_QwEc9mlSVTYD8RYRp_6IIZKS4IQK36NEEulFOo0O5SgpctyyCBilJcMudPr5s_rczT4NP7h9q8a_OZ28NEA--b6-CZsF2Zit7edgTbHr8vUoqN_pl3TF8vjpg53LbJwkDg


Next I'm making a shop jig. My wife / daughter want me to build a couple frames for hanging up some pictures / prints that we have, and I thought it was time to improve my process & skills by making a jig designed for frame construction, and for making things more repeatable than doing multiple setups on a miter saw.

I'm following this basic method from "Make Something" channel on YouTube, a great resource:

https://www.makesomething.tv/tutorials/making-ultimate-picture-frame-sled

So far so good, got the base cut & aligning to 45 degrees to the blade:
y4m_ur38BgFeEiLFMgfbIkI5w8XZ3KjDXrNB3x9EtYzhEs5K5wtsHApio_wivK_bfLEtaPlEVHNsA9UhLQsyj7LaY-VX2P7GJab8W_QGVlDRRv38u-ycLBarBz4AP3mHSTCwFvqP1W5UlJ8jhNTq9hFWQoJwCmSJTn6shSMT8rTye42r6FtUgKsNjqndhSJY8-SSusdDXsY-vhm1AGZfD_xfQ


Secured to the miter saw rails:
y4m9u3UUnYH9lDYI6h101LUUkNzawh71fFNbqzDFiT-OR5eKD_DTHmrrKsbt0BY5xtsFxgR9nMXPjXQCUzcoQqSdUKaw-brohXqlm8urZP-Co05x_u5V6GAS4uDPp929udyRaQ-2ANSLIzFWnJETyYeoqBbs6kwdeEOG_ZBYxa4TJeepj5bkOgtSKkMtTvYIHX9ICTH5EcS2EsquyGDY--hIg


And finally getting the aluminum fence / ruler cut and ready to install:
y4mhAIRnYQ7SpW38V-h56sbBfkjUv3bcfRtoPiJ1HGdUMTylqRPc2UPNogShkkVhaDptEr3OfxoIoNLJ3y94AvAMoMH1mthYREhRVBbCt5RXAnqxN4IE2ZPfMjc9MZKDMGj-leJihpXtHAwz7IW3jFXdZ6CEP8GL2gGTSIxfQDOOxlD8SLCXHBQ0tkYZg7vjylS8ubU3MFtm1X4hg3ZLrJksQ


Hope to get this one knocked out by end of the weekend.
 
OP
M

moparfreak

Well-known member
Joined
Jan 24, 2005
Messages
853
Location
Milwaukee, WI
Continuing on the frame jig, it's come together nicely.

Here setting up to make the stop block, with the groove to fit in against the ruler:
y4m5cvEvNU9IVDJ2Fw6W200bYzUipAA56Lo-8stXjJaMrawj4OBsU1QGfB3D-9rL7paYJfxGd_6jpUC123hor4R4yj0h2J8zjOafPW1y3aZVgsM8vQA_hjBJonZXuU25xMMaeqrHG5h8z1UlaeiuiK6ttkvZ0YopvaB2bcRn1tx11DQJO9hKKE7H6zcZqyb2XpfHmGPfC8hjOvHmRQA1O7BOQ


y4mxglN0HdcpLhL0K9ICcTNaepMab1-vAHGo02rsjRFEb3lk2_VMHQ-beCtahV2sx_k9i9LHRoH7AiE28n2zmtOucrRhbG4hteDcsOVdi5jI07OTdhmY_-yKC6J4-1zJpPRxyd8A--Mg5QYJEZJysc3hY7K1Aj4XU_XqFVFvgECCEhJPa1pLA4TexvQis4l8_jwZAijjtNb5T46Gv2NNfULvA


Here's the finished piece:
y4mOJ4QDW1LWJjlSqlaEqiai1t7KovimuT_BEedE8Q2lq4fwQjrv2L_RKY28p-evboqvRkUL_TUSdngkVLWMYzTSW-lNfEj2jx2OZEGzu7c5C5zrPMqNaKBE2QfnMcSTTKcWcAVBOyfhHGxwrGdEBncFvnTZEX5WMRCCqz8QOJzZ3gcJYDoT5q4RIJvhZUQqbozVit85eHEnhNVegAVQGh3Ag


Using it on the saw, it's just one setup, and nice tight miters! This way I'm also not flipping the miter saw back and forth between two 45 deg set points and introducing possibility for small errors each time. Also guarantees that the two opposing sides are of perfectly equal length.
y4mzJAlw5LL-ubSH_M5EExYAOkNqTxqQrFHqbjTZIfGEG6D2ReUMMCZDqTNsYlZhqEpNCG8ECDO8MBJYeSx8q7v0Fa4mvQEwxAaN07ekSSYAbWOP_ZrPyEAWBVFtGU8DuGa3nB7L2o_RjLQkthGIfFQOhUW7C1Uoh7n0h9fNSoJTDZBzTHNcwqH7AS2YwQWyzr0CV3cYJDgHu4fQybmEQEZRg


To help with assembly of the frames, I took a page out of a Family Handyman article and made a few of these:
FH14FEB_MITERS_13.jpg


y4mFjELolO1WX4ys_u4sj-4T6K8POUfIZ1vh1VQnCFtebvWQGDjWdDbOPpY3Ajki9K8gpBOSoM5ymYQhwfKvqJY4F4ebHG8R5w3wkeBRo_HFEfpw8O4L7OIcVF_lnW4S-brYue-siwINKHAJI-lnJRApj-p2jnyFpqRjsYP_719gae2FetK_w3M6fpcm-y0-cZ4spUsZOKSTpF3KAj1qejA-A


y4mMIZbDTM39egYXDUr3I-L1TRGzYRRlDfQ0uvKAOYl4PO1zRiks4aMipnGcJ_vOKAxcEL_9iimBsMtp0y-k0NgEKNSWdaScfbu6rxvn89sPlKA3b0Z4wPn030_A-7zFS4EjEvMfmNvbM88JicgC8Pfi0d89gEMr_QJuIEE8C49BCZ0V1Lb-h6JSfX6uHmqQhF-Zhv4gUPcSLG4W8GsYMJhsA


Also to help 90 degree panel glue-ups, I found some cheap right angle brackets that were 3/4" wide so they fit 1x material perfectly, and made up some right angle clamping block aids.
y4mF-MqiKbDR-tbUIoH3ikzBHOLls_MsW-z74WmLIxkqFkFY8MXhjtdGbrkFzSGaRuM1bWxpDwaXYvGf9KuC9kTqN_ASORFSFecmld-jVEGr4mcXZCpiIrM7mYv0jmvCDz5M_tXxu6mhqfOHCcY1EaS0sn_Wx5rF9dSMu_6FMNuwXegYgF3HcbJjGql4Ri78lzqwzYBCqBISdENef6oPRmD0g


y4mksNLB5XAv1UpSz_j_9CorfDd2-sAgPw30sQ3Oz4jnpubm8zlrgx-e34Da5jY0E700Yv26aq2v99AyJjD1FFEgcqLEaV16hQXjL8r58cJ-4re07hOvBeKbKV2-RuXObZsTsMR4ubIalBYWm84Di7nZNxywwDEu_q8DTtT9lg4TZSZrjTBc6rmVkKWt8AhZNDO66Ez_gbxXSUCiROxjdKgMg


y4mxHSCMjFTkG6xu5C8EOrm4I9KazhSMynIxHkLDgxW8INFXM48oAfI7FKzUSPIPa6mKd_frtCIT9fkbXIY7OkZwmj7k3Cb0xRPJBJqAOJFMwHgqqDE29zPvBTyFQvdKDPB_WJOZMjjkv-SWZZtgVqi_pqKaZpaCCo6vgbh6a3Vzy1B7E5avBfR4K0Q8bx225FkIzSEYygjjpe4v1-chEp5jA


These should come in handy. I've found that an effective way to improve the result of WW and general shop projects is to use smart jigs and fixtures to help the work produced be accurate and repeatable. Hopefully these help....

Next up once I finish the couple picture frames is a welding cart and some general things to prepare for the Charger restoration project! To be continued...
 

drivesitfar

Well-known member
Joined
Oct 23, 2013
Messages
36,014
Location
Pacific Northwest
MF: great looking shop. I hope you find good storage locations for all your cool new jigs and stuff.

keep up the great work and hope to see more pictures and good write ups as often as you can.

how's all the air pressure hoses working and are the locations working out where you put them?
 
OP
M

moparfreak

Well-known member
Joined
Jan 24, 2005
Messages
853
Location
Milwaukee, WI
Drives,
The PEX airlines are working out great. I love having access to compressed air at pretty much all of my most commonly used workstations. The one I use the most happens to be the drop I have hanging over the tablesaw / assembly benches. It's where I do most of my work. It's also made it much more convenient to use my air nailers. I have a few of the Ryobi 18V nailers and they are awesome. But, they are also heavier, and using them a lot can get fatiguing, whereas the air nailers are rather light and nice to use for bigger projects that are being assembled in the shop.
 

Jim 68 cuda

Well-known member
Joined
Aug 23, 2016
Messages
76
Location
Virginia
Great Mopar shop. Love the red stripe. I painted red Mopar stripes in my new garage too. I did a 68 Barracuda stripe, 68 bumble bee stripe and a 70 GTX stripe.
 

Attachments

  • stripe 1.jpg
    stripe 1.jpg
    56 KB · Views: 56
  • stripe 5.jpg
    stripe 5.jpg
    94.2 KB · Views: 59
  • stripe 4.jpg
    stripe 4.jpg
    52 KB · Views: 52
  • stripe 3.jpg
    stripe 3.jpg
    26.4 KB · Views: 51
  • stripe 2.jpg
    stripe 2.jpg
    28.8 KB · Views: 55
OP
M

moparfreak

Well-known member
Joined
Jan 24, 2005
Messages
853
Location
Milwaukee, WI
Great Mopar shop. Love the red stripe. I painted red Mopar stripes in my new garage too. I did a 68 Barracuda stripe, 68 bumble bee stripe and a 70 GTX stripe.

Jim,

That Mopar decor is freakin' awesome. Where / how did you get / do the emblems and the big barracuda graphic on the back wall?

:bowdown::bowdown::bowdown:
 
To avoid these ads, REGISTER NOW!
OP
M

moparfreak

Well-known member
Joined
Jan 24, 2005
Messages
853
Location
Milwaukee, WI
The clamp blocks worked out nicely for gluing up the miter joint as well, which has always been tricky for me. Took about 5 minutes to make from scraps but much recommended, I'll be making another set.

y4mYgjpszWwPHfU-11GeOrQqYTH2Nc45WBlxXfVmBqs6nqc5YbtGlfbCWRal8MNcns7vn0BpjKAq1sEUcOU87T3LbC9LFKUYgYxTRIcnIBeeq7XPgrOWgHW9aN_khDuGbLnyNzqLiT7FL59mUU1IqpSnwtDMTZ4uwqRLb7jkdEUNlCTtS6hdBdkU38Aikke3AhTm2PDIfkFitrUO5CKqj6ROA


Next, onto mounting an electric lift motor on the header beam above the Charger....
 

Jim 68 cuda

Well-known member
Joined
Aug 23, 2016
Messages
76
Location
Virginia
Jim,

That Mopar decor is freakin' awesome. Where / how did you get / do the emblems and the big barracuda graphic on the back wall?

:bowdown::bowdown::bowdown:

Thanks. The emblems are metal signs I found in the Classic Industries Mopar Catalog. The Barracuda fastback on the wall is a self adhesive wall decal that I found on Amazon. Its available in several sizes and colors. With a little searching, you may find something similar that matches your Charger.
 
OP
M

moparfreak

Well-known member
Joined
Jan 24, 2005
Messages
853
Location
Milwaukee, WI
With the frames done, spent a bit more busytime in the shop, and made progress on a few things....

First, I'm starting to look into a socket storage method. There are so many versions to be found on GJ. I always gravitated to the version with foam, where folks would get the Kaizen foam and cut out what they needed, getting a perfect fit. But, for a large collection of sockets that's just way too expensive for my tastes. Kaizen foam to fill up my collection could easily get up to a couple hundred $$. So, I've done a little experiment with simply using insulated foam sheets, the polystyrene used in construction. Then, to be able to make a nice, perfect & clean cut for the various shapes needed, I set up my dremel with a plunge base that I had gotten with a gift card to Lee Valley.

fdCCINcoSWriYaQ?width=495&height=660&cropmode=none.jpg

I had a collection of small bits that fit the dremel perfectly and are basically like tiny endmills. I'm sure these would snap off in metal or even wood but in a soft material like polystyrene it's just perfect. I don't even remember where I got this, it was years ago.

EfGgBtXYB8irihw?width=660&height=495&cropmode=none.jpg

So I tried out just tracing a shape I wanted in some scrap foam and cutting it free-hand. Wow, super easy and excellent control. This is almost as easy as it would be buying the Kaizen foam and using an exacto knife to cut out the shapes.

Wpunki_fVzwjvdQ?width=660&height=495&cropmode=none.jpg

Nice snug fit, easy to dial it in.
-OVEOestlwVVy5A?width=660&height=495&cropmode=none.jpg

More to come on this, as I gear up to apply this technique to all my sockets and ratchets.
 
OP
M

moparfreak

Well-known member
Joined
Jan 24, 2005
Messages
853
Location
Milwaukee, WI
Next I took some time to get my wrenches a bit more orderly. This is what they started with, basically 4 drawers of this:

y4miKAcw_ml_eAN5c6LlA9KrMClwXIXrcx9Yng61aRpO3su57teLRVd-IFqT-wmBwMji0VDViME2PvMc5Vj-LmmL3OQAsUGXQ3_KGIHjJDlWZBSpZhun3_l9RIQ1LzDod_EaPoKVnhkejqeV7zmmo-W3oZQXeEHJqjDF52E4qqKCCfwWKYz_KADtbvFWHkX-mj1pKAc94-wCNk1UNk-uYVHQA


My shop OCD raged every time I opened the drawer. No more. I am a fan of having things out that can be seen, so I decided to put my wrenches up on a nearby pegboard above the socket cabinet:
y4mudcyXU9hGDwRk3OMHZy51M7h-59w1LJzTP91X7HtfjPNjrGUnDTXDlTePZ65GKdJvrNVB1caSLMS4hYksYMcbgoJjHUSvSJShCB0vQaKJ7QwXKVQubh6PgEITlHUaCppqsRkedLqaRszhIXkmAZJ1IE67b3p8XwspsJNsmYGszwuShlueFPiZSQCVjRl6ltbtXKcjTUd2DF7TKXFCDcAHA


Then used the solid 12ga wire + broom handle method and wound up some holders for my other different wrench sets and organized two more drawers. Much better!
y4mKKRlACzjnIMg_V8lVi4N2ggESYratVIt0-TsubpxcuRH6PJe6wkJfq_fhXvr1BBKDi-rmfUG7n-k3woHLRigGZwdpgERT8hjSh4dPCB-GJNcyF1hTunOPy7CJEl-pJbMIuPQLXLUBWlXW19oK13LcNOEBLInXS4FEKPzYKGCN5rLPx24oOqVcWjJhUGGdima12CVNd7Pdvuxb00vLEleEA


y4mIDiDduQf4lPuIqupDUg_w13Ah3pln0oBOlSAjrwjsFrNkutFGbe7fabqecliYPN1ylRuc4Y9EUV9i85WDjoc9Dx691lBchwmFuv00GKvir2aXCv0EPA3mKw2QFc7hyQgAFXNjd1vG4Rk4aJMsbAmiDAJwpCPtX54SwIQqGy6Ft5QDtsOT6NZlaCRO6bdN6jl-H8TT59T6N7F__DqyPo8gQ
 
OP
M

moparfreak

Well-known member
Joined
Jan 24, 2005
Messages
853
Location
Milwaukee, WI
Finally I've started working on tidying up a shop utility cart that I throw my most commonly used hand tool items for various projects. A while ago I came across this little small 3 tier cart from Menards that rolls quite well and is small, and I found it works better than bigger carts. It's plastic so needs reinforcing in certain areas with I have no problem doing with assorted scraps.

I put one of my Milwaukee shop vacs on it, and have started building up the stuff it holds. Here how it's started, pretty much just a mess:
f72W4i8soTXmcpA?width=495&height=660&cropmode=none.jpg

K5_rQwTjcFn7jtg?width=660&height=495&cropmode=none.jpg

Then Ive started adding various containers, hooks and little blocks of wood to hold things in place here and there, and it's a great deal better. I've got some more ideas for storing things on this that I'll post later on. But, even now it's way more functional and easy to use.
XNde_CQQuw6eYuw?width=660&height=495&cropmode=none.jpg
 

shortykorte

Well-known member
Joined
Sep 1, 2014
Messages
8,039
Location
Tallahassee, Fl
Jim Cuda, nice shop and cool idea on the emblems. I guess the signs were trimmed to the emblem border.

MF I like how the frame jig came out. See a various uses for that.
On the frame clamping, my Family Handyman square is base on placing square on the inside. Looks kinda like a stealth bomber. Has the same cutouts for placing clamps. Down side is frame has to be bigger that 12”. Could have a small set also.

Cart looks good. Where’d the plastic caddy on top come from?

p.s. you need more wrenches. lol.

Sent from my iPhone using Tapatalk
 
OP
M

moparfreak

Well-known member
Joined
Jan 24, 2005
Messages
853
Location
Milwaukee, WI
Jim Cuda, nice shop and cool idea on the emblems. I guess the signs were trimmed to the emblem border.

MF I like how the frame jig came out. See a various uses for that.
On the frame clamping, my Family Handyman square is base on placing square on the inside. Looks kinda like a stealth bomber. Has the same cutouts for placing clamps. Down side is frame has to be bigger that 12”. Could have a small set also.

Cart looks good. Where’d the plastic caddy on top come from?

p.s. you need more wrenches. lol.

Sent from my iPhone using Tapatalk

Oddly enough I think that yellow caddy came from Aldi, you know that store where they sell cheapo tools and car mats right next to fruits and vegetables? :lol_hitti

Kept it on my workbench for awhile but it's got a rather large footprint and was using too much workspace, but for this cart it's rather well suited.

Yes I think it's safe to say I do not plan to ever buy wrenches again (but really I'm gonna get some more next week...)

As far as the miter clamp, are you referring to something like this?

HANDYHINTS_042618_010.jpg


What I've found is that the outside clamp blocks if you can't get a good tight clamp onto the legs, then when you clamp across the diagonals, it makes them slide towards each other and counteracts what you're trying to do with pulling the joint in tight together. The one above might work a bit better, and also easy enough to make with a piece of scrap wood.
 

shortykorte

Well-known member
Joined
Sep 1, 2014
Messages
8,039
Location
Tallahassee, Fl
Here they are in action. They’re made out of MDF. Pretty easy to make. 53a7eb69a65ab38ce3955f25333e9d4f.jpg

I saw a version similar that has a hole in it so you can clamp closer to the corner. I need to do this to mine.


Sent from my iPhone using Tapatalk
 

Attachments

  • 53a7eb69a65ab38ce3955f25333e9d4f.jpg
    53a7eb69a65ab38ce3955f25333e9d4f.jpg
    91.7 KB · Views: 8
OP
M

moparfreak

Well-known member
Joined
Jan 24, 2005
Messages
853
Location
Milwaukee, WI
Ah very nice. I might have to make myself a set of those and see how they work. Looks like they are around 12" on the long edges?
 
OP
M

moparfreak

Well-known member
Joined
Jan 24, 2005
Messages
853
Location
Milwaukee, WI
Not much shop time this weekend unfortunately, but did get a few minutes to try out an idea that popped into my head last week. I ordered one of those hat hanging straps that they sell for your closet. It's got a piece of webbing with adjustable position clips. I figured that would be perfect for quick and easy grabbing of my various pairs of work gloves.

It was about $12 on amazon, and I think a good repurposing.
y4mNuXAZQgLCPp-V7TNRcbdjhziTpQDfewkHKGjXi1lED5P6BHSbNTcRFx7dDgvHvNXKgKiviwEj8vojEFpo1Xs81TtC7UGwn5T1HaHCB64y65e6XJVp93eiVYZtqv_h3FmV5HE0mjiNPUYSyUM-zHQGsGs6UJwinIyi4_lqZqBCF15P8-Z-877YvmEJh5mGECdgZESGrerPV_1zBQhuMxqPA


Used a hook magnet I had laying around to secure it to a spot in the middle of the shop, easy to access.
y4m2DUrCeJ43vLB94zCVQLHDOJI5xSAJ5ZtwsDXv9keYgq0mITQjnCvKiA1Uh_zoJ1v68czOoYlY90sfCzJNL6-Oa3DD7aLGtf6ME__bNyO6ojuVZutp9n4wGkW10uk0GbDPoVuRviFkLGM825YzXdkO8I65ecsOHq5zCs5f3ZRMnmU8NVA5uN6uBY5kgpoaiWdEmLZIQn98NM2XjIXGMhF0A
 
OP
M

moparfreak

Well-known member
Joined
Jan 24, 2005
Messages
853
Location
Milwaukee, WI
When I redid my wrenches a few weeks back I took these out of a drawer. I believe they were originally from HF, a decent set of allens. Decided to make a quick holder out of scrap. I messed around with a few different ways of doing it but ultimately decided on a simple board w/ appropriate sized holes for a nice tight fit of the handles.

275Zu0J4BZHEPJg?width=495&height=660&cropmode=none.jpg

bUx3pVhjhdGsSYg?width=660&height=495&cropmode=none.jpg

Turned out pretty well I think...
g9bdR1Lz3a8MuzQ?width=495&height=660&cropmode=none.jpg
 
OP
M

moparfreak

Well-known member
Joined
Jan 24, 2005
Messages
853
Location
Milwaukee, WI
Been sidetracked for awhile again. Finished up baseboard in our family room, and also getting ready for a family trip to FL. However, in the meantime, I've decided to start putzing around with the socket storage idea with foam. Got a single sheet of 2" foam, which should be more than enough for my entire socket storage strategy, and only cost about $20.....plus lots of time.

Started with layout. To be honest just deciding how to arrange things is what takes the longest. The actual routing of the holes goes pretty fast. Establishing grid-lines and layout marks makes it go much easier.
1B9DO2WcWJbKmtQ?width=495&height=660&cropmode=none.jpg

Sql0qgVjKud4l_g?width=495&height=660&cropmode=none.jpg

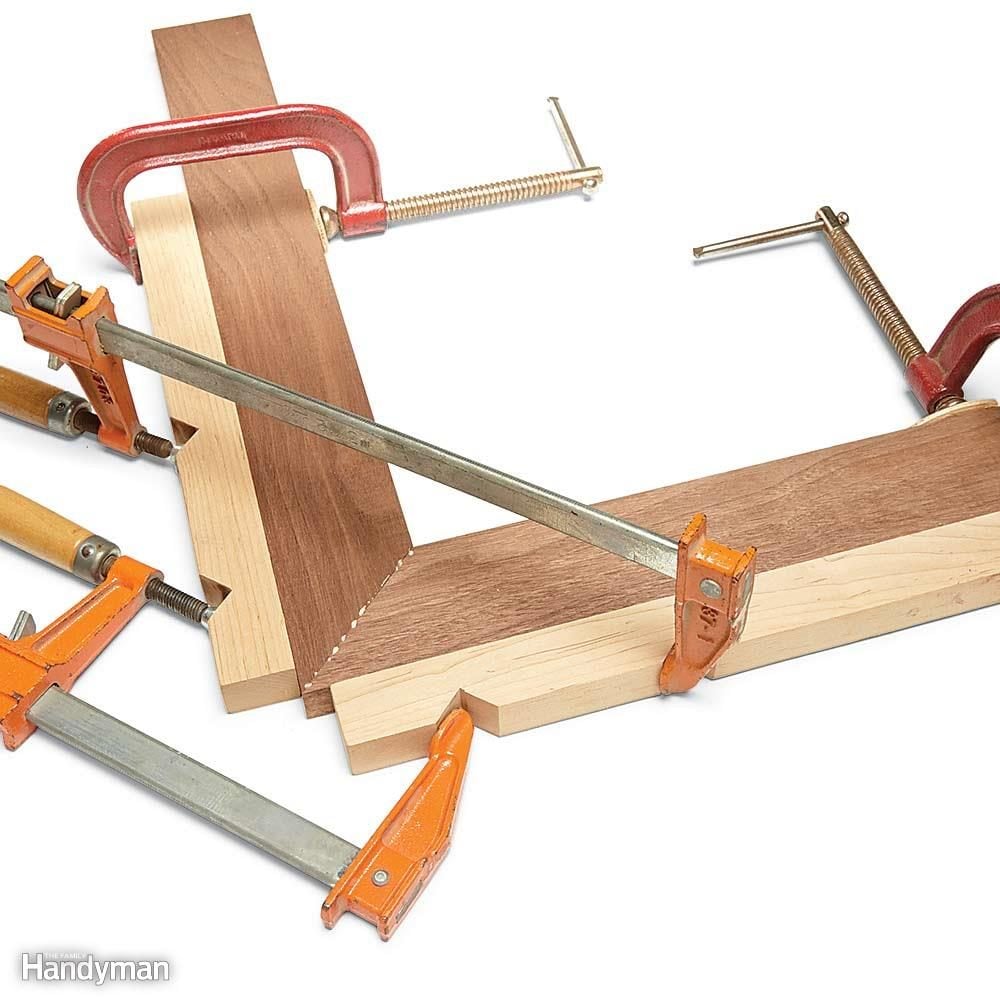
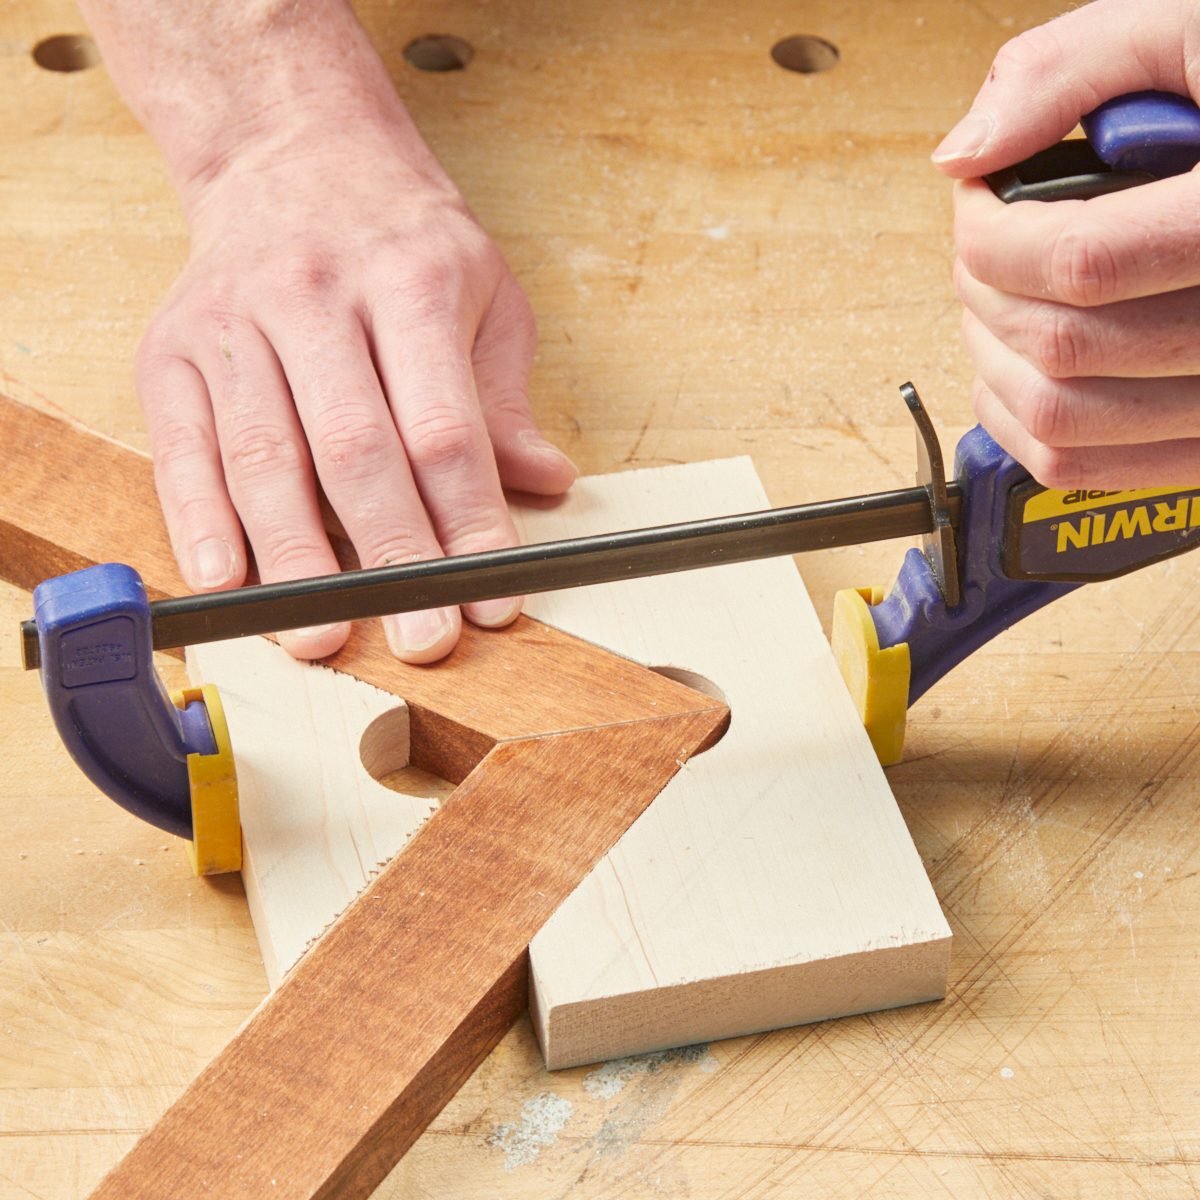
I like to rout the holes and get the layout the way I want, then use the TS to trim the overall block to just the right size and shape. The other nice thing about this is since I'm using 2" foam, its quite sturdy on its own and so I can make the blocks in sections rather than having to incorporate everything into one big wide sheet, which means if I make mistakes and have to re-do a set it's all good.

Q2bOg0WIIen8KMg?width=495&height=660&cropmode=none.jpg

Got my 1/4" drive stuff pretty much set.
OSXFDQKQs35a3GA?width=495&height=660&cropmode=none.jpg

gGTujEl7M-v2CQQ?width=660&height=495&cropmode=none.jpg

Next on the right side of this drawer I'm going to put my socket bits (allens, torx, etc). First step for me is to set up the holder for the 6" long allen sockets that I have. To save space I want these standing proud, and in order for them to fit in the drawer, it means basically boring a thru-hole all the way to the drawer. Found a forstner bit that fit the socket perfect and did it on the drill-press.
6RjVIVA-G_gGmOA?width=495&height=660&cropmode=none.jpg

unb5CA7RJVuPd2A?width=660&height=495&cropmode=none.jpg

Worked out well, and they don't wiggle at all when the drawer is opened or closed. Also can put this in the back so that I don't bump into them reaching for other sockets.
QFv98TtFVbEzD4A?width=660&height=495&cropmode=none.jpg

Next I'll be laying out another piece or two for the rest of my socket bits, and that will complete this drawer. Then it'll be the 3/8" drive stuff.
 

shortykorte

Well-known member
Joined
Sep 1, 2014
Messages
8,039
Location
Tallahassee, Fl
Looks like the 2” foam sheet would be nice to have around. Use to hold tools and bits and as filler blocks behind drawer trays.
Question on your pex connection with the regulator/filter. Did you screw in the pipe to pex fitting in the regulator first then insert/crimp the pex?


Sent from my iPhone using The Garage Journal mobile app
 
OP
M

moparfreak

Well-known member
Joined
Jan 24, 2005
Messages
853
Location
Milwaukee, WI
Shorty,
Yes, in all of the cases I would install the PEX-to-pipe threaded fitting first (usually in a vise, where I could get a lot of installation torque onto the fitting to ensure seal), then I'd mount it to the wall, then I'd slide the PEX onto the barb and crimp it.

Finished up the bit sockets, lots of room to grow too. Since a lot of these sockets used the same size base socket, I actually used forstner bits for most of these which made things go a bit quicker.
5xmR6Te12scLu3A?width=660&height=495&cropmode=none.jpg

-LoW5YYMdI3UaxQ?width=660&height=495&cropmode=none.jpg

Next I'll gather up the 3/8 sockets and setup a grid-work for the next drawer below.
 

drivesitfar

Well-known member
Joined
Oct 23, 2013
Messages
36,014
Location
Pacific Northwest
MF: thanks for sharing some good storage/organizing ideas. looks like your shop is getting more usable every time I stop by to see what you've been up to.

keep up the great work!!
 

Unruh

Well-known member
Joined
Aug 12, 2017
Messages
1,431
Location
Silverdale, Washington
Really great read. I use a very similar approach with my organization as in I find something I like and modify it to work for my needs. You are very creative that way.
 
OP
M

moparfreak

Well-known member
Joined
Jan 24, 2005
Messages
853
Location
Milwaukee, WI
Thanks guys. Just got back from a trip to Orlando & Disney World w/ the family (thanks to GJ for suggestions in the Free Parking section). Great / exhausting time and everyone's seeming to bounce back into routine pretty well also. With that big trip (and expense) behind me I'm already planning my next projects:

- Finish up the sockets (to satisfy my OCD)
- Frame up a pass-thru opening in the attic for storage of larger car parts
- Build a welder cart
- Get things planned and on track for starting up on the Charger!!

This Sunday I'm taking my two boys to my SFIL's house out in the sticks and spending a day there, where we'll all work together to fabricate a cart for my welder. I've kept it on a cheapo HF cart for awhile but I haven't welded in a few years so before I get ready to work on my car I'd like a bit of a practice run. Here's my crude sketch:
y4m8lGjeKxt9Ff2i8VssbZYOJlJqz_wKqX9hBm0kxYX8EQ7DHNX75X-_Pg7T07iBoFtXq_RDkS-uL8zIKgAJbdE5S0JnindRmy1hFEh1kmZ0OmiWi_AvDnpu1M6QTEkwVyQUTMDE1OGI1sgYBUcctR1g2ie-LHJWypau2UlgmSSMApPZq76Sc16-OCIJ-1b5zDw1GdRA4B8Lr8PoKocaKd28Q


The other nice thing is that my SFIL has enough scrap steel & assorted materials to build the whole thing. Probably at least a couple hundred in steel tube, angle & sheet. Hope to capture enough pics to document the process!
 

turbowoodworker

Well-known member
Joined
Mar 18, 2012
Messages
3,538
Location
Apex NC
I think I bumped into you in the Space Mountain line. Disney wasn't as crowded as I expected, but still bad. Went to Universal two days. Way shorter lines.
 
OP
M

moparfreak

Well-known member
Joined
Jan 24, 2005
Messages
853
Location
Milwaukee, WI
Disney was cool, but yes it is a day largely spent navigating & waiting in lines. Star Wars park has me pretty excited, so we leave open the possibility of coming back in a couple years once its finished and hitting up the parks we didn't get a chance to see, such as Universal, Animal Kingdom & waterparks. Overall tho for my 5 yr old daughter who is herself a princess, it really felt magical so job #1 accomplished in my mind. :thumbup:
 
To avoid these ads, REGISTER NOW!
Top Bottom