aggierailroad
Well-known member
Hello all, long time lurker, first thread.. I'm a mechanical engineer just building my shop up. I graduated a few years ago and now am working in the oil patch. I have been working on a solid maple coffee table for my wife for a few months now off and on. It is loosely modeled after the Pottery Barn "Benchwright" line of tables: http://www.potterybarn.com/products/benchwright-coffee-table/.
After reading up on the quality of their furniture and feeling the general heft (or lack there of) I assumed I could build one using the old techniques - mortise and tenons, solid wood, breadboard ends, etc. Unfortunately I don't have too many pics of the actual construction of the pieces. I learned 99% of how to make tenons and mortises from youtube and various woodworking forums. I'm a firm believer that the everyday guy can produces work that has 95% of the quality of a true craftsman if he is devoted to patience and works and studies the craft.
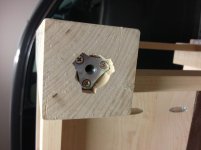
Now, back to the "build." I bought the maple surfaced S4S, meaning surfaced-4-sides. This was because I did not have a planer, hand planes, jointer or anything else to really straighten wood. It's from a local mill - great guys - and I wouldn't recommend anyone tackle something like this with wood from a big box store... I built the rest with a 12" Ridgid compound sliding miter saw, a Ridgid worm drive circular saw, a 1HP Craftsman router and cheap router bits and a Craigslist Craftsman drill press. I built a lot of jigs out of 1/2" mdf to route the mortises. I also built a mini router table that clamped to my regular table (which I also had to build to have something to clamp it to..). I used the Incra rulers to lay out the mortise lines (thanks to the Aerodrome studio for that), routed them with 3/8" plunge bit.
The tenons were cut on the router table using a rabbeting bit. I ended up rounding half the tenons over and squaring the mortise corners. I found that generally for me, squaring the mortises was easier. Also, a good, SHARP, set of chisels was invaluable for this project. Sharpen them often and they will work for you.
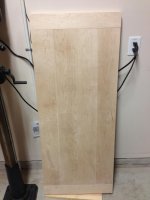
The top is made from 1 5/8" maple, roughly 6" wide. They were joined using a boatload of 1/2" dowels. I drilled the dowels using a cheap jig from Rockler and a hand drill. The breadboard ends were one of the most difficult things to make. They have a long mortise that is 1/2" wider than the tenon on the table runner boards. They were attached using glue in the middle and drawbored with 3/8" oak pegs from the bottom. Fantastic way to attach a "floating" piece of wood that I learned about, naturally, on the internet.
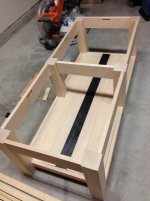
The bottom shelf is made from 3/4" maple with a :gasp: mdf center piece. Now, critics beware - I don't feel like I ruined this fine furniture by using mdf. Here's my reasoning: 1) I needed a piece that was 1/8" thinner than the maple boards. This is because there will be a 1/8" steel strap running lengthwise down the shelf. This is part of the "industrial" look that she wants. 2) mdf, when used and attached properly is very dimensionally stable - meaning it won't expand with changes to temperature and humidity. This was important to me as the steel strap will be laminated to the mdf. I didn't want the substrate to be expanding when the steel wasn't - leading to cracks. I live in Houston, we have wild changes in humidity and temperature, everything needs to be able to float and move.
On to the pics - any questions please ask. Next I'll show how I'm attaching the turnbuckles and threaded rods, attaching the top using the "old" method and finishing/sealing.
After reading up on the quality of their furniture and feeling the general heft (or lack there of) I assumed I could build one using the old techniques - mortise and tenons, solid wood, breadboard ends, etc. Unfortunately I don't have too many pics of the actual construction of the pieces. I learned 99% of how to make tenons and mortises from youtube and various woodworking forums. I'm a firm believer that the everyday guy can produces work that has 95% of the quality of a true craftsman if he is devoted to patience and works and studies the craft.
Now, back to the "build." I bought the maple surfaced S4S, meaning surfaced-4-sides. This was because I did not have a planer, hand planes, jointer or anything else to really straighten wood. It's from a local mill - great guys - and I wouldn't recommend anyone tackle something like this with wood from a big box store... I built the rest with a 12" Ridgid compound sliding miter saw, a Ridgid worm drive circular saw, a 1HP Craftsman router and cheap router bits and a Craigslist Craftsman drill press. I built a lot of jigs out of 1/2" mdf to route the mortises. I also built a mini router table that clamped to my regular table (which I also had to build to have something to clamp it to..). I used the Incra rulers to lay out the mortise lines (thanks to the Aerodrome studio for that), routed them with 3/8" plunge bit.
The tenons were cut on the router table using a rabbeting bit. I ended up rounding half the tenons over and squaring the mortise corners. I found that generally for me, squaring the mortises was easier. Also, a good, SHARP, set of chisels was invaluable for this project. Sharpen them often and they will work for you.
The top is made from 1 5/8" maple, roughly 6" wide. They were joined using a boatload of 1/2" dowels. I drilled the dowels using a cheap jig from Rockler and a hand drill. The breadboard ends were one of the most difficult things to make. They have a long mortise that is 1/2" wider than the tenon on the table runner boards. They were attached using glue in the middle and drawbored with 3/8" oak pegs from the bottom. Fantastic way to attach a "floating" piece of wood that I learned about, naturally, on the internet.
The bottom shelf is made from 3/4" maple with a :gasp: mdf center piece. Now, critics beware - I don't feel like I ruined this fine furniture by using mdf. Here's my reasoning: 1) I needed a piece that was 1/8" thinner than the maple boards. This is because there will be a 1/8" steel strap running lengthwise down the shelf. This is part of the "industrial" look that she wants. 2) mdf, when used and attached properly is very dimensionally stable - meaning it won't expand with changes to temperature and humidity. This was important to me as the steel strap will be laminated to the mdf. I didn't want the substrate to be expanding when the steel wasn't - leading to cracks. I live in Houston, we have wild changes in humidity and temperature, everything needs to be able to float and move.
On to the pics - any questions please ask. Next I'll show how I'm attaching the turnbuckles and threaded rods, attaching the top using the "old" method and finishing/sealing.