To avoid these ads, REGISTER NOW!

Mr. Cool DIY A/C mini split install. Pics and questions :)

k_ross

Member
Joined
Jun 14, 2016
Messages
16
Location
Northern Michigan
Hello everyone! This is my first time here, and am installing a 24K BTU Mr. Cool DIY A/C heat pump mini split system.

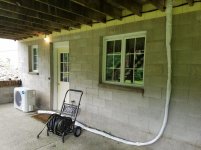
I finished the hard part already, which is the indoor unit, and drilling the 3.5" hole through my wall. I followed the directions and install video, and made sure the hole slopes downward towards the outside. I cut the supplied plastic sleeve and installed it in the wall, with some silicone caulk.

My install is on the second floor. I'm putting the outdoor unit on the first floor, on a concrete slab. I drilled a hole through the deck and ran the lineset through.

I'm currently waiting for the electrician to run a line to the compressor, which won't be done until next Monday. So I have some time to plan this a little bit.

Now my questions:

1. I was going to mount the compressor to the left of the back door, back in the corner. But it looks like the lineset is just a hair too short. Can/should I mount the compressor on concrete blocks to raise it up, so the lineset will reach? If not, I will just mount it to the right of the door, where the lineset comes down.
2. Should I wrap/insulate the lines with anything?
3. Should I extent the drain pipe from the indoor unit somewhere? Or should I just let it drip right there onto the deck?
4. I was going to fill the hole in the wall around the lineset with expanding foam. Is that a good idea? Or should I stuff some fiberglass insulation in there instead? Or something else?

Thanks for your help!

-- Kevin
 

Attachments

  • 20160614_165817.jpg
    20160614_165817.jpg
    135.6 KB · Views: 339
  • 20160614_165847.jpg
    20160614_165847.jpg
    144.1 KB · Views: 383
  • 20160614_165951.jpg
    20160614_165951.jpg
    146.7 KB · Views: 447
To avoid these ads, REGISTER NOW!

Fixin'Stuff

Well-known member
Joined
Jun 14, 2016
Messages
584
Location
HotterNHellHouston
1) You can raise it, just be sure that you secure the block that you use to raise it. Knocking the unit over would NOT make for a good day. Another option is to use one of the wall mounts. I've seen pictures of the outdoor units hanging from the sides of buildings several stories high.

2) I have the same question about covering the lines, as I wonder about their UV light resistance. I fear that the foam will degenerate in the sunlight.

3) The condensate needs to drain away somewhere. If you let it drip on the deck then the deck will be wet 24/7 in the summer. Even treated lumber won't last long under those conditions. (Note: When the unit is in heat mode, the outdoor coil gets cold and condenses water. There's a drain that should be mounted into the bottom of the unit and that needs to drain off to an appropriate place as well.

4) I was wondering how to seal that tube also. Fiberglass would hold water and leak air, while spray foam turns orange when the sun hits it. Plus the foam is no fun to remove later, if you need to work on the unit for some reason. Might be a good question to ask the supplier. Did you get yours from Ingrams Water and Air?
 

crabjoe

Well-known member
Joined
Jul 15, 2012
Messages
197
Location
Ceciltucky, MD
Unless you never get blown snow or rain in that spot, I say get it off the floor and mounted using a wall mount. Home Depot even sells wall mounts for mini splits and they're under $50.

I don't know how loud the compressor might be, but normally, you wouldn't mount it under a window. Also, make sure you get it mounted away from the wall, as instructed.
 

Kaizen

Well-known member
Joined
Jan 9, 2015
Messages
6,948
Location
New England
I would mount it to the right of the windows where it comes straight down. I bought their wall mount and it is heavy duty. i'm in snow country so I want to keep it off the ground away from leaves and snow. hoping it doesn't vibrate but I won't know for a week most likely when I finish the install.
I too was confused about the instructions on wrapping with insulation. it says to bundle all of it tight and wrap with fabric tape but then they give the impression to put something like pipe insulation.
I got their kit that hides the pipes. definitely recommend getting it. mine I wanted to use some 45's to move it a foot or two to the left as it hit the bottom of the 2nd floor and was happy to see I could order them on line. fairly heavy duty plastic but the thing I like is the first piece covers that hole in the wall. take a look at the pics on their site.
http://www.rectorseal.com/slimduct-featured/
I bought another 20 feet of water line to run mine down to the ground. not sure if i'd run it out past that concrete so it doesn't get it rusted or slimed
 
OP
K

k_ross

Member
Joined
Jun 14, 2016
Messages
16
Location
Northern Michigan
Thanks for the advice everyone! I'll look into wall mounts to get it up off the ground. I'm in northern Michigan, definitely snow country.

Kaizen, thanks for the link, those covers look great, I think I'll order some!

-- Kevin
 

Ohmthis

Well-known member
Joined
Jan 20, 2013
Messages
3,009
Location
Outside of Louisville KY
Kevin, most of your questions have been answered. I just want to add a couple of things.
1) There is nothing wrong with keeping the heat pump on the ground, but raise it up 8" or more and make sure it is anchored down. There are mounts to do this.
2) The lines are already wrapped, but another layer doesn't hurt anything. It will actually help. Use either what was suggested or another product to cover the lineset. It will protect from sun, elements, and physical damage, plus it will make the install much neater.
3) Yes, extend the condensate drain to the ground. Besides the damage that it can cause to your deck, it will keep a potential hazard (think slips, bug infestation) at bay. Take it to the ground and I would 90 at the slab and take it to the grass/ dirt.
4) Foam is great at sealing air and insulating, but it is a booger to remove if you need to. I like to stuff insulation into the cavity and then foam just the outside. If /when it needs to be gotten into just the surface foam needs to be removed.
I hope this helps and let us know how the system does!
 
OP
K

k_ross

Member
Joined
Jun 14, 2016
Messages
16
Location
Northern Michigan
The electrician called last night to tell me he had a schedule change, and that he could come today if I wanted. I naturally said yes, but that meant I had to scramble a bit to mount the condenser unit.

I just bolted it to the concrete slab, using the supplied rubber feet, to the right of the door, straight down from the vertical drop of the lineset.

I don't have a wall bracket, the local Home Depot doesn't stock them, I'd have to order one. And I don't like the idea of putting it up on bricks. So I will leave it on the ground for now, and raise it up in the fall, when I start using the heat pump, to allow condensate from the heat pump to drain properly. And also to get away from the snow that is sure to follow.

Ohmthis, I really like the idea of stuffing the cavity with fiberglass insulation, then topping it off with expanding foam. Best of both worlds, I think. I will do that.

I will extend the drain down through the same hole as the lineset, then 90 degrees to the edge of the deck, and let it drain onto the grass. I'll get that done over the next couple days. I will post pictures of the final install, and let you guys know how I like the unit.

Thanks!
-- Kevin
 

Kaizen

Well-known member
Joined
Jan 9, 2015
Messages
6,948
Location
New England
kevin one thing that I was thinking about on mine is when its freezing out and running the heater how does the drain line not freeze? kind of like ice dams do is my concern. so the outlet would slowly plug it up. wonder if there is a certain exposed footage that's allowable or something? maybe gravity and the warm water make it not a problem?
 

crabjoe

Well-known member
Joined
Jul 15, 2012
Messages
197
Location
Ceciltucky, MD
Check your local HVAC supply house to see if they will sell a wall mount to you. If they won't you might get lucky and find a contractor going in that might get it for you.

You could also try Grainger, if you have one in your area. They will sell to the general public now.
 
OP
K

k_ross

Member
Joined
Jun 14, 2016
Messages
16
Location
Northern Michigan
The electrician did his job yesterday, and I'm up and running. Like I said earlier, I just bolted it to the concrete slab since he arrived ahead of schedule, and I didn't have time to order a wall bracket to get it up off the ground.

I'm impressed with how quiet this thing is. Especially the outdoor part, I was expecting it to be much louder. It's very quiet, and no vibration, so mounting it to the wall shouldn't be a problem with noise/vibration transfer into the wall.

Now I just need to extend the drain line. My deck has a nice puddle on it already. :eek2:

Thanks!
-- Kevin
 

Kaizen

Well-known member
Joined
Jan 9, 2015
Messages
6,948
Location
New England
The electrician did his job yesterday, and I'm up and running. Like I said earlier, I just bolted it to the concrete slab since he arrived ahead of schedule, and I didn't have time to order a wall bracket to get it up off the ground.

I'm impressed with how quiet this thing is. Especially the outdoor part, I was expecting it to be much louder. It's very quiet, and no vibration, so mounting it to the wall shouldn't be a problem with noise/vibration transfer into the wall.

Now I just need to extend the drain line. My deck has a nice puddle on it already. :eek2:

Thanks!
-- Kevin

Kevin i'm a little anxious about connecting my lines. read the instructions seemed pretty clear. just that easy? no leaks?
 
OP
K

k_ross

Member
Joined
Jun 14, 2016
Messages
16
Location
Northern Michigan
Kevin i'm a little anxious about connecting my lines. read the instructions seemed pretty clear. just that easy? no leaks?

Yep I just followed the directions. Also watched their video. Pretty easy.

Main thing is don't kink the lines, and try to keep the stress on the connections as low as possible.

-- Kevin
 

PoorOwner

Well-known member
Joined
Feb 10, 2007
Messages
5,032
Location
CA
You may find that the drain line inserts into 3/4 class 200 pvc pipe. The thinner wall kind and you can redirect the condensate to flower bed if possible.
 
OP
K

k_ross

Member
Joined
Jun 14, 2016
Messages
16
Location
Northern Michigan
I just now finished running 3/4" PVC pipe to redirect the condensate. It runs down the wall, through the hole in the deck, and along the underside of the deck and drains onto the grass. No flower beds nearby.
 
To avoid these ads, REGISTER NOW!

chrispyny

Well-known member
Joined
Nov 7, 2013
Messages
467
Location
albany, ny
I have a question about these Mr Slim units. Are ALL the Mr Slim units DIY with precharged linesets?

I ask because i need a 2 zone system. I found a 2 zone Mr Slim system on ingrams that is 9k btu and 22k btu. PERFECT. But it does not say in the description wether this is a precharged lineset system or not.... it seems ingrams may be one of GJ's top places to buy minisplits ( along side ecomfort.com ) but ingrams sure doesn't really get into the details on the system you are buying...
Am i missing something? thanks
 

Fixin'Stuff

Well-known member
Joined
Jun 14, 2016
Messages
584
Location
HotterNHellHouston
I have a question about these Mr Slim units. Are ALL the Mr Slim units DIY with precharged linesets?

I ask because i need a 2 zone system. I found a 2 zone Mr Slim system on ingrams that is 9k btu and 22k btu. PERFECT. But it does not say in the description wether this is a precharged lineset system or not.... it seems ingrams may be one of GJ's top places to buy minisplits ( along side ecomfort.com ) but ingrams sure doesn't really get into the details on the system you are buying...
Am i missing something? thanks
Mr Slim and Mr Cool are two completely different brands.

Mr Cool makes several lines of mini-splits that use standard copper linesets and require the system to be properly leak tested and vacuumed before charging. Mr Cool also has a line of mini-splits that are for DIY and come with the linesets already charged. They're literally plug and play.

I have not seen any Mr Cool DIY systems that are more than 1 zone. :(
 

Spdstr280Z

Well-known member
Joined
Apr 29, 2015
Messages
158
Location
Georgia
Yeah, the Mr. Cool name is pretty cheesy, but Mr. Slim isn't really any better...

OP, thanks for the thread, and please keep us updated. Many of us are very interested in the MR. Cool DIY option, I'm pretty close to pulling the trigger myself, but there isn't much out there about them...

Jason
 

gtae07

Well-known member
Joined
Mar 6, 2015
Messages
2,973
Location
Fayetteville, GA
I finished installing my Mr. Cool DIY unit this weekend and it works great so far.

Thoughts/impressions:

The lineset was already connected to the indoor unit. This made laying the system in a bit harder; my plan was to hook up the outdoor unit first and then see where the indoor one could go. With it preconnected, that got too cumbersome. I wound up with about 3.5 feet of extra lineset to lay out outside because I played it a bit conservative and didn't want to run up short. So in hindsight I could have moved the indoor unit over at least two more feet. Other than that the install wasn't hard. I do wish the electrical portion of the lineset was an inch or three longer.

It's QUIET.

Pulldown time seems a bit longer than I expected, but then I have nothing to compare it to.

The wifi remote capability is nice, but setting it up was a pain. The Android setup procedure didn't work so I had to use my work-issued iPhone.

Right now I'm debating whether to leave it in "dry" mode during the week, or just leave it completely off until the weekend.
 

Fixin'Stuff

Well-known member
Joined
Jun 14, 2016
Messages
584
Location
HotterNHellHouston
Right now I'm debating whether to leave it in "dry" mode during the week, or just leave it completely off until the weekend.

Glad to see some positive feedback on the Mr Cool DIY!

One thing to keep in mind about the pull down: I think it's going to take a while with any system. You aren't just cooling the air. There are a LOT of BTU's that get stored in the slab, walls, toolboxes, lawnmowers, cars, parts, etc. when you let the space heat up over several days. It takes a while to cool all of that stuff down. So when you first fire up the system, all that stuff is releasing its heat faster than the a/c can pump it outside. :(
 
OP
K

k_ross

Member
Joined
Jun 14, 2016
Messages
16
Location
Northern Michigan
The wifi remote capability is nice, but setting it up was a pain. The Android setup procedure didn't work so I had to use my work-issued iPhone.

Yeah I had to do the same thing. I couldn't get it setup with my Android phone, had to go find someone with an iPhone to set it up. Since the stuff is stored on their server with your account, once it's set up it then worked fine from my Android.

I was a little disappointed with the app. Their web site led me to believe that I would be able to see graphs of power usage of my A/C over time. But it seems this model doesn't support that feature. :mad:
 

PoorOwner

Well-known member
Joined
Feb 10, 2007
Messages
5,032
Location
CA
The thing about mrcool I found weird is the test for soapy water part. If there are bubbles does that mean you loss some of the precharged 410a already during install. ?


Also maybe some will disagree but I found it is better to turn on the AC early morning before all the metal in the garage heats up to 80 degrees or more. The AC can't pull down the temp unless it is somewhat oversized. I have found the AC cools a few degrees then hold still without cooling Futher with 7000 lbs of warm metal they release heat and goes to the inlet of your mini split handler
 
Last edited:
OP
K

k_ross

Member
Joined
Jun 14, 2016
Messages
16
Location
Northern Michigan
The thing about mrcool I found weird is the test for soapy water part. If there are bubbles does that mean you loss some of the precharged 410a already during install. ?

Heh I don't know, I'm not a HVAC expert. I just followed the directions, squirted some soapy water on there, didn't see any bubbles. Powered it up, squirted it again, still no bubbles.

Inside it blows out nice cold air. I measured as low as 39 degrees F. So I think that means I'm not empty on refrigerant. :)
 

Spdstr280Z

Well-known member
Joined
Apr 29, 2015
Messages
158
Location
Georgia
The thing about mrcool I found weird is the test for soapy water part. If there are bubbles does that mean you loss some of the precharged 410a already during install. ?

I think the answer is yes, but unless you REALLY screwed up, it will be very little and not enough to affect the operation of the unit.

Jason
 

Kaizen

Well-known member
Joined
Jan 9, 2015
Messages
6,948
Location
New England
heck I might as well stick my review here as well for ya'll on the fence to have them in one thread. I did the 12k unit. Ordered the lineset cover and the wall mount. The unit and extras were all high quality. They screwed up and did not send me the wall mount with the shipment so I had to wait a few days to install. Other stuff you will need besides the obvious electrical is duct tape or something similar to wrap the lineset tighter and a drain hose I think with a 5/8 inside opening. I had to buy 2 rolls so another 30 bucks.
I was taking out a window while installing mine. so I had new 2x and drywall. if you have the wall open i'd wait till you get the bracket so you can add some studs going down on both sides of the bracket. I wanted mine centered so I only managed to secure the top of the bracket into wood.
I agree its very cumbersome to have the 20 feet or so of lineset to stick through the hole. Its a 3 person job. I had 2 so I put the unit on a rolling chair and as I fed through the hole and the person outside routed it so it wouldn't kink the chair pulled to me.
as I have clapboards I installed 1x so I could have a clean transition when I install the claps again. I really like the lineset cover. not only does it seal the exit hole well but it allows for offsetting the lines to get around stuff. I used two 45s to get around a roof. I wanted the rest to be vertical not angled. I did mess up and ordered 3.5 inch 45s and as none of it had any instructions I did my best before realizing I had to order other ones. had someone moving in so I had to get it working that day. other nice thing on lineset is it has black pieces you twist into position on the back so you can tie off the lineset to it. I used zip ties.
Found using the wall mount nice to do the work on the rest of the install. I put mine about 3 feet up so connecting lineset was easier then on the ground. Found I could either coil the extra under it horizontally as some have said its better or vertically wrapped around the bracket arms that go to the wall as the unit is a foot out from the wall.
Connecting the linesets was the only real anxiety as if you screw it up you have to call the pro's and I hate calling in anyone. As the op said its hard to screw up. The soaping thing is a standard double check. if you saw bubbles then you'd just tighten it more. I tightened mine to spark plug tightness....lol who uses torque numbers anyway?
Only real problem I had was the plug. I installed a power drill replacement cord as I only needed 110v. I posted this in electrical and really didn't get a solution. anyway I ran a new circuit from the panel. new regular breaker, 12-2, exterior waterproof plug enclosure, and a gfci. The first gfci kept tripping the breaker. got a replacement and the gfci kept tripping within a few minutes of running. reset gfci same thing. tested everything and looked fine. finally got aggravated and just put a normal plug on it and all was fine. Not sure what the deal was. Going to get a gfci breaker and see if it works that way.
Wall mounted when running has zero vibration through wall. inside unit takes awhile but cools the whole area. Now I want more. some pics before lineset covers added.
IMG_5576.jpg

IMG_9810.jpg

IMG_3038.jpg

IMG_0563.jpg
 
OP
K

k_ross

Member
Joined
Jun 14, 2016
Messages
16
Location
Northern Michigan
Kaizen,

How many square feet is that 12k unit covering? Do you plan on installing vinyl siding? Will the lineset interfere with installation of siding?

"Now I want more". Hehe, addicting little buggers. I now want to get a 3-head unit for the bedrooms in the house, and get rid of the portable units in there now.
 

Kaizen

Well-known member
Joined
Jan 9, 2015
Messages
6,948
Location
New England
its a 600 sq foot apartment. Its installed centrally to all 4 rooms so does well. we're really not air conditioning people so its mostly for 90s or muggy. Behind the lineset I put 1x6 pine so the clapboards will **** right up to it. I've been taking the vinyl off my house as I work on it.
Its my kid living up there now but I wanted to try this as the source of heat as well. The apartment is normally never below 45 as my place on the 1st floor heats it so interested to see how cold this really works down to. To be honest I bought this for my place so I didn't have to install a 12k window behemoth again. then things changed and I stuck it up there. damn kids. so i'll def be doing another probably a 24 k as I have an open floor plan and more sq feet. Probably next year.
If this thing lasts as the warrantee implies this is such a great option over the hvac tech required ones.
 

txoid

New member
Joined
Jul 4, 2016
Messages
4
Location
TX
I'm also thinking of getting the MrCool DIY. The 18K BTU unit comes with 26ft lines. Is there a way to shorten the lines? I only need about 8ft. Indoor unit is on the other side of the outdoor unit which is about 7 ft.
Thank for the post and info. You guys are very helpful.
 
OP
K

k_ross

Member
Joined
Jun 14, 2016
Messages
16
Location
Northern Michigan
Nope, no way to shorten them. Can you plan your install so the two units are farther apart? Maybe even move the indoor unit to a different wall, and run the lineset either along the interior wall, or under the eves on the exterior? From what I've read, it's best not to coil up the extra lineset, if it can be avoided.
 

txoid

New member
Joined
Jul 4, 2016
Messages
4
Location
TX
I could move the outdoor unit further away. The lines would go up about a foot to get to eave. They would run back down to the outdoor unit. Would that be ok?
 
OP
K

k_ross

Member
Joined
Jun 14, 2016
Messages
16
Location
Northern Michigan
The installation manual doesn't caution against it, so it's probably okay. But I'm not an HVAC professional.

The condensate drain hose, however, cannot go uphill. It must slope downhill from the indoor unit.
 
To avoid these ads, REGISTER NOW!
Top Bottom