To avoid these ads, REGISTER NOW!

Mr. Heater Big Maxx vent adapter?

CJseven

Well-known member
Joined
Mar 4, 2007
Messages
344
Location
Southeast Missouri
I just bought a new Big Maxx 80,000 btu unit, I’m planning on ordering z flex nova vent pipe to vent the unit horizontally Question is do I need to order the double female appliance adapter, or will the nova pipe slip into the vent on the unit.
 
To avoid these ads, REGISTER NOW!

crowwinger

Member
Joined
Nov 2, 2020
Messages
17
Location
MN
I was searching for this same question... can you update on what you determined during your install? Thanks!
 

Showkey

"MEMBER EMERITUS"
Joined
Aug 9, 2014
Messages
8,638
Location
Wausau WI
Hanging furnace horizontal vent is suppose to Cat III ........is that Z flex CAT III ???????????

CAT III is stainless, gasketed joints, positive lock joints.
 

crowwinger

Member
Joined
Nov 2, 2020
Messages
17
Location
MN
Yes, my question was in regard to connecting the 80k (which is 4" vent) to the Cat III Z-flex (which appears to me would need a female/female with double seals). I had initially sent an email request to Mr. Heater, but due to delay I called and was told that the Universal Appliance Adapter (2ZVB04) would work - so I place my material order.
I just got the email response and it contradicted the advisement saying that the appliance adapter will not work and I should instead order 2SVSRHA040, which appears to be a pretty hard item to find.

My order is already shipped and was hoping to complete this weekend, so not sure if I'll be able to make the 2ZVB04 adapter work. I will update.
 

crowwinger

Member
Joined
Nov 2, 2020
Messages
17
Location
MN
I just received the Z-flex the Universal Appliance Adapter (2ZVB04) and can see why I was later informed that it "wouldn't work" from Mr. Heater.

I'm attaching 2 photos:

1. Side profile showing depth alignment of the adapter and the flue transition on the heater. The raised ring on the adapter is where the red rubber gasket is housed. You can see that this overlaps only slightly on the short flue transition attached to the heater.

2. Looking inside the attached adapter to the heater.
Here you can still see the red rubber gasket exposed because you can't fully push the adapter onto the transition. However, the main reason you can push it on further is because of the clamp screw that you can see towards the top of the 2nd photo (there is a clamp on both sides of the adapter).

Since the "correct" adapter (2SVSRHA040) is on back order a month out, I will probably make this one work by removing the clamp from the heater side and push it on further until the rubber gasket is fully onto the flue transition. It is very tight fitting and could still probably get a sheet metal screw to further solidify the connection.
 

Attachments

  • GarageJounal1.jpg
    GarageJounal1.jpg
    42.5 KB · Views: 211
  • GarageJounal2.jpg
    GarageJounal2.jpg
    61.3 KB · Views: 185

Ron_J

Well-known member
Joined
Jul 10, 2018
Messages
295
Location
Central PA
I'm getting read to install my Big Maxx heater and trying to get my head wrapped around what is needed for the horizontal vent.

Is a class 3 a double wall? I will be able to get outside with just a 45deg elbow and about 4' of pipe. What else is required for going through the wall?

would you guys mind posting a link to the vent kits you bought?
 

Showkey

"MEMBER EMERITUS"
Joined
Aug 9, 2014
Messages
8,638
Location
Wausau WI
Usually if there is a double walled CAT III its setup for concentric outside air intake.

The BIG max horizontal vent is usually a CAT III single walled from the heater to the weather cap.
Through the the wall needs a wall thimble.

Northern tool and mail order HVAC supply houses is common place to purchase, some BIG BOX stores stock in some locations. The trick is to get all the pieces, manufactures specific pieces are often not interchangeable.
Menards has some CAT III
https://www.menards.com/main/heating-cooling/venting/high-efficiency-appliance-venting/c-9520.htm


.
 

crowwinger

Member
Joined
Nov 2, 2020
Messages
17
Location
MN
I'm getting read to install my Big Maxx heater and trying to get my head wrapped around what is needed for the horizontal vent.

Is a class 3 a double wall? I will be able to get outside with just a 45deg elbow and about 4' of pipe. What else is required for going through the wall?

would you guys mind posting a link to the vent kits you bought?

I intended to purchase mine from Menards, but apparently everyone in MN bought a garage heater this year and they are sold out of materials with no ETA on restock. So I ended up going with Z-Flex and purchased from supplyhouse.com. I received my order in 2 days and all the parts look like good quality.

Like you, I needed a 45 degree elbow for my install so I couldn't buy the kit (which only had 90 degree) and had to buy each piece. For my install, I needed an adapter, 1' pipe, 1.5' pipe, 45 degree elbow, wall thimble, and termination hood. I plan to install today.
 
To avoid these ads, REGISTER NOW!

sarman47

Well-known member
Joined
Aug 18, 2011
Messages
153
Location
Ontario, Canada
I went with the Mr. Heater horizontal vent kit (see pic of contents). The kit came with the 4” male connector (see pic), which is the first piece used from the 80k Big Maxx heater’s exhaust vent outlet. It is installed with a bead of RTV sealant around the attached adaptor and 3 small sheet metal screws.

The only issue is depending on your vent run there may not be enough pipe in the kit, depending on your roof eves or and other factor to meet code. The kits are basically designed for a corner mount venting out to the right or left. Or a side mount venting straight out.

2k41QKH


2k3ZWzF


2k3ZWAh


2k41BMV
 

Attachments

  • 4BAC3731-FC8F-4049-8CF7-D5650A30BCAF.jpg
    4BAC3731-FC8F-4049-8CF7-D5650A30BCAF.jpg
    62 KB · Views: 155
  • 53B611B8-108F-42B2-BD77-F734A1A4D6DB.jpg
    53B611B8-108F-42B2-BD77-F734A1A4D6DB.jpg
    49.6 KB · Views: 160
  • 2A49FCB9-ADF2-49A5-A08C-1FE8F5CD32E8.jpg
    2A49FCB9-ADF2-49A5-A08C-1FE8F5CD32E8.jpg
    80.2 KB · Views: 157
  • C7A7F24E-806B-4E3C-8E5A-A35B4533AABB.jpg
    C7A7F24E-806B-4E3C-8E5A-A35B4533AABB.jpg
    109 KB · Views: 157
Last edited:

LX-Markham

Well-known member
Joined
Apr 27, 2013
Messages
2,929
Location
Markham, Ont.
Mine was a Modine HotDawg, but basically same thing just different adapter. Here’s the parts for my install...

IMG_0043_zps593jm55p-L.jpg


Right side bottom to top: exterior vent cap (tee), adapter, condensate trap, wall thimble.
Left side: a couple straight length of Cat III

IMG_0044_zps6z1mgq3p-M.jpg
 

crowwinger

Member
Joined
Nov 2, 2020
Messages
17
Location
MN
Not as nice as LX's install (1st time doing anything like this), but here's how mine turned out this weekend. I ended up using the universal adapter and just removed the clamp on the heater side to allow me to push it fully onto the heater.

Just doing a little retrospect tonight after cleaning up the garage. For anyone reading these posts and considering putting in a heater wondering about cost... I didn't really do the math up front, but the material costs for the installation were more than the heater itself. I did get a quote for a pro to run the gas line, but estimate was $800 and I opted to do it myself - very doable if you're comfortable with handyman stuff at home and do a little research.

Heater: $410
Materials: $435 (plus $60 for tools --> $495)
- Venting $220
- Gas: $135 (Used copper like the rest of my house)
- Electrical: $30 (Ran an outlet with a switch)
- Thermostat: $50
- Tools: $60 (A few things I didn't have like a Flaring Tool for copper gas line)
 

Attachments

  • GarageJounal7.jpg
    GarageJounal7.jpg
    19.2 KB · Views: 125
  • GarageJounal3.jpg
    GarageJounal3.jpg
    62.4 KB · Views: 130
  • GarageJounal4.jpg
    GarageJounal4.jpg
    72.2 KB · Views: 130
  • GarageJounal5.jpg
    GarageJounal5.jpg
    58.6 KB · Views: 145
  • GarageJounal6.jpg
    GarageJounal6.jpg
    53.7 KB · Views: 165

penright

ALLIANCE MEMBER
Joined
Dec 27, 2016
Messages
618
Location
SW of Mustang, OK
For anyone reading these posts and considering putting in a heater wondering about cost...

I liked the switch with the outlet. All my wiring is 3/4" conduit with 4" boxes. I was going to a quad outlet like all my others, but it does not make sense how high the outlet would be, just that I have all the parts, so that what I was going to do. I also have the faceplate to do an outlet/switch. Kind of like what you did.

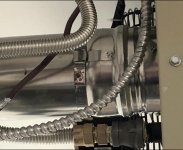
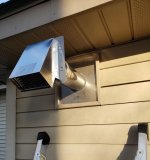
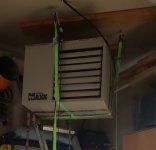
A little thread drift, but venting was one of the questions I was going to ask so I hope it not too far.:)

I just started looking and had a professional come and quote it. My shop is 25' x 30' metal. Gas is stubbed up out of the ground right next to the building. They quoted a 45,000 BTU turnkey except for the electrical, which I was going to handle. The cost was quoted at $2,800 turn key. That also included hanging the heater. Still, it seems a little high.
They were going to vertical vent it. In OK we can not use copper except for LP. So I would have to use black pipe.
 

crowwinger

Member
Joined
Nov 2, 2020
Messages
17
Location
MN
The cost was quoted at $2,800 turn key. That also included hanging the heater. Still, it seems a little high.
They were going to vertical vent it. In OK we can not use copper except for LP. So I would have to use black pipe.

That seem really high to me penright, especially since you have gas stubbed already. Black pipe would make it more tedious, but there are other flexible options other than copper... I was very close to using CSST, but chose copper for consistency and it was also slightly cheaper. In addition, vertical venting is about half the material cost because you can use type-B pipe.

I'll admit that hanging it was not super fun, but this was $20 in my "tool costs"... it worked really good. I hoisted it up with this and then moved it onto pre-hung straps (Cam straps instead of ratchet to simplify "inching" it up until tight to the ceiling):
Carolina North Hang Em High Hoist

I was able to do this by myself with the hoist... due to the tightness of my space, it would have still been tough positioning with another person.
 

Attachments

  • GarageJounal8.jpg
    GarageJounal8.jpg
    15.1 KB · Views: 135

LX-Markham

Well-known member
Joined
Apr 27, 2013
Messages
2,929
Location
Markham, Ont.
I'll admit that hanging it was not super fun, but this was $20 in my "tool costs"... it worked really good. I hoisted it up with this and then moved it onto pre-hung straps (Cam straps instead of ratchet to simplify "inching" it up until tight to the ceiling)

Easy as doing a drywall ceiling :thumbup:

IMG_0040_zpsvrmndipy-L.jpg


I put the heater on the drywall lift. Easy to move into position and hoist up.
 
To avoid these ads, REGISTER NOW!
Top Bottom