To avoid these ads, REGISTER NOW!

Mr.Paramo is in the shed

ALLFAST

Well-known member
Joined
Feb 20, 2017
Messages
1,233
Location
Northern California
This is my 3rd attempt in 2 days to post some before photos (I failed to check the box upon login and my info was lost upon the after the re-login requests [Thanks Drives]).

My story of the acquirement is I believe posted last Saturday evening for those interested in those details. As a sidenote, this is the BEST $150 tool investment that I've ever made !!

My at purchase cursory inspection revealed the inner support ring (for the swivel base) severed through and through in 2 places. I placed Mr.Paramo on my workbench and gave him a turn or two. If I hadn't known of the damage I never would thought there was a problem. It worked just fine....I'm sure once some work piece was mounted up it would be different, but by itself it's very solid. I removed the ring and placed it in a box for much later. I probably will not use it as Drives and others have said, it's much more solid as a fixed base tool.

The swivel base ring is in great condition.
 

Attachments

  • 2017-05-22 22.09.33.jpg
    2017-05-22 22.09.33.jpg
    129.2 KB · Views: 38
  • 2017-05-22 22.09.59.jpg
    2017-05-22 22.09.59.jpg
    42.9 KB · Views: 40
To avoid these ads, REGISTER NOW!
OP
A

ALLFAST

Well-known member
Joined
Feb 20, 2017
Messages
1,233
Location
Northern California
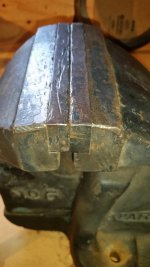
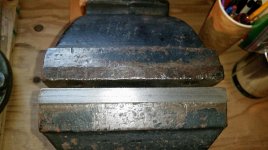
I also noted a missing original screw in one of the otherwise fine original dynamic side jaw insert. That was a clue. The threads were likely buggered up and the opposing screw would not start. I bought a 6 dollar Irwin 5/16-18NC tap (while enroute home with my new prize on Saturday ) and started it very carefully and crossed my fingers. I used a 4 inch vise grip to complete the mission and less than 5 minutes later I successfully screwed home the test screw into the jaw insert. I dodged the bullet on that speed bump for sure. Yesterday I flipped this jaw over and exposed the beautiful unused opposing edge. The screws on the static jaw are VERY tight. I'll be doing the PB Blaster soaking, heat and tap, and buying a drag link socket for these next week. I don't want to ****** up the original screw heads.

A photo of the as found jaws, and with the one flipped. They will clean up great when all is done. There is minimal carnage to the jaw towers, sides and edges.In fact, these jaw bodies are plain works of art IMHO (from a visual aesthetic point and their solid construction ) .They remind me of the base on Cape Buffalo horns ! They are in great alignment all around and the dynamic shuts with perfect fit....zero slop or backlash when snugged home.
 

Attachments

  • 2017-05-22 22.11.03.jpg
    2017-05-22 22.11.03.jpg
    147.3 KB · Views: 26
Last edited:
OP
A

ALLFAST

Well-known member
Joined
Feb 20, 2017
Messages
1,233
Location
Northern California
Had to resize to 50%
 

Attachments

  • 2017-05-22 22.57.25.jpg
    2017-05-22 22.57.25.jpg
    120.9 KB · Views: 22
  • 2017-05-22 22.57.48.jpg
    2017-05-22 22.57.48.jpg
    135.6 KB · Views: 23
  • 2017-05-22 22.58.18.jpg
    2017-05-22 22.58.18.jpg
    147.7 KB · Views: 22
  • 2017-05-22 22.59.13.jpg
    2017-05-22 22.59.13.jpg
    132.8 KB · Views: 20
  • 2017-05-22 22.59.38.jpg
    2017-05-22 22.59.38.jpg
    138.8 KB · Views: 25
OP
A

ALLFAST

Well-known member
Joined
Feb 20, 2017
Messages
1,233
Location
Northern California
Backing up abit, previous to all of he jaw activity, I sprayed a liberal dose of PB Blaster in the snout, nut,slide surfaces, and leadscrew. After a few minutes soaking I edged Mr.P to the workbench lip and held him down with my torso and forearm of the left side (yes I should have clamped it down in retrospect) and spun the handle out with the index finger of the right hand.....butter smooth....well 95% so. It is markedly quieter from the test run at the seller's shop. There is a bunch of grit and oil soaked junk inside the body and nut, so I'm very confident that after a proper degreasing and lube session it will be 110% tiip top. The leadscrew seems to be very true vjsually, and there is no binding. There is also no play, or listing in any direction, and absolutely no walking of the slide side to side, and zero slop fore-aft. The spring,washer,pin affair looks unmolested and solid.

Next week I'll have the whole thing fully degreased and start brass wire wheeling the machined surfaces (it has the swirls of the original machine process under the grime.) I'll be taking the handle/screw to a friend who is a 2nd generation blacksmith for some minor straightening. ...this I'm no good at ! So I'll need to loosen the 2 screws ,make another screw, and clean/paint.


I did give this thing a thorough sponge bath with a 50/50 Krud Kutter /water mix and the exterior is significantly cleaner, and the original Azure blue is present. Someone years ago slathered some flat black paint all over which helped things, but it's tough paint. I took a 8 inch block of 2x6 and put it in the jaws and clamped it down solid. The vise is like brand new....
 
OP
A

ALLFAST

Well-known member
Joined
Feb 20, 2017
Messages
1,233
Location
Northern California
I found an old thread where drives mentioned attempts to buy back his Paramo 6 from a friend, and the friend told him NO. After toying with this thing for a few hours I am totally smitten ....I'll be buried with this little T-Rex.....
 

Attachments

  • 2017-05-22 23.09.39.jpg
    2017-05-22 23.09.39.jpg
    52.5 KB · Views: 40
  • 2017-05-22 23.10.08.jpg
    2017-05-22 23.10.08.jpg
    145.5 KB · Views: 26
  • 2017-05-22 23.10.34.jpg
    2017-05-22 23.10.34.jpg
    138.9 KB · Views: 26
  • 2017-05-22 23.11.01.jpg
    2017-05-22 23.11.01.jpg
    131.5 KB · Views: 26
  • 2017-05-22 23.11.37.jpg
    2017-05-22 23.11.37.jpg
    141.2 KB · Views: 30
  • 2017-05-22 23.12.14.jpg
    2017-05-22 23.12.14.jpg
    73.6 KB · Views: 24
Last edited:
To avoid these ads, REGISTER NOW!
OP
A

ALLFAST

Well-known member
Joined
Feb 20, 2017
Messages
1,233
Location
Northern California
I did a pretty thorough inspection of all the important casting intersections and typical problem areas....degreased and used a bright light.....aside from a few nicks on exterior edges I found no damage or old repairs. So far so good. ....
 

454ragtop

Well-known member
Joined
Mar 24, 2008
Messages
5,012
Location
Carver, MA
As far as that broken ring, if it were cleaned and redrill the mounting holes so the small piece gets 1 bolt and the other 2 it would probably be just about as good as an unbroken one. Don't do anything more than wire wheel the breaks so they interlock like a puzzle. Of course a much better approach would be to machine a new ring out of steel plate, would be much stronger than the cast. Nice looking vise.
 
OP
A

ALLFAST

Well-known member
Joined
Feb 20, 2017
Messages
1,233
Location
Northern California
454 RT,

You are right about using it as is, and in time I may have one done in steel. This is a better shot of the reversed original jaw insert with its mildly worn opposite.

Thanks for your thoughts !
 

Attachments

  • 2017-05-23 08.01.27.jpg
    2017-05-23 08.01.27.jpg
    148.7 KB · Views: 16

Bellaireroad

Well-known member
Joined
Mar 22, 2013
Messages
636
Location
Fort Worth
Backing up abit, previous to all of he jaw activity, I sprayed a liberal dose of PB Blaster in the snout, nut,slide surfaces, and leadscrew. After a few minutes soaking I edged Mr.P to the workbench lip and held him down with my torso and forearm of the left side (yes I should have clamped it down in retrospect) and spun the handle out with the index finger of the right hand.....butter smooth....well 95% so. It is markedly quieter from the test run at the seller's shop. There is a bunch of grit and oil soaked junk inside the body and nut, so I'm very confident that after a proper degreasing and lube session it will be 110% tiip top. The leadscrew seems to be very true vjsually, and there is no binding. There is also no play, or listing in any direction, and absolutely no walking of the slide side to side, and zero slop fore-aft. The spring,washer,pin affair looks unmolested and solid.


Next week I'll have the whole thing fully degreased and start brass wire wheeling the machined surfaces (it has the swirls of the original machine process under the grime.) I'll be taking the handle/screw to a friend who is a 2nd generation blacksmith for some minor straightening. ...this I'm no good at ! So I'll need to loosen the 2 screws ,make another screw, and clean/paint.


I did give this thing a thorough sponge bath with a 50/50 Krud Kutter /water mix and the exterior is significantly cleaner, and the original Azure blue is present. Someone years ago slathered some flat black paint all over which helped things, but it's tough paint. I took a 8 inch block of 2x6 and put it in the jaws and clamped it down solid. The vise is like brand new....


As far as those pesky jaw screws go, I've had good success with an impact driver, doesn't goober up the slot in the screw head, maybe a friend has one?
fc3cfb9825f46e1220a4b2268ef461ab.jpg


Sent from my iPhone using Tapatalk Pro
 
OP
A

ALLFAST

Well-known member
Joined
Feb 20, 2017
Messages
1,233
Location
Northern California
BAR,

Pure genius! I'd forgotten about these. I can borrow one from my tool whisperer at work...he has about 6. I always used the old bang the screwdriver end with a solid whack.....This is the next level here.

Thanks again....
 

454ragtop

Well-known member
Joined
Mar 24, 2008
Messages
5,012
Location
Carver, MA
Another way is to get a screwdriver bit with a hex shank, put a wrench on the hex, put the bit in the screw and lightly close the vise. Use the vise to force the bit into the screw, not allowing it to cam out. As it starts to move you slowly open the vise, keeping a little tension on the bit.
 
To avoid these ads, REGISTER NOW!
Top Bottom