
You are using an out of date browser. It may not display this or other websites correctly.
You should upgrade or use an alternative browser.
You should upgrade or use an alternative browser.
Mueller red iron complete
- Thread starter Woodweasel
- Start date

green.bubbly
Well-known member
Keep on rollin. It will not get finished just looking at it!
Now is the time to make sure it is half way squared up.
Now is the time to make sure it is half way squared up.
green.bubbly
Well-known member
Might I also suggest keeping all your build posts and updates in one thread. Makes it nice to go back and see the entire build in one thread. And don't do anything unsafe as it is hard to enjoy a new shop with broken bones. ")
OP
Woodweasel
Active member
Is there a way to combine my posts into one? Also remember the key is do unsafe acts SAFELY I'm sure OSHA would not have approved of some of the things involved in erecting this building
I'm sure OSHA would not have approved of some of the things involved in erecting this buildinggreen.bubbly
Well-known member
Is there a way to combine my posts into one? Also remember the key is do unsafe acts SAFELY
I do not think there is any way to merge the threads unless you contact a mod. Wife and I are building our house ourselves and I can assure you OSHA would have hit me with some nasty fines.
My son and I put up my 24x24 shop from Meuller a few years ago. I really like those red iron kits they have. Everything fit and nothing was missing.
cbacres
Well-known member
I would install the roll up after. If you have the c channel trim for he door opening, this will need to be under the door track. Also you want all the tweaking and squaring to be done before trying to adjust the tracks.
Pay close attention to the details of the trim that goes above the window and doors, it'll be all the difference of water leaks or not. It's not a big deal, just look over the details on your plans, I wish the guy that put mine up did.
Looking good, I'll be watching. I like the layout you have, especially the lean to being designed into the building.
Craig
cbacres
Well-known member
How's it coming, we are starving for pics.
Charles (in GA)
Well-known member
Kinda surprised you didn't plan for the doors so the proper steel could have been cut, drilled, tabs/feet welded, etc and installed during the erection. Adding doors after the fact makes for a messy install usually.
Are you doing "roll up" doors, or "sectional doors". A roll up door will have some sealing issues you will have to deal with.
Charles
Are you doing "roll up" doors, or "sectional doors". A roll up door will have some sealing issues you will have to deal with.
Charles
OP
Woodweasel
Active member
I did plan for the doors,and the proper steel is in place.The roll up doors are under my barn.My question was should I install them before or after I put up the sides and roof. I'm a Captain on a tugboat,I won't be back home until the 23rd.Hence no progress no pics
OP
Woodweasel
Active member
also there are no tracks,per say this is a commercial style roll up,
fnieto
Well-known member
I did plan for the doors,and the proper steel is in place.The roll up doors are under my barn.My question was should I install them before or after I put up the sides and roof. I'm a Captain on a tugboat,I won't be back home until the 23rd.Hence no progress no pics
We hung all walls and roof prior to doors. Don't forget the J-trim goes on prior to skins around the doors windows etc. Also the base drip trim.
Have fun and be safe.
OP
Woodweasel
Active member
Three days and a wakeup, then I'm off the boat and headed home to work on my SHOP! A few more braces, then I'll get started putting insulation & skin on the sides!!
1/2 Cup
Member Emeritus
I am a steel frame tragic, well done.
OP
Woodweasel
Active member


Charles (in GA)
Well-known member
Doors last I would think.
Charles
Charles
cbacres
Well-known member
Captain ,
Any updates on your build?
Hope to see some soon.
Any updates on your build?
Hope to see some soon.
OP
Woodweasel
Active member
1/2 Cup
Member Emeritus
Thanks for the update, looking fantastic.
cbacres
Well-known member
I'm liking that cover outside area.
Make sure you clean off all the swarf from cutting and drilling. That's one thing that the contractor I used didn't do all the time and the panels end up with rust spots.
Looking good.
Make sure you clean off all the swarf from cutting and drilling. That's one thing that the contractor I used didn't do all the time and the panels end up with rust spots.
Looking good.
OP
Woodweasel
Active member
It's been a learning experience for sure!Hope to finish the wall I'm on now.Will have to put in a 6x3 window & a walk in door on that wall!
OP
Woodweasel
Active member
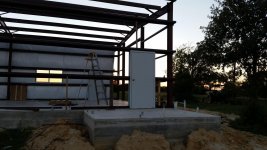
Gonna have to rent a lift for the roof. The sheets for the lean to side are one continueous piece 32' long. Wind is gonna play hell with them. Will need calm days.
OP
Woodweasel
Active member
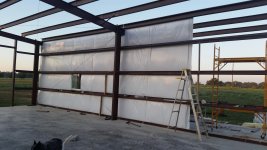
Slowly making progress ,its taking forever because I work on a tugboat and only get a few days a month to work on it.
Attachments


1/2 Cup
Member Emeritus
Looking great and thanks for the update.
I am in a similar situation and time poor, there is never enough hours in the day..
I am in a similar situation and time poor, there is never enough hours in the day..
OP
Woodweasel
Active member

OP
Woodweasel
Active member
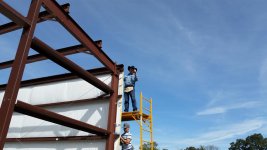
 that would be me with a black hat grinning like ear to ear

fnieto
Well-known member
Looking great!
Good luck with the wind and your roof panels. I used my fork lift and raised a panel at a time (from the inside) due to breezy conditions. I also insulated after (R-30) installation of panels. This proved to be a huge upgrade in comfort zone, plus much simpler installing the (all) panels.
Stay safe Captain
fnieto
Well-known member
One more thing on roof panels. Use lighter help on the roof and pre drill your lap joints and pre tape prior to lifting. The "peel" on the tape will come off just prior to screwing laps.
I ran two string lines down the middle to help line up the center edge of the roof sheets.
Take your time and set your first sheets on the money as the rest will follow.
DO NOT STEP ON RIDGES.
Again, looks great!
I ran two string lines down the middle to help line up the center edge of the roof sheets.
Take your time and set your first sheets on the money as the rest will follow.
DO NOT STEP ON RIDGES.
Again, looks great!
OP
Woodweasel
Active member
I have been pre-drilling , and planned on doing that. I had not thought about
pre-taping! Can you explain why you lined up the center with the stringline? Also what about the preformed black foam that seals the end. Did you slip that in after the sheets were in place?
pre-taping! Can you explain why you lined up the center with the stringline? Also what about the preformed black foam that seals the end. Did you slip that in after the sheets were in place?
fnieto
Well-known member
The string line simply helps square up the sheets as well as shows how far to hold the end of the panel from peak. That way all your over hangs meet up. The foam closures where placed as I went along as it was still hot in Arizona at the time of install. Take care not to stretch the foam when applying. If the weather is cold when you use the sealer tape and foam you might consider storing it inside until use.
To be clear on the two string lines , measure from peak to where your roof panels ends will end up and run your string lines (one for each side). Your peak cover sheets should join the two halves of you roof system.
I also noticed you have yet to install your rake angles at the ends of your red iron. You'll want to do this prior to your roof sheets.
I too have a Muller building so I'm guessing its similar but do not know 100%. Just trying to help.
I was able to down load somewhat of generic instructions from Mueller's site and it did help but a lot need to be cleared up.
Again the string line thing is something I came up with as I was short staffed and wanted good results. I'm sure you have squared up the red iron by now so the sheets will fit up nice.
The last sheets to go on will probably require a long cut (trim) as they do not want you to overlap roof panels (causing moisture trapping).
Remember your sealant tape, this stuff will prevent leaks.
hope this helps.
OP
Woodweasel
Active member
Re: Mueller red iron pics
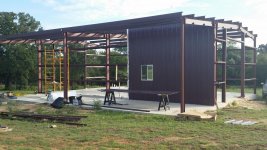
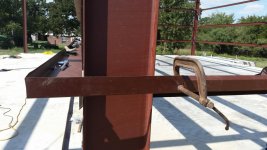
Helps a lot, keep it coming!! I welded these end pieces,except at the top. Watched the videos, left a lot of unanswered questions. How am I supposed to attach the sheets to the top?
Helps a lot, keep it coming!! I welded these end pieces,except at the top. Watched the videos, left a lot of unanswered questions. How am I supposed to attach the sheets to the top?
Attachments

fnieto
Well-known member
Wood,
I too welded the corner pieces, I felt the screw head would pose a problem when it came time to skin. You still have more red iron to screw to the top of the Z perlins. The "rake angle" looks like that short corner piece in your photo, only they come on 20'.
Look at the top part of the building (my photo), that piece connecting the tops of the z-perlins is the "rake angle". I did not see that piece in your photos. That piece ties in all the ends of the z-perlins and provides a place to screw down the roof panels between z-perlins (on the ends of your building).
If it helps, the rake angle looks like the base angle. Your prints will show it.
Attachments

fnieto
Well-known member
Wood,
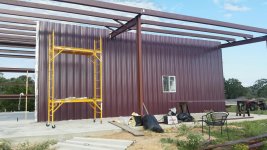
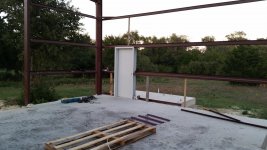
in your post (22) the top right photo your showing a completed side with man door.
I can't tell in the picture, but did you place the "drip rail"? It should be the same color as your sheets. It's shaped like an angle with another slight bend on one one leg. It goes between the base angle and the skin. This piece sheds water off the end of the slab during wet weather. This would be found in the big cardboard box that all the trim pieces came in.
You must over lap the ends when installing. Post a close up photo if you have a chance.
If you have not installed yet, you'll need to remove lower screws from your wall sheets to sneak these pieces in. Again, I studied the blue prints for many hours as a lot of things where unclear. I'm hoping to save you some re-work.
My over all experience erecting was uneventful but I did have some pause moments at times.
If you would like to talk on the phone I will have my blue prints with me for reference. You might want to have a set on you as well. PM me and I will provide my cell number.
Your project look awesome and I remember how exciting it was to complete another milestone.
Sincerely,
PN
aka firestopper.
OP
Woodweasel
Active member
PN, Thanks for all the pointers!! I did use the drip raill on both sides of the long walls.Mine was the color of my trim. I left my blue prints at home by mistake this time. I hate that because this is when I have time to really study them! Do I screw the end skins to the rake angle , as well as screw the roof skins on the top of the rake angle?Attached is a random pic of what I do to pay for The Mueller Project
Attachments

fnieto
Well-known member
Cool Picture,
I served in the Navy many years ago and living in the desert I enjoy seeing that big barge.
The rake angle will screw to the z-perlins. The screw heads might get in the way of the roof skins that screw to the rake angle after. Take some measurements and find the best placement for securing the rake to the perlins. The trim along with sealant tape should line up to the rib on the roof panel so lap type screws will be used (same color of trim).
Stay safe and keep the water ways open!
OP
Woodweasel
Active member
Its frustrating at best, If I had a solid week, w/o any distractions from family
& honeydews for the wife, I could button it up. Trying to do it with a rag tag bunch of fellows is frustrating also. If I could keep the 4 of us in the pic on it . It wouldnt take long to close it in. Two of them have regular jobs. Ive had other guys stand me up. But I expected delays when I started on the project myself, rather than hire it out!!
& honeydews for the wife, I could button it up. Trying to do it with a rag tag bunch of fellows is frustrating also. If I could keep the 4 of us in the pic on it . It wouldnt take long to close it in. Two of them have regular jobs. Ive had other guys stand me up. But I expected delays when I started on the project myself, rather than hire it out!!