To avoid these ads, REGISTER NOW!

Mulligan Garage Build

Silvercbr

Well-known member
Joined
Aug 9, 2010
Messages
53
Location
Ankeny, Iowa
Well a couple of years of lurking and I am now ready to start my build thread. Can't thank the members of this forum enough for all the great builds, ideas, feedback on items, etc. I absolutely love cruising this forum nightly.

Name: Mulligan Garage!
Behind of Name: Divorced dad with 1 son (7 years old). A friend of mine was going through a divorce as well, started to hang out, next thing we knew it we fell for each other. Since we are now married we call ourselves "Team Mulligan" in that we took a mulligan on married. :)


Anyway, here we go:

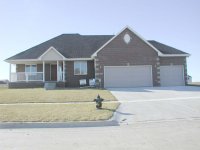
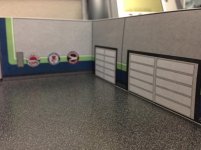
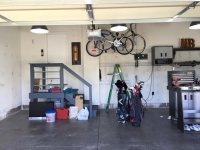
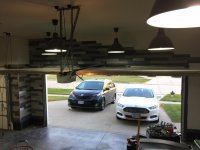
House was build in 2001, roughly 2100 square feet on each level, finished basement. We just finished the game room last winter so now it is time to focus on the garage.

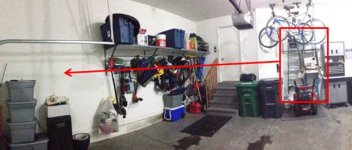
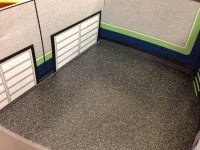
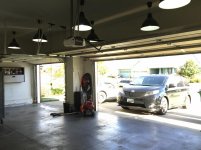
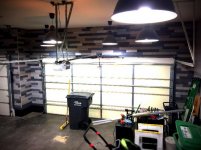
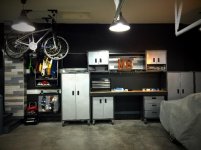
Garage is roughly 33 wide by 22 deep, typical 3 stall layout. "Monkey Bars" have been added previously on the left side of the garage for all the garden tools, shovels, etc, as well as a small set of "Monkey Bars" for the ladders. The set for the ladders will be moved to the left side next to the large set of Monkey Bars in the next few weeks.

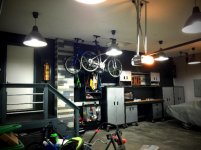
I then have added a few Gladiator hanging cabinets, two base cabinets, as well as two large standup cabinets. I have one more large standup cabinet coming on Friday because Gladiator is having a great sale on them at 50% off for Presidents Day. This last cabinet should finally empty the last of the rubbermaid totes.

For my bench, I used two base Gladiator cabinets in which I built a 2x4 frame on top of each one, then built a 2'x8' bench top that attaches to them. Love the fact that everything is on casters as well. Now I just need to think about how I want to finish the top of the work bench. Option 1 is to order some "stainless steel" mimicing laminate, Option 2 is to just seal the plywood, or Option 3 is unknown.

So here are my plans as of right now and hopefully in this order:

1. Install the last Gladiator tall cabinet this weekend and organize everything.

2. Move the Monkey Bars for the ladders.

3. With only three lights on the ceiling, add 2 more rows of 3 lights, for a total of 9.

4. Install a few more outlets, extension cord reel, along with a air hose reel.

5. Now that all the cabinets will be in, start the wonderful process of filling in all holes, drywall dings, etc and prime walls.

6. Paint lower half of wall dark gray, upper half light gray, with a blue stripe dividing the two. I will be color matching the Racedeck blue tiles that will be installed hopefully this summer.

7. Paint a large piece of art for the garage that will cover up the unsightly electrical panel/irrigation controls/coax cable junction. I initially was going to go to art school after high school but went another direction. More to come on this little project.

8. Build and install an overhang above the work bench and hanging Gladiator cabinets to allow for more focused lighting with recessed lights.

9. Install LED accent lighting throughout the garage for focused, as well as ambient/mood lighting, for beer drinking.

10. Finally, install Racedeck freeflow tiles, in some pattern of Blue/Gray/Black.

So I can't wait to get started and finally turn the garage into something special. Then it will be time to enjoy some homebrew in the garage this summer.
 

Attachments

  • Garage 3.jpg
    Garage 3.jpg
    123.1 KB · Views: 312
  • Garage 4.jpg
    Garage 4.jpg
    23.7 KB · Views: 478
  • Garage 5.jpg
    Garage 5.jpg
    27.9 KB · Views: 646
  • Garage 2.jpg
    Garage 2.jpg
    18.3 KB · Views: 52
To avoid these ads, REGISTER NOW!
OP
S

Silvercbr

Well-known member
Joined
Aug 9, 2010
Messages
53
Location
Ankeny, Iowa
You would be correct, my wife's low mileage 1981 White Corvette. Very clean and between working on projects on the garage I just have a few things to button up on Corvy.

I am a reformed motorcycle guy who has an addiction to Ducatis. I am trying to move to 4 wheels. Between my wife and my dad who restores cars, I am just trying to figure out what I want.

Never been a Mopar guy but I began to love the 1970-1974 Barracuda or would settle for a 1970 Challenger in Sublime. I wouldn't kick a 1970-1971 Chevelle out of my garage either.
 
OP
S

Silvercbr

Well-known member
Joined
Aug 9, 2010
Messages
53
Location
Ankeny, Iowa
Got a little time to work on the garage this past weekend. Even though it is cold outside, it stays a decent 46 degrees or so inside the garage, and my little heater gets it above 50 degree which is more than fine.

So I got another tall gear cabinet delivered, put together, and in position. Gladiator had a great Presidents Day sale on them at 50% off and free delivery. I then had to take the gear tracks off the wall and reposition them which was easy because everything shifted to the right in order to fit the gear cabinets where I wanted them. Moved the Monkey Bars for the ladders to the opposite wall. Now I just need to move the bicycles to hang on another part of the ceiling.

A couple other ideas and additions soon:
- May build a 4x4 table that the snow blower can fit under. I would then leave one side open so I can pull it out and then put it away easy or possibly put a door on it so I won't have to look at it. Otherwise, the snow blower causes a lot of dead space and I don't have a shed.

- My wife is getting into the garage remodel. She bought a retired stop light that has been converted to 110 with a sequencer. That should be here later this week hopefully.

- Friend at work has a 3 axis wood CNC table so she is cutting me a large Corvette symbol out of a 4x8 sheet of MDF. I will then paint it and mount it above the wall cabinets. This is a surprise for the wife.

Slow progress but progress none the less.
 

Attachments

  • Garage 12.jpg
    Garage 12.jpg
    16.7 KB · Views: 48
  • Garage 11.jpg
    Garage 11.jpg
    137.8 KB · Views: 185
OP
S

Silvercbr

Well-known member
Joined
Aug 9, 2010
Messages
53
Location
Ankeny, Iowa
Garage time has been slow seeing how we are expecting a baby girl in August. So that has been absorbing my time but it has been fun.

Anway, starting to collect items to put on the walls, and we came across this antique fire extinguisher at an auction for $55. It definitely had patina, so much so that it had a lot of scratches and surface stains, so I have to actually sand the metal to clean it up. Then I decided to Scotchbrite it because I liked the brushed finish better, and if it needs cleaned, it will be far easier than polishing.

So now I just need to build a wall mount and find a place to mount it. Then I have a few repro vintage signs to get and I should be ready for paint soon.
 

Attachments

  • Antique Fire Extinguisher Before.jpg
    Antique Fire Extinguisher Before.jpg
    132.5 KB · Views: 80
  • Antique Fire Extinguisher After.jpg
    Antique Fire Extinguisher After.jpg
    138.7 KB · Views: 106

plugnpl4y

Active member
Joined
Aug 26, 2011
Messages
28
Location
WA
Looks like a great space. I'm envious of those high ceilings! Keep up the good work.
 

dubber

Well-known member
Joined
Dec 31, 2012
Messages
5,326
Location
Canada's Capital
Perfect spot between those two Gladiator uppers to get their paper towel rack which can hang on the wall system you have already in place.

I'm curious as to what vehicle that is in the gladiator shot.
 
OP
S

Silvercbr

Well-known member
Joined
Aug 9, 2010
Messages
53
Location
Ankeny, Iowa
Looks like the hood / turn signal of a Toyota FJ Cruiser to me.

Yep, that is my 2007 FJ Cruiser, aka "the Silver Brick" because it pretty much is shaped like a brick. I absolutely love the FJ, and with 120K on the clock, she has been fantastic if you don't take into account the wonderful 18-19mpg she gets.

Thank guys, couldn't do it without this forum. Lots of great ideas! I love the way the fire extinguisher turned out. I am building a cool wall mount for it this weekend so I can mount it. Once everything is on the walls where I want it to be, then I can fill in the 1800 holes, and then finally paint!
 
OP
S

Silvercbr

Well-known member
Joined
Aug 9, 2010
Messages
53
Location
Ankeny, Iowa
Got the fire extinguisher shelf done and mounted. Just did it out of mdf and sprayed it with hammer texture paint.
 

Attachments

  • image.jpg
    image.jpg
    144.2 KB · Views: 99
Last edited:

HSpencer

ALLIANCE MEMBER
Joined
Nov 28, 2010
Messages
2,854
Location
South Central US
I think that fire extinguisher is the max! It looks great on the wall. Things like that are what make a garage special. Great job on everything! Keep sending pics!
 
OP
S

Silvercbr

Well-known member
Joined
Aug 9, 2010
Messages
53
Location
Ankeny, Iowa
$55 for the fire extinguisher at an auction, a whole lot of sanding/cleaning/scotchbriting, $20 to build the wall mount, equals a unique piece. Glad you guys like it.
 
OP
S

Silvercbr

Well-known member
Joined
Aug 9, 2010
Messages
53
Location
Ankeny, Iowa
Make a quick run to Ikea in Minneapolis this weekend and grabbed 10 of these warehouse pendant lights. They are 20" in diameter, a nice dark gray finish, and best of all only $30 each. Test fit one last night to see how it would look. Just need to find a pattern I like and start the process of hanging them.
 

Attachments

  • Garage Light.jpg
    Garage Light.jpg
    149.1 KB · Views: 68
OP
S

Silvercbr

Well-known member
Joined
Aug 9, 2010
Messages
53
Location
Ankeny, Iowa
Oh, and did a little art project. We have a lot of creative people on the forum so I stole this idea. Hit up the local monthly flee market, found all the plates that I needed, and started cutting. Just need to build the frame/mount to attach this to and hang it up.
 

Attachments

  • Garage Sign.jpg
    Garage Sign.jpg
    135.8 KB · Views: 76
To avoid these ads, REGISTER NOW!
OP
S

Silvercbr

Well-known member
Joined
Aug 9, 2010
Messages
53
Location
Ankeny, Iowa
So I had a little fun in PowerPoint today. I quickly drew up the garage walls and start experimenting with the upcoming paint scheme. While the colors are Seattle Seahawk colors (not a fan, just like the colors) I came up with this. I then printed out the sheets, or walls, and taped them together.

Kind of a minature model so to speak. What do you think? I can't help but laugh for some reason when I look at the pictures......I need to get a life.:willy_nil
 

Attachments

  • Paint Scheme 1.jpg
    Paint Scheme 1.jpg
    129.8 KB · Views: 134
  • Pain Scheme 2.jpg
    Pain Scheme 2.jpg
    136.1 KB · Views: 121
  • Paint Scheme 3.jpg
    Paint Scheme 3.jpg
    137 KB · Views: 125
  • Paint Scheme 4.jpg
    Paint Scheme 4.jpg
    150.5 KB · Views: 103

Omphaloskeptic

Well-known member
Joined
Oct 11, 2008
Messages
2,346
Location
Ultima Ratio, Wa.
Since you're having fun with PowerPoint, just for grins & giggles, try carrying the paint scheme across the garage doors to see what it might look like. If you don't like the result, 'take a mulligan'! lol

P.S. - Just to be clear in my thought, adjust the heights/widths to align with the garage door panels, if possible.
 
Last edited:
OP
S

Silvercbr

Well-known member
Joined
Aug 9, 2010
Messages
53
Location
Ankeny, Iowa
So finished hanging my Ikea warehouse lights, all 10 of them. Made a huge difference when compared to the three craptastic lights that the contractor put in when the house was built. Only problem now is I can actually see how crappy the walls look with all the nail holes and scuffs.
 

Attachments

  • image.jpg
    image.jpg
    149.9 KB · Views: 131
OP
S

Silvercbr

Well-known member
Joined
Aug 9, 2010
Messages
53
Location
Ankeny, Iowa
Thanks to the forum, bought two of these on Woot. 65% off, yes please. Have wanted to cover this **** for a while.
 

Attachments

  • image.jpg
    image.jpg
    142.1 KB · Views: 45
OP
S

Silvercbr

Well-known member
Joined
Aug 9, 2010
Messages
53
Location
Ankeny, Iowa
WOW, almost 2 years since my last post. That is because we took on a new project and his name is Bain. The name was picked by his mother, and after I mentioned the "Batman" reference, she still wanted to name him Bain. So two kids, a newborn and a 2 year old, has derailed my efforts in the garage (and rightfully so).

Then there were the other projects which includes "de-oaking" our home. Took out the largely worthless gas fireplace, sealed up the house, and did a built in for the TV and components. More modern and now we only have one focal point in the room again since we got rid of a massive entertainment center.
 

Attachments

  • Fireplace 2.jpg
    Fireplace 2.jpg
    143.8 KB · Views: 64
  • FireplaceGood1.jpg
    FireplaceGood1.jpg
    128.8 KB · Views: 61
OP
S

Silvercbr

Well-known member
Joined
Aug 9, 2010
Messages
53
Location
Ankeny, Iowa
Sooo, on to the garage. First order of business was to fill in the 3,000 nail/screw holes left by the previous owner. Swear to god he didn't know what a stud finder was.

Then after filling in the holes, sanding everything, it became apparent that the texture they applied to the walls during construction was going to make the repairs waaay to noticeable.

NEVER TEXTURE GARAGE WALLS! We ended up having to skim coat every wall to smooth out the texture and fixed hole areas. That was a whole lot of fun skimming and sanding.
 

Attachments

  • MGarage1.jpg
    MGarage1.jpg
    108.3 KB · Views: 60
  • MGarage2.jpg
    MGarage2.jpg
    134.9 KB · Views: 61
  • MGarage3.jpg
    MGarage3.jpg
    138.8 KB · Views: 62
  • MGarage4.jpg
    MGarage4.jpg
    137.7 KB · Views: 60
OP
S

Silvercbr

Well-known member
Joined
Aug 9, 2010
Messages
53
Location
Ankeny, Iowa
So this past weekend we ended up getting 3 of the 4 walls painted with a few touch-ups still needed. Trim around the doors, base boards, and the concrete "brick" sections needs to be finished up. Hope is to get some of this done tonight so I can deep clean the cabinets so they can all be put back. I hate cars sitting outside.

The 4th wall that is unpainted, which is the one with the garage doors, is getting a little different treatment. That wall and so other accents throughout the garage. We did this to my son Bain's wall which was inspired by all those cool "pallet wood" walls. I refused to use pallet wood due to all the work so came up with a different idea.

I ended up using pine plank paneling which is typically cut and installed vertically for wainscoting. Instead of using the side that is router-ed, we used the other side, because it had a rough texture with saw marks visible. Did what amounted to 7 different treatments to the wood, some straight stain, some stained with diluted paint "white-washing" done over the top. Then just a ton of random cuts. Total wall cost was about $120. Best of all, it is also tongue-and-grooved so installing it was super simple.

We liked it so much that we decided to do the same in the garage. The hope is we will have the boards all stained by Saturday afternoon, dry overnight, and install them on Sunday. More pics to come!
 

Attachments

  • Garage Wood.jpg
    Garage Wood.jpg
    139 KB · Views: 61
  • Bains Room 1.jpg
    Bains Room 1.jpg
    76.8 KB · Views: 92
OP
S

Silvercbr

Well-known member
Joined
Aug 9, 2010
Messages
53
Location
Ankeny, Iowa
Got some time to do some more work. The white section of the wall "bump out" will be covered with the wood treatment we are working on. Should be a different garage by Sunday.
 
OP
S

Silvercbr

Well-known member
Joined
Aug 9, 2010
Messages
53
Location
Ankeny, Iowa
Got 1/3 of the wood wall up now that the boards are all stained and dried. Did 6 different staining treatments to the boards with stains and then "white-washing" paint over the top of some of them to bring out the grain a bit. Hopefully taking Tuesday off to finish up all the installing of wood.

Next question for the group: What the heck do I do with the yellowed plastic panels on the inside of the garage door? I am afraid paint won't stick to them well.
 

Attachments

  • Garage Wall 1.jpg
    Garage Wall 1.jpg
    132 KB · Views: 45
OP
S

Silvercbr

Well-known member
Joined
Aug 9, 2010
Messages
53
Location
Ankeny, Iowa
Burned up a day of vacation to try and knock out the wood work. Got all the wood up except the corner boards which will come soon. So far, I really like it. Just need to adorn the wood wall with some cool retro signs soon.
 

Attachments

  • IMG_1293.JPG
    IMG_1293.JPG
    138.1 KB · Views: 36
  • IMG_1292.JPG
    IMG_1292.JPG
    136.9 KB · Views: 32
  • IMG_1291.jpg
    IMG_1291.jpg
    56.8 KB · Views: 34
  • IMG_1290.jpg
    IMG_1290.jpg
    68 KB · Views: 42
  • IMG_1289.jpg
    IMG_1289.jpg
    71.6 KB · Views: 45
  • IMG_1288.jpg
    IMG_1288.jpg
    63.2 KB · Views: 40
  • IMG_1287.jpg
    IMG_1287.jpg
    64.6 KB · Views: 46
OP
S

Silvercbr

Well-known member
Joined
Aug 9, 2010
Messages
53
Location
Ankeny, Iowa
Since I had to skim coat all the walls, the last thing I want is damage, and the recycling bin and garbage can poses a threat to my walls. Bought some galvanize pipe and fitting and make a "guard" to keep this from happening when pushing them in and out of the storage area in the garage.
 

Attachments

  • Wall Guard 1.jpg
    Wall Guard 1.jpg
    5.9 KB · Views: 19
  • Wall Guard 2.jpg
    Wall Guard 2.jpg
    7.8 KB · Views: 18

quadrcr87

Well-known member
Joined
Jul 5, 2013
Messages
1,036
Location
Travelers Rest, SC
That guard rail was a good idea. I used a piece of gladiator garage trac for the same purpose in my garage. I really like the wood and everything else you have done. It looks very classy and upscale with the lights and wood.
 
To avoid these ads, REGISTER NOW!
Top Bottom