
You are using an out of date browser. It may not display this or other websites correctly.
You should upgrade or use an alternative browser.
You should upgrade or use an alternative browser.
Murdoch's War-Machine MkIII research thread
- Thread starter Murdoch
- Start date
Hey Guster just wanted to ask, Sand or Shot bag. Now I had heard of these, are they something that I make or can I buy them. Sand I can get any where, I am guessing buck-shot is the reference to a shot bag. If I make it myself, can I get the shots from a gun shop? Is that a burlap bag? Sorry or the delay on that one lol and thanks...GMYou may find it a little easier to maintain the cosmetic features of the material when using TIG. Definitely takes a little more time to become competent but eventually TIG welds require less cleanup and grinding and easier to do the really fine work required for costuming. I have both arc , MIG and TIG and rarely use anything but TIG when making props and costume pieces for people. The only time I had a request to make anything similar to an arc weld bead was on a plastic costume piece and ended up using a silicone mold of a weld in my workshop and transferring it to hot glue to get the look.
If you plan to do a lot of aluminium sheet metal shaping you will need an oxy acetylene set with a rosebud torch to anneal the material. Makes it softer and less prone to cracking. Also consider a pneumatic plannishing hammer and jeny/swage for getting deep bowl shapes and crisp edges or creases. English wheel is nice for large smooth contours but in the end what you are making is like body armor to a degree. For the material you'll be using most you will likely benefit from owning a beverly shear too. A lot of the rough shaping and stretching can also be done with a teardrop HDPE mallet and a sand or shot bag.
Then watch as much Ron Covell and Lazze metalshaping youtube videos you can. There are plenty more but those will get you started. Also ton of medieval armor tutorials to teach you some of the techniques.
Ohmthis
Well-known member
Murdoch, the shot bag should be made out of leather. You can get shot at anyplace that sells reloading supplies. You have been given some really good advice. I'm not even a newby when it comes to metal working besides what I've learned here and on YouTube. There is a real good video that I bought that was recommended here by David Gardner. It shows several techniques with only hand tools. This project is awesome. My little boy wants me to make him an iron man armor so bad he can taste it. I would show him this, but that would put in the cross hairs to make one. Keep posting. Also what gauge sheet are you using? I don't see why 20 gauge steel couldn't be used? You could see what the difference in the weight of a sheet of steel vs aluminum is. It would be easier to weld, form, because you can use thinner sheet, and since you said the hinges and other fasteners will be steel, you could weld those instead of bolts and screws which would save weight. Just some food for thought!
Ohmthis
Well-known member
A quick check shows a 4x8x.063 5352 aluminum weighs 28.7 lbs. a 4x8x20 gauge weighs 48 lbs. I'm just giving info for your research. It is 20 pounds heavier, but I wonder how much will be taken off the total by not using a lot of bolts, nuts and screws. Here is another idea, how about using rivets to hold some of this together? That could make it easier to build, give it a mechanical look, and save weight too.
I think that you maybe misunderstanding what I was getting at. This will be a welded armour. But some pieces will need to be mounted and or fastened ie The M134 gating gun and other weapons. I would say maybe 5% or less would be steel. It will be fully animation ice, the helmet faceplate with arduino and servo motors work eye lights. A working M134 gating prop gun. Other weapons, the Arc reactor unibeam, hand and boot repulsors with sound and hopefully smoke. I want aluminum so that I can anodize the parts. After I want to paint over the anodizing with a paint that changes colour electronically. No I'm not high lol, I just have high expectations, I have thought about this for some time. I hope that this answers your questions, some what anyway. Thanks so much for your input...GMA quick check shows a 4x8x.063 5352 aluminum weighs 28.7 lbs. a 4x8x20 gauge weighs 48 lbs. I'm just giving info for your research. It is 20 pounds heavier, but I wonder how much will be taken off the total by not using a lot of bolts, nuts and screws. Here is another idea, how about using rivets to hold some of this together? That could make it easier to build, give it a mechanical look, and save weight too.
Ohmthis
Well-known member
I didn't misunderstand, I just didn't know the level that you were going for. Welding aluminum has a good sized learning curve, that if steel would work that would shorten the curve. My biggest piece of advice welding aluminum is clean, clean, clean.
racingtadpole
Well-known member
I think I would lean toward fibreglass for something like this. You will learn a stack of new skills trying to do it in aluminium, but it will be a pretty steep learning curve.
Guster
Well-known member
What everyone else said on the shot bag. You can make the bag out of heavy leather but to be honest, they are not that expensive. Unless you have a good sewing machine you will be doing it by hand. Great skill to learn but again not a very cost effective use of time. There is some good stuff on shot v.s sand. I suggest you start researching and see what you prefer.
Now onto costuming. A good costume relies on two primary things that are often overlooked and left till last minute. That is the undergarment and the harness. The under garment may carry your 'backing' panels. The light bits that fill gaps between major parts of the costume and make it more flexible and easy to walk in. The harness is the bit that really makes or breaks your costume. This is the part that carries the weight with padding to bear it. Also allows all the parts to 'locate' and 'function' properly. Making it right solves all your 'garment issues' and speeds up refitting after the usual potty break.")
You just have to read a Stormtrooper diary to realise how critical even small details are. Good for a laugh too. You are going to be carrying some weight and the panels will be hard and rigid unlike all the foam Ironman costumes out there. Get used to that and start on the harness. You won't be ruining as nice paint-job by having to drill and weld in afterthoughts. Most foam costumes rely on just the undergarment so have a look at the composite builds like XRobots channel on Youtube and many more. Incidentally there are a few guys who made aluminium sheet metal Iron man costumes - no welding or anything though - just folded edges and hot glued panels. However you may get some insights and learn from their struggles. Some foam placed in the right spots may also save you a lot of agony.
If I was to do this for a job I would also do it in composite, foam and slush cast bits but where is the fun in that. For myself I would also be tempted to do it right with aluminium.
Now onto costuming. A good costume relies on two primary things that are often overlooked and left till last minute. That is the undergarment and the harness. The under garment may carry your 'backing' panels. The light bits that fill gaps between major parts of the costume and make it more flexible and easy to walk in. The harness is the bit that really makes or breaks your costume. This is the part that carries the weight with padding to bear it. Also allows all the parts to 'locate' and 'function' properly. Making it right solves all your 'garment issues' and speeds up refitting after the usual potty break.
You just have to read a Stormtrooper diary to realise how critical even small details are. Good for a laugh too. You are going to be carrying some weight and the panels will be hard and rigid unlike all the foam Ironman costumes out there. Get used to that and start on the harness. You won't be ruining as nice paint-job by having to drill and weld in afterthoughts. Most foam costumes rely on just the undergarment so have a look at the composite builds like XRobots channel on Youtube and many more. Incidentally there are a few guys who made aluminium sheet metal Iron man costumes - no welding or anything though - just folded edges and hot glued panels. However you may get some insights and learn from their struggles. Some foam placed in the right spots may also save you a lot of agony.
If I was to do this for a job I would also do it in composite, foam and slush cast bits but where is the fun in that. For myself I would also be tempted to do it right with aluminium.
Last edited:
Foam build are made from 6-10mm PVA foam anti fatigue mats. Foam is sealed with a 50/50 mix of white glue diluted with water and then sanded smooth and then coated with smooth on 65D for rigidity. The trouble with this is that when working with foam, you lose detail quality and the lifespan of the armour is very short. Xrobots - James Brunton of the UK who I am familiar with and who I have chatted with online. We both are members of another site, his stuff is great. Fibreglass I have tried as well as the foam. With FG there is a lot of mess, fumes and in the end when that face plate closes I want to hear the ching sound that just can't be replicated by FG. The under armor-endo skeleton is also something that I have thought about. Alot will be trial and error for me. I am always reading into better ways of building this. I have seen several types of armour, foam - fiberglass - thermoforming - casted resin - sheet aluminum and cold rolled steel. I have worked with a variety of metals over the years from sterling silver to gold to aluminum just for very small projects. Watched several vids via YouTube or by some other means I belong to a couple of forums relating to this upcoming project. Aluminum plate seems to be the right way for me to go...GM
Guster
Well-known member
Was never much of a fan of PVA over EVA. Always preferred Plasti-dip instead.
Looks like you are on sound footing for the design. James Brunton also went through a lot of trial and error and one thing I value is all that shared experience helping learn form the others problems. If not to pick up on something they missed or taking a good idea forwards.
On that topic you will likely be wanting to bend slightly heavier material too. A benchvice and brute force assisted by a hammer will get you so far. Though if it is something than needs to show you may want to consider even a small hydraulic press and a brake. Nice even curves can even be achieved between pieces of MDF if the need arises.
That's great stuff Guster. I actually picked up a bench top hand brake.
The pic is an armour of 2 Ironman suits one in cardboard, the other cold rolled steel. The builder goes by the name Sandbagger. Incredibly talented gentleman from Australia, or the UK but I believe Australia. Enjoy folks...GM
The pic is an armour of 2 Ironman suits one in cardboard, the other cold rolled steel. The builder goes by the name Sandbagger. Incredibly talented gentleman from Australia, or the UK but I believe Australia. Enjoy folks...GM
Attachments

Last night I watch a few hours of YouTube vids. Shaping metal, forming, shrinking ect. , I learned quite a bit. I had checked out the Ron Cover vids, I found that most of them were sales oriented. Pitching his wares, he has got some great equipment but I need to find a tutorial video from him. I connected with him on LinkedIn. What I did learn is that I need to start collecting some hand tools. Used would be preferred, any Ontario members who have some metal shaping tools gaining dust pls send me a PM. Anyway I'm going to check out a guy who can get stuff lol, will keep you posted...GM
racingtadpole
Well-known member
Have a look at Peter Tomassini's videos also. His most famous one is the one where he takes a sheet of flat steel and turns it into a rear 1/4 of an Australian muscle car from the 60's. The man has some serious talent.. There might be a few tips in there for you.
I saw a couple of vids yesterday, him and Peach. Great tutorials...GMHave a look at Peter Tomassini's videos also. His most famous one is the one where he takes a sheet of flat steel and turns it into a rear 1/4 of an Australian muscle car from the 60's. The man has some serious talent.. There might be a few tips in there for you.
Is anyone familiar with Multiplaz welder. I saw an ad online and was wondering how well it works, from someone other than a salesman. Is it worth the purchase, are you happy with it. Please let me know, and thanks...GM
Guster
Well-known member
Here is a good one for you
Just taking a break right now for a cuppa. Been putting a rolled wire edge on what used to be a satellite dish for a Captain America shield commission. Amazing what it did for the floppy steel sheet it was before. Should be paint-stripping and burnishing later today.
Just taking a break right now for a cuppa. Been putting a rolled wire edge on what used to be a satellite dish for a Captain America shield commission. Amazing what it did for the floppy steel sheet it was before. Should be paint-stripping and burnishing later today.
Here is a good one for you
Just taking a break right now for a cuppa. Been putting a rolled wire edge on what used to be a satellite dish for a Captain America shield commission. Amazing what it did for the floppy steel sheet it was before. Should be paint-stripping and burnishing later today.
Did you just Cap'n shield I've been in the market for one in spun aluminum. Do you have a pic.
This is what I am looking at...GM
What is cuppa?
Attachments


Just an update. At the moment I am on a 2 week leave from work. I have ripped muscles in my arms and shoulders so Tuesday in am doing physio and rest may get checked for nerve damage. ***** big time, I went and checked out a welding school $12,000.00 tuition for the full course and all the tickets. Way out of my price range. So I will source out materials for my project and rest the arms...GM
Guster
Well-known member
Cuppa as in cup of tea/coffee.
****** on the arms an shoulders! That can take a while to recover fully.
Spun object that large is big money over here. Definitely the right look though. An RPF member had a batch done to recoup some of the cost. I'd be tempted to do it on an English wheel if I had one.
Friend has a Marvel Multiverse party and dropped of an old sat dish and I got a nice 80cm shield out of it. Thin steel was a little floppy so had to do something to hold the shape a bit better. A folded edge wouldn't do. Wire edge added just enough stiffness and should not ding much if he drops it. Just welded the bolt holes shut then I have a little sanding to do after the old paint comes off.
No photos at the moment. I'm rushing to get it done so I can go for a kitesurf this afternoon. Water is freezing but no idea when I'll get out again now that it is officially winter.
Guster
Well-known member
Yeah I did mention that. Customer wanted it that large since he is 6.5 and built like a tank. He is coming around to check it out tonight. I'm not small but find it a little cumbersome against my arm. Might talk him into something smaller as it will be a little stiffer too. It will only end up hanging on his lounge wall afterwards. A little smaller would be great given I have less to paint.
I'm getting much better at the wire edge stuff now I've had a practice run. Hardest part was really figuring out how to support the work as it is just slightly bigger than you can comfortably hold with one hand and because it is round and dished will not sit nicely against something. Managed to support a sheet of plywood and some clamps in a way that I can work the bottom edge on the table. I would really really like a bead former/swage/jenny next time I have to do it.
I'm getting much better at the wire edge stuff now I've had a practice run. Hardest part was really figuring out how to support the work as it is just slightly bigger than you can comfortably hold with one hand and because it is round and dished will not sit nicely against something. Managed to support a sheet of plywood and some clamps in a way that I can work the bottom edge on the table. I would really really like a bead former/swage/jenny next time I have to do it.
Guster
Well-known member
I'm using the Duplicolour Metalcast. Having looked at the steel beneath I don't think I will be able to get a consistent burnish look as the metal is deeply discoloured so may have to do a silver base coat. Might do a sample and see if the silver paint can be slightly burnished for that 'spun' look using a 3M scourer or some fine steel wool before doing the colour coats.
Are you painting on steel or aluminum? If so use a scotch Brite pad to get the spun look, clean it with acetone or thinner and spray the red and the blue. The white is replaced by the bare metal look. But always do a sample-practise piece first. Sample everything from the begging to the end. Water paper between coats 800 then 1200 then 2000 then 3000...GMI'm using the Duplicolour Metalcast. Having looked at the steel beneath I don't think I will be able to get a consistent burnish look as the metal is deeply discoloured so may have to do a silver base coat. Might do a sample and see if the silver paint can be slightly burnished for that 'spun' look using a 3M scourer or some fine steel wool before doing the colour coats.
Guster
Well-known member
I've clear-coated bare metal plenty of times and know how to get the look on bare metal. Unfortunately the steel has deep discolouration like brown blemishes which is either from the steel mill or the die punching process when the satellite dish was made. I have already tried etching and passivation techniques to remove it and don't have an oven large enough to try and quench in out. So the 'bare metal look' is out of the question at the moment.
Alternative is to go with the older red, white and blue or to use a silver basecoat. If I go with the silver basecoat I would still like to try to achieve the spun look - something I have never tried with paint before - which is to give it that burnished grain you get on spun objects. I've read a few articles on paint techniques last night which suggested to try fine steel wool or a fine 3M scourer to get the look before clear coating or candy coating. It is a cheap dish anyway so not wasting too much time other than the potential for learning from trying something new or different.
Alternative is to go with the older red, white and blue or to use a silver basecoat. If I go with the silver basecoat I would still like to try to achieve the spun look - something I have never tried with paint before - which is to give it that burnished grain you get on spun objects. I've read a few articles on paint techniques last night which suggested to try fine steel wool or a fine 3M scourer to get the look before clear coating or candy coating. It is a cheap dish anyway so not wasting too much time other than the potential for learning from trying something new or different.
Hi guy's I don't know if this is an appropriate thing to ask, and if it's frowned upon then I apologize. So here I go. In my city we have the Toronto tool library and they are offering a lifetime membership. I thought that if I had a few endorsements from folks on the Facebook page then I would stand a chance.
https://www.facebook.com/TorontoToolLibrary?ref=hl&__nodl&_rdr
The above is the link and if any of you fine folks are interested in seeing this finished, then your endorsements would certainly help me out. Thank you folks...G.Murdoch.
https://www.facebook.com/TorontoToolLibrary?ref=hl&__nodl&_rdr
The above is the link and if any of you fine folks are interested in seeing this finished, then your endorsements would certainly help me out. Thank you folks...G.Murdoch.
Shameless bump for likes...GM
https://www.facebook.com/TorontoToolLibrary?ref=hl&__nodl&_rdr
https://www.facebook.com/TorontoToolLibrary?ref=hl&__nodl&_rdr
Well today's the last day for voting and I would just like to express my thanks to all who commented or liked my request for the lifetime membership at the Toronto tool library. Win or not I won't let this stop me from reaching my goal. It will just be delayed and that's OK. I am limited on the tools that I need and I live in an apartment so the tool library would have benefited in a big way. That being said, I am still going to use their services. Anyway thank you for your time, and once this starts rolling I will be a more active member... G.Murdoch
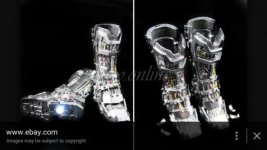
So it's been awhile. Ripped muscles in my arm, so I needed a break. Right now I am working with the boot, starting with the soles. I used MDF to make the masters for casting a mold in rubber. To get a metal look I will add aluminum flakes to achieve this. The pics are a reference of design and function. I will be using aluminum, rubber, Super Fabrice and electronics. Next the weekend I've got a show and will be researching a lot as well as doing a demo and showing some pieces in the works...GM
Attachments


Last edited:
dr_clyde
Well-known member
Hey guys I am looking into getting a mini lathe for working aluminum. What are your thoughts on this? Your wisdom is appreciated, thanks in advance...GM
I would look at a south bend, Logan or Sheldon lathe in the 9-10" swing size.
Guster
Well-known member
Seconded. Those are some good starter options. Some of the older import lathes in the 9-11" swing in brands like Jet, Tru-pro(Turn-pro) etc. can be quite acceptable if they are complete and reasonable condition too. Be aware than any broken bits may be hard to source parts for in older machines despite what the seller tells you.
Normal advice with machinery is biggest you can buy for the money and space you have. Doesn't necessarily mean you need to buy a 12ton behemoth because it was cheap. Rather think about the size of things you want to build and then the work envelope a machine has to do that work and perhaps look at the next size up. There is no lathe owner out there who bought one and did not wish they could have one larger for a job they could not realise before the purchase. Those little sewing machine sized units are tempting for a beginner but have more limitations than the money is worth.
Read up on and know what to look for when inspecting and buying one. Plenty of literature out there. Know how to identify wear, slop and backlash that may be unacceptable for your level of precision requirements. Be realistic but don't be put of by a little dirt and tarnish. Many a diamond in the rough out there. Lathes often come with additional change gears, chucks and steadies. Remember that you can easily double your price if having to go buy some basic but necessary tooling, accessories and measuring equipment if not included in the deal.
Keep in mind that even a small benchtop lathe can easily exceed 500lbs and may need additional equipment to move and perhaps a stronger bench if it doesn't have one provided. Once you have one you also need to clean and maintain it... but lets keep it simple and get one first.
Good hunting.
vintagespeed1956
Well-known member
the amount of time to do that kindof thing in aluminum and the skill necessary is high.
how about looking at vacu-forming those shapes from foam molds and painting? that's the only way i see this happening.
how about looking at vacu-forming those shapes from foam molds and painting? that's the only way i see this happening.
Well I appreciate your advice but foam is not an option, nor plastic or resin.the amount of time to do that kindof thing in aluminum and the skill necessary is high.
how about looking at vacu-forming those shapes from foam molds and painting? that's the only way i see this happening.
I work at a shop where we do cylindrical grinding, I'D and OD. Now I am not a grinder but I am a quick study. I am not walking into this half cocked nor am I approaching this with a hue of arrogance. But when I want something I fully intend on gating it. I am a hard worker and please stay tuned for updates...GM
This is awesome stuff, thank-you so much Guster...GMSeconded. Those are some good starter options. Some of the older import lathes in the 9-11" swing in brands like Jet, Tru-pro(Turn-pro) etc. can be quite acceptable if they are complete and reasonable condition too. Be aware than any broken bits may be hard to source parts for in older machines despite what the seller tells you.
Normal advice with machinery is biggest you can buy for the money and space you have. Doesn't necessarily mean you need to buy a 12ton behemoth because it was cheap. Rather think about the size of things you want to build and then the work envelope a machine has to do that work and perhaps look at the next size up. There is no lathe owner out there who bought one and did not wish they could have one larger for a job they could not realise before the purchase. Those little sewing machine sized units are tempting for a beginner but have more limitations than the money is worth.
Read up on and know what to look for when inspecting and buying one. Plenty of literature out there. Know how to identify wear, slop and backlash that may be unacceptable for your level of precision requirements. Be realistic but don't be put of by a little dirt and tarnish. Many a diamond in the rough out there. Lathes often come with additional change gears, chucks and steadies. Remember that you can easily double your price if having to go buy some basic but necessary tooling, accessories and measuring equipment if not included in the deal.
Keep in mind that even a small benchtop lathe can easily exceed 500lbs and may need additional equipment to move and perhaps a stronger bench if it doesn't have one provided. Once you have one you also need to clean and maintain it... but lets keep it simple and get one first.
Good hunting.

Guster
Well-known member
I've been looking at this, any thoughts folks. Wanting something for aluminum work. Thanks in advance...GM
Listed for $1,000.00
Popular hobbyist size lathe. One thing worth mentioning is that 7"x12"(7" dia and 12" span) is often the un-tooled work envelope. Once you add the chuck, compound, toolpost and tailstock(with chuck and perhaps a drill) into the equation you will find it quickly becomes a lot less as clearances and tooling interferes.
The basic 3 jaw chuck also has a stock holding limit that is much smaller than the lathe capacity. That looks like about a 4" chuck which will likely hold less than about 2.5" in material without swapping the jaws which then give you less holding power. The outside holding jaws contact surface reduces to something like 0.3" in 3 steps for that size chuck. If you do the math you find that you can actually only work with material much smaller than 7'x12"
You can probably get the next size up 9x20 for not much more in cost. Gives a larger work envelope that doesn't take up much more space or adding much additional weight. The older machines mentioned earlier might get you a fully tooled machine in the 9"-11" x20" size for about the same price.
Just some things to think about.
I'll check em out, and thanks man...GMPopular hobbyist size lathe. One thing worth mentioning is that 7"x12"(7" dia and 12" span) is often the un-tooled work envelope. Once you add the chuck, compound, toolpost and tailstock(with chuck and perhaps a drill) into the equation you will find it quickly becomes a lot less as clearances and tooling interferes.
The basic 3 jaw chuck also has a stock holding limit that is much smaller than the lathe capacity. That looks like about a 4" chuck which will likely hold less than about 2.5" in material without swapping the jaws which then give you less holding power. The outside holding jaws contact surface reduces to something like 0.3" in 3 steps for that size chuck. If you do the math you find that you can actually only work with material much smaller than 7'x12"
You can probably get the next size up 9x20 for not much more in cost. Gives a larger work envelope that doesn't take up much more space or adding much additional weight. The older machines mentioned earlier might get you a fully tooled machine in the 9"-11" x20" size for about the same price.
Just some things to think about.
