To avoid these ads, REGISTER NOW!

My 1975 Chevy Dually Build

OP
7

75Dually

Well-known member
Joined
Dec 5, 2013
Messages
444
Location
Lubbock, TX
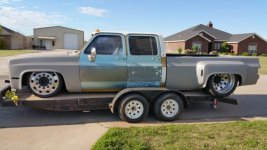
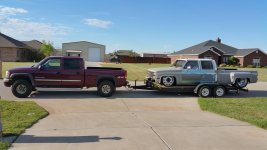
I did drag the truck out last weekend to go to a local show. It was just down the street from the house. So we threw it on the trailer to see what the locals thought. Fun stuff!

For those of you who have been following along on this build you know how far this truck has come, and I only feel it is half way! Ah well back to the grind stone!:thumbup:
 

Attachments

  • On trailer.jpg
    On trailer.jpg
    50.5 KB · Views: 445
  • On trailer 2.jpg
    On trailer 2.jpg
    134.6 KB · Views: 373
To avoid these ads, REGISTER NOW!

rodsnratfinks

Well-known member
Joined
Jan 13, 2015
Messages
1,397
Location
California
Thanks man!


You think you got a good size car hauler, but not with that fat pig on it! Makes it look small!! You forget just how big these trucks are until you have to haul one around...:thumbup:


So true. Reminds of a time I towed mine 60 miles with the help of my old boss: He was a stubborn guy, and was convinced that we should strap the axles and that three straps were enough. When we first took off, the trailer was sitting all the way down on the axles, so he jacked the trailer up and put 4x4s in between the axles and the frame. Then, as we were going 70mph down the freeway, I'm watching my truck like a hawk and 10 miles into the trip we go over a bump on a slight curve and I watch as my truck (which was already bouncing all over the place) pops up over a foot. I told him we should check the load and he insists its fine. So, we arrive at our destination and I get out and happen to notice that the two rear straps had failed!! It was nothing short of a miracle that the truck made it to its destination
8e03ec5d0b965831eeca02856436a177.jpg
92e5a00bd379c416a1231f5edea59cfb.jpg
16af08efc4f20d12ac821c7386338311.jpg


Sent from my iPhone using Tapatalk
 

xtremek

Well-known member
Joined
Apr 13, 2012
Messages
11,603
Location
St. Johns, Mi
Thanks man!


You think you got a good size car hauler, but not with that fat pig on it! Makes it look small!! You forget just how big these trucks are until you have to haul one around...:thumbup:

A few questions. How long is that trailer? If you were going to build/buy a trailer for this, how long would you get? Last, do you buy or make rear trailing arms?
 

jayz66ragtop

Well-known member
Joined
Sep 11, 2009
Messages
1,533
Location
SoCal
A few questions. How long is that trailer? If you were going to build/buy a trailer for this, how long would you get? Last, do you buy or make rear trailing arms?

I know you didn't ask me BUT I have a 22' dovetail and an '88 Ford dually fit on it perfectly with about two feet to spare. Towed it for over 120 miles with zero issues.
 

xtremek

Well-known member
Joined
Apr 13, 2012
Messages
11,603
Location
St. Johns, Mi
Not to jack 75's thread, but thx Jazzy. Both Rodsnrats and 75's look a little short. Just looking for opinions on my next build.
 
OP
7

75Dually

Well-known member
Joined
Dec 5, 2013
Messages
444
Location
Lubbock, TX
So I admit that my trailer is not made to haul a truck like mine. However my trailer IS made to be pulled by a truck like mine.

So now back to your regularly scheduled show!
 
OP
7

75Dually

Well-known member
Joined
Dec 5, 2013
Messages
444
Location
Lubbock, TX
Just a quick update. My oldest is getting married!! Thus my time, and especially my money has been dedicated to that event lately. So the truck is sitting and waiting for me to get back to work on it. However my bank account needs a serious injection of capitol before I can even think of pulling out that debit card any time soon! Lucky for me most of the things I need done are just time related, body work, finish the interior, etc. I already have most of the items waiting to go on, just no time at the present to do any of it.

Stay tuned!
 
OP
7

75Dually

Well-known member
Joined
Dec 5, 2013
Messages
444
Location
Lubbock, TX
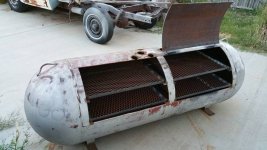
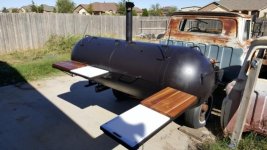
This is what I have been doing in the shop lately. Building this for my daughters wedding reception. Her grandmother is going to be doing all the cooking for the reception and she said that if I got this done we would do Texas BBQ. Yes!

We will be back on the truck real soon.
 

Attachments

  • Cooker 1.jpg
    Cooker 1.jpg
    51.5 KB · Views: 132

930dreamer

Super Moderator
Staff member
Joined
Oct 7, 2009
Messages
22,966
Location
Amarillo,TX and Stinnett,TX
This is what I have been doing in the shop lately. Building this for my daughters wedding reception. Her grandmother is going to be doing all the cooking for the reception and she said that if I got this done we would do Texas BBQ. Yes!

We will be back on the truck real soon.

Lubbock isn't that far to travel from Amarillo for a wedding with good home cooked food.:bounce::lol_hitti

Nice build
 
OP
7

75Dually

Well-known member
Joined
Dec 5, 2013
Messages
444
Location
Lubbock, TX
Lubbock isn't that far to travel from Amarillo for a wedding with good home cooked food.:bounce::lol_hitti

Nice build

Thanks man!

I hope to have some real progress once this event is over. The nice thing is I get to keep the smoker, and give away the daughter...:thumbup: Actually her future hubby is a super guy and a real hot rodder, so we think we will keep him around for the long haul. :thumbup::thumbup:
 
OP
7

75Dually

Well-known member
Joined
Dec 5, 2013
Messages
444
Location
Lubbock, TX
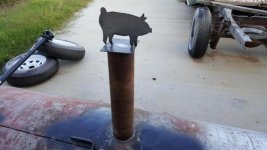
Just wanted to show where I am on the smoker. I promise to get back on the dually right after the end of this month. So ready to have that truck on the road!
 

Attachments

  • 20151017_212614[2].jpg
    20151017_212614[2].jpg
    53.2 KB · Views: 104
  • 20151010_1744322.jpg
    20151010_1744322.jpg
    54.9 KB · Views: 96
  • 20151017_212717[2].jpg
    20151017_212717[2].jpg
    54.8 KB · Views: 88
OP
7

75Dually

Well-known member
Joined
Dec 5, 2013
Messages
444
Location
Lubbock, TX
OK we did a ton of work on the smoker this past weekend! We did the first burn and it was so hot (which is exactly what we wanted, to cook out all the old tank junk) it flaked all the old paint off. I just took a wire brush and cleaned all the remaining paint off after that.

After it cooled down I finished putting all the small items on the tank. Things like chains for the pins so we would not lose them in transit, the front swing out tables latch pins, and pins and tabs for the cutting boards. Just a ton of small work, but it all takes time... Then I shot two coats of Rustoleum high temp fire pit paint (you can get it now at Home Depot in quarts) on it. Allowed it to dry over night.

I put the smoker on the frame of one of my donor trucks for the time being. I have all the parts to make a new trailer for it, but just ran out of time before the wedding. The last thing we have to do is bring it up to temp one more time and coat the inside with peanut oil which will season it just like a cast iron frying pan.

I hope you enjoyed this smoker build.
 

Attachments

  • 20151025_150158.jpg
    20151025_150158.jpg
    55.2 KB · Views: 86
  • 20151025_145842.jpg
    20151025_145842.jpg
    57.2 KB · Views: 85
  • 20151025_145755.jpg
    20151025_145755.jpg
    132.8 KB · Views: 84
  • 20151024_142932.jpg
    20151024_142932.jpg
    134.9 KB · Views: 86
OP
7

75Dually

Well-known member
Joined
Dec 5, 2013
Messages
444
Location
Lubbock, TX
OK I'm back! The wedding is all done, daughter is now married, and dad is back on the dually!!

I got to thinking over the past couple of weeks about the rear suspension. I am going to install a 4 link from Thorbros. I saw some of there stuff at a show early this year and was very impressed with the workmanship. So in a week or two I am going to order it. In the mean time I am going to be prepping the rear to accept the new 4 link. Should be interesting.

I cannot tell you how happy I am being back in the shop playing with my truck.

Stay tuned!
 
To avoid these ads, REGISTER NOW!

bigpokie

Well-known member
Joined
May 25, 2013
Messages
438
yeah, yeah. i want pics for proof ! ive had a SD 3 link on my s10 for yeeeeeaaaars and have not had a stitch of trouble. very well built parts.
 
OP
7

75Dually

Well-known member
Joined
Dec 5, 2013
Messages
444
Location
Lubbock, TX
So the dually has not moved all summer. Tonight I got the air ride hooked back up and functioning. At least the dually can move again under it's own power. Now I can get one of my cars in the shop and fix it's failing oil pump. Man that truck takes up a lot of room!
 

Attachments

  • 20151119_212403[1].jpg
    20151119_212403[1].jpg
    144.7 KB · Views: 176
  • 20151119_212611[1].jpg
    20151119_212611[1].jpg
    54.4 KB · Views: 167

bsg

Well-known member
Joined
Feb 10, 2009
Messages
329
Location
Imlay City, MI
So the dually has not moved all summer. Tonight I got the air ride hooked back up and functioning. At least the dually can move again under it's own power. Now I can get one of my cars in the shop and fix it's failing oil pump. Man that truck takes up a lot of room!

I have space in my barn if you get tired of tripping over it!:thumbup:

Kevin
 
OP
7

75Dually

Well-known member
Joined
Dec 5, 2013
Messages
444
Location
Lubbock, TX
Happy Thanksgiving everyone! I worked on the truck as much as I could today, we have a lot of bad weather heading our way tonight so I wanted to get as much done as possible. I got the front end aligned so at least I can get it to the alignment shop without tearing up the front tires. I did some work on getting the doors a little bit better gapped. I also did very tedious things like make the support plates that will go under the mounting bolts for the seats, all 16 of them!. The floor pan metal is too light for my tastes so I wanted some thicker material for the mounting bolts.

So some progress here and there...
 
OP
7

75Dually

Well-known member
Joined
Dec 5, 2013
Messages
444
Location
Lubbock, TX
First the body shop guys need to keep their laughter to themselves on this one. With that being said I have wanted to use one of the big round erasers that body shops use to remove the double sided tape that holds the trim on and the vinyl striping, but I always seem to forget them when I pick up my paint supplies. Well I got some the other day and they are fantastic. It took off the old vinyl striping on the drivers door in just under 5 minutes. Wow! And it did not hurt the paint below. All I did after I got done using it was wipe the door down and was done faster than I thought possible. The body shop guys have some of the coolest tools!!

I also did the front passenger fender as well. I will do the rest of the passenger doors this weekend. What a time saver.

Ok you body shop guys, be kind...
 

Attachments

  • 20151203_191750[1].jpg
    20151203_191750[1].jpg
    132.9 KB · Views: 149
  • 20151203_191719[1].jpg
    20151203_191719[1].jpg
    100.5 KB · Views: 163
OP
7

75Dually

Well-known member
Joined
Dec 5, 2013
Messages
444
Location
Lubbock, TX
Got the dually out of the shop today for the first time in a long time. I needed to fix one of our family cars and was going to need a ton of tools to get it done. So out went the dually and in went the car. Plus it gave me a chance to clean out the shop at the same time. I took the truck around the block and that was a blast. Can't wait until this thing is road worthy and street legal!!

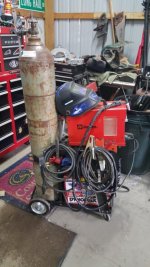
I also got my TIG setup this weekend. Started to run a couple of test beads once everything was setup correctly. Was a bit rusty at first, but it started to come back after a few minutes. Been waiting on this for a long time. Wait until you see what I am going to be doing with it. Wink Wink Wink
 

Attachments

  • Dually 5.jpg
    Dually 5.jpg
    56.4 KB · Views: 168
  • Tig setup.jpg
    Tig setup.jpg
    63.7 KB · Views: 132
OP
7

75Dually

Well-known member
Joined
Dec 5, 2013
Messages
444
Location
Lubbock, TX
any pics on the edc and how its mounted?

Bigpokie check out the entire separate build pages I did on the EDC alone (link below). There was only a couple of sights around but no one did the entire build on an EDC. Yeah there are 4wd guys who did some, but there systems were only for filling tires and running tools on the trial. Super cool and a lot of good knowledge to get one started, but not what I needed for my build. So I started this separate build to help others learn what I found out by piecing all the other info out there available.

Since I started that page there have been 4900 visits to it, so I hope it has helped some guys out there with their projects. Check it out and let me know what you think.

http://www.duallyscene.com/threads/15485
 

bigpokie

Well-known member
Joined
May 25, 2013
Messages
438
good write up. ive read a lot of threads but wasnt a member so i couldnt ask questions
 
OP
7

75Dually

Well-known member
Joined
Dec 5, 2013
Messages
444
Location
Lubbock, TX
I didn't see how you relive your head pressure after the comp turned off. Did you wire a toggle switch to cut of the edc as another fail safe ? Other than that, it was good.

I found a lot of info reading this thread. It's a lot of posts though.

http://www.gmfullsize.com/threads/york-compressors-edc.107722/

As far as the head pressure is concerned, what I have found out is that you need to put a one way valve at the head so that reverse pressure cannot back up and overpressure the piston. With this set up you will have no issue with pump start up. They can handle a lot more start up pressure than you think. Imagine what it has to endure with the AC system it was originally designed for. I also recommend that you put another one way valve before the tank. This way you have two stop gaps helping out if one fails to work.

Because I run the pump through a Hella relay I did not feel the need for a master over ride switch (fail safe). I worked for Hella and know that they make the best relays, so I doubt that this will ever be an issue. However if you feel that you need one on your system go ahead. It might be a good safety measure.

I'll check out that thread. I think I have read it already, but any additional info I can gather might help me in outer places.

Glad you liked my thread! When you get around to doing yours start a thread on it somewhere and let me know. I would like to watch it being built.
 

bigpokie

Well-known member
Joined
May 25, 2013
Messages
438
Hell, I'm faaaaaaaaaarrrrrr away from that. I'm still working on adding the floors back to it. I'm gathering info and as many parts as I can so when the time comes I'll have no surprises.

I just got the dodge from my avatar back together so I can get back on the impala !
 
Last edited:
OP
7

75Dually

Well-known member
Joined
Dec 5, 2013
Messages
444
Location
Lubbock, TX
So Santa UPS dropped by today and left these toys for me to play with! Trying to get this truck ready for Lone Star Throwdown and other 2016 shows.
 

Attachments

  • 20151216_204049[1].jpg
    20151216_204049[1].jpg
    139.6 KB · Views: 62
OP
7

75Dually

Well-known member
Joined
Dec 5, 2013
Messages
444
Location
Lubbock, TX
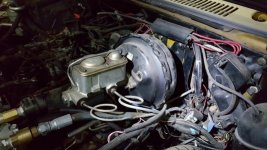
Well I actually got some real work done on the truck tonight. I am changing out the brake booster and master cylinder from the Suburban to the correct hydro boost booster and matching master cylinder. The brakes should work a lot better from now on. The only thing I have left to do is get new lines made up for the high pressure side, and get a "T" fitting to tie into the low pressure return line. The pics below show the new master and the hydro boost just after I shot some Rustoleum on them for protection.

Lots more to do before it rolls out of the shop, but at least I am checking off one item at a time.

Stay tuned...
 

Attachments

  • Brake booster 2.jpg
    Brake booster 2.jpg
    62.2 KB · Views: 83
  • Brake booster 1.jpg
    Brake booster 1.jpg
    135.6 KB · Views: 89
OP
7

75Dually

Well-known member
Joined
Dec 5, 2013
Messages
444
Location
Lubbock, TX
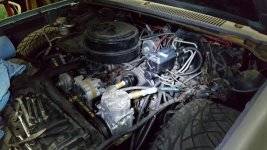
The hydro boost is now done! Ok I still have to bleed the brakes, but hey it's mostly done!! Yes the brake lines need the bends to be cleaned up, and all that wiring needs to be cleaned up as well. The underside of the engine bay really needs some attention.

I was so glad to have the OEM lines from Napa. They made this so much easier and cleaner. I also did the spark plugs on this side of the motor because the brake system was out of the way. Talk about a knuckle buster with all that stuff in the way... I will get the other side done tomorrow, we are now getting freezing rain and more snow on the way. Yeah!
 

Attachments

  • Brake booster 3.jpg
    Brake booster 3.jpg
    62 KB · Views: 105
OP
7

75Dually

Well-known member
Joined
Dec 5, 2013
Messages
444
Location
Lubbock, TX
Got all of the small items cleaned up on the hydro booster tonight. Here is a pic of the pump and the lower lines. Also got the plugs on the passenger side installed also.

Tomorrow I will start on the dash body work. I want it in paint soon. Then I can start to put the interior together.

Lots of work ahead. The LST crush is on!

Stay tuned!
 

Attachments

  • Power Steering Pump.jpg
    Power Steering Pump.jpg
    131.1 KB · Views: 64
OP
7

75Dually

Well-known member
Joined
Dec 5, 2013
Messages
444
Location
Lubbock, TX
Made a pedestal for the eLevel touch pad last night, got it installed today after work. I will leave it unfinished for a while so I can concentrate on other portions of the interior.
 

Attachments

  • eLevel mount.jpg
    eLevel mount.jpg
    112.2 KB · Views: 99
  • eLevel mount 2.jpg
    eLevel mount 2.jpg
    133.5 KB · Views: 76
OP
7

75Dually

Well-known member
Joined
Dec 5, 2013
Messages
444
Location
Lubbock, TX
Let there be tail lights! Ok the markers and the tail lights work, but no brake lights! Arg! Can't this ever be easy! Oh well I will tackle that later in the week.

Stay tuned!
 

Attachments

  • Tail lights 1.jpg
    Tail lights 1.jpg
    146.3 KB · Views: 61
To avoid these ads, REGISTER NOW!
Top Bottom