
You are using an out of date browser. It may not display this or other websites correctly.
You should upgrade or use an alternative browser.
You should upgrade or use an alternative browser.
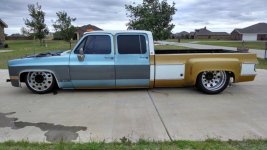
My 1975 Chevy Dually Build
- Thread starter 75Dually
- Start date

![20160317_223052[1].jpg](/forum/data/attachments/430/430688-0e2cfc42f54da86fa06e14948acefc9d.jpg)
![20160317_223136[1].jpg](/forum/data/attachments/430/430721-54e7bc1a34990f04c056b45ca35ed7c2.jpg)
xtremek
Well-known member
If and when I do my project, I want to pull a 5th wheel. Do you have any idea what size bags I should use?
75 - didnt you have a 2 link ? Keep up the good work. And is this damn thing one color yet ?
Xtreme - site for the knowledge...
http://www.slamspecialties.com
http://riderite.com
Form a quick search, 7" bags should work, but 8" in the rear would help more. Less psi used to lift. More useable stroke, if it set up correctly. The mega ram from the video uses 7's. There are plenty of people that tow low and tow a long ways!
And a video for inspiration ....
Last edited:
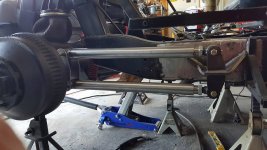
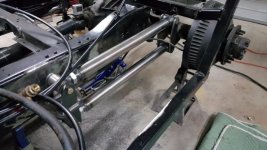
I got the drivers side 4 link mount welded up last night. I also welded up the bars last night too. Now All I have to do is the mounts to the axle for the drivers side, and the new watts link assembly. I just need time to get the metal cut and get it mocked up. Maybe this weekend (if the wife let's me...)
Attachments
xtremek
Well-known member
I'm sorry to be a pain, but why are those brackets always welded so they form a pocket? Isn't anyone worried about them collecting mud and rotting out? Thanks for documenting this build so well, I'm learning a ton.
GirchyGirchy
Well-known member
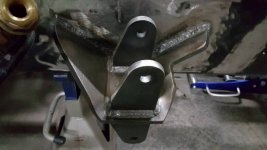
Ditch the spikes! Just ruin the otherwise clean look IMO.
Nice looking welds though.")
Nice looking welds though.
I'm sorry to be a pain, but why are those brackets always welded so they form a pocket? Isn't anyone worried about them collecting mud and rotting out? Thanks for documenting this build so well, I'm learning a ton.
It comes down to strength, and with the pockets bent up like that it increases the surface area. Good paint prep and really good paint will keep the rust monster at bay!
Ditch the spikes! Just ruin the otherwise clean look IMO.
Nice looking welds though.
Thanks for the thoughts, but I dig the spikes... Remember your hot rod should slightly scare your Grandma.


keeps the rear end centered from left to right. if he used a pan hard bar it would move up and down in an arch ( if you were watching from the rear )
So yes it keeps the geometry better lol.
I've never done a Watts link. Always wanted too though. Just never needed too
Bigpokie is my official answer guy!!!
Lol. I just get bored at work. I don't know electrical and codes, but I know a little about this.
So yes it keeps the geometry better lol.
I've never done a Watts link. Always wanted too though. Just never needed too
I figured form the avatar you would have an idea. I just elaborated for other readers
Yah on a lowered bagged anything solid axle the Watts link makes alot of sense.
Shoot on my 86 ( also a crew cab dually) I might do one just cause I never have before. Buts it's going the opposite direction in altitude
Shoot on my 86 ( also a crew cab dually) I might do one just cause I never have before. Buts it's going the opposite direction in altitude


I had to take back my hydro boost because it was sticking and I had to use my foot to pull it back up. It would make the brakes drag really badly. The new one came in today, so off the old one came, and now it is replaced. I figured while I was under the hood I would replace the upper radiator hose too. The old one failed during our trip home from LST, so it got a trip to the trash can, and the new one is now in it's new home. It's the little things that can drive you up a wall... Now on to the Watts Link. Gotta get it done because we have a local show next weekend and I want this big girl buttoned back up so I can slam it on the ground. That just sounds wrong doesn't it...
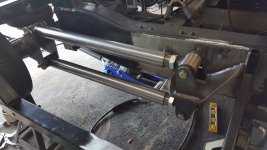
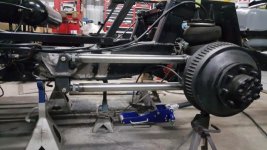
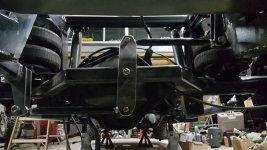
Watts link mount is now done and welded to the rear end. I need to make the rest of the assembly that attaches the link arms to the mount, but that will get done later this weekend. I am also going to make new side mounts for the link arms. I want them to be stouter and look a lot better than my first go around. Progress!
Stay tuned!
Stay tuned!
Attachments

So a short update. I've been finishing up getting the truck back together. One good thing about the 4 link is my pinch is only 3" above the shop floor. I gained 1.5" of additional drop! Now the truck sits level when slammed. My only issue is now the drive shaft needs some additional clearance around the cross member when fully laid out. Man if it is not one thing it is another... The truck does look a lot better laid that close to terra firma! I'll get some pics this weekend and post them.
xtremek
Well-known member

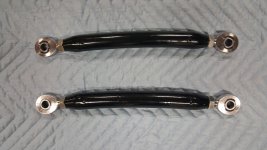
So I found out there was some slight interference issues with the top watts link arm. Because I have felt for quite a while the old arms were a bit to small I thought this would be a good time to replace them and build a bigger and stouter set. So I went with 1 1/4" tubing and some chromoly heim ends. I also pulled out my tubing roller and gave each arm a slight bow to clear the mount. Now all is good with the world!
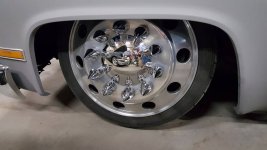
With the new ride height I wanted to check the clearance with the tires to the flares and the bed sides. I got the bed sides mounted back up tonight, and then check all the clearances at full drop. Thankfully there are no issues. I still have a lot of room on all sides. Whew!
Now I need to do an overall check and take it out for a run this weekend.
Stay tuned!
Attachments
So I got the big girl out of the shop today after work. I took a couple of pics, and I was comparing it to an older side view at roughly the same distance and angle. You probably cannot see any major difference, but because I am around it all the time I can see the inch difference.
Anyway I took it out for a short drive and the ride is really nice. Yes even better than before, and the ride was pretty good before.
So what is next... Most likely the interior, but the bodywork and panel fitment might take presidence. Oh yeah and the AC needs to get finalized too. Lots to do still!
Stay tuned!
Attachments


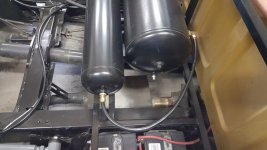
Ok so I have not really liked all the plastic air tubes since the beginning of this project. They are prone to fail, and I simply don't want to trust my ride to them. Weakest link you know...
I want hard lines for the whole system at some point. So tonight I took off the tank to tank line and ran some copper line in it's place. The next line I'm going to run is from the filters to the tanks, and then from the tanks to the valve. It has been a while since I have soldered any joints. Not since the last water heater went kapoot!
Eventually I will do the main supply line from the York to the filters, but that hydraulic line is doing a fine job at this point. And naturally I will do all 4 corners to the bags. One less thing to worry about! My stuff may not be as pretty as some of the show trucks I see, but I want mine to be mechanically sound first.
Looks a little steam punk to me!
Attachments

I went back and looked at the pic. Wow that color is a touch to dark for me but that beer bottle brown/ root beer brown is such a cool color.
I dig the copper lines too. If you put a clue of fake rivets near the inlet it would be totally steampunk
I dig the copper lines too. If you put a clue of fake rivets near the inlet it would be totally steampunk
I went back and looked at the pic. Wow that color is a touch to dark for me but that beer bottle brown/ root beer brown is such a cool color.
I dig the copper lines too. If you put a clue of fake rivets near the inlet it would be totally steampunk
That is an amazing idea! I will have to do that!!
thejudges69
Well-known member
Ok so I have not really liked all the plastic air tubes since the beginning of this project. They are prone to fail, and I simply don't want to trust my ride to them. Weakest link you know...
I want hard lines for the whole system at some point. So tonight I took off the tank to tank line and ran some copper line in it's place. The next line I'm going to run is from the filters to the tanks, and then from the tanks to the valve. It has been a while since I have soldered any joints. Not since the last water heater went kapoot!
Eventually I will do the main supply line from the York to the filters, but that hydraulic line is doing a fine job at this point. And naturally I will do all 4 corners to the bags. One less thing to worry about! My stuff may not be as pretty as some of the show trucks I see, but I want mine to be mechanically sound first.
Looks a little steam punk to me!
Those air lines run millions of miles on commercial vehicles every single day. I'd honestly trust them more then a hard line, any flex in the hard line can crack it. The only place that's not plastic on commercial vehicles is from the frame to the axles, rubber flexes better with the movement of the axle.
Just a friendly piece of advice. Build looks good.
joe49
Well-known member
Rigid copper pipe is a bad idea on a vehicle.
if you don't want plastic use copper tubing.
if you don't want plastic use copper tubing.
xtremek
Well-known member
........They are prone to fail, and I simply don't want to trust my ride to them. Weakest link you know....Looks a little steam punk to me!
Those air lines run millions of miles on commercial vehicles every single day. I'd honestly trust them more then a hard line, any flex in the hard line can crack it. The only place that's not plastic on commercial vehicles is from the frame to the axles, rubber flexes better with the movement of the axle.
........
Rigid copper pipe is a bad idea on a vehicle.
if you don't want plastic use copper tubing.
Ok, I'm torn. I don't like the looks of the plastic lines, but I know they hold up forever, especially the colored ones if they're kept out of the sunlight. I would stay away from anything that is rigid because of the influence of vibrations that will lead to cracking. I got involved in robotics at school because they were having numerous electrical failures. They were using solid core wiring and after a few hours, the vibrations would cause connection failures. I forced them to go to automotive grade multi-strand wiring and no more issues. Just my .02$
thejudges69
Well-known member
It has to flex with the vehicle. Bottom line. Just my opinion. I bet that copper pipe won't make it 10k miles if your lucky.