To avoid these ads, REGISTER NOW!

My 24 X 40 Workshop Build

jrocco

Active member
Joined
Apr 5, 2010
Messages
25
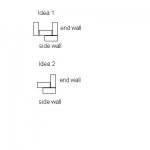
Following is my workshop build. Size is 24' X 40' and 10'walls. I am using scissor trusses so that I can have 12' clear in the center for a lift. Except for the slab, this will be all home built with help from my Wife, Grandson and friends. Since I have never framed anything bigger than a garden shed this will be a learning experience for me also.

Pouring the Slab

P0167317Small.jpg


P0167319Small.jpg


Gable End Truss Built

P4158141Small.jpg


Here's the 1st Scissor Truss. This will give me 12' clear for a car lift.

P4158143Small.jpg


I made a jig out of one of the Gable End Trusses to make the Scissor Trusses on, and also made patterns for all the parts. The other 18 should go a lot faster than the first.

P4158142Small.jpg
 
Last edited:
To avoid these ads, REGISTER NOW!
OP
J

jrocco

Active member
Joined
Apr 5, 2010
Messages
25
Building your own Trusses...nice. What is the cost savings?
I got a quote on the trusses (both gable ends and the 19 scissors) at $2,800.00. I figure about $ 600 to $ 700 in materials total. My labor is real cheap. LOL
:beer:
 
OP
J

jrocco

Active member
Joined
Apr 5, 2010
Messages
25
I built my workbench bases and they came in real useful for work tables. One used for the Miter Saw and the other 2 for layout and material storage.

P4178145Small.jpg


I spent most of a day pre-cutting all the parts for the scissor trusses and staging them in the workbench bases. This included building one additional scissor trusss to prove out all my patterns.

P4178144Small.jpg


Here I am in process. It takes me about 20 minutes to assemble a Scissor Truss by myself and 30 minutes with a helper. :lol_hitti

Seriously thou, one of my friends helped me out and we assembled 10 scissor trusses in about 3-1/2 hours including stacking all of them in the yard.

P4178146Small.jpg


Now that the trusses are all done, I can start framing the walls.
 
Last edited:
OP
J

jrocco

Active member
Joined
Apr 5, 2010
Messages
25
Got quite a bit done yesterday and today. My Wife and Grandson helped and we got one end wall and one side wall built and stood up.

P4208148Small.jpg
 

Garry Carter

Active member
Joined
Apr 17, 2010
Messages
28
Location
Bulverde TX
Looking at your pix, and reading about your progress, brought back memories of lots of hard work -- and good times. I built my own 24 X 32 shop in 2003 and have been working on it ever since. I had a pro come in and pour the slab, but it's been pretty much my deal since that point.

Since I couldn't afford to go high enough with the side walls to put in a lift, I opted for an attic and storage space instead. Wish now I'd "bitten the bullet" and gone taller so I'd have that lift today.

Here's a couple of photos of when I was at about the same stage as you are presently.
 

Attachments

  • ShopProgress2.jpg
    ShopProgress2.jpg
    106.8 KB · Views: 185
  • Framing-Day1-1.jpg
    Framing-Day1-1.jpg
    133.4 KB · Views: 161
OP
J

jrocco

Active member
Joined
Apr 5, 2010
Messages
25
Looking at your pix, and reading about your progress, brought back memories of lots of hard work -- and good times. I built my own 24 X 32 shop in 2003 and have been working on it ever since. I had a pro come in and pour the slab, but it's been pretty much my deal since that point.

Since I couldn't afford to go high enough with the side walls to put in a lift, I opted for an attic and storage space instead. Wish now I'd "bitten the bullet" and gone taller so I'd have that lift today.

Here's a couple of photos of when I was at about the same stage as you are presently.

Thanks for the complements guys.

Garry, thanks for the photos. Since this is the 1st thing I ever framed larger than a garden shed, I am in a learning process. Even with 10' walls I still had to go with the scissor trusses to get the 12' head room for a lift.

And speaking of lifts, I scored an asymmetrical 2 post lift on Craigs List for $500.00. It needs cleaned and painted but I can afford to do some work since they are about $3000 new.

Anyone seeing anything that I need to look out for, please speak up.

Thanks
 
Last edited:

e-tek

Well-known member
Joined
Dec 19, 2007
Messages
10,690
Location
Saskatoon, SK
Love it. Great lessons on do-your-own trusses. My ceiling is 11'3" with drywall, which is fine for cars, but having a little more would always be nice!
 

larry_g

Well-known member
Joined
Apr 28, 2007
Messages
16,858
Location
oregon
Looking good there. One thing I see is that looks to be nontreated lumber on in contact with the concrete. I don't think that is allowed, at least not reccomended. There should be a moisture barrier there.

lg
no neat sig line
 

mad57

Well-known member
Joined
Jan 30, 2009
Messages
1,698
Looks great!! how are you anchoring the walls to the concrete? i dont see and threaded rods in the slab??
 

e-tek

Well-known member
Joined
Dec 19, 2007
Messages
10,690
Location
Saskatoon, SK
Looking good there. One thing I see is that looks to be nontreated lumber on in contact with the concrete. I don't think that is allowed, at least not reccomended. There should be a moisture barrier there.

lg
no neat sig line

Good catch. My builder used a treated piece for the bottom stringer. I piece of plastic or something wouldn't work, 'cause water could seep over top.
 
OP
J

jrocco

Active member
Joined
Apr 5, 2010
Messages
25
Good catch. My builder used a treated piece for the bottom stringer. I piece of plastic or something wouldn't work, 'cause water could seep over top.

The bottom sill plates are all treated lumber.
 

Daedalus

Well-known member
Joined
Sep 28, 2009
Messages
5,949
I made a jig out of one of the Gable End Trusses to make the Scissor Trusses on, and also made patterns for all the parts. The other 18 should go a lot faster than the first.
That is the way to do it! The other thing is to set up a miter saw bench with stops and cut all pieces of each length as a group. Think that's what you meant by making patterns? Looking very good. I'm inspired! :)
 

Red05GT

Well-known member
Joined
Mar 29, 2010
Messages
438
Location
ohio
Building your own trusses brought back memories of my wife and I building the trusses
for our first house in 1980. We were building on a tight budget and I figured we could
save about a thousand dollars by building our own. We put down the subfloor and
built a jig on the subfloor. I then used the patterns like you did and cut all the pieces.
We used 3/8" plywood for gussets, 1 and a half gallons of wood glue, and 75 pounds
of 6 penny nails to assemble the trusses. I would put the pieces in the jig, tack the
gussets on and my wife would then fill the gussets up with nails. She still brings this
instance of abuse up right after the mortar mixing complaint. The scissor trusses will
really set your shop off. The metal liner panels would really look great on the sloped
ceiling.
 

wbrian63

Well-known member
Joined
Mar 31, 2010
Messages
843
Location
Houston, TX
Couple of questions / suggestions.

1) The header at the rear of the space, above the large opening. If there is to be any sort of roof load borne by that wall, the header is probably not large enough. Of course, if your scissor trusses go parallel to that wall, then it's probably no big deal.

2) I see the blocking in the corner stud gang is a 2x4 "on the flat" between 2 studs. If it were me, I'd turn the 2x4 90 degrees, which will give you a 6.5" wide corner instead of a 4.5" wide corner. A 4.5" wide corner only gives you a 1" exposure of one of the 2x4's. Sometimes, a little more is better when the sheathing starts to go up. Optionally, you could use 2 2x4's on the flat to get a 6" wide corner. With a 4.5" wide corner, you have to be deliberate on how you put the sheathing up. If you put the sheathing on the opposing wall first (the one with the fully exposed 2x4), then (assuming you're using 1/2" or thicker sheathing), you're now down to just a 1/2" corner to attach the sheathing to.

Another alternative to corner blocking, and one that works well in climates where you need as much insulation as possible, is to use just one 2x4 at the very end, with the 2nd 2x4 attached 90 degrees to the first (wide portion parallel to the sole/cap plate). This gives you a full 1.5" exposure for nailing the interior sheathing, plus a nice pocket for insulation.

Other than that - congratulations.

I'm not old enough to have a grandson and for that matter I also don't have any children, so I'll never be old enough to have a grandson. But, some of my most fond memories are a variety of building projects with my grandfather.

I remember one project in particular, where we had to enlarge the opening to a shed area where he was wanting to keep his boat. We were just raising the height of the opening - there was no door. We were careful to mark the new cutout with a level, and after cutting the hole, it was obvious that something had slipped or the level was inaccurate, because the top of the opening had a visible slant to it. Grandpa's statement, after scratching his head was "A dumb man won't notice it, and a smart man won't say anything..."
 
OP
J

jrocco

Active member
Joined
Apr 5, 2010
Messages
25
Brian, Thanks for the comments:

Couple of questions / suggestions.

1) The header at the rear of the space, above the large opening. If there is to be any sort of roof load borne by that wall, the header is probably not large enough. Of course, if your scissor trusses go parallel to that wall, then it's probably no big deal.

The Trusses do go parallel to the rear wall, so I hope the header will be OK

2) I see the blocking in the corner stud gang is a 2x4 "on the flat" between 2 studs. If it were me, I'd turn the 2x4 90 degrees, which will give you a 6.5" wide corner instead of a 4.5" wide corner. A 4.5" wide corner only gives you a 1" exposure of one of the 2x4's. Sometimes, a little more is better when the sheathing starts to go up. Optionally, you could use 2 2x4's on the flat to get a 6" wide corner. With a 4.5" wide corner, you have to be deliberate on how you put the sheathing up. If you put the sheathing on the opposing wall first (the one with the fully exposed 2x4), then (assuming you're using 1/2" or thicker sheathing), you're now down to just a 1/2" corner to attach the sheathing to.

The rear (and front walls) have two studs with blocking in between making up 5" wide. The side walls have a single 2 x 4 nailed to the corner block group which makes it 3" wide for nailing the siding. I think that is what you were suggesting. If that is not clear I can post a photo.

I remember one project in particular, where we had to enlarge the opening to a shed area where he was wanting to keep his boat. We were just raising the height of the opening - there was no door. We were careful to mark the new cutout with a level, and after cutting the hole, it was obvious that something had slipped or the level was inaccurate, because the top of the opening had a visible slant to it. Grandpa's statement, after scratching his head was "A dumb man won't notice it, and a smart man won't say anything..."

Like the quote from Grandpa
 
To avoid these ads, REGISTER NOW!

wbrian63

Well-known member
Joined
Mar 31, 2010
Messages
843
Location
Houston, TX
I was just working with math figures when I came up with the #'s. A 2x4 is 1.5" thick x 3.5" wide, so 3 stacked together = 4.5". The end wall corner assembly should be about 4.5" wide +/- . The side wall will be 3.5" +/-, which is where I get the 1" exposure (4.5 - 3.5).

If you sheath the side wall before the back with a 1/2 board, you'll only have 1/2" of exposure to attach the end wall sheath.

I've attached a diagram detailing what I'm talking about.

Idea 1 gives you a lot more room to nail the sheathing, no matter which wall you start on.

Idea 2 eliminates 1 stud per corner, a design method which is gaining ground for economical reasons (fewer studs per house), and for energy saving reasons, as you can insulate the corner better. Idea 2 only gives you 1/2" more nailing surface, but more is more.

I'm not meaning to cast aspersions on your construction methods. The way you're doing it is just fine, and millions of structures have been constructed using those methods.

I was just offering up a different perspective. Proceed as you deem best, and the result will be outstanding, I'm sure.

My granddad was a true gentleman and a guide for how I try to live my life today. I was lucky enough to have him around well into my 30's - he was nearly 90 when his "among the living" membership card expired.
 

Attachments

  • Stud Diagrams.JPG
    Stud Diagrams.JPG
    7.4 KB · Views: 130
OP
J

jrocco

Active member
Joined
Apr 5, 2010
Messages
25
OK. I see what you are saying about the corner.

Here's the way I made mine. I was following some construction techniques in an old book I have.
 

Attachments

  • Corner Detail.jpg
    Corner Detail.jpg
    20.6 KB · Views: 99

jonlb

Well-known member
Joined
Jul 7, 2009
Messages
128
Location
South Central Kentucky
Wow $2800 dollars for 21 trusses. I got 9 for $600 in south central Ky delivered from 50 miles away. they were 24' long standard trusses 4/12 pitch. Anyways looks great I will be doing an addition to mine soon, giving me the 24x40 they you have. The 24x24 just isn't cutting it anymore.
 
OP
J

jrocco

Active member
Joined
Apr 5, 2010
Messages
25
Wow $2800 dollars for 21 trusses. I got 9 for $600 in south central Ky delivered from 50 miles away. they were 24' long standard trusses 4/12 pitch. Anyways looks great I will be doing an addition to mine soon, giving me the 24x40 they you have. The 24x24 just isn't cutting it anymore.

How long ago was that?

Standard trusses were $2100 and the Scissor trusses $2800. I know around Houston, currently, that $100 per truss is about the "norm".
 
OP
J

jrocco

Active member
Joined
Apr 5, 2010
Messages
25
Well here we are - Erection Day 4/25/2010. Some really good friends and my Grandson Tim came over and worked a full hard day. We got all the trusses set and about 2/3 of the roof decking. All in all it went really smooth considering we are all amatures at this.

Prior to today, I had all the wall built and 3 stood up and anchored. I left off the front wall so we would have easy access to set trusses with the Tractor.
P4218149Small.jpg


P4258152Small.jpg


P4258162Small.jpg


P4258164Small.jpg


My friend Terry with his home made jib on his John Deer Tractor. What a backsaver this is.
P4258169Small.jpg


P4258175Small.jpg


P4258178Small.jpg


I'm happy now. All the preperation work up to now is really paying off.
P4258184Small.jpg


Here you can get an idea of how much ceiliing height you can get with Scissor Trusses.
P4258189Small.jpg


P4258191Small.jpg


P4258193Small.jpg


My wife Ruth Ann sitting pretty on the John Deer
P4258199Small.jpg


P4258200Small.jpg


Grandson Tim nailing things down.
P4258202Small.jpg


Still lots of work to do, but we made huge progress today.
 
OP
J

jrocco

Active member
Joined
Apr 5, 2010
Messages
25
I got a lot finished this week:

Roof Decking Finished:

P4268221Small.jpg


Also finished installing the insullation panels and Hardie Panels on the front end.

I originally intended to shingle myself, but with the threat of approaching Texas rains, I decided to bring in a roofing crew. 4 guys for 4 hours and done.

P4298224Small.jpg


P4298225Small.jpg


I also finsihed installing the OSB on the rear and one side.

P4298227Small.jpg


P4298226Small.jpg


Note: I did not realize how heavy the Hardie panels are. It is almost impossible for one guy to handle the panels, especially up high. I had in the past replaced panels on my house using hardboard panels and they are easily 1/3 the weight.

Also I had no success setting the pressure on the nailer to heep from shooting thru the Hardie so it's hand nailing all the way.

If I had know then what I know now, I would have used the hardboard panels.

Note 2: It did rain last night.
 
Last edited:

nathank

Well-known member
Joined
Jul 2, 2008
Messages
509
Location
West Texas
I love this build. Neighbors and family all chipping in to get things done. The trusses are great!
 

DAinTN

New member
Joined
Jun 11, 2009
Messages
4
This is a great thread, its been great watching it all come together. I cheated and went with cinder block. lol a note on trusses i went with a local company here in East Tennessee 24' standard trusses with a 4/12 pitch and 14" for overhang were $38 a piece. I just couldnt see building them myself for that...please keep the pics coming when you can:thumbup:
 

Orange65

Well-known member
Joined
May 3, 2010
Messages
200
Location
Clanton, AL
A warning about building your own ceiling trusses if you have to have an inspection- the inspector may require a professional engineer sign off on your truss. That is the advantage of buying them- they have been analyzed and signed off on by the manufacturer. I had a friend build his own as well- he had to hire a structural PE to verify and sign off on his before the city would sign off on his build. That added about $1000 to the build and ate up his cost savings on the trusses.
 

Falcon67

Well-known member
Joined
Jun 11, 2009
Messages
18,371
Location
Merkel, TX
Hardy Panels - yep, they are heavy. What I did was run a perimeter around the base of the building with 1x4 pressure treated lumber. I set the panels on top of that - made install much easier and kept the bottom of the panels well above grade.
 
OP
J

jrocco

Active member
Joined
Apr 5, 2010
Messages
25
I am curious as to where you got the truss design from? Books, truss company, your own?

The Scissor Truss is a standard truss design concept that appears in most design books. However the angles and length of members are something you have to calculate.

Generally the slope of the bottom cord is 1/2 the top cord, so if the top cord if for a 6/12 pitch then the bottom cord would run along a 3/12 pitch. However, modifications can be made if the roof slope is higher or no snow loads (or other interior loads) exist. In my case, in Houston (no snow) I used a 4/12 for the bottom cord and a 6/12 for the top.

Reference: http://www.dutchcrafttruss.com/trussdesign.html
 
OP
J

jrocco

Active member
Joined
Apr 5, 2010
Messages
25
A warning about building your own ceiling trusses if you have to have an inspection- the inspector may require a professional engineer sign off on your truss. That is the advantage of buying them- they have been analyzed and signed off on by the manufacturer. I had a friend build his own as well- he had to hire a structural PE to verify and sign off on his before the city would sign off on his build. That added about $1000 to the build and ate up his cost savings on the trusses.

ORLY?

As I said before, the 2 quote I got for 21 trusses were about $2,800.00. I spent about $800.00 in materials including bolts and nails.
 
OP
J

jrocco

Active member
Joined
Apr 5, 2010
Messages
25
This weekend and Monday I got all the "heavy lift" stuff done.

R-Max insulation panels installation.

P5028231Small.jpg


Hardie Siding Completed.

P5038234Small.jpg


To go: Trim Work, Facia, Soffits, Door installation, Electrical, and paint.
The list is getting shorter
 

51rider

Well-known member
Joined
Dec 21, 2009
Messages
502
Location
London, England.
Looking good.:thumbup:

I really like those scissor trusses-making me reconsider my roof options:headscrat

With the Hardie siding, did you fix it directly to the OSB or batten it out?
 

38Chevy454

Well-known member
Joined
Dec 26, 2006
Messages
4,036
Location
Cincinnati, OH
Nice job on the Hardie panels. I built a shed at my old San Antonio house using them and agree they are pretty heavy to handle. Supposedly rot and insect proof, it was a good choice for the shed.
 
To avoid these ads, REGISTER NOW!
Top Bottom