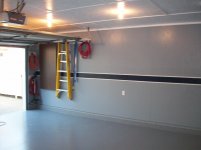
I had to wait 72 hours to drive on the floor. Lucky for me the 72 hour time frame was up last night. The storm hit about 5 hours after I moved my F150 and MKX in for the night.
The ceiling and walls are all 7/16" OSB 4 x 8 sheets screwed with galvanized screws. The ceiling seams/joints were covered with lattice strips. I made my own strips by ripping 2x4's this gives you 1 1/2" wide lattice strips (huge cost savings). The lattice was then air nailed to the ceiling. Any voids where the strip meets the OSB panel were caulked. This gives the ceiling a continuous flow look. Everything was then primed with Zinser primer and painted with Olympic paint (Lowes). At first blush it looks like a drywall knock down ceiling.
Note: I grew up in the Plaster/Dry wall trade and my family has been in business for three generations (60 yrs) so I know a little something about the trade. I used OSB because of the heating and cooling variations in Michigan. This has a negative effect on dry wall and yes, even good old fashion wet plaster.
I hung the OSB on the walls vertical and kept the joints as tight as possible. The joints were then belt sanded to knock down any high spots (very few). I experimented with the stripe i.e. different types of tape (kept bleeding through - no clean line).
I found the best thing was to paint the stripe and trim it using the same principals as the ceiling. I just ripped 1/2" x 6" boards on edge to give you 1/2" lattice strips. I then primed and painted them. Next I snapped a line on top and bottom of the blue stripe and followed it with the 1/2" strip. This gives you crisp clean straight lines.
The corner bench is made from 3/4" plywood (good one side). I just made the bench frame top with 2x4's. I then ripped one sheet of 3/4" x 8' plywood to give you a 24" wide top and screwed it to the frame. Fastened the top to the wall (37" high) via the underside 2x4 frame and add the legs for support. I then finished the edge/face of the bench top. Lastly I laid a 24" wide strip of thin rubber on the bench top. Very inexpensive project.
Hope this gives you guys some ideas. I found the best thing was to read everyone's ideas and then just develop your own style from everyone's experiences. Don't forget to have fun as you go!