
JoeNES
Member
Hi All,
I'm a Made In USA Craftsman tool fan and long-time lurker on the site, and had an idea I wanted to share, so decided to join. I've got a few more garage ideas I can't wait to share, since I've gained so much from reading.
I was having an issue with my Craftsman socket rails, the ones with the gray, black, or red handles. Because they are rounded on the bottom, they fall over, especially with deep sockets. The drawer isn't deep enough for the Hansen kind, and I like the rails with the handles so I can take the whole row to where I'm working and find the right size without taking multiples off.
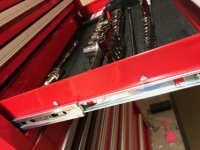
I was trying to work out a way to keep them upright, and nothing was working (magnets, pegs, little alligator clips, etc), so I had the idea to rivet a lot of clips to a steel strap. While I was working out the dimensions (man it was gonna be ugly!) I just absent-mindedly placed the bar on the end of the rails to get it out of the way, and bingo! Turns out that's all I needed!
In short, I took a 12-inch-long Simpson Strong-Tie (#HRS12) and bolted it to the left tray wall, about 1/4" or less out from the side using spacers and just enough clearance underneath to slide the end of the rails under. I spray painted it red to match, and I had to use machine screws to clear the hinges and side, as well as file one screw edge flat. But the rail ends fit in under there really tight, and you just slide them out when you need one. Best of all, when I close the drawer, nothing moves a millimeter.
Hope that helps somebody out there, apologies if this has already been done, but when I looked, I couldn't find anything! Thanks all!
I'm a Made In USA Craftsman tool fan and long-time lurker on the site, and had an idea I wanted to share, so decided to join. I've got a few more garage ideas I can't wait to share, since I've gained so much from reading.
I was having an issue with my Craftsman socket rails, the ones with the gray, black, or red handles. Because they are rounded on the bottom, they fall over, especially with deep sockets. The drawer isn't deep enough for the Hansen kind, and I like the rails with the handles so I can take the whole row to where I'm working and find the right size without taking multiples off.
I was trying to work out a way to keep them upright, and nothing was working (magnets, pegs, little alligator clips, etc), so I had the idea to rivet a lot of clips to a steel strap. While I was working out the dimensions (man it was gonna be ugly!) I just absent-mindedly placed the bar on the end of the rails to get it out of the way, and bingo! Turns out that's all I needed!
In short, I took a 12-inch-long Simpson Strong-Tie (#HRS12) and bolted it to the left tray wall, about 1/4" or less out from the side using spacers and just enough clearance underneath to slide the end of the rails under. I spray painted it red to match, and I had to use machine screws to clear the hinges and side, as well as file one screw edge flat. But the rail ends fit in under there really tight, and you just slide them out when you need one. Best of all, when I close the drawer, nothing moves a millimeter.
Hope that helps somebody out there, apologies if this has already been done, but when I looked, I couldn't find anything! Thanks all!
Attachments


Last edited: