To avoid these ads, REGISTER NOW!

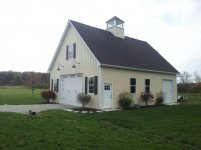
My 30 x 40 shop/office

Jeep51

Well-known member
Joined
Jan 19, 2014
Messages
76
Location
OHIO
My first post!
Hello to all! I have been watching this forum for some time now and finally decided to join. Thanks for all the tips!
This is my shop/office. The first floor is basically finished!
Building: 30 x 40 with 12' ceiling on the first floor and a 17 ' x 40' room upstairs. The upstairs is framed and will eventually be my office. I built the cupola so you can access it from the office area!
 

Attachments

  • My Shop.jpg
    My Shop.jpg
    139.6 KB · Views: 3,309
To avoid these ads, REGISTER NOW!

smg980

Well-known member
Joined
Oct 18, 2011
Messages
64
Location
Illinois
Looks nice. What are the dimensions of the front overhead door?

I'm also interested in how you made the cupola accessible...got photos?
 
OP
J

Jeep51

Well-known member
Joined
Jan 19, 2014
Messages
76
Location
OHIO
Thanks! The overhead door is 14 wide by 10 high.
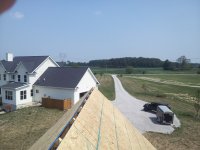
Currently I have a ladder going up through the trusses. The roof is cut out to allow access. When I'm finished all you will see is an access hole from the office ceiling. I'm going to have a wooden ladder going up to a platform with a bench seat. The inside dimensions of the cupola are 5' x 5' and about 80" from the platform. No pictures currently but "what a view!"
 

smg980

Well-known member
Joined
Oct 18, 2011
Messages
64
Location
Illinois
14' eave height? And what is the total height to the peak? I'm really liking this shop.
 
OP
J

Jeep51

Well-known member
Joined
Jan 19, 2014
Messages
76
Location
OHIO
The door is 14' wide by 10' tall. The peak is 28' and the top of the cupola is 37'
The side overhead door is 8' wide by 9' high and the windows are all 3' wide by 5' high.
The roof is a 12 pitch!!!
 

rinker1

Well-known member
Joined
Aug 30, 2008
Messages
289
Location
Ohio
Great looking garage!! Sure looks warm when that photo was taken,bet ya got that Ohio white grass around the garage now!!!!
 
OP
J

Jeep51

Well-known member
Joined
Jan 19, 2014
Messages
76
Location
OHIO
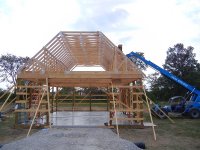
Here are some of the construction pictures. We set the trusses, sheeted the roof and set the cupola in two days! Man was I tired!!
 

Attachments

  • Const. 1.jpg
    Const. 1.jpg
    53.9 KB · Views: 461
  • Const. 2.jpg
    Const. 2.jpg
    134.8 KB · Views: 490
  • Const. 3.jpg
    Const. 3.jpg
    134.8 KB · Views: 521
  • Step location.jpg
    Step location.jpg
    126.7 KB · Views: 524
OP
J

Jeep51

Well-known member
Joined
Jan 19, 2014
Messages
76
Location
OHIO
Here are a couple of pictures for you. The access for the cupola and us setting the cupola. This was a very long day. The lift I rented was getting picked up the next morning and we needed to finish. These pictures were taken around 10:30 p.m.!!
 

Attachments

  • Cupola hole.jpg
    Cupola hole.jpg
    44.6 KB · Views: 212
  • Setting cupola.jpg
    Setting cupola.jpg
    114.4 KB · Views: 229

BuickFarmer

Well-known member
Joined
Apr 5, 2006
Messages
1,415
Location
Athens, Georgia
Here ya go!

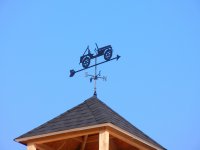
Nice view!!! Curious, is that a lightening rod on top of the cupola. If not, have you considered one.

Sorry the picture came out so "LARGE"


attachment.php
 
OP
J

Jeep51

Well-known member
Joined
Jan 19, 2014
Messages
76
Location
OHIO
What you are seeing is the mount for the weathervane! I had this made for the barn but Mother Nature decided it looked better on the ground. The directional portion of the mount was make of pot metal and basically fell apart during a huge storm! I' going to custom fabricate a sturdier bracket for it this summer. I was very disappointed, as I'm addicted to Jeeps! :bounce:
It will be reinstalled this summer!
 

Attachments

  • Weathervane.jpg
    Weathervane.jpg
    144.5 KB · Views: 96
To avoid these ads, REGISTER NOW!
OP
J

Jeep51

Well-known member
Joined
Jan 19, 2014
Messages
76
Location
OHIO
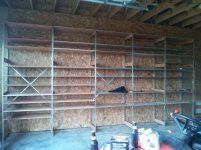
I picked up this shelving system from a Kohls location that was closing!
I'm planning on enclosing them so the shop looks nicer. They are currently an organized mess! The best part about these is the fact that every shelf is adjustable in 1 1/2" increments.
 

Attachments

  • shop shelving.jpg
    shop shelving.jpg
    97.9 KB · Views: 267
OP
J

Jeep51

Well-known member
Joined
Jan 19, 2014
Messages
76
Location
OHIO
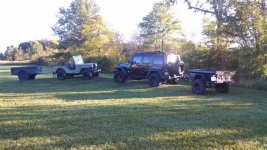
Here is what I keep in it!
The Willys is a 1947!
 

Attachments

  • Jeeps & trailers.jpg
    Jeeps & trailers.jpg
    153.3 KB · Views: 335
OP
J

Jeep51

Well-known member
Joined
Jan 19, 2014
Messages
76
Location
OHIO
Once I finish off the upstairs, I'm sure I will spend a few nights out there! My wife said it's my "dog house"!
 

Steelhorse27

Well-known member
Joined
Apr 23, 2012
Messages
143
Location
The hachie, tejas
Man, this is a nice build. I'd like to see some more pictures of the trusses and bottom cord, if you have some time. What dimension lumber was used on the trusses and your wall framing?
 
OP
J

Jeep51

Well-known member
Joined
Jan 19, 2014
Messages
76
Location
OHIO
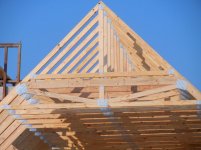
Two pics: Main truss has a 2x10 bottom cord, a 2x6 top cord with 2x4 center supports. The upper truss or "piggy back truss" is all 2x4. The overall truss height was too tall for transporting so it was a two piece truss design. The most important thing to remember is when you run your sheeting you need to overlap the sheeting so you have a good solid connection.
The main beams around the top of the walls are 2x12's. The girts or the 2x material that creates the wall framing was done in 2x6. I over kill everything!
6x6 post at 8' on center for the structural columns. I also added diagonal bracing on the room side of the girts. These were installed everywhere a window or door wasn't! Hope this helps!
 

Attachments

  • Main truss.jpg
    Main truss.jpg
    146.1 KB · Views: 213
  • Piggy back truss.jpg
    Piggy back truss.jpg
    117.1 KB · Views: 184

jesse72

Well-known member
Joined
Sep 26, 2011
Messages
352
Location
California
That is a great garage, looking forward to more info and pics of the interior and office! Thanks for sharing!
 

Steelhorse27

Well-known member
Joined
Apr 23, 2012
Messages
143
Location
The hachie, tejas
Two pics: Main truss has a 2x10 bottom cord, a 2x6 top cord with 2x4 center supports. The upper truss or "piggy back truss" is all 2x4. The overall truss height was too tall for transporting so it was a two piece truss design. The most important thing to remember is when you run your sheeting you need to overlap the sheeting so you have a good solid connection.
The main beams around the top of the walls are 2x12's. The girts or the 2x material that creates the wall framing was done in 2x6. I over kill everything!
6x6 post at 8' on center for the structural columns. I also added diagonal bracing on the room side of the girts. These were installed everywhere a window or door wasn't! Hope this helps!

Thanks Jeep! I'm hoping to build one later this year and I like this so much more than the 30x40 I had planned
 
OP
J

Jeep51

Well-known member
Joined
Jan 19, 2014
Messages
76
Location
OHIO
Steelhorse27, If you want, I can scan and send you copies of the approved truss drawings? It might make it easier for you! Just let me know what email address.
 

hemibee69

Well-known member
Joined
Jan 15, 2011
Messages
92
Location
VA
That is a great looking building. The detail and proportions really set it off!

Where did you get your lights over the garage door?

Thanks for sharing.:beer:
 
OP
J

Jeep51

Well-known member
Joined
Jan 19, 2014
Messages
76
Location
OHIO
Thanks for all the compliments on my shop! I'm pretty proud of it! The overhead lights are actually re-purposed! They were originally on an Italian restaurant and red! I cleaned them up, rewired them and painted them satin black! I love the look.
When I was planning the shop, I wanted it to look more like a carriage house instead of a detached garage. I hate it when I'm driving down the road and pass a building that looks like it fell out of the sky! I wanted it to look like the house as much as possible without using horizontal siding. I actually like the vertical board and batten look that steel siding gives you.
 

Attachments

  • Property.jpg
    Property.jpg
    136.1 KB · Views: 226
OP
J

Jeep51

Well-known member
Joined
Jan 19, 2014
Messages
76
Location
OHIO
Here is a shot of the air line system I installed. I have since installed the filters and regulators. The design works well for my set up. One outlet is for my hose heel and the other is for my blast cabinet and painting needs. I also installed a non filtered/regulated outlet at the far left end and also made provisions to add on later if needed. Since the shop is only 30' wide I didn't feel it was necessary to run line to the other side but I did install a "T" if I ever change my mind.
 

Attachments

  • air lines.jpg
    air lines.jpg
    121.2 KB · Views: 215

hambone1967

New member
Joined
Feb 23, 2014
Messages
2
I would be really interested in seeing some of the upstairs if possible? I want to build something like this to live in with in the next 2 years and am looking for some ideas.
 
OP
J

Jeep51

Well-known member
Joined
Jan 19, 2014
Messages
76
Location
OHIO
I will see if I have any pictures of the second floor. I haven't finished the upstairs yet. The interior walls are framed but that's it.
 

rtcblc

Member
Joined
Jul 9, 2013
Messages
14
Jeep51: I like your build. Looking to build a similar size myself. Been debating the pole vs. stick built options. Are your plans custom or off the shelf and available to the public.
Looking forward to following your progress.

...Ray

"Not Retired, Just Repurposed"
 
OP
J

Jeep51

Well-known member
Joined
Jan 19, 2014
Messages
76
Location
OHIO
I designed my shop. I really wanted it to blend with the house and the design allows me to expand it pretty easily. The 12' walls allow me to expand to the right or left if I ever feel the need. I can add a porch or a "lean to" by placing the roof line under the current overhang. If you go with shorter walls you are very limited with a "lean to" addition because the low end of the "lean to" would end up being too low! Damn that sentence sounds stupid but you get the point!

I don't have any pictures of the upstairs, as it isn't finished yet. My office will eventually be located upstairs. I have a couple of walls currently framed and the electrical circuits are run but nothing more than that.
 
OP
J

Jeep51

Well-known member
Joined
Jan 19, 2014
Messages
76
Location
OHIO
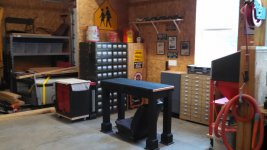
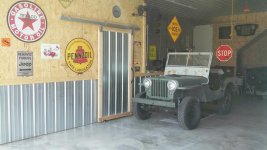
It's been awhile since I posted some pics of my shop, so here are some interior shots!

cabinets.jpg

Shop CJ.jpg
 

Emmo213

Active member
Joined
Sep 23, 2014
Messages
26
Location
Amherst, Oh
I love the look of this. I'm hoping to start on a 32'x38' one that'll be somewhat similar in the next year or so. Any more picture from the inside would be appreciated.
 
To avoid these ads, REGISTER NOW!
Top Bottom