To avoid these ads, REGISTER NOW!

my 32x52 with full loft

His200HerScout

Well-known member
Joined
Mar 17, 2009
Messages
217
Location
mid-michigan
Been meaning to post pics for a long time!!!

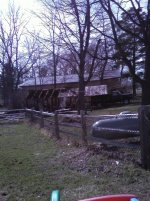
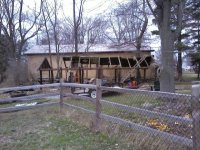
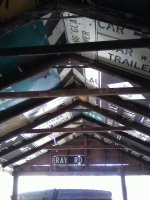
First off, the old shed. Wow, what an engineering marvel! It was made from telephone poles, those horizontal wooden beams near the top of telephone poles that hold the wires, old plywood road signs (no, I am not kidding), and corrugated steel & plastic. Apparently some previous owner worked for the road commission -- at least that's the story I've heard.

The roof was constructed of what I decided to call trussy things. Sort of like rafters, but without a ridge beam. Sort of like trusses because they had a cross-piece near the peak. They were about 6 feet on center with no purlins between, so the 1/2" plywood sheathing spanned nearly 6 feet. The roof was so weak that my father in-law and I ended up picking the corrugated roof off with shovels because I thought I'd go through the roof by standing on it.

Telephone poles probably have a large weight bearing capacity, but they weren't notched, so the roof load was carried by carriage bolts, which (of course) sagged. Also, the telephone poles were not set with any precision, so the builder just added (a few inches worth of) nuts and washers to the carriage bolts to make the trussy things parallel. This also contributed to the roof sagging.

Honestly, I can't believe this thing didn't fall over decades ago... And it was full of garbage that came with the house when we bought it. The only good thing I can say is "thank you for using box nails, because it came apart easily!"

I shot some video of pulling the poles out of the ground with my truck using a railroad tie and a chain. Now THAT was fun. I'll have to post that here or on YouTube.
 

Attachments

  • 1-old-shed.jpg
    1-old-shed.jpg
    152.7 KB · Views: 336
  • 2-old-shed.jpg
    2-old-shed.jpg
    154.5 KB · Views: 336
  • 3-old-shed.jpg
    3-old-shed.jpg
    139.1 KB · Views: 350
  • IMG_0019.jpg
    IMG_0019.jpg
    94 KB · Views: 315
  • IMG_0093.jpg
    IMG_0093.jpg
    102.8 KB · Views: 290
  • IMG_0015.jpg
    IMG_0015.jpg
    102.5 KB · Views: 303
To avoid these ads, REGISTER NOW!
OP
H

His200HerScout

Well-known member
Joined
Mar 17, 2009
Messages
217
Location
mid-michigan
After asking many questions and getting many great answers from Garage Journal members, I got my 26x46 barn drawn up the way I wanted. I went to the building inspector and said "here, 1192 square feet, just under that maximum you mentioned a few weeks ago." He gave me a funny look and said "what maximum?" A day later I came back with a 32x52 drawing, and he wrote up a permit within 24 hours.

I really, really wanted to build this myself and the entire job is within my capabilities. Between family and work, I just don't have the time and won't for quite some time. While tossing around the idea of playing GC, I had a heck of a time finding subcontractors that did quality work. I ended up going with a highly recommended general contractor who has done an excellent job so far. The only thing I will be doing is the electrical.

Here's my SketchUp drawing. I didn't bother with colors because computers are terrible at painting them correctly. We're going with HardiePanel Sierra 8 siding and Miratec trim, and we will be painting three Benjamin Moore colors that we chose ourselves. When I applied those colors to SketchUp, it looked disgusting :shocking:
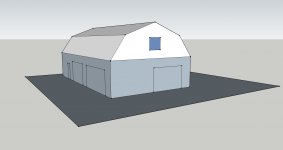
. So I made a model out of plywood scraps and paint samples and thankfully the actual color is what I expect :).
 

Attachments

  • barn.jpg
    barn.jpg
    139.2 KB · Views: 125
OP
H

His200HerScout

Well-known member
Joined
Mar 17, 2009
Messages
217
Location
mid-michigan
The day of the dig was awesome. 60-something degrees and sunny. They dug for a few hours and then poured the footing. When they say "footing ought to be on undisturbed soil" this is the digger you want. One guy was in the trench with a laser level while the backhoe operator ever-so-carefully dug each piece. No back-filling of low spots was required because of the care the operator took.
 

Attachments

  • IMG_0219.jpg
    IMG_0219.jpg
    99.6 KB · Views: 203
  • IMG_0210.jpg
    IMG_0210.jpg
    123.2 KB · Views: 137
  • IMG_0207.jpg
    IMG_0207.jpg
    107.9 KB · Views: 155
  • IMG_0203.jpg
    IMG_0203.jpg
    109.5 KB · Views: 138
  • IMG_0202.jpg
    IMG_0202.jpg
    110.8 KB · Views: 132
  • IMG_0200.jpg
    IMG_0200.jpg
    108 KB · Views: 149
OP
H

His200HerScout

Well-known member
Joined
Mar 17, 2009
Messages
217
Location
mid-michigan
The next day, the masons showed up. I've never seen a wall so smooth. Every block was laid with precision, and the building ended up perfectly square. :bowdown:
 

Attachments

  • IMG_0321.jpg
    IMG_0321.jpg
    87.2 KB · Views: 137
  • IMG_0322.jpg
    IMG_0322.jpg
    77.5 KB · Views: 130
  • IMG_0323.jpg
    IMG_0323.jpg
    83.9 KB · Views: 138
  • IMG_0391.jpg
    IMG_0391.jpg
    79.6 KB · Views: 131
OP
H

His200HerScout

Well-known member
Joined
Mar 17, 2009
Messages
217
Location
mid-michigan
It required a ridiculous amount of sand back-fill, but they did it right, compacting each load of sand. I guess I never took a picture of it, but they definitely used a plate compactor on each load, not just a dozer and a front loader.
 

Attachments

  • IMG_0353.jpg
    IMG_0353.jpg
    100.4 KB · Views: 121
  • IMG_0351.jpg
    IMG_0351.jpg
    106.3 KB · Views: 108
  • IMG_0346.jpg
    IMG_0346.jpg
    86.2 KB · Views: 117
OP
H

His200HerScout

Well-known member
Joined
Mar 17, 2009
Messages
217
Location
mid-michigan
There was a small miscommunication, and the masons only put in 5 courses of block. This would've put my siding about 4 inches above ground -- not good in Michigan. A quick phone call and I had one more course of block. Now the siding is/will be 12 inches off the ground and I am pleased. I also get a ceiling height of around 11 feet which is plenty for me. :bounce:

I guess I never took a pic of the extra course until after the floor was poured...
 

Attachments

  • IMG_0361.jpg
    IMG_0361.jpg
    114.1 KB · Views: 134
  • IMG_0390.JPG
    IMG_0390.JPG
    117 KB · Views: 151
OP
H

His200HerScout

Well-known member
Joined
Mar 17, 2009
Messages
217
Location
mid-michigan
They did an awesome job on the concrete floor. Mirror smooth, angled toward the drains, thresholds are angled outward so rain doesn't wash in. You know, all those little details that unprofessionals overlook. :thumbup:
 

Attachments

  • IMG_0390.JPG
    IMG_0390.JPG
    117 KB · Views: 126
  • IMG_0392.JPG
    IMG_0392.JPG
    130 KB · Views: 111
  • IMG_0389.JPG
    IMG_0389.JPG
    128.7 KB · Views: 110
  • IMG_0387.jpg
    IMG_0387.jpg
    88.7 KB · Views: 108
  • IMG_0383.jpg
    IMG_0383.jpg
    107.3 KB · Views: 124
  • IMG_0380.jpg
    IMG_0380.jpg
    89.2 KB · Views: 133
OP
H

His200HerScout

Well-known member
Joined
Mar 17, 2009
Messages
217
Location
mid-michigan
Here they are framing.... Not sure what the stuffed bird is all about. Maybe good luck? They nailed it to the pole the day they arrived. Maybe it's an attention-getter so the SkyTrak operator doesn't drive into the pole...
 

Attachments

  • IMG_0453.jpg
    IMG_0453.jpg
    99.4 KB · Views: 151
  • IMG_0454.jpg
    IMG_0454.jpg
    102.3 KB · Views: 153
  • IMG_0455.jpg
    IMG_0455.jpg
    68 KB · Views: 165
  • IMG_0452.jpg
    IMG_0452.jpg
    95.5 KB · Views: 144
  • IMG_0354.jpg
    IMG_0354.jpg
    85.4 KB · Views: 140
  • IMG_0451.jpg
    IMG_0451.jpg
    75.4 KB · Views: 160
  • IMG_0447.JPG
    IMG_0447.JPG
    122.1 KB · Views: 143
OP
H

His200HerScout

Well-known member
Joined
Mar 17, 2009
Messages
217
Location
mid-michigan
And setting the trusses... By the way, my hat is off to this crew. I've heard so many stories of guys showing up late & leaving early and homeowners footing the bill for idle rental equipment. These guys showed up everyday before 7 am, didn't drink coffee, didn't chat, ate lunch in 30 minutes, smoked while working (no smoke breaks), stayed past 5, and worked the Saturday of Memorial Day weekend. They needed the SkyTrak for only one week because they worked so hard.
 

Attachments

  • IMG_0511.jpg
    IMG_0511.jpg
    81.4 KB · Views: 163
  • IMG_0524.jpg
    IMG_0524.jpg
    102.2 KB · Views: 167
  • IMG_0523.jpg
    IMG_0523.jpg
    102.9 KB · Views: 169
  • IMG_0466.jpg
    IMG_0466.jpg
    94.4 KB · Views: 134
  • IMG_0465.jpg
    IMG_0465.jpg
    94.1 KB · Views: 141
  • IMG_0464.jpg
    IMG_0464.jpg
    97.2 KB · Views: 138
  • IMG_0463.jpg
    IMG_0463.jpg
    116 KB · Views: 141
OP
H

His200HerScout

Well-known member
Joined
Mar 17, 2009
Messages
217
Location
mid-michigan
Up goes the siding! That's where they're at as of today. It is raining, so that will delay them. Probably will have it sided and painted by early next week. I am happy so far with the contractor and his crew.

My wife and I really feel like we went out on a limb with this HardiePanel stuff. We wanted something paintable, but not short-lived. HardiePanel has a great reputation, but finding examples is extremely difficult. After doing a bunch of Google searches for T1-11 buildings, we came up with a look we wanted. We ended up biting the bullet and ordered HardiePanel hoping it would turn out as expected. We both think it will. We're going to have the 4' seams covered with 3.5" Miratec rather than the traditional/typical board & batten 2" Miratec on 8" spacing. These are examples that we found in a Google image search: http://www.barnsnorthwest.com/barns.htm
 

Attachments

  • IMG_0554.jpg
    IMG_0554.jpg
    77.8 KB · Views: 162
  • IMG_0555.JPG
    IMG_0555.JPG
    110.6 KB · Views: 176
  • IMG_0559.jpg
    IMG_0559.jpg
    81.8 KB · Views: 179
Last edited:
To avoid these ads, REGISTER NOW!

rieferman

Well-known member
Joined
May 18, 2009
Messages
2,586
Location
Collegeville PA (30 min west of Philly)
Looks like a really nice setting you have there. I like the roof shape you selected as well.

Btw, did you keep any of those old signs? Would be funny/cool to clean one up, add some trim to it, and display it in your new beautiful space!
 

Mikea57

Well-known member
Joined
May 28, 2008
Messages
262
Location
Olive Branch, MS
That looks GREAT!!! You'll love the Hardi-panels. I resided my old house with them and they were great. I sold it right after I finished so I can't comment conclusively on how they hold up but I know that they still look great 5 years after I put them up from driving by the old place. (Despite the people who bought it's lack of upkeep.)

What will the upstairs be used for?
 
OP
H

His200HerScout

Well-known member
Joined
Mar 17, 2009
Messages
217
Location
mid-michigan
The only problem with the signs is: they were all used and at the end of their lives 20-30 years ago when the shed was constructed. Up close, they're flaky and beat up, etc. Also, none of them are complete. The builder nailed them up then cut them off. It's marine plywood so it's in good condition, just not showroom quality. I think I'll build a clubhouse for the kids sometime. Maybe I can mount one or two of them... Or cut the highway numbers or street names out of the good ones.

The loft will be for storage, but it is way bigger than the amount of storage we need. Some ideas are... Wall off an area and make a home gym (no weights, just cardio equipment), wall off another area and make a playroom of some sort. It's 16x52x8 so there's plenty of space up there for whatever we decide. Honestly, we don't need the space, but I didn't want to "waste" it by getting non-attic trusses.
 

rieferman

Well-known member
Joined
May 18, 2009
Messages
2,586
Location
Collegeville PA (30 min west of Philly)
option 2 for the signs (and then I'll stop hijacking :) )

make some coasters for around the shop... still lets you launch into the story every time someone asks

in any case, really impressive stuff you've got going on..

edit: pool table/rec room type of area up in the loft!
 

e-tek

Well-known member
Joined
Dec 19, 2007
Messages
10,690
Location
Saskatoon, SK
The loft will be for storage, but it is way bigger than the amount of storage we need. Some ideas are... Wall off an area and make a home gym (no weights, just cardio equipment), wall off another area and make a playroom of some sort. It's 16x52x8 so there's plenty of space up there for whatever we decide. Honestly, we don't need the space, but I didn't want to "waste" it by getting non-attic trusses.

Hows about a secret laire for yo and the wifey!:pimpflash
 

McDowell

Member
Joined
Sep 15, 2009
Messages
19
Location
Central PA
looks like this thread could use resurrected from the dead. any updates?

any pics of that cornbinder you'd like to share? i have a 72 1210 Pickup.
 
To avoid these ads, REGISTER NOW!
Top Bottom