rslaback
Well-known member
So I know everyone here loves the Akro type bins. I am no exception. In my previous garage I had them all over the place, wherever I could find room. Some were hung with factory plastic track and some on homemade metal rack. I even had a bunch of bins that weren't in use due to lack of space and rack to hang them on.
We moved this summer and I am still unpacking the garage (and will be for months) but I wanted to get all the bins up that I own and have them all in one location.
Today I did that.
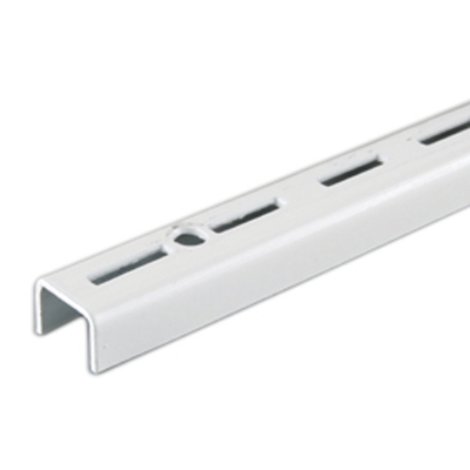
The biggest problem that I think anyone has in having a bunch of this type of bin is that the track is pretty outrageously priced for what it is. I did some searches on homemade track solutions and couldn't find anything that looked strong enough to me or fit the bins well. The closest I found to a good fit used suspended ceiling track angle but I have my doubts as to the strength of that track if I load up the bolt and screw bins.
To make my own solution I used old school shelving standards like were popular in the 80's. I picked up 4' long chunks at $3 each. The metal is nice and thick and fits the bin lips well. The height of the legs are also nice and short so the bin won't have as much leverage. As a bonus, they even come with prefabbed holes for mounting.

http://www.fleetfarm.com/detail/-single-track-wall-standard/0000000042131
The standards were fastened onto 1x6's that were ripped in half widthwise. You could get by with a lot smaller material but I wanted something that would support the entire back of the bin so it couldn't cam out of the track. I screwed the standards on so that the lip was flush with the face of the 1x with #8 - 3/4" sheet metals screws (using pilot holes). The screws are far enough away from the lip of the track that it does not interfere with the bins at all. Then the 1x was screwed to the wall across 4 studs.


After that all that was left was to hang the bins. Some are missing still in this picture as they are somewhere in the garage. I picked this wall because it has an outside door to the right and the dryer vent sticks out into the garage (you can see it below the bins to the right) so I can't really use the space for much else.


I like how clean the installation turned out, the racks are strong, cheap and can easily be removed to move with me whenever I move again (or build my second garage/shop). Total cost for the 12 racks was about $40 including screws. By the way, all the red bins were free after rebate from Menards. If you happen to be near one, snag some next time they are FAR.
We moved this summer and I am still unpacking the garage (and will be for months) but I wanted to get all the bins up that I own and have them all in one location.
Today I did that.
The biggest problem that I think anyone has in having a bunch of this type of bin is that the track is pretty outrageously priced for what it is. I did some searches on homemade track solutions and couldn't find anything that looked strong enough to me or fit the bins well. The closest I found to a good fit used suspended ceiling track angle but I have my doubts as to the strength of that track if I load up the bolt and screw bins.
To make my own solution I used old school shelving standards like were popular in the 80's. I picked up 4' long chunks at $3 each. The metal is nice and thick and fits the bin lips well. The height of the legs are also nice and short so the bin won't have as much leverage. As a bonus, they even come with prefabbed holes for mounting.
http://www.fleetfarm.com/detail/-single-track-wall-standard/0000000042131
The standards were fastened onto 1x6's that were ripped in half widthwise. You could get by with a lot smaller material but I wanted something that would support the entire back of the bin so it couldn't cam out of the track. I screwed the standards on so that the lip was flush with the face of the 1x with #8 - 3/4" sheet metals screws (using pilot holes). The screws are far enough away from the lip of the track that it does not interfere with the bins at all. Then the 1x was screwed to the wall across 4 studs.
After that all that was left was to hang the bins. Some are missing still in this picture as they are somewhere in the garage. I picked this wall because it has an outside door to the right and the dryer vent sticks out into the garage (you can see it below the bins to the right) so I can't really use the space for much else.
I like how clean the installation turned out, the racks are strong, cheap and can easily be removed to move with me whenever I move again (or build my second garage/shop). Total cost for the 12 racks was about $40 including screws. By the way, all the red bins were free after rebate from Menards. If you happen to be near one, snag some next time they are FAR.
Last edited:
 This is a technique that I will have to remember!