To avoid these ads, REGISTER NOW!

My ArmorPoxy experience

chargermann

Active member
Joined
Mar 21, 2015
Messages
29
Location
Ocala, Florida
While I am a new contributing member to this Forum, I've lurked for several years, finally finishing my 2000SF outbuilding to the point of applying a floor surface.
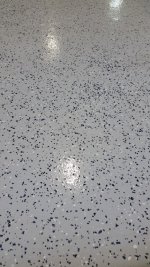
From the many threads and positive comments on epoxy finishes, including very attractive cost discounts, I decided to contact Armor-Poxy. Spoke extensively to a 'Greg', who was most professional and extremely patient with my many questions and concerns, thoroughly explaining all aspects of the product and my specific installation.

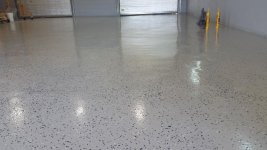
I provided Greg with the square footage (1640SF) of the floor and he selected the appropriate product line and estimated the quantities. A few weeks later, all products were shipped via truck courier to my residence. The plastic wrapped pallet contained everything - etching solution (not used), base and clear epoxies, vinyl speckles, anti-slip additives, rollers, roller frames, power drill mixer, buckets and spiked sandals. This material pallet remained within the house garage for 11 months before usage, so as long as everything's kept in a cool, dry location, the product appears to have no short-term shelf life.

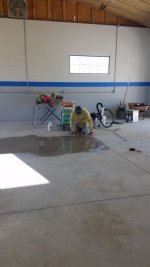
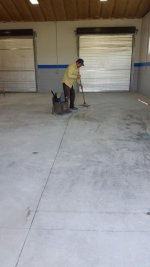
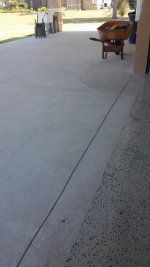
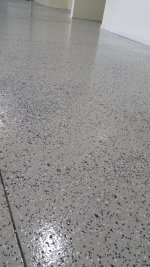
My primary concern was the current condition and preparation of the concrete slab, which was poorly finished by the idiot sub-contractor. Huge pockets, divots, and raised areas were everywhere, plus rain water from the garage doors drained into the building. Seven 50 lb. bags of an expensive, exterior concrete leveler was necessary, then extensive grinding of the entire surface with a machine. After numerous vacuum and mopping sessions, no residual film remained. The surface looked good and finally ready for the Armor-Poxy application. This preparation alone took me one month.
 

Attachments

  • 20180627_133037.jpg
    20180627_133037.jpg
    59.8 KB · Views: 320
  • 20190307_164750.jpg
    20190307_164750.jpg
    46.3 KB · Views: 297
  • Me final mopping concrete foor.jpg
    Me final mopping concrete foor.jpg
    51.4 KB · Views: 307
To avoid these ads, REGISTER NOW!
OP
C

chargermann

Active member
Joined
Mar 21, 2015
Messages
29
Location
Ocala, Florida
Initially, I was concerned with the fact that Greg had under-estimated the base epoxy w/clearcoat at three kits, but sure enough, had very little waste.
So, how did the floor come out? Absolutely fabulous!
As indicated, I still need to fill the saw cuts with the Sika gray caulk. Once thing I did was reduce the depth of the saw cut with a high-grade latex caulk to 1/4" below the top surface. I didn't have any foam backer rod, so the flexible caulk appeared to be a good alternative. If not used, I'd use an enormous amount of the Sika product, as it's of a very thin consistency.

I chose to add the anti-slip power into the epoxy clear, and was initially concerned the floor would dry in a milky white color, as shown in the mixing bucket. In fact, it only slightly reduced the sheen and created the perfect surface.

I can not tell you how pleased I am with the finished job. Yes, it's alot of work (especially solo), but certainly a true D.I.Y. project. The mixing and application is foolproof, however, distribution of the speckle flakes requires some practice. I tried to use a handheld Scott's grass seed spreader - no go. Used the 'throw high into the air' method. In areas where I had apparent heavy flake, I simply rolled back over it with the base gray epoxy, and reapplied a new layer of flake. The follow-up clearcoat sealed everything nicely.

I highly recommend this product and their customer support to others planning a future epoxy floor surface. In fact, I shall be ordering two more 'kits' from Armor-Poxy in the near future. One for the patio area outside the main garage door, and another for a pool deck.

Thanks Armor-Poxy, for a highly superior product offered at a very attractive price, and the customer service/support you'all provided.
 

Attachments

  • Sika floor sealant.jpg
    Sika floor sealant.jpg
    92.8 KB · Views: 314
  • Finished edge & Patio floor.jpg
    Finished edge & Patio floor.jpg
    58.6 KB · Views: 288
  • Overall view of finished floor #2.jpg
    Overall view of finished floor #2.jpg
    148.6 KB · Views: 323
  • Epoxy floor #2.jpg
    Epoxy floor #2.jpg
    112.9 KB · Views: 317
  • Epoxy floor #1.jpg
    Epoxy floor #1.jpg
    104.8 KB · Views: 313
  • Mixing in anti-slip  product.jpg
    Mixing in anti-slip product.jpg
    41.6 KB · Views: 264
  • Armor-Poxy products.jpg
    Armor-Poxy products.jpg
    141.3 KB · Views: 283

erervin

Member
Joined
Feb 23, 2019
Messages
9
Location
Burlington, KS
Looks great! I’m starting my ArmorPoxy project this week and went with their beige color. Going to start the etching process tonight.

Looks like you used an 18” roller, that work well to apply primer, epoxy, and clear coat? That’s what I’m planning to do. I went with two 600 sq/ft kits and Greg said i shouldn’t have to worry about running short for a 1200 sq/ft project.
 

CJseven

Well-known member
Joined
Mar 4, 2007
Messages
344
Location
Southeast Missouri
Looks great! I’m starting my ArmorPoxy project this week and went with their beige color. Going to start the etching process tonight.

Looks like you used an 18” roller, that work well to apply primer, epoxy, and clear coat? That’s what I’m planning to do. I went with two 600 sq/ft kits and Greg said i shouldn’t have to worry about running short for a 1200 sq/ft project.


The 18” rollers are the only way to go for the open floor, if you have tight spots you will want a smaller one also. As for applying the epoxy use a squeegee then back roll with the roller.
 
OP
C

chargermann

Active member
Joined
Mar 21, 2015
Messages
29
Location
Ocala, Florida
Looks great! I’m starting my ArmorPoxy project this week and went with their beige color. Going to start the etching process tonight.

Looks like you used an 18” roller, that work well to apply primer, epoxy, and clear coat? That’s what I’m planning to do. I went with two 600 sq/ft kits and Greg said i shouldn’t have to worry about running short for a 1200 sq/ft project.

...yes, each application of product (base & clear epoxy) required a new 18" roller. Went through all four of the provided roller cartridges only because of the square footage of my project, and doing it myself. Completing the color base coat in one session (with one roller cartridge) was too much for me. Two days for base application and two days for clearcoat.
I also used an industrial squeegee to initially distribute the clear, but found it was not necessary because I only worked small 3' X 10' wide sections. As Armor-Poxy explains in their instructions - pour a even line of the product out across the surface, left-to-right.
Also, I quickly learned a little Xylene thins out the clearcoat nicely, as it starts to thicken within ten minutes as becomes difficult to roll. Used Acetone for cleanup.
 

Toomanytools?

Well-known member
Joined
Nov 4, 2010
Messages
855
Location
Washington
Looks great! I’m starting my ArmorPoxy project this week and went with their beige color. Going to start the etching process tonight.

Looks like you used an 18” roller, that work well to apply primer, epoxy, and clear coat? That’s what I’m planning to do. I went with two 600 sq/ft kits and Greg said i shouldn’t have to worry about running short for a 1200 sq/ft project.

I have the beige Armor Poxy kit to install also this spring, not sure I'm sold on the color but didn't want gray. Post a picture when your done.
 

Jayhawk_Aviator

Well-known member
Joined
Jun 2, 2015
Messages
123
Have any pictures with the caulk applied to the joints? Is that the self-levelign stuff from Home Depot? Is it hard or squishy?
 

ford33

Well-known member
Joined
Feb 26, 2011
Messages
2,118
Location
Chicago, IL. USA
Nice job on the floor. Doing that work solo must have made your muscles sore at the end of each day. It looks great.
 
To avoid these ads, REGISTER NOW!

Armorpoxy

Well-known member
Joined
Aug 18, 2013
Messages
3,731
Location
NJ
Thank you for your comments and business, and you did a fantastic job. We do try hard to give good customer service!
 

dlafever

Member
Joined
Jul 26, 2010
Messages
6
Location
Aridzona, USA
That looks awesome! Thanks for sharing your experience. :)

I'm curious ... about to either do this or have someone do it for me and I'm concerned about finding stuff I drop on the floor with all that flake on it. Am I making that more of an issue than it really is? (not 20 anymore, not 30 either, or 40, ok 50ish).
 
OP
C

chargermann

Active member
Joined
Mar 21, 2015
Messages
29
Location
Ocala, Florida
...thanks. Yes, I will admit with the flakes it may be difficult locating small items dropped, however, that's where a small dustpan comes in handy.
The flakes look great, enhance the overall shop appearance, and really hide the many concrete surface defects left by my lousy sub-contractor.
 
OP
C

chargermann

Active member
Joined
Mar 21, 2015
Messages
29
Location
Ocala, Florida
Have any pictures with the caulk applied to the joints? Is that the self-levelign stuff from Home Depot? Is it hard or squishy?

The recommended Sika seam filler was purchased at Lowes. I consider myself pretty good at neatly feathering caulks, but this stuff is tricky. It is petroleum-based and even a finger dipped in solvent won't provide a smooth application.

It dries to a rubbery texture, matches very nicely, and appears to adhere very well, but again, smooth, consistent flow takes patience and talent.
 

Attachments

  • Epoxy floor caulking.jpg
    Epoxy floor caulking.jpg
    73.5 KB · Views: 74
  • Overall view of finished floor #1.jpg
    Overall view of finished floor #1.jpg
    147.3 KB · Views: 77
OP
C

chargermann

Active member
Joined
Mar 21, 2015
Messages
29
Location
Ocala, Florida
About what did this project cost you to complete?

Thanks.

...depending on what brand, quality, options or additions you may prefer, this specific epoxy, supplies and caulking was between $1.05 - $1.20 a square foot. Pricing may have increased, as the order was placed in Dec. 2017, with the entire pallet of material being delivered in March 2018.
 
To avoid these ads, REGISTER NOW!
Top Bottom