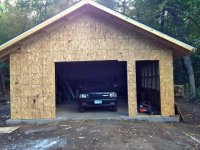
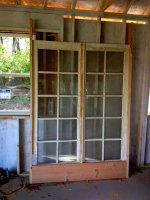
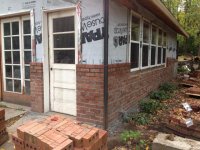
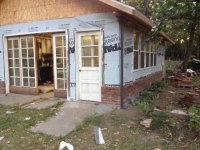
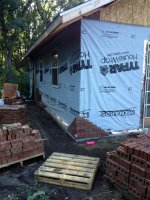
To avoid these ads, REGISTER NOW!

My Atomic Garage

atomicgarage

Member
Joined
Mar 12, 2014
Messages
16
Location
mn
hello I am new to the site and I have been working on my new Garage for almost two years now . "part time on the weekends" I will be my home office/shop some day but until then I have a drive to work. I have a back ground in building and Fab. So with a lot of work and help from friends and my beautiful wife. this is the 4th shop I have built and I don't think it will be my last.
 
To avoid these ads, REGISTER NOW!
OP
A

atomicgarage

Member
Joined
Mar 12, 2014
Messages
16
Location
mn
here are the first few pics. I bought a bunch of brick because I saw a building and thought I can do that. I lucked out this shop started as a 10x12 shed for the tractor and I just kept making it bigger and bigger. my wife said great! I guess the winter of parking in the driveway was all the help I needed to sell her on the idea.
 

Attachments

  • IMG_0205.jpg
    IMG_0205.jpg
    91.5 KB · Views: 20
  • IMG_0368.jpg
    IMG_0368.jpg
    79.3 KB · Views: 19
  • IMG_0459.jpg
    IMG_0459.jpg
    67.8 KB · Views: 17
  • IMG_0776.jpg
    IMG_0776.jpg
    93.2 KB · Views: 17
  • IMG_0771.jpg
    IMG_0771.jpg
    73.6 KB · Views: 18
  • IMG_0795.jpg
    IMG_0795.jpg
    69.5 KB · Views: 20
OP
A

atomicgarage

Member
Joined
Mar 12, 2014
Messages
16
Location
mn
next it was sheeting and shingles.
 

Attachments

  • IMG_0860.jpg
    IMG_0860.jpg
    65.2 KB · Views: 17
  • IMG_0858.jpg
    IMG_0858.jpg
    53.7 KB · Views: 14
  • IMG_0855.jpg
    IMG_0855.jpg
    44.8 KB · Views: 16
  • IMG_0854.jpg
    IMG_0854.jpg
    54.2 KB · Views: 14
  • IMG_0853.jpg
    IMG_0853.jpg
    44.1 KB · Views: 14
  • IMG_0841.jpg
    IMG_0841.jpg
    71.4 KB · Views: 17
OP
A

atomicgarage

Member
Joined
Mar 12, 2014
Messages
16
Location
mn
I built the garage doors out of two old doors I found in a trash pile. and the entry door was a left over from our house. It was a lot of work but I got all the window moldings to line up. I built a barn door rail and hardware out of strap and odds and ends. hey wanted $500+ for hardware I did the project for $48 and 2 hours of work.
 

Attachments

  • IMG_0915.jpg
    IMG_0915.jpg
    30.9 KB · Views: 16
  • IMG_0914.jpg
    IMG_0914.jpg
    75.5 KB · Views: 19
  • IMG_0886.jpg
    IMG_0886.jpg
    40.8 KB · Views: 17
  • IMG_0885.jpg
    IMG_0885.jpg
    84.8 KB · Views: 16
  • IMG_0867.jpg
    IMG_0867.jpg
    75.6 KB · Views: 16
  • IMG_0865.jpg
    IMG_0865.jpg
    51 KB · Views: 16
  • IMG_0862.jpg
    IMG_0862.jpg
    52.5 KB · Views: 16
OP
A

atomicgarage

Member
Joined
Mar 12, 2014
Messages
16
Location
mn
they open very easy and ounce I weather strip them they will just be part of the wall. of windows!
 
OP
A

atomicgarage

Member
Joined
Mar 12, 2014
Messages
16
Location
mn
power going in. 200 amp sub. my father in law is a linemen so he trenched it all in and a buddy and i pulled all the wires and started on outlets.
 

Attachments

  • IMG_1103.jpg
    IMG_1103.jpg
    71.3 KB · Views: 20
  • IMG_1104.jpg
    IMG_1104.jpg
    72.3 KB · Views: 23
  • IMG_1106.jpg
    IMG_1106.jpg
    71.5 KB · Views: 21
To avoid these ads, REGISTER NOW!
OP
A

atomicgarage

Member
Joined
Mar 12, 2014
Messages
16
Location
mn
the brick has taken a long time and I started doing it the end of August so I only got this far before it got too cold. I cant wait to get back to Finnish putting it up
 
OP
A

atomicgarage

Member
Joined
Mar 12, 2014
Messages
16
Location
mn
brick takes for ever. but you get faster the more you do it and i dropped 15 lbs
 

Attachments

  • IMG_2370.jpg
    IMG_2370.jpg
    105 KB · Views: 18
  • IMG_2371.jpg
    IMG_2371.jpg
    62 KB · Views: 16
  • IMG_2359.jpg
    IMG_2359.jpg
    63.9 KB · Views: 15
  • IMG_2289.jpg
    IMG_2289.jpg
    62.5 KB · Views: 14
  • IMG_2286.jpg
    IMG_2286.jpg
    58.2 KB · Views: 13
  • IMG_2275.jpg
    IMG_2275.jpg
    57 KB · Views: 13
  • IMG_2273.jpg
    IMG_2273.jpg
    102.7 KB · Views: 14
OP
A

atomicgarage

Member
Joined
Mar 12, 2014
Messages
16
Location
mn
I started a mfg co right out of college and it is called Atomic Design mfg. I am also a big mid century modern fan. also know as the atomic style. I have a youtube channel that is Atomiccowboy85. I have to look at his garage, I hope mine stacks up and dose not bring down the name.
 

MKE Mike

Well-known member
Joined
Sep 8, 2011
Messages
88
Location
Milwaukee, WI
I built the garage doors out of two old doors I found in a trash pile. and the entry door was a left over from our house. It was a lot of work but I got all the window moldings to line up. I built a barn door rail and hardware out of strap and odds and ends. hey wanted $500+ for hardware I did the project for $48 and 2 hours of work.

Cool! I like the "I can do it better for less" mentality. I plan to fabricate a barn door rail system for the door on my compressor closet. ( the garage door track in front of it prohibits a swing-door)

Can you provide details on your materials / method for the track? I'm specifically interested in the "wheels" you sourced that carry the door on the track.

Nice build BTW - that's one hell of a "shed for the tractor"!
 
OP
A

atomicgarage

Member
Joined
Mar 12, 2014
Messages
16
Location
mn
barn rail build

supplies
1 3/8 2.5"x 19' metal strap stock
1 5/8 x4' metal tube
2 6" HD fixed casters
2 4" pulleys
18 6" 5/8 lag screws
doos and ends nuts and bolts

Barn rail
rail
measure 1" 1/4" from the top of the metal strap and strike a line along the length of the metal strap. find the center of the metal strap and correlate it to the wall and opening. I started from the left and set my first hole marked and then spaced the hole 16" on center.
spacer

cut the 5/8 tube into 2" lengths. be-bur and clean. done

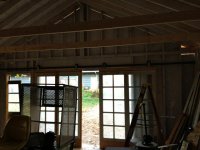
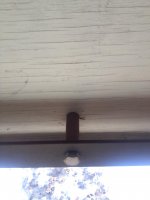
locate and pre drill 1/2" piolet holes into the studs for the 5/8 lag screws. make sure the holes are level. use a level. do not reference the floor or ceiling. because they my not be level, and this is the most important part. if the the rail is not level the doors will be hard to open or close.

now the hard part I did this alone but I need a second a par of hands. hold up the strap and and lace the lag screws thru the strap and screw the the lags into the predrilled 1/2 pilot holes.

door rollers.
take the caster wheels of the farm and cut in half. use nuts and bolts to attach the 4" pulleys done. attach to your doors/door


now you just need to scale this design to fit your project.
thanks for reading.
 

Attachments

  • IMG_3055.jpg
    IMG_3055.jpg
    129.5 KB · Views: 11
  • IMG_3056.jpg
    IMG_3056.jpg
    138.8 KB · Views: 8
  • IMG_3057.jpg
    IMG_3057.jpg
    114.5 KB · Views: 7
  • IMG_3058.jpg
    IMG_3058.jpg
    134.9 KB · Views: 7
  • IMG_3059.jpg
    IMG_3059.jpg
    80.8 KB · Views: 8
Last edited:
To avoid these ads, REGISTER NOW!
Top Bottom