
You are using an out of date browser. It may not display this or other websites correctly.
You should upgrade or use an alternative browser.
You should upgrade or use an alternative browser.
My back yard fab shop
- Thread starter NASTYZEN
- Start date


WOW, great build pics
Thank's Hotrod,I knew someone would appreciate the work here.
Real nice place!
Thank you 3bay,I love my shop!
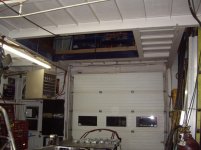
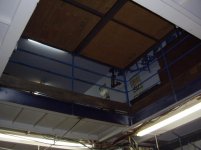
I left myself an access hole to be able to bring larger things upstairs with my forklift and also doubles as extra roof space for the day I can afford a two post car hoist.Actually triples as a work table too.The table tops are hinged and can be folded back and is also completely dismantle-able if need be.
Attachments


Hemihead2
ALLIANCE MEMBER
Wow. Very cool work space.
What kind of bracing did you do to be able to support the mill up there?
What kind of bracing did you do to be able to support the mill up there?
Wow. Very cool work space.
What kind of bracing did you do to be able to support the mill up there?
Read the first pages of the thread it is all there, and very cool. I am amazed at this building, shop, and the things that come out of it. Gentlemen we are in the presence of a great man here.
lg
no neat sig line
Hemihead2
ALLIANCE MEMBER
Thanks lg, I went back and checked it out. Somehow I missed it.
Drdaves49
Well-known member
It's nice to see a Working shop, show places are nice, but ya can't work in them.
I'd like yer supply of steel.....makes my mind reel...
Nice shop!
Dave
I'd like yer supply of steel.....makes my mind reel...
Nice shop!
Dave
The front shop episode one
Thank you Hemi,the next shots should explain .
Wow,thank's Larry!I am not worthy!
Sorry but you are mistaken about this building.The construction is different than the back shop.")
Thank's Dave,I always have about 20 grand of inventory on hand.Comes with the teritory.
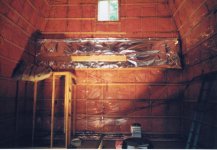
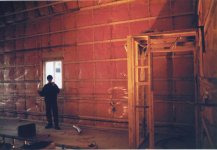
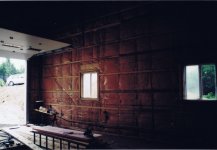
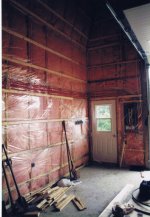
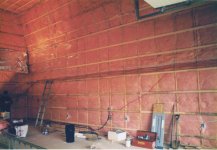
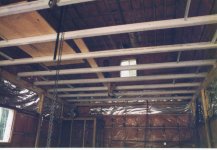
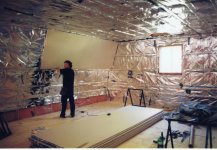
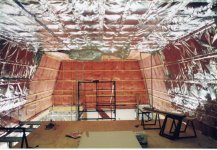
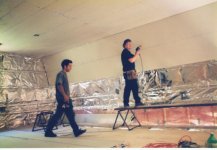
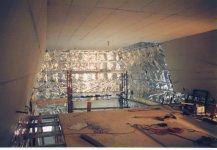
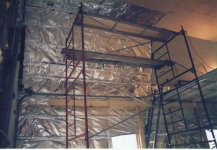
I have finally figured out how to scan old pictures.So these are of the front shop build in 96.As I have stated earlier the contractor put up the shell and with the help of some good friends I did the rest of the interior.In those days you put the aluminized paper towards the inside.It is done differently nowadays.
To hold up the second floor I used 2x8s horizontaly screwed to the vertical wall studs and supported by doubled up 2x6s going to the ground floor.For the cross span I used 2 x 5 steel I beam.I should of used 3 x 8 because it was a little springy.I later added bracing underneath.These are screwed into the 2 x 8 structure.
Wow. Very cool work space.
What kind of bracing did you do to be able to support the mill up there?
Thank you Hemi,the next shots should explain .
Read the first pages of the thread it is all there, and very cool. I am amazed at this building, shop, and the things that come out of it. Gentlemen we are in the presence of a great man here.
lg
no neat sig line
Wow,thank's Larry!
I am not worthy!Sorry but you are mistaken about this building.The construction is different than the back shop.
It's nice to see a Working shop, show places are nice, but ya can't work in them.
I'd like yer supply of steel.....makes my mind reel...
Nice shop!
Dave
Thank's Dave,I always have about 20 grand of inventory on hand.Comes with the teritory.
I have finally figured out how to scan old pictures.So these are of the front shop build in 96.As I have stated earlier the contractor put up the shell and with the help of some good friends I did the rest of the interior.In those days you put the aluminized paper towards the inside.It is done differently nowadays.
To hold up the second floor I used 2x8s horizontaly screwed to the vertical wall studs and supported by doubled up 2x6s going to the ground floor.For the cross span I used 2 x 5 steel I beam.I should of used 3 x 8 because it was a little springy.I later added bracing underneath.These are screwed into the 2 x 8 structure.
Attachments
-
 Front Shop build14.jpg141.8 KB · Views: 437
 -
 Front Shop build15.jpg138.6 KB · Views: 364
 -
 Front Shop build16.jpg140.6 KB · Views: 364
 -
 Front Shop build17.jpg132.5 KB · Views: 327
 -
 Front Shop build18.jpg141 KB · Views: 332
 -
 Front Shop build19.jpg141 KB · Views: 320
 -
 Front Shop build20.jpg140.4 KB · Views: 369
Last edited:


The front shop episode one
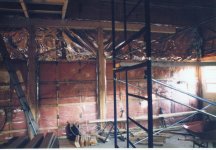
Initially I built the bathroom downstairs but later moved it upstairs to maximize my use of space.Thank God I had my friends help me with the drywall!
I ran out of cash and only built 2 thirds of the second floor at first.It is covered with3/4 plywood.I finished the front section with recycled 3 x 8 I beam witch is way beefier than the 2 x 5 and built the stairs a couple of years later.
Attachments
-
 Front Shop build05.jpg141.6 KB · Views: 233
 -
 Front Shop build06.jpg144.8 KB · Views: 288
 -
 Front Shop build07.jpg150.8 KB · Views: 273
 -
 Front Shop build08.jpg138.9 KB · Views: 368
 -
 Front Shop build09.jpg142.9 KB · Views: 255
 -
 Front Shop build10.jpg142.9 KB · Views: 238
 -
 Front Shop build11.jpg144.1 KB · Views: 226
Last edited:


muibubbles
Well-known member
i hate you in so many ways but i envy you for everyone of those reasons.... amazing shop man.
michel
Well-known member
Very Nice shop, almost neighbor I'm from St Joseph du lac, near St Eustache, I reguraly go to St Columban.
I haul concrete.
I haul concrete.
JC23
Well-known member
I'm still diggin' that billet comin' atcha logo.
As an old time rod guy, I'm trying to think of a way to 'de-billetize' it with some 1 Shot paint.
As an old time rod guy, I'm trying to think of a way to 'de-billetize' it with some 1 Shot paint.
Jim Johnstone
Well-known member
I'd love to hear more about the CNC mill and lathe. What brand, what size?
i hate you in so many ways but i envy you for everyone of those reasons.... amazing shop man.
Thank's for hating me in a good kinda way!
Very Nice shop, almost neighbor I'm from St Joseph du lac, near St Eustache, I reguraly go to St Columban.
I haul concrete.
Thank's,your more than welcome to come n visit.
I'm still diggin' that billet comin' atcha logo.
As an old time rod guy, I'm trying to think of a way to 'de-billetize' it with some 1 Shot paint.
You mean these?


Those are my company logo I was playing around with on my cnc mill.The possibilities are endless.
I'd love to hear more about the CNC mill and lathe. What brand, what size?
The lathe is an English Colchester Storm A-50. With Fanuc 21iT controller. Max.swing 16.in.turn dia.6.75 in.X travel 6.75in.and Z travel13.75 in.I installed a bar puller so that it can take 12 ft. lengths and run continuously with it's lights out technology.
It also has a twelve position turret.I love it!


The mill is a US made Mighty Comet-MV-5 with Dynapath 40 50 60 control.
5.hp. Spindle with Z 18 in. Y 19.5 in. and X 30 in. travel.I have made auxiliary spindles of 28000rpm. and 75000 rpm.for wood and plastics carving.The open design is messy with chips going all over but is great for all the different size stuff that I have to deal with. I affectionately call it ( La Brute).


JC23
Well-known member
Yep, those is the babies. They look even better in the big pics! Thanks.
Jim Johnstone
Well-known member
Right on. I have a manual mill/lathe/surface grinder moving into my shop this summer, but I am really itching for some CNC in there someday in the future. In the meantime I'll have to settle for using the machines at work after hours.
Yep, those is the babies. They look even better in the big pics! Thanks.
Thank's, I get a lot of comments from people who see it.I need to find time to really play with this machine.My better half hand drew the logo on a piece of paper witch I later scanned and imported to the machine. I'm thinking of making a G.J. clock or something at some point. Battle of the cnc clocks
Right on. I have a manual mill/lathe/surface grinder moving into my shop this summer, but I am really itching for some CNC in there someday in the future. In the meantime I'll have to settle for using the machines at work after hours.
Your boss is one cool dude.
 .Don't ever let him down.
toolfanatic
Well-known member
Great build, well done!
holy moly one hell of a sweet fab shop here great work ,geez it must get cold over the in the us . never in a million years will it snow were i live
gives me good ideas , might pick up a shop press
cheers sam
Thank's Sam,yes it gets cold in the States and even colder up here in Canada!
Great build, well done!
Thank you Toolfanatic but I think it will never be completely DONE!

For the billet lovers out there. Here is my latest test. My beloved better half billeted.
3 1/2'' by 2 5/8''

blue dog
Banned
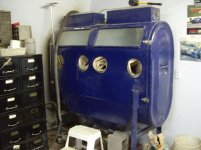
Great build, thanks for sharing. And excellent idea hanging the tig machine.
Simply an amazing build!
Looks like a lot of work.
Makes me tired just reading about all of it.
Thank's guy.You know, sometimes I step back and look at the thing and it almost seems sur-real. I built this??
It was much work indeed for one man and a bit of help from the better half.
 But every day, I appreciate it to death!
Great build, thanks for sharing. And excellent idea hanging the tig machine.
Thank you Blue dog.Yeah, it get's it out of the way but something fried in it last night. Gotta pull out the step ladder and check it out. That's the down side.
SoL from Sweden
Well-known member
stunning, love it!
chris fresh
Well-known member
great shop,great build and i love all the progress pics.i'm thinking of building a slip roll like yours,did you go off of a plan,or build it to what you needed it for from scratch,either way,any chance on how ya built it? and what you used?
stunning, love it!
Thank you Sol, glad you enjoyed it.
great shop,great build and i love all the progress pics.i'm thinking of building a slip roll like yours,did you go off of a plan,or build it to what you needed it for from scratch,either way,any chance on how ya built it? and what you used?
Thank you Chris.
Well, like allot of the stuff I built for myself,I built as I went from memory and available parts n materials. I started from gears and went from that. I guess I would have to measure it up a little to be able to give you dimensions. If your going to build one for yourself, you are going to have access to a lathe and milling machine as well as a welder.
Here is a bigger picture for now if that helps.

Look at what I got Friday, A new(old) surface plate.Boy that's gonna take up some space! It's so heavy my 4000lbs capacity fork lift can barely get a corner off the floor!

Sure glad I put in a big garage door.

I had it sand blasted as it had been sitting outside for a couple of years.

I got my oldest son to help me clean up the surface and wax it up while it was still hot from being out in the sun.


First coat of paint.

Yes Sir!

Sure glad I put in a big garage door.
I had it sand blasted as it had been sitting outside for a couple of years.
I got my oldest son to help me clean up the surface and wax it up while it was still hot from being out in the sun.
First coat of paint.
Yes Sir!
Vernmotor
Well-known member
Wow thats big !..where in the heck you going to put that ! O by the way. nice shop- tools and buildings..been reading all along
hunter1151
Well-known member
Nice.....at what working height will you put it? I have a big mill table that is 4ft.x 10ft. and I can't decide what height to put it. My table is not as big as yours but I have the same issue with the weight of it. How many supports will you put under it?? Mine only has T-slots in one direction. How did you clean the rust off? What does the wax do for the surface? Thanks in advance.
Steve from Socal
Well-known member
Nasty,
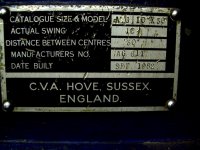
I haven't looked at this thread for a while and noticed a few additional pictures! I really like the new plate, I have a 12' x 3' angle plate from a horizontal boring mill but this is even neater! I also noticed you have a CVA lathe, the English "copy" of a Monarch 10EE, last the tig welder reminds me of the old P&H Quin Epperly had.
Looking good,
Steve
Wow thats big !..where in the heck you going to put that ! O by the way. nice shop- tools and buildings..been reading all along
I'm leaving it right where it is.For the time being it seems to be where it'l be out of the way ,sort of... O and thanks for reading and the kind words.
More importantly what is it used for?
I'll be making the production chassis and fixtures for this on it.

Nice.....at what working height will you put it? I have a big mill table that is 4ft.x 10ft. and I can't decide what height to put it. My table is not as big as yours but I have the same issue with the weight of it. How many supports will you put under it?? Mine only has T-slots in one direction. How did you clean the rust off? What does the wax do for the surface? Thanks in advance.
I was going to sit it right on the floor,but now you have inspired me to maybe set it on some 6'' channel I beam or something so I don't have to bend over as much.It seems to be only resting on adjuster bolts around the perimeter.
I had it sand blasted with no.30 sand before shipping and lightly sanded the top with an angle grinder with a 120 grit ******* pad.Waxing it will keep it from rusting again. It worked out well because it was still warm from sitting in the sun. BTW I use regular floor paste wax and melt it down with a torch to be able to brush it on then rub it down with a rag when it's cold again.Painting the surface would leave it bumpy and make measurements inaccurate.
Nasty,
I haven't looked at this thread for a while and noticed a few additional pictures! I really like the new plate, I have a 12' x 3' angle plate from a horizontal boring mill but this is even neater! I also noticed you have a CVA lathe, the English "copy" of a Monarch 10EE, last the tig welder reminds me of the old P&H Quin Epperly had.
Looking good,
Steve
Thank's Steve, I love my old CVA iron. Seems like not a day goes by without me using it. One of my neighbors has an old Lindy welder that broke down and when I took a look at it to help him out I noticed it was exactly the same machine inside as my old P&H. Even had a spare part for him.
Who is Quin Epperly? Pardon my ignorance.
Steve from Socal
Well-known member
Nasty,
Here is a little blurb about Quinn, he was an institution in SoCal. I knew him when I worked for Ed Pink in the late 1970's
http://en.wikipedia.org/wiki/Epperly
Steve
Here is a little blurb about Quinn, he was an institution in SoCal. I knew him when I worked for Ed Pink in the late 1970's
http://en.wikipedia.org/wiki/Epperly
Steve
Coyote Red
Well-known member
...to Michigan International Raceway in 1996 for the U.S. 500
The Cooper might have been the only car to leave in one piece. The stars and the cars...
Mark H
Well-known member
You've got more cool stuff than any one man should be allowed to have!
Jealous?Me? You bet your **** I'm jealous!
Love that surface plate,it would certainly make chassis building easier.
Thanks for the message,PM'd you.
Mark.
Jealous?Me? You bet your **** I'm jealous!
Love that surface plate,it would certainly make chassis building easier.
Thanks for the message,PM'd you.
Mark.
flybefree
Well-known member
That is some no-nonsense, get it done, awesomeness there...well done.