Yes the upstairs has a 17'6 wide room that has 4'8 knee walls and a 9' ceiling. With an 8/12 pitch the slope climbs quickly and head room at the walls is not really an issue. It spans the length of the structure and will have stairs accessed from the door at the back of the side room. With a 12' ceiling downstairs the stair case will be over 19' long and I did not want it taking up valuable space in the garage. I tried to think ahead and had my back retaining wall built so that I can enclose that area later. Then the stairs will be inside. The room will eventually be finished and my HO train collection will go up there. Long way to go yet.benjacobs said:Nice build! The room off to the side is a great idea. It really adds to the whole garage. Are you going to have a room up top.. maybe an office or storage area?

You are using an out of date browser. It may not display this or other websites correctly.
You should upgrade or use an alternative browser.
You should upgrade or use an alternative browser.
My construction begins.
- Thread starter chaingang
- Start date
cdrewferd
Well-known member
Great looking garage. That room on the side is awesome. Why didn't you throw one on the other side for twice the storage and I'm sure the price wouldn't have been that much more?
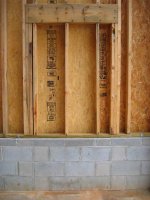
My plan is to build an open lean-to for covered storage on the right side. May do it now if the money holds. Probably will do that later and spend money for the lift. I even had the block masons build the walls with corner blocks and seams in two places for openings for doors, one in right side and one in the back wall for future expansion. I will then be able to knock these sections out without destroying the wall and the openings will be nice and neat. Framed these sections with headers and jacks in place to make it a simple sawzall job. Makes adding doors at a later time easy.cdrewferd said:Great looking garage. That room on the side is awesome. Why didn't you throw one on the other side for twice the storage and I'm sure the price wouldn't have been that much more?

Attachments

wrigh003
Well-known member
chaingang said:I even had the block masons build the walls with corner blocks and seams in two places for openings for doors, one in right side and one in the back wall for future expansion. I will then be able to knock these sections out without destroying the wall and the openings will be nice and neat. Framed these sections with headers and jacks in place to make it a simple sawzall job. Makes adding doors at a later time easy.
That's a great idea.
Anto
Active member
any updates on this garage??? really like the design of this.
signcrafter
Well-known member
- Joined
- May 9, 2012
- Messages
- 12,317
any updates on this garage??? really like the design of this.
The OP hasn't signed in in 2 and half years. Think it's safe to say he isn't going to update anymore.
Wow! I didn't realize it has been that long since I have been here. Time really gets away from you in this thing called life. I guess I have been disheartened and somewhat embarassed that this thing is not done by now. Oh well, we all have to choose priorities in life and this was not one of them for several years. Having said that, I am now working on it again and hope to have the wiring don by late fall early winter. Here are a few pics taken today as it now stands. If anyone has any questions I will try to check in a lot more often. LOL.")


JimVonBaden
Well-known member
I really like your fire pit. What was it made from?
Jim
Jim
cgall
Well-known member
That looks exceptional. Did you have that designed, or did you have a plan for it?
What type of wood did you use on the siding and trim?
What type of wood did you use on the siding and trim?
fergus
Well-known member
Awesome setup. Like the barn, lean-to, weathered wood and the pretty setting. Nice '64...kind looks like a Crites hood on there...do we have a T-bolt in the making???? 
HOTFR8
Banned
Nicely done. It has character.
ConstructionBoss
Well-known member
Nice work. Did you put the siding up already weathered or is that from the 5 years it's been on the shop? I know what it is like to be on hiatus. I had my house built in 2006, and started getting the garage together after I moved in. Then for about 4 years it was a low priority. It's only been in the last 6 months since I finished the playroom and before that the bedroom for my now 18 month old son that I was able to start working on the garage again. You have something to be proud of there, not embarrassed. I a sure I speak for many when i say we're rooting for you on this one!!! Alot of us have been in that position you were in putting the shop on the backburner.
e-tek
Well-known member
Nice to see threads come back from the dust bin! Nice to see you caught it and will get back on it. Yes life gets in the way - but that's a GOOD thing:
The Autoist was the second poster here and I bet he wishes he could be working on his stuff right now. My son Colby was just wearing the hat he sent him several years back. I really miss the Autoist sometimes....
Anyways, yes - very nice building. Can we see more of the Galaxie/Fairlane too??? Tell me tat's not a true lightweight!
pops52
Member
I've only seen this thread for the first time. It was a great read following it and you sure thought things out well. I really like your project and look forward to more photos and descriptions of what plans you have for the inside.
PS. Love your avatar too.
PS. Love your avatar too.
Jim, Thanks, the fire pit was an air receiver tank that I cut apart. We love to sit out there and enjoy the fall evenings. I want to add a bracket to put a pivoting grate and a hook to hang a pot from. Nothing like chili cooked over an open fire while sitting around having a few beers with good friends.
CGALL, Thanks, I just had an idea of what I wanted and had the truss guy design the attic trusses for that. It is rough sawn pine 1x12's and 1x2 bats. The door trim is pressure treated pine that was stained dark.
fergus, Thanks, It is a Crites hood, came with the car. The car is my youngest sons, he wants to sell the hood though. It is the tallest one Crites has and he doesn't like the look. It is too rounded and tall. The T-Bolt had a lower, flatter teardrop. Yes his plan is to make a T-Bolt clone.
HOTFR8, Thank you. That was what I had in mind when I started oh so many years ago now. Wanted it to look like it belonged in the country and had been there for decades. Although at the rate I am going it will be that long before I am done so it will fit in nicely.
Construction Boss, Thank you, It was all nice fresh cut pine when I started. Man was it clean and bright, smelled great too. I was torn about what to do with it and finally decided to just let it weather out. Most barns around here are left alone although I may pressure wash it and seal it in the future. I like the look of it now but not sure I want it o get much darker.
e-tek, thanks for the compliments. After reading your post I searched the forum about the autoist. Sorry to hear of his passing. I had seen and read many of his posts. The car is a Fairlane 500 2 dr hardtop, unfortunately not a factory lightweight. It will be a T-Bolt clone. My son bought this with summer job money as a Jr in high school 6 years ago. How many teenagers in this day want a a Fairlane? He got his fire/emt certification and recently started his career with Dekalb county in Metro Atlanta. He is ready to start working on the car now and says my slow progress on the shop is holding him up. I said raising two sons was my hold up. Car is almost flawless with only a little trunk rust. All the trim is intact and very nice, slight damage on the grill in the pic is about the only thing wrong with the car.
Pops, I have lots of pictures and big plans but the outside is my shining moment. The inside is not much to speak of yet. Wiring has commenced and plan to spend the day tomorrow working on it.
I appreciate the comments and I will update more often than 2 1/2 years.
Chaingang
JasonW
Well-known member
I want to add a bracket to put a pivoting grate and a hook to hang a pot from. Nothing like chili cooked over an open fire while sitting around having a few beers with good friends.
Jim wasn't the only one who noticed the fire pit. All I can say is what are you waiting for?! Find yourself a hook. Sounds like an awesome idea and a perfect way to spend a fall evening.

Gotta find me a big tank.
Last edited:
CGALL, Thanks, I just had an idea of what I wanted and had the truss guy design the attic trusses for that. It is rough sawn pine 1x12's and 1x2 bats. The door trim is pressure treated pine that was stained dark.
I love your barn!!! The coloring of the wood is fantastic.
I have a question on the siding and the bats. Are the bats jjust nailed on or is there some adhesive? I was just wondering how its all sealed up.
Thanks,
Ed
The boards are 12" wide with a 1/2 gap between them. The Bats are 2" overlaped evenly. All the exterior boards are screwed in place. I put the screws in the wide boards at the 4" in mark and the bat screw goes between the gaps. There is nothing sealing them except at the window/ door trim and above the trim piece that seperates the upstairs from the downstairs. This wood was put up pretty green and as it dried it has drawn up some but nothing to worry about. It shrinks and swells with the weather and seems to work fine. If I was doing this over I would probably choose a 3" bat just for a little more overlap.
HOTFR8
Banned
HOTFR8, Thank you. That was what I had in mind when I started oh so many years ago now. Wanted it to look like it belonged in the country and had been there for decades. Although at the rate I am going it will be that long before I am done so it will fit in nicely.
It sure looks like it belongs there.
jonahbones
Well-known member
I have needed a shed for the last twenty years so I reckon just going ahead and building one no matter the time frame is better than not starting. Dry and not raining better get back outside to my shed with the blue ceiling !.........


Since several people liked the fire pit here are some pics. Nothing fancy about it. Just cut the top off an old air receiver tank and added some channel iron for legs. I cut the shape like this because I want to add a swing out grate about mid way up to grill on and a hook up higher to hang a cast iron pot from. Like to cook chili and Brunswick Stew over the fire.


Still gathering rocks from the fields and dirt roads to cover the hill behind it but it sure is nice to sit around on a cool night.
Still gathering rocks from the fields and dirt roads to cover the hill behind it but it sure is nice to sit around on a cool night.


I had documented the door build in a seperate thread on the site originally but want to include a few pics with the primary build thread.


Basically I screwed the outer door framing to the door opening using a 3/8 shim. I then screwed all the interior framing together and skinned it with T&G pine siding. After I installed the hinges and trim I removed the perimeter screws, cut the center of the frame with a sawzall and swung the doors open. Worked like a charm with no sag and the doors open as good today as the day I cut them loose.
Basically I screwed the outer door framing to the door opening using a 3/8 shim. I then screwed all the interior framing together and skinned it with T&G pine siding. After I installed the hinges and trim I removed the perimeter screws, cut the center of the frame with a sawzall and swung the doors open. Worked like a charm with no sag and the doors open as good today as the day I cut them loose.
HOTFR8
Banned
Nice to see some more photos.
Anto
Active member
great to see updates on this, its one of the nicest garages ive ever seen. love it, i plan on cladding my own shed here in ireland with something similar to what youve done. great job!!
upndown
Well-known member
Beautiful build!! Love the firepit!!
dlenkewich
Well-known member
Awesome! That exterior sure aged nicely and looks great.
magnusk750
Well-known member
Very nice!
A quick outside shot with my antique porcelain lights. They came out of an old paper mill in Wisconsin that was be demolished. I think they really set the garage off. I'll get a few inside shots posted up over the weekend. It feels really good just to walk in and flip the light switches on.
Attachments

A few pics of the electrical work as I progressed. Digging the trench from the barn to the pole.

The trench leading off to the right is for the floor drains. It just goes to daylight off in the woods.

Looking back to the shop from the new pole. Had to move all the "projects" out of the lean-to to dig the trench and run conduit.

Laid the wire out, slid the conduit over it and glued it up.

As we glued it together, we laid it on boards over the trench and then just came back and pulled them out as we walked along the trench. Nice and easy.


The lights as I laid them out in the lower side.

A couple from the high side.


The somewhat odd looking light combination in the high bay is due to two things.
1. The ceiling is 12' 6" or so and I plan to put a lift in the left side so I couldn't clear fluorescent fixtures on the entire ceiling.
2. The 5 fluorescent fixtures were given to me brand new. They are T8 8ft bulbs so they are kinda odd ball but they are $100 dollar fixtures and they were free. It works well now that it is lit up.
porschedude996TT
Well-known member
Looking good!
We have power!


Some of the panel made up.

Cell phone pics not so good but lights are on in the low bay.

The high bay.

I was originally going to use six less cans on the these two high bay rows but spacing was hard to do consistantly so I added 3 to each row and put them in each joist space, Glad I did cause I would have been disappointed in light output otherwise. I am using 23watt CFL's in 5600K in all the cans and matched the K's in the 8ft tubes. Light is really good in the high bay and great in the low bay. I will be adding task lighting over the bench and under cabinet lights when I get that far.
Thought I would post a few somewhat recent (October) pics. My oldest son and his girlfriend decided they wanted a country wedding in an old barn. I was kinda surprised, but flattered she wanted to use my barn as the location. I told her the inside just looked like an unfinished house, not very rustic or old looking. They decided to use the front as the backdrop and have the reception inside. We cleaned it out, decorated it up a bit and hoped for good weather. Even though it is only seven or so years old it fit the bill nicely.


