Let me preface my write up by saying that everybody has there own opinions on what's the best product, preparation, and application. I spent some time researching different products and made my decision based on what I felt was the best value for me. I have a new 1400 sq.ft hobby shop that I do woodworking in and am also building a 36 Ford pickup and had a maximum budget of $750. So I lurked here and other places and read as much as I could to find out about different products before I made my final decision. I can appreciate the professional and high end floors some of the guys have done, but that just wasn't for me. I just want to share some of my experience with what I did and hope someone else gets a little useful information, but I am not looking to get into an argument with anybody about some aspect that they believe is better. Positive questions or comments are welcome.
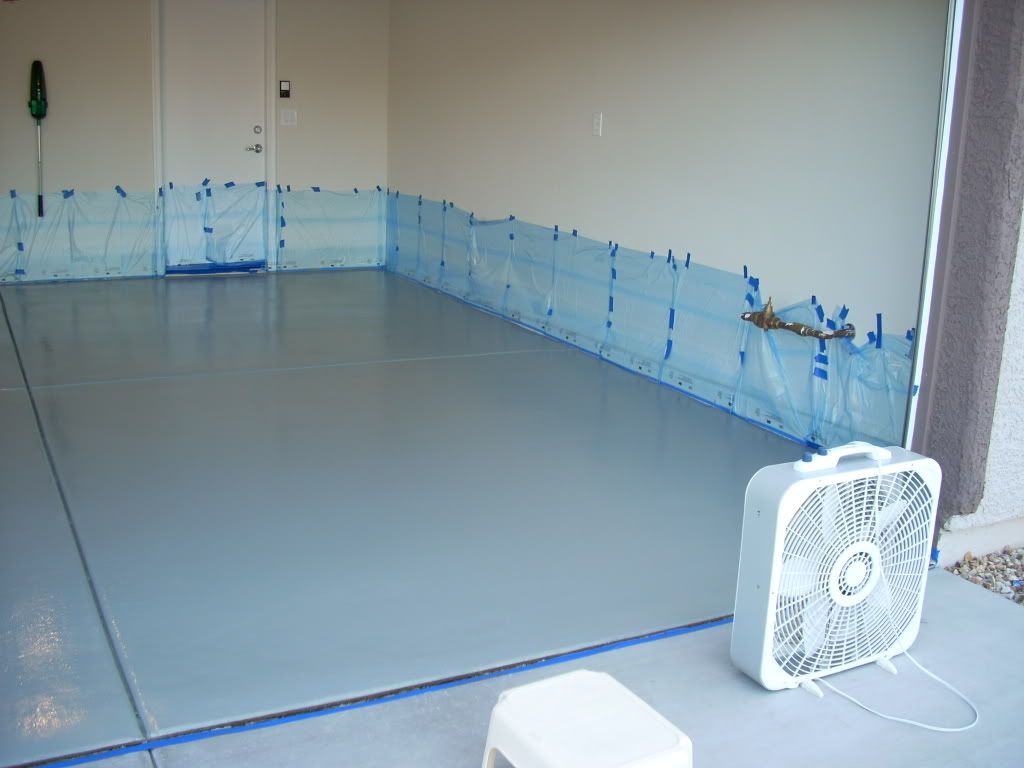
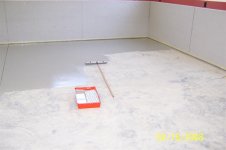
Preparation: My slab was about 2 years old and had no oil stains on it. It is slick finished with saw cut expansion joints and has a vapor barrier under the slab so I had no moisture issues. I had pressure washed it about a year ago before I built the structure and had only swept out since. I decided I did not want to acid wash it for several reasons but did want to do something to rough it up and clean it. I had access to a floor buffing machine from work, and used it with 60 grit sanding screens to go over the entire floor. It did a nice job of leveling things off and eliminating the really slick spots. I used my shop vac to constantly clean-up behind me and after I was done I mopped the floor a couple of times. I did have a few small cracks in the floor so I used a 2 part epoxy crack filler that came in a tube that fit in a standard caulking gun. I used a die grinder with a carbide burr to vee the edges out slightly and filled the cracks up. It took several applications to build it above the surface, but that allowed me to grind it down flush with the floor. After that the only other prep I did was to mask the walls and doors and sweep and blow the shop out a few more times. All told it was probably 10-14 hours spread over nights and a weekend.
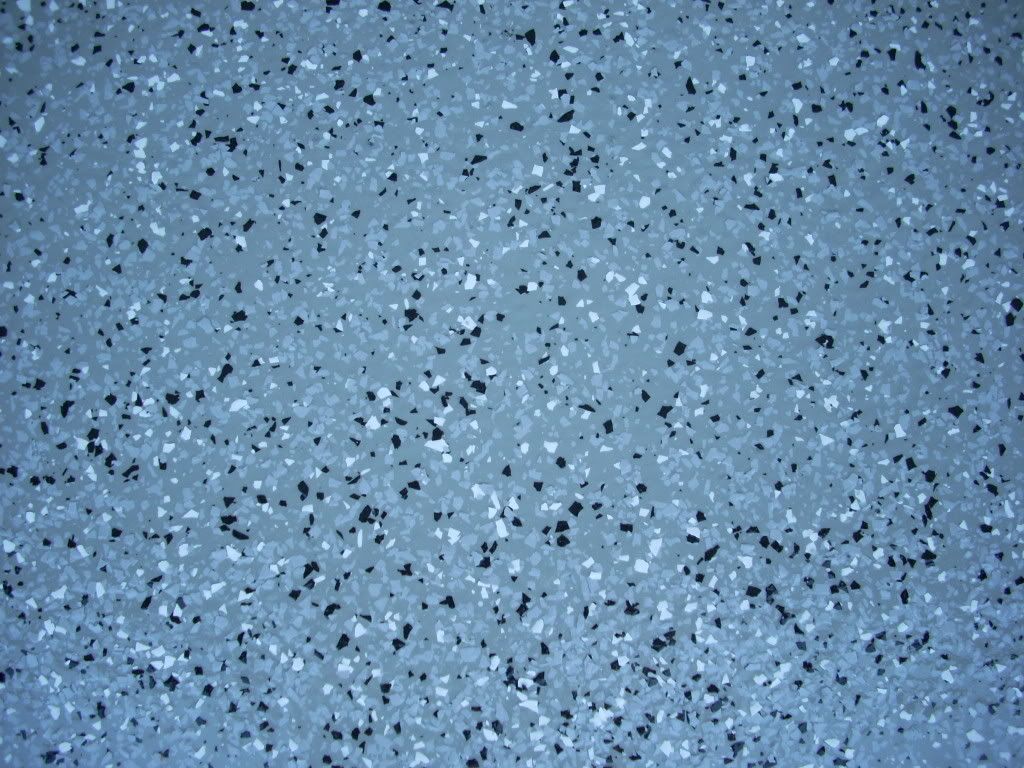
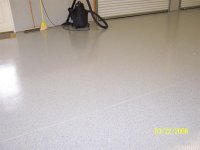
Materials: I decided on the Devoe 224HS 2 part epoxy after looking at everything else. For my application it seemed to be the best value at $39.50 per gallon for Part A or B. It is a 75% epoxy comparable to the SW Armorseal 1000 HS. I ended up buying 10 gallons and actually used 9 gallons. I used 1 gallon of Xylol as a thinner and for cleanup as well. I purchased a HD 18" roller frame (17.00), inexpensive 21" trays (3.50), and special roller covers made for epoxy work (6.00). The roller covers are made by Wooster and are called "Epoxy Glide". They are 1/4" nap, shed-resistant and worked perfect. I had some regular power mixing paddles and used a cheap 4" brush for the cut in. I found that standard 2" masking tape worked just as well as the blue painters tape and wouldn't waste the money for it. I bought the epoxy at my local ICI paint store and the other items online from "The Paint Store.com". The ICI paint store is much easier to work with than my local SW store that I have an account with. I also decided that I wanted to add flakes to help hide any defects in the floor and to give it a nicer look and found a vendor on ebay selling a limited amount of a returned custom blend of light gray and electric blue. So I bought 6) 1 pound bags for $4.00 each. After I received the chips I pulled out some of the gray chips to take to the paint store with me to pick my epoxy color. I wanted something a little darker so that there would be a contrast between the floor color and the chip color and ended up with a color called "wirework gray". I made a set of "spikes" using a couple pieces of 1x4 and drywall screws and screwed them to the bottom of some old work boots. It sounds cheap but $20 is $20 and it was a one time job anyhow.
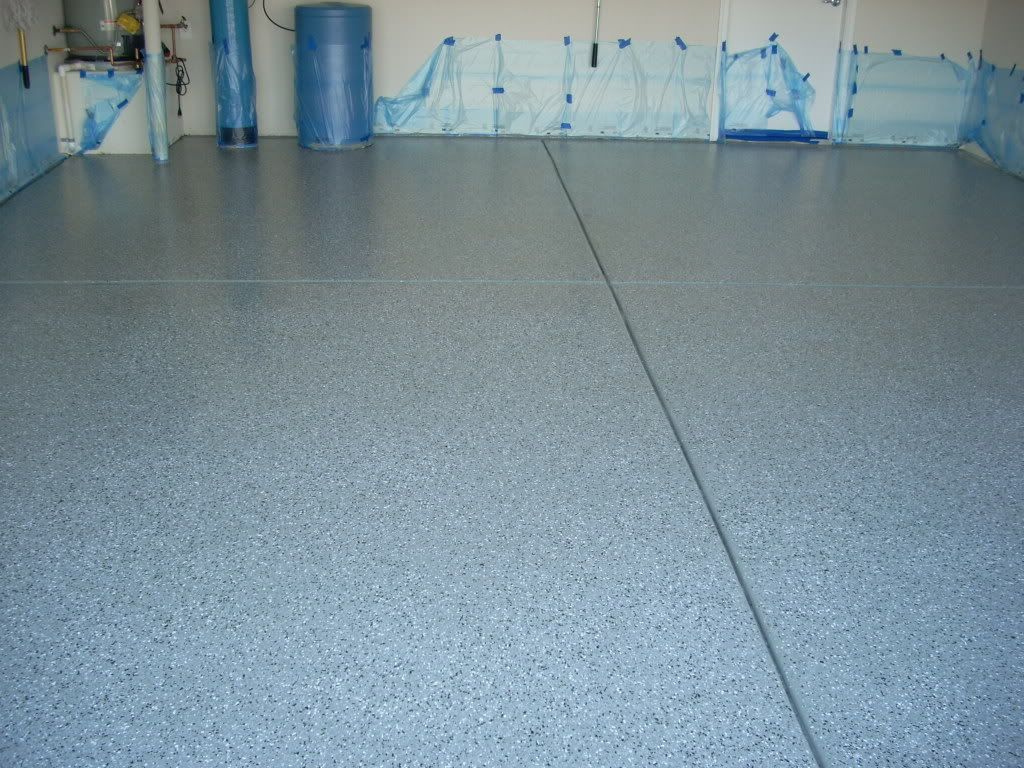
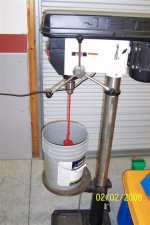
Application: I waited for a good weekend that would be around 70 degrees and low humidity (I am in Florida). I followed the directions on the cans and power mixed both parts separately with a mixer on my cordless drill. Next I dumped the color in a 5 gallon bucket and used a cheap spatula to scrape the 1 gallon cans clean. I put the 5 gallon bucket on my drill press with another mixing paddle (like a big stand mixer) and slowly added the converter. I blended it for 3 minutes making sure to move the bucket around and then let it sit for the required 15 minute induction time. For the first coat I also added some Xylol per the recommended 1 pint per gallon to create the primer coat. I poured from the bucket into the tray as I rolled it out on the floor and at the end scraped the bucket out onto the floor to try and not waste any. I waited 24 hrs to put on the 2nd coat after the 1st had set-up nicely. The first coat was flat and thin but did seal the porous areas and made the next coat go on slick. I basically did the same thing for the second but without adding the Xylol. It definitely went on thicker and smoother and filled in tiny little cracks and chips. After the second coat was on I used my spikes to move over the floor and spread the chips. I used a small, handheld, manual crank seed and fertilizer spreader to put out the chips. It worked really well and I could just walk around and spread the chips going back over areas to make it as even as I could. Any where the tape and epoxy was stuck together I pulled the tape or cut the line with a razor knife. After 24 hrs it was hard to the touch and I let it sit for 7 days before walking on it or moving anything heavy across it. I also used a good respirator while applying it because the fumes are very intense while it is wet.
Sealing: At first my plan was to not put anything else on top of it, but after reading some more I decided it would be better to seal the chips with something to help prevent stains and trapping of dust and dirt. Having used and worked with the floor finish they put on VCT tile and terrazzo floors I decided that I would put on 3 light coats to seal everything up. We have this finish on floors at work and it holds up very well for the cost and ease of maintenance. You can mop and clean it, add another coat if it gets worn or strip it and do it over again if it gets to beat up. The only thing it doesn't like is rubber tires, it leaves black marks in the finish if it sits on it for a long time. So I have my truck on 16" cardboard squares which is only a minor inconvenience to me for all the other benefits. I picked up a 2.5 gallon jug of 24% solids for $24.00 from Sams Club which was enough to do the whole shop. It leaves a nice gloss finish that is also slip resistant.
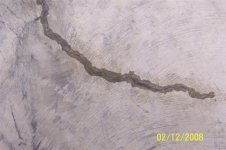
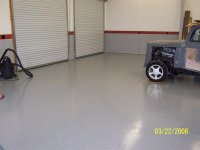
Conclusion: I am very happy with the results and feel it was the best value for my application. The floor looks really nice, it is easy to clean and gets rid of the dusting problem. I would definitely recommend the chips as it makes the floor look uniform and helps hide minor problems. If you have cracks you would want to fix them first because they will stand out even more once the epoxy is down. I had to do my shop in 2 segments because I already had a bunch of equipment in it. I moved everything to a 1/4 area and did 3/4's first and then moved stuff back and did the other 1/4. So if you can do it while it is empty it will definitely save you some time. I still have to seal the expansion cuts and am planning on using the Sika self leveling crack filler from Home Depot with foam backer rod. I will try to get some pictures posted once I figure out how. I ended up spending about $600.00 total to coat 1400 sq .ft. which kept me under my budget. If anybody has questions I would be glad to help
Preparation: My slab was about 2 years old and had no oil stains on it. It is slick finished with saw cut expansion joints and has a vapor barrier under the slab so I had no moisture issues. I had pressure washed it about a year ago before I built the structure and had only swept out since. I decided I did not want to acid wash it for several reasons but did want to do something to rough it up and clean it. I had access to a floor buffing machine from work, and used it with 60 grit sanding screens to go over the entire floor. It did a nice job of leveling things off and eliminating the really slick spots. I used my shop vac to constantly clean-up behind me and after I was done I mopped the floor a couple of times. I did have a few small cracks in the floor so I used a 2 part epoxy crack filler that came in a tube that fit in a standard caulking gun. I used a die grinder with a carbide burr to vee the edges out slightly and filled the cracks up. It took several applications to build it above the surface, but that allowed me to grind it down flush with the floor. After that the only other prep I did was to mask the walls and doors and sweep and blow the shop out a few more times. All told it was probably 10-14 hours spread over nights and a weekend.
Materials: I decided on the Devoe 224HS 2 part epoxy after looking at everything else. For my application it seemed to be the best value at $39.50 per gallon for Part A or B. It is a 75% epoxy comparable to the SW Armorseal 1000 HS. I ended up buying 10 gallons and actually used 9 gallons. I used 1 gallon of Xylol as a thinner and for cleanup as well. I purchased a HD 18" roller frame (17.00), inexpensive 21" trays (3.50), and special roller covers made for epoxy work (6.00). The roller covers are made by Wooster and are called "Epoxy Glide". They are 1/4" nap, shed-resistant and worked perfect. I had some regular power mixing paddles and used a cheap 4" brush for the cut in. I found that standard 2" masking tape worked just as well as the blue painters tape and wouldn't waste the money for it. I bought the epoxy at my local ICI paint store and the other items online from "The Paint Store.com". The ICI paint store is much easier to work with than my local SW store that I have an account with. I also decided that I wanted to add flakes to help hide any defects in the floor and to give it a nicer look and found a vendor on ebay selling a limited amount of a returned custom blend of light gray and electric blue. So I bought 6) 1 pound bags for $4.00 each. After I received the chips I pulled out some of the gray chips to take to the paint store with me to pick my epoxy color. I wanted something a little darker so that there would be a contrast between the floor color and the chip color and ended up with a color called "wirework gray". I made a set of "spikes" using a couple pieces of 1x4 and drywall screws and screwed them to the bottom of some old work boots. It sounds cheap but $20 is $20 and it was a one time job anyhow.
Application: I waited for a good weekend that would be around 70 degrees and low humidity (I am in Florida). I followed the directions on the cans and power mixed both parts separately with a mixer on my cordless drill. Next I dumped the color in a 5 gallon bucket and used a cheap spatula to scrape the 1 gallon cans clean. I put the 5 gallon bucket on my drill press with another mixing paddle (like a big stand mixer) and slowly added the converter. I blended it for 3 minutes making sure to move the bucket around and then let it sit for the required 15 minute induction time. For the first coat I also added some Xylol per the recommended 1 pint per gallon to create the primer coat. I poured from the bucket into the tray as I rolled it out on the floor and at the end scraped the bucket out onto the floor to try and not waste any. I waited 24 hrs to put on the 2nd coat after the 1st had set-up nicely. The first coat was flat and thin but did seal the porous areas and made the next coat go on slick. I basically did the same thing for the second but without adding the Xylol. It definitely went on thicker and smoother and filled in tiny little cracks and chips. After the second coat was on I used my spikes to move over the floor and spread the chips. I used a small, handheld, manual crank seed and fertilizer spreader to put out the chips. It worked really well and I could just walk around and spread the chips going back over areas to make it as even as I could. Any where the tape and epoxy was stuck together I pulled the tape or cut the line with a razor knife. After 24 hrs it was hard to the touch and I let it sit for 7 days before walking on it or moving anything heavy across it. I also used a good respirator while applying it because the fumes are very intense while it is wet.
Sealing: At first my plan was to not put anything else on top of it, but after reading some more I decided it would be better to seal the chips with something to help prevent stains and trapping of dust and dirt. Having used and worked with the floor finish they put on VCT tile and terrazzo floors I decided that I would put on 3 light coats to seal everything up. We have this finish on floors at work and it holds up very well for the cost and ease of maintenance. You can mop and clean it, add another coat if it gets worn or strip it and do it over again if it gets to beat up. The only thing it doesn't like is rubber tires, it leaves black marks in the finish if it sits on it for a long time. So I have my truck on 16" cardboard squares which is only a minor inconvenience to me for all the other benefits. I picked up a 2.5 gallon jug of 24% solids for $24.00 from Sams Club which was enough to do the whole shop. It leaves a nice gloss finish that is also slip resistant.
Conclusion: I am very happy with the results and feel it was the best value for my application. The floor looks really nice, it is easy to clean and gets rid of the dusting problem. I would definitely recommend the chips as it makes the floor look uniform and helps hide minor problems. If you have cracks you would want to fix them first because they will stand out even more once the epoxy is down. I had to do my shop in 2 segments because I already had a bunch of equipment in it. I moved everything to a 1/4 area and did 3/4's first and then moved stuff back and did the other 1/4. So if you can do it while it is empty it will definitely save you some time. I still have to seal the expansion cuts and am planning on using the Sika self leveling crack filler from Home Depot with foam backer rod. I will try to get some pictures posted once I figure out how. I ended up spending about $600.00 total to coat 1400 sq .ft. which kept me under my budget. If anybody has questions I would be glad to help


")