To avoid these ads, REGISTER NOW!

My Dream Garage

fawcusfitness

Member
Joined
Feb 20, 2020
Messages
9
Location
Alberta
Hi everyone,

I was on here years ago under another username but didn't post much...

I really look forward to learning from you all and hopefully I can contribute something!

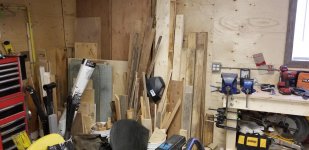
Anyways, close to two years ago I moved from BC to Alberta, Canada and purchased my first house. One of the requirements was that the house had a decent sized detached garage in the backyard. Well to make a long story short I found what I was looking for and then the fun began...

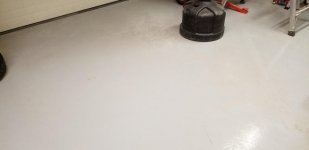
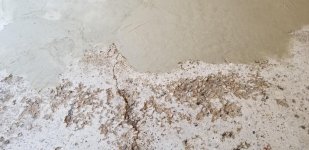
My first task was to deal with the garage floor as it was in very rough condition and I didn't want to move anything inside until it was dealt with. There was a lot of pitting and cracks. I went to a local concrete specialty shop in Edmonton called Conspec Industries and they educated me on how to repair the floor.

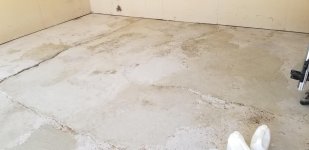
First I rented a concrete grinder to smooth everything out and clean up the concrete. I then patched all the major holes. Turns out I basically patched the entire floor. In retrospect I should have just skimmed the entire floor right from the get-go. Once everything was patched I rented the grinder again and smoothed everything out.

Once everything was smoothed out it was time to deal with the cracks. I put cardboard vertically into the large cracks and then back-filled the cardboard on either side with a special concrete mix that Conspec sells. Once that was done I removed the cardboard (was a pain) then installed foam backer rod.

Once the backer rod was installed I filled all the cracks with a special joint sealant. After this was done I cleaned off any excess sealant to make things tidy (I actually used my angle grinder for this and found it worked great).

Next step was to apply epoxy primer and then the next day I applied the epoxy coating while the primer was slightly tacky. I had to do the floor in two stages as the garage was full of stuff. Essentially I did half the garage for each step, then moved everything then did the other half then moved everything back and then did it again and again...

I had several quotes before I tackled this and thought I would do it myself, it was a great experience. Of course after I did all this I found out about polyaspartic coatings and wonder if I should have gone that route...

So here is the kicker. I started this project and worked on it for about 2 weeks then it got put on hold for several months because a couple weeks after I moved in I found that the foundation in the house was leaking...I will post about that later.

I will attach some photos of the finished floor shortly.
 

Attachments

  • 20180709_135116.jpg
    20180709_135116.jpg
    148.1 KB · Views: 234
  • 20180709_135128.jpg
    20180709_135128.jpg
    149.5 KB · Views: 225
  • 20180709_215619.jpg
    20180709_215619.jpg
    101.8 KB · Views: 218
  • 20180712_175421.jpg
    20180712_175421.jpg
    146.1 KB · Views: 219
  • 20180717_140546.jpg
    20180717_140546.jpg
    148.7 KB · Views: 204
  • 20180717_140606.jpg
    20180717_140606.jpg
    101.4 KB · Views: 208
To avoid these ads, REGISTER NOW!

BB Sig

Well-known member
Joined
May 16, 2018
Messages
139
Location
Florida
Rough looking floor! Looks like a lot of work needed to be done. Looking forward to the finished pictures.
 
OP
F

fawcusfitness

Member
Joined
Feb 20, 2020
Messages
9
Location
Alberta
Here is a photo of the finished floor which I snapped this evening along with scuff marks from my freestanding punching bag. :)

In the photo you can see the garage door threshold seal that I installed as I wanted a complete seal. I also installed a new garage door bulb seal around the same time.
 

Attachments

  • 20200224_175639.jpg
    20200224_175639.jpg
    52.6 KB · Views: 248
Last edited:
OP
F

fawcusfitness

Member
Joined
Feb 20, 2020
Messages
9
Location
Alberta
Here are a few photos for eye candy...

Built my first barn-wood coat rack, sick of not having somewhere to hang my jacket!

Installed a new cord reel from Costco. I had to move the outlet as the original one was in front of the door opener and I didn't want the cords hanging all over the place.

Picked up another section of shelving that I quickly put up this evening.
 

Attachments

  • 20200303_181358.jpg
    20200303_181358.jpg
    111.4 KB · Views: 234
  • 20200303_181336.jpg
    20200303_181336.jpg
    72.7 KB · Views: 239
  • 20200303_181323.jpg
    20200303_181323.jpg
    148.1 KB · Views: 287
OP
F

fawcusfitness

Member
Joined
Feb 20, 2020
Messages
9
Location
Alberta
Here is where things are at as of this morning.

I got another section of shelving and had to relocate the t-stat so that I could put my toolbox beside the shelf without covering the t-stat.

Fun times!

I am going to be asking for some serious input from you guys. In particular I am planning to build a workbench where the existing one is (that was left behind by the previous owner) and am looking for ideas...one thing I was wondering is should I make a bench that has legs in front and uses a ledger board in the back? OR make one with legs all around?

Make sense?
 

Attachments

  • 20200317_093548.jpg
    20200317_093548.jpg
    150.9 KB · Views: 106
  • 20200317_083214.jpg
    20200317_083214.jpg
    139.8 KB · Views: 125
  • 20200317_083202.jpg
    20200317_083202.jpg
    58.4 KB · Views: 111
  • 20200317_083152.jpg
    20200317_083152.jpg
    151.3 KB · Views: 121
OP
F

fawcusfitness

Member
Joined
Feb 20, 2020
Messages
9
Location
Alberta
I scored this wood from work. It is all hardwood 4x4's and 2x4's! Thinking of using it for the workbench...Any other ideas?
 

Attachments

  • 20200302_172723.jpg
    20200302_172723.jpg
    65.3 KB · Views: 92
  • 20200302_172736.jpg
    20200302_172736.jpg
    115.3 KB · Views: 71
To avoid these ads, REGISTER NOW!

Jeff Ivers

Well-known member
Joined
Apr 9, 2010
Messages
2,556
Location
Oklahoma
I scored this wood from work. It is all hardwood 4x4's and 2x4's! Thinking of using it for the workbench...Any other ideas?

If it were me, I would save the hardwood for projects where you need the strength or appearance that it offers - home made deep reach clamps, chair clamps, etc. You can make great workbenches with standard construction lumber.
 
OP
F

fawcusfitness

Member
Joined
Feb 20, 2020
Messages
9
Location
Alberta
Thanks for the replies! The only issue is that the 4x4 posts are a tad short as I had planned for the top of the bench to be right underneath the outlet boxes...
 

kumquat

Well-known member
Joined
Jun 16, 2015
Messages
403
Location
North of Montana aka Saskatchewan, Canada
....
I am going to be asking for some serious input from you guys. In particular I am planning to build a workbench where the existing one is (that was left behind by the previous owner) and am looking for ideas...one thing I was wondering is should I make a bench that has legs in front and uses a ledger board in the back? OR make one with legs all around?

Make sense?

After having a fire in my garage that started when my heater went AWOL and the fire spread to my wooden bench and then every where, I made a new bench from steel, steel cabinets, steel shelving. Essentially nothing that will burn.

Your choice, of course.
 

Wsidr1

Member
Joined
Mar 18, 2020
Messages
14
Location
Indiana
Try to decide what kind of work you will be doing most before you build your workbench. If you are mostly automotive, I'd lean towards a modest size perma mount bench(say, max 6'x3', then build a steel, movable welding table.

I do mostly auto, and my workbench sees very little work. The welding table and my portable pedestal vise/grinder stand see way more action than the workbench.

I don't like to do any spark or flame producing work inside the garage unless unavoidable. So, my wooden workbench is high on my anxiety list for locations to do anything much.
 
OP
F

fawcusfitness

Member
Joined
Feb 20, 2020
Messages
9
Location
Alberta
There are three main things that I would be using it for. Automotive repairs, metal fabrication and welding and woodwork.

I am just getting into woodwork and would like to make the bench so that I can insert and remove the mitre saw when I don't need it. Anyone here done that?

I plan to make a welding cart for the welder at some point that would serve as a type of work area perhaps...

I could definitely build a steel bench but I have a pile of spare wood kicking around including 3/4 inch plywood which I thought I would use for the top...
 
OP
F

fawcusfitness

Member
Joined
Feb 20, 2020
Messages
9
Location
Alberta
Okay so I finally built a workbench over the weekend using mostly scrap wood. The only wood I purchased were 2-2x4x8 and 3-2x6x8. Not bad!

Below are several random thoughts I have (me thinking out-loud), I would love any ideas you guys have.

I plan to build some drawers into the bench and I will probably make some rollout drawers (that sit on casters) for underneath the bench.

The bench isn't currently bolted to the wall but it will be at some point, most likely with lag bolts.

As pictured I have two vices, a Record number 2 and number 8. Debating on where to mount the vices.

When I do mount the vice it will be on a steel plate that it is over a 1/4 thick.
If I mount the vice at the end where it is in the photo then it may be in the way for when I cut long lengths of wood but then the bench is not deep enough to use the sliding mitre saw to its full capacity so I am thinking of making another bench/station for this. Thoughts?

I want to make a welding cart/metal working station. I have access to quite a bit of free steel. Should I make a small portable welding station? I am thinking it would be nice to have a welding cart that doubles as a little workstation, perhaps with the small vice mounted to it.

Oh and the huge chunks of hardwood I can get for free, what to do with those??? Could make for a solid bench top! :bounce:

Also was thinking maybe I should double up the plywood on the bench?
 

Attachments

  • 20200407_125748.jpg
    20200407_125748.jpg
    148.4 KB · Views: 20
  • 20200407_192242.jpg
    20200407_192242.jpg
    142.5 KB · Views: 21
  • 20200407_192250.jpg
    20200407_192250.jpg
    136.4 KB · Views: 19
  • 20200407_192304.jpg
    20200407_192304.jpg
    146.2 KB · Views: 21
  • 20200407_192307.jpg
    20200407_192307.jpg
    123.1 KB · Views: 22
  • 20200407_125739.jpg
    20200407_125739.jpg
    146.8 KB · Views: 18
To avoid these ads, REGISTER NOW!
Top Bottom