

repomannwp
Active member
- Joined
- Oct 15, 2011
- Messages
- 26
Home garage 550sq ft., used as my workshop primarily.
I'll say right up front, there's not much new here - I learned A LOT reading this forum before starting this project and it was the difference between success and failure. I'll add my $0.02 in the hopes it adds to the collective wisdom around here. I'm thrilled with my new floor, it only took me 17 yrs to get to it.
Prep:
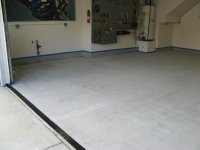
I opted for shot blasting, and have another thread that describes that process. First pic is the prepped surface ready to go. Notice I opted to tape where the garage door hits the ground and not epoxy the remaining few inches of the slab that sit outside the door - too many reports of the epoxy yellowing convinced me.
The Epoxy:
I opted for the Epoxy-Coat product. I was looking at Wolverine, ArmorPoxy, and Epoxy-Coat. That most of the users here had good things to say, and that their Customer Service is universally cited as a big factor made the difference for me. 1 full kit plus 1 half kit, grey color with top coat and white/blue/black fleck. I had 550sq. ft. of floor and an additional 80sq.ft. of curbing. I figured with the shot blasting I would have a very porous surface so the 750sq. ft coverage of the 1.5 kits of Epoxy-Coat seemed like a safe amount (turns out I needed it all)
Application:
I had my wife helping me the whole way. Two sets of hands is a must IMHO. We opted to do the curbing first, we mixed 1 qt part A and 1/2 qt. Part B, split that and applied with paint brushes. After about 25 min the epoxy mix started fusing but we were 95% done so overall that worked well. I did the rest of the curb using my first batch for the floor. The vertical surfaces of the curbing tend to have the epoxy run down to the floor and pool a bit, but that didn't really create any problems for us.
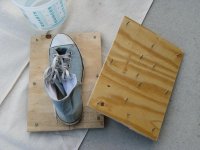
I used the Purdy white dove 1/4" and 3/8" roller covers plus what they gave me in the kit - have plenty on hand, you'll need them. First batch for the floor we mixed was 2qt A, 1qt B, poured along the back corner, squeegeed and rolled. I got about 10x12' out of that, I came back and did a backroll 10min later, which really made a huge difference to even out the base coat. It was obvious right at the beginning that spike shoes are a must have. I made my own and they worked great throughout the process.
As I neared completion of the base coat, I saw bubbles forming in various spots, I went back with compressed air and blew them out. More bubbles formed and keeping them knocked down wasn't too bad. Also, we were monitoring our remaining base coat product and could tell we were just going to make it. Between my rough curb surface and my shot-blasted floor, it took a lot of product- I needed every bit of that 1.5 kits to cover my surface.
We started adding fleck after the second batch was spread, but it would have been fine to just do it all at the end of the base coat phase. We got a few heavy spots when my wife wasn't paying enough attention to the lighting and the light reflection made it look like there wasn't much fleck on the spot... doh. I found that constantly walking around, mostly in circles allows you to see the density of the fleck on the ground at all angles, some of which can be very deceiving. If you stand still and toss, or always toss from the same perspective of floor plus light source, you'll get fooled a bit so keep moving around in your spike shoes. Of the 9lbs of fleck, we went with a medium density and that took about 3lbs of the fleck, max. We had tons left over.
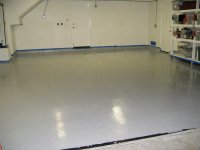
Base coat done, started about 3pm, finished around 8pm, much of that time was curb painting and prep. Floor went down without any drama. Notice I had this steel plate covering my sewer access - epoxied it no problem as well.
Finishing with Top Coat:
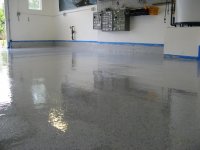
Next morning about 7am we started the top coat. We elected not to bother with the curb, and just do the floor - same process again, although it was very difficult to see where the clear coat was given the morning light conditions. I tried to be very systematic about ending one section and starting another, but it was pretty tough I got to say. Bubbling was more of an issue with the top coat for me. Again, compressed air did wonders, but I still ended up with bubbles that popped up without me noticing. I went back several hours later when I could walk on the surface and I just used a razor blade to slide off the bubble and add a drop of fresh top coat in that spot and it looked fine. This phase took us about 3 hours start to finish.
The pictures mask some of the imperfections, such as a few roller lines, or a few places where fleck is heavier than others, or where there is more top coat in one place than another... you know what, even with those normal imperfections, it looks FANTASTIC and I'm super happy with the result. Only I (and you for your floor) will notice those things - nobody else will. You'll drive yourself crazy if you try to make it too perfect. Keep that in mind when doing it yourself.
Final thoughts:
I'll say right up front, there's not much new here - I learned A LOT reading this forum before starting this project and it was the difference between success and failure. I'll add my $0.02 in the hopes it adds to the collective wisdom around here. I'm thrilled with my new floor, it only took me 17 yrs to get to it.
Prep:
I opted for shot blasting, and have another thread that describes that process. First pic is the prepped surface ready to go. Notice I opted to tape where the garage door hits the ground and not epoxy the remaining few inches of the slab that sit outside the door - too many reports of the epoxy yellowing convinced me.
The Epoxy:
I opted for the Epoxy-Coat product. I was looking at Wolverine, ArmorPoxy, and Epoxy-Coat. That most of the users here had good things to say, and that their Customer Service is universally cited as a big factor made the difference for me. 1 full kit plus 1 half kit, grey color with top coat and white/blue/black fleck. I had 550sq. ft. of floor and an additional 80sq.ft. of curbing. I figured with the shot blasting I would have a very porous surface so the 750sq. ft coverage of the 1.5 kits of Epoxy-Coat seemed like a safe amount (turns out I needed it all)
Application:
I had my wife helping me the whole way. Two sets of hands is a must IMHO. We opted to do the curbing first, we mixed 1 qt part A and 1/2 qt. Part B, split that and applied with paint brushes. After about 25 min the epoxy mix started fusing but we were 95% done so overall that worked well. I did the rest of the curb using my first batch for the floor. The vertical surfaces of the curbing tend to have the epoxy run down to the floor and pool a bit, but that didn't really create any problems for us.
I used the Purdy white dove 1/4" and 3/8" roller covers plus what they gave me in the kit - have plenty on hand, you'll need them. First batch for the floor we mixed was 2qt A, 1qt B, poured along the back corner, squeegeed and rolled. I got about 10x12' out of that, I came back and did a backroll 10min later, which really made a huge difference to even out the base coat. It was obvious right at the beginning that spike shoes are a must have. I made my own and they worked great throughout the process.
As I neared completion of the base coat, I saw bubbles forming in various spots, I went back with compressed air and blew them out. More bubbles formed and keeping them knocked down wasn't too bad. Also, we were monitoring our remaining base coat product and could tell we were just going to make it. Between my rough curb surface and my shot-blasted floor, it took a lot of product- I needed every bit of that 1.5 kits to cover my surface.
We started adding fleck after the second batch was spread, but it would have been fine to just do it all at the end of the base coat phase. We got a few heavy spots when my wife wasn't paying enough attention to the lighting and the light reflection made it look like there wasn't much fleck on the spot... doh. I found that constantly walking around, mostly in circles allows you to see the density of the fleck on the ground at all angles, some of which can be very deceiving. If you stand still and toss, or always toss from the same perspective of floor plus light source, you'll get fooled a bit so keep moving around in your spike shoes. Of the 9lbs of fleck, we went with a medium density and that took about 3lbs of the fleck, max. We had tons left over.
Base coat done, started about 3pm, finished around 8pm, much of that time was curb painting and prep. Floor went down without any drama. Notice I had this steel plate covering my sewer access - epoxied it no problem as well.
Finishing with Top Coat:
Next morning about 7am we started the top coat. We elected not to bother with the curb, and just do the floor - same process again, although it was very difficult to see where the clear coat was given the morning light conditions. I tried to be very systematic about ending one section and starting another, but it was pretty tough I got to say. Bubbling was more of an issue with the top coat for me. Again, compressed air did wonders, but I still ended up with bubbles that popped up without me noticing. I went back several hours later when I could walk on the surface and I just used a razor blade to slide off the bubble and add a drop of fresh top coat in that spot and it looked fine. This phase took us about 3 hours start to finish.
The pictures mask some of the imperfections, such as a few roller lines, or a few places where fleck is heavier than others, or where there is more top coat in one place than another... you know what, even with those normal imperfections, it looks FANTASTIC and I'm super happy with the result. Only I (and you for your floor) will notice those things - nobody else will. You'll drive yourself crazy if you try to make it too perfect. Keep that in mind when doing it yourself.
Final thoughts:
- Epoxy Coat is awesome
- I used SikaFlex for my control joints, but if I had to do it again, I'd go with the Legacy Gel Product, either way, a no joint surface looks awesome
- If you shot blast and have curbs, order lots of extra product, you'll need it.
- Bubbles in top coat - if need be, razor them off after the epoxy sets up enough to walk on, and add a drop of top coat to the spot, best to blow them out when floor is wet, you'll get them so deal with it
- I taped off where my garage door comes down - it will bleed through a little so you'll have some cleanup to do (see pic)
- Top coat is hard to see, use late afternoon sun if possible; uneven squeegee will result in uneven top coat density and some roller lines.
- Spike shoes a must, they work great, even on the base coat while its partially setup
- get LONG extension poles for your squeegee and rollers, mine was too short from home depot - 8ft is best
- It's a garage floor - don't get too ****, fleck hides 99% of all imperfections. Notice I had shelves on the side of my garage, I just rolled under it and tossed some fleck in there, you'll never see it so it didn't need to be perfect.
Attachments


Last edited:
