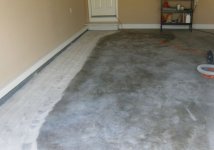
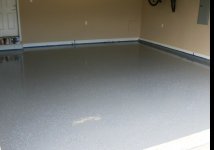
New to the board, and just got done installing Epoxy-Coat system on my garage. A little background to my project. I bought a new construction home about 2 months ago, that had an "epoxy coating" in the garage the builder installed. The day after closing date, my wife pulled her car out of the garage and the beautiful coating ripped right up. The peeling continued and continued, until we decided to strip up the entire coating (thank God for builder warranties). After questioning the builder, he said that he had gotten bored one day, so he decided to coat the garage floor, digging a little deeper I found he did not prep the floor because he thought you only had to prep dirty garage floors. So basically the most important step was left off, the etching and preparation for concrete. Well after stripping up the residual coating, I purchased an acid solution at Home Depot, which after applying I was still not satisfied with the prep of the floor. I then decided to rent a 7 inch diamond grinder with vacuum (BTW makes very little mess). After this step I pressure washed off residual dust and let the floor dry. I checked the pH of the garage floor and was satisfied. I also taped a plastic bag to the floor, left over night to check the water content of the concrete. After all of this I had to decide which flooring to install. I ended up going with Epoxy-Coat because of ease of application and cost. It was delivered very quickly (2 day delivery). After getting the product I arranged all necessary supplies and laid down a lot of plastic (this stuff is messy). My garage floor is 360 sq ft. So I needed one full kit. Each full kit will allow for 4 batches to be made which cover essentially 120sqft each with ~9mil. I divided my garage into 4 equal sections 9 x 10 ft. Mixed a single batch of Epoxy-coat, and applied to the floor using brush for edges and sides, squeegee for spreading and 9 inch 3/8 nap roller for even coating. After backrolling this section I started mixing 2nd batch. Applied the same way. Backrolled both sections and applied Alum oxide and flakes to first section. This continued for next sections. I ended up using all of part A and B, cleanup was quick (again stress plastic covering) Now I will just wait until full cure (3 days) before walking on or driving on floor. I will give updates as they are available. Feel free to email [email protected], or PM if you have any questions. Attached are pics of prep, midway, finished. I also have 50 or so pics of process on a snapfish album if anyone is interested.


You are using an out of date browser. It may not display this or other websites correctly.
You should upgrade or use an alternative browser.
You should upgrade or use an alternative browser.
My Epoxy-Coat Project
- Thread starter MDoneday
- Start date


SimpleManLance
Active member
looks good. you did the right thing on taking the extra step and diamond grinding the whole floor. it is a little hard on the back and a dusty, but it ensures a good bond for the coatings.
how long did the grinding take you? I made my own 7" diamond grinder buying a hitachi 7", a dust hood, and both a t segment wheel and a dual row wheel. It took forever. I've got about 8-10hrs doing the 300sf side of my garage. It came out nice but took a lot longer than I expected. the floor had a lot of shallows that required work to get the area around them down.
What kind of grinder was it? rpms? type of wheel? Did you notice the wheel cut really good for the first 50sf or so then slowed down a bit? I noticed it with both wheels but the dewalt double row was faster than the T seg after that point.
I've still got the 250sf side of my garage to do after I coat this side. I can say I'm not looking forward to grinding it.
That looks nice. What chip colors did you use? That's a taupe base, right? I'm hesitant on the longevity of these coatings. They typically require touch up every 3-5 years, but it looks like epoxy coat is claiming it's much more durable. How do you apply the chips to the area when it's "wet"? ie how did you get the chips all teh way to the back wall of the garage without stepping on the coating?
Last edited:
SimpleManLance
Active member
i know the question wasn't directed at me but i figured i would share my input.how long did the grinding take you? I made my own 7" diamond grinder buying a hitachi 7", a dust hood, and both a t segment wheel and a dual row wheel. It took forever. I've got about 8-10hrs doing the 300sf side of my garage. It came out nice but took a lot longer than I expected. the floor had a lot of shallows that required work to get the area around them down.
What kind of grinder was it? rpms? type of wheel? Did you notice the wheel cut really good for the first 50sf or so then slowed down a bit? I noticed it with both wheels but the dewalt double row was faster than the T seg after that point.
I've still got the 250sf side of my garage to do after I coat this side. I can say I'm not looking forward to grinding it.
i use both a BOSCH grinder and a Matabo grinder im not sure of their exact RPMs they both grind really good as long as there is a good power. if not i will constantly blow curcits.
8-10 hours seems like a really long time to grind a floor. if i had to guess i would say your concrete was really hard (did it kick up a lot of dust) or your your grinder/wheel combination wasn't good enough. 300sq ft should only take an hour or two depending how hard the concrete is. if it is soft it will create a lot of dust there for requiring cleaning the filter on the vacumn more.
how long did the grinding take you? I made my own 7" diamond grinder buying a hitachi 7", a dust hood, and both a t segment wheel and a dual row wheel. It took forever. I've got about 8-10hrs doing the 300sf side of my garage. It came out nice but took a lot longer than I expected. the floor had a lot of shallows that required work to get the area around them down.
What kind of grinder was it? rpms? type of wheel? Did you notice the wheel cut really good for the first 50sf or so then slowed down a bit? I noticed it with both wheels but the dewalt double row was faster than the T seg after that point.
I've still got the 250sf side of my garage to do after I coat this side. I can say I'm not looking forward to grinding it.
I must be honest, I would love to be more helpful about the floor grinding but to be honest I just went to the local rental store asked if they had a handheld floor grinder. This was also my first time ever using a grinder so it took me a while just to figure out. As far as the wheel, I used a single row wheel which seemed to work fine as long as I kept moving. As for time: 360sq ft took me about 2 1/2 hours to finish, I just had to keep moving and not sit in one area for too long. At first it was a little slow because I couldn't figure out the best way to position myself and the grinder to move smoothly. Eventually after a few passes I started getting faster. I did blow a few circuits running the vac and grinder with garage outlets-> switched to indoor outlet for grinder and outdoor for vac and had no further problems.
Issues I ran into grinding: During some of the passes I must have taken more time grinding-> because there are a few places where i can feel the concrete is lower/higher than previous rows. Overall I was satisfied with how it turned out since it was my first experience using grinder.
Other questions: Base Coat: The base coat pictured is Dark Grey, with a combination flakes-> Black, White, Blue.
Applying Chips: I divided my garage into 4 sections. After finishing first 2 sections, I threw flakes onto those areas so that it would not be too hard to get flakes to be uniform. Only had to reach a total of 10 feet away.
I also had some spike shoes but didn't end up needing them.
Online Album: http://picasaweb.google.com/mdoneday09/GarageProject02
Last edited:
5Cent
Well-known member
Looks great to me, and this thread has sealed the deal for me using epoxy-coat on my home, thank you!
I see some air bubbles in the one closeup picture in your album, did they work themselves out ok? Any issues with the flakes sticking up being it's a one coat process? Did they sink into the epoxy ok?
Congrats on the new floor!
I see some air bubbles in the one closeup picture in your album, did they work themselves out ok? Any issues with the flakes sticking up being it's a one coat process? Did they sink into the epoxy ok?
Congrats on the new floor!
Looks great to me, and this thread has sealed the deal for me using epoxy-coat on my home, thank you!
I see some air bubbles in the one closeup picture in your album, did they work themselves out ok? Any issues with the flakes sticking up being it's a one coat process? Did they sink into the epoxy ok?
Congrats on the new floor!
For Air Bubbles: Epoxy-coat recommends using a leaf blower to blow over the wet surface if air bubbles appear, I only had a few areas that appeared early-> I used blower and I was able to smooth most of them out. The areas that appeared in the back of the garage too far away for blower to reach, I just let be. I had actually ordered a touch up kit (relatively cheap 60sq ft for $50.), and could sand down the bubbles then apply epoxy.. For now I just took a razor blade popped the bubble and cut down the sharp edge, and am happy with the results.
Flakes: I was also worried about the flakes sticking on top of the surface and coming off, but suprisingly they sank into the epoxy and are very secure.
Other pitfalls: #1 - I found that using the leaf blower to get rid of the bubbles early actually sent bubbles flying like projectiles into my baseboards which I had taped only partially up the board. I had to sand down those areas cause that epoxy is thick, and repaint baseboards-> Had planned on repainting anyway so this was not really an issue. I also used an offbrand blue tape to mask off the walls (ACE Hardware brand-> Epoxy actually soaked through in some areas. So don't cut corners like me to save the extra 2 bucks on tape.
I am extremely happy with results, and have already gotten many compliments by passer-byers stopping into see what I have been working on all week. And customer service at Epoxy-coat is excellent. They answer quickly, and don't place you on hold to look up questions in a database (They actually know their product, and have helpful answers.)
If you have any other questions, I will try to help out anyway I can.
AlphaGarage
Well-known member
Flakes, when enough are broadcast, will give the finished floor some texture, but not enough to provide a high level of slip resistance. The finish will feel kind of like patterned linoleum.
Opinion seem to vary, but I think sealing flakes is essential. The flake isn't near as durable as the epoxy (assuming a good quality epoxy) so over time exposed flakes will wear down, leaving a small void to catch dirt.
Opinion seem to vary, but I think sealing flakes is essential. The flake isn't near as durable as the epoxy (assuming a good quality epoxy) so over time exposed flakes will wear down, leaving a small void to catch dirt.
5Cent
Well-known member
Flakes, when enough are broadcast, will give the finished floor some texture, but not enough to provide a high level of slip resistance. The finish will feel kind of like patterned linoleum.
Opinion seem to vary, but I think sealing flakes is essential. The flake isn't near as durable as the epoxy (assuming a good quality epoxy) so over time exposed flakes will wear down, leaving a small void to catch dirt.
That is my concern also. Epoxy-coat said to not do a clear coat as it will yellow and will delaminate from the epoxy. From what I gather, if you do plan on doing a clear coat, it will need maintenance every now and again to keep it looking good and doing it's job. So now I'm stuck between no clear coat, or clear coat and expect to sand it lightly every couple of years and recoat

AlphaGarage
Well-known member
Well EpoxyCoat knows their product history better than I do, but I feel compelled to post that at least with Wolverine epoxies applied to specs they haven't experienced any delamination between the various coatings.That is my concern also. Epoxy-coat said to not do a clear coat as it will yellow and will delaminate from the epoxy.
From what I gather, if you do plan on doing a clear coat, it will need maintenance every now and again to keep it looking good and doing it's job. So now I'm stuck between no clear coat, or clear coat and expect to sand it lightly every couple of years and recoat
With certain usage there may be areas that will lose the high gloss luster. Often a quick fresh up of just the affected spots will do the trick. There's no need to sand down to concrete or anything like that. Hit the spots with a ScotchBrite pad, wipe with MEK or denatured alcohol, and recoat. Another good point is that usually the spots that need a fresh-up are exposed areas and easy to get to. If you have flakes it's often difficult to note where the recoat spot begins. Even w/o flakes properly done the entire floor looks new.
5Cent
Well-known member
Great info, thanks.
I was talking about sanding the clear, but if scuffing with a scotchbrite pad and alky is enough, sweet. Now time to choose a good clear
I was talking about sanding the clear, but if scuffing with a scotchbrite pad and alky is enough, sweet. Now time to choose a good clear
Well EpoxyCoat knows their product history better than I do, but I feel compelled to post that at least with Wolverine epoxies applied to specs they haven't experienced any delamination between the various coatings.
With certain usage there may be areas that will lose the high gloss luster. Often a quick fresh up of just the affected spots will do the trick. There's no need to sand down to concrete or anything like that. Hit the spots with a ScotchBrite pad, wipe with MEK or denatured alcohol, and recoat. Another good point is that usually the spots that need a fresh-up are exposed areas and easy to get to. If you have flakes it's often difficult to note where the recoat spot begins. Even w/o flakes properly done the entire floor looks new.
SimpleManLance
Active member
if you do some searching under the flooring are there is a guy that posted up about his clear coat after like 6 months in the sun. he has no yellowing. so there must be some UV inhibiter in it. epoxy should stick to epoxy if it quality stuff.
dodgepolara500
Well-known member
My garage floor is 360 sq ft. So I needed one full kit. Each full kit will allow for 4 batches to be made which cover essentially 120sqft each with ~9mil. I divided my garage into 4 equal sections 9 x 10 ft. Mixed a single batch of Epoxy-coat, and applied to the floor using brush for edges and sides, squeegee for spreading and 9 inch 3/8 nap roller for even coating.
How did you measure out the 4 parts? Do they provide a measuring tool of some sort? My concern would be that eyeballing Part A and B would result in improper proportions. You certainly seesed to get it right!
Nice job
How did you measure out the 4 parts? Do they provide a measuring tool of some sort? My concern would be that eyeballing Part A and B would result in improper proportions. You certainly seesed to get it right!
Nice job
eddy
Member
looks good. hope it lasts a long time.