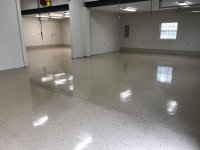
Just finished my 2000 sq ft floor with Armorpoxy Ultra, khaki tan. Overall I'm very happy with the result. It's a lot of work, but worth the effort and saved me $4 grand in the process.
The Armorpoxy was very well labeled and they have a pretty much idiot proof system. When it arrived in over a dozen boxes, I wondered what the heck but now realize it's packaged in individual sets, making it easy to work with. The kit came with good quality tools, right down to liners for the buckets. The only thing I had to buy was an 18" paint tray.
My building is new construction but the floor had a lot of paint and drywall mud splattered all over. After watching a few YouTube videos, I decided on renting the Home Depot floor polisher with DIAMABRUSH. I also bought a 4" diamond cup wheel which I used with my grinder to get close to the walls. The Diamabrush scuffed up the surface a little, but definitely didn't get down to a fresh surface and didn't do much on the paint or mud spots either. I ended up using the 4" grinder on a lot of the paint blobs which worked amazingly well. If I were to do it again, I'd rent a proper floor grinder. I'm sure my epoxy is well adhered, but the spots where I used the 4" grinder were definitely a better surface. I went with the grinding/polisher rather than the acid etching because I didn't want to flood my garage with a bunch of water (plywood walls). I ended up power washing the floor anyway because even with a powerful leaf blower and vacuum, I couldn't get the dust off the floor. Even if you can't avoid the water, I'd still grind over etch as I think it's better.
I ended up using a little more than half of the primer they sent, even though I was putting it down fairly heavy. The epoxy second coat worked out perfectly with just a little in the bucket left over. I thought I had ordered flakes with the kit, but they weren't in my delivery (not on the invoice either) so I had to buy some from Lowes. This actually turned out better as I liked the tan Rustoleum flakes over the sample Amorpoxy had mailed me. The Armorpoxy fakes they recommended with a khaki tan had a small about of red flakes that looked a little out of place. I thought I'd need over 10 bags ( 1 lb) of flakes but only used five as I didn't want too heavy of flake look. The top coat went down well, but is really hard to see where it's being applied as the epoxy coat is also very shiny. I ended up with a few streaks which I think are more from the antislip additive than my rolling technique. The antislip settles out quickly and a few times when I got to the bottom of the tray, there would be a high concentration of anti-slip.
So, I'm really happy with how it turned out and now I've got to start setting the shop up and getting the lift installed.
Craiger