To avoid these ads, REGISTER NOW!

my fabrication projects

22george

Well-known member
Joined
Jan 26, 2011
Messages
1,637
Location
SW Ohio
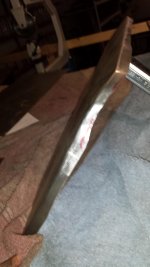
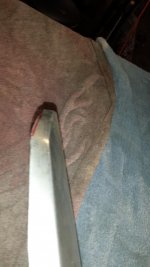
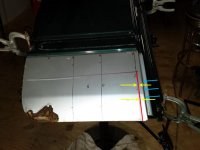
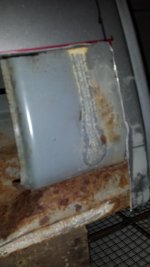
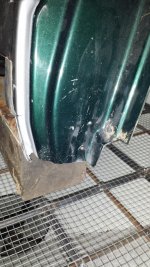
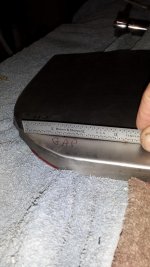
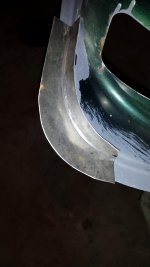
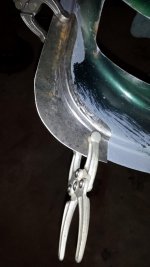
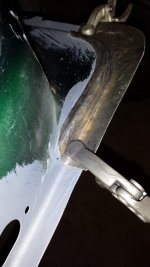
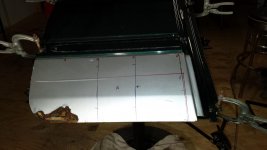
I've started repairing the rust on doors for my 01 Dodge quad cab. I cut the rusted section off of the bottom of the outer skin on the right rear door and partially fabbed the repair patch using the English wheel with an inner tube belt on the upper wheel and tipping dies on the bead roller. When using a hammer and dolly to shrink the wrinkles on the tipped flange (around the corner) I ended up with the skin being "dimpled out" where the dolly was sitting. I had the dolly sitting on a sand bag and held the patch panel on top of the dolly. I'm thinking maybe I should have set the panel on the sand bag and held the dolly. With the last 4pictures I'm trying to show where "dimple" is. My questions are how did that happen and how do I fix it?? :dunno: :dunno:

In the mean time, my next step is to sand blast the inner skin on the bottom of the door to see how much of the lower inner skin I need to replace.

Any suggestions - tips - pointers - help will be greatly appreciated.

This got a little long winded, but I'm trying to give you guys enough info to see what happened.
 

Attachments

  • 629.jpg
    629.jpg
    130.9 KB · Views: 167
  • 626.jpg
    626.jpg
    146.1 KB · Views: 131
  • 620.jpg
    620.jpg
    133.2 KB · Views: 122
  • 625.jpg
    625.jpg
    138.8 KB · Views: 126
  • 632.jpg
    632.jpg
    141.7 KB · Views: 129
  • 633.jpg
    633.jpg
    140.8 KB · Views: 135
  • 622.jpg
    622.jpg
    134.4 KB · Views: 121
To avoid these ads, REGISTER NOW!

Noland

Active member
Joined
Jan 18, 2013
Messages
27
You can buy a door bottom at local decent auto parts. then just cut it to fit. on the rounded part at back of the door for the inside lip. Ill just cut a piece out tin to make the inside lip then when your welding your patch in you vise grip the patch and the inner lip together pinching the door frame between just like it suppose to then weld up the seam and grind the seam to make the gap. instead of trying to bend it. I hope that makes alittle sense. Ive found that it needs less mud work this way because every time Ive tried to bend a edge like that I mess up the outside of the patch or my gap comes out wonkie. But in all honesty I wouldve never cut it up as high as what you did. it looks in the picture like you couldve stayed below the bend in the door easily without any issues. remember sometimes less is more. Ive found a panelspotter works great for door bottoms.
 
OP
2

22george

Well-known member
Joined
Jan 26, 2011
Messages
1,637
Location
SW Ohio
Robert, I plan on using o/a. I haven't done that in 40 years. I bought a Dillon torch because it isn't as long as a regular torch. I am not as steady as l was back then, I figure l can keep it steadier. I have some strips of 19 gauge cut to practice on. If l have problems with that l will use the same method you do. I have a Miller 211 mig welder. I am in the process of rereading your post - relearning some of your teachings. It really helps.
 
OP
2

22george

Well-known member
Joined
Jan 26, 2011
Messages
1,637
Location
SW Ohio
Noland, The rust on the outer door skin went above the line on the inside of the skin. Than is why l cut it there. I had the patch panel formed, the line put in and the edge tipped to 90 degrees before l made the cut. The patch is plenty big enough to fit the opening even after trimming it for "no gap" to o/a weld it. I didn't buy a door bottom because l'm using these "easier repairs" to learn how to use the bead roller, English wheel, etc. before l go on to the places that need work that don't have repair panels available. I hadn't thought of welding the 2 pieces together like you suggested. I'll try that on the other doors. I guess part of it was I had just bought the tipping wheel set and had to try out my new toy :lol_hitti :lol_hitti

I wasn't going to weld this piece in until l get the inner skin done. L figured l have better access this way
 

MP&C

Well-known member
Joined
Oct 21, 2009
Messages
4,404
Location
Leonardtown, MD
To start, the flange at the rear radius is nothing more than tipping and tuck shrinking. The attached youtube link is a simplified version of it that I did on a dash panel. Form a tuck, hammer the high spots back into themselves... A large piece of pipe with a matching radius would help out to use as an anvil... Trimming any excess you don't need will make easier work of it...


https://www.youtube.com/watch?v=L2jzqhR6zdI


For O/A gas welding, I'd say to start with good fitup, tight gaps, and tack the panel from one end to the other like David Gardiner shows toward the end of this video (the purchase of his DVD is well worth the money btw):


https://www.youtube.com/watch?v=IGElSHzm0q8&list=UUGfDpMMWH6gSAQFDCmIrHPw&index=4

Once tacked in place, then come back and weld from one end to the other, using no-filler fusion welding if possible..
 
Last edited:

MP&C

Well-known member
Joined
Oct 21, 2009
Messages
4,404
Location
Leonardtown, MD
Some random thoughts....

First, any weld will have shrinking effects, so placement should consider access for hammer and dolly for stretching the weld and HAZ.

Second to that, placement near a body crease will help to hold the panels shape to minimize any distortion from shrinking. So having the seam closer to the crease below your cut would help. Whether the cut was above the crease (crease added to patch) or cut below (crease left on door) either will help the panel to hold it's shape.

Next, refer to the first thought again. Now, with that in mind, any time you have a sharp 90, these shrinking effects will stack or compound at the inside corner, making it a bit more difficult to planish out the distortion. A large sweeping radius where ever possible will help to balance out these shrinking effects on either side of the weld, for an easier job of removing weld distortion. So radius cut=good, sharp 90, not so good.

Next, having a vertical weld in close proximity to the panel edge should be especially cognizant of planishing access, as insufficient stretching of the weld and HAZ's shrinking effects (yellow arrows) may have a tendency of pulling the edge inward (blue arrows), which will give you the wart on nose effect as the gap between panels becomes inconsistent in width.


attachment.php


Because of the shrinking issues inherent in the last two comments, any elimination of perpendicular welds, I.E.: welding in a straight line only where possible, will help to balance out shrinking deformity on either side for the least difficulty in planishing out said defects (all other things considered). So if possible, welding a patch on the bottom of a fender, door, etc. will have less issues to deal with if you can perform the installation using one single horizontal weld. The front edge of that door looks to have a couple folds, so that throws a bit more in the mix, especially if there is no access for planishing.

All in all, you (whomever) should look at a particular job at hand, look at the detractors with each consideration, and pick the least of the group of evils..
 

Attachments

  • 22George02.jpg
    22George02.jpg
    67.9 KB · Views: 1,876
Last edited:
OP
2

22george

Well-known member
Joined
Jan 26, 2011
Messages
1,637
Location
SW Ohio
To start, the flange at the rear radius is nothing more than tipping and tuck shrinking. The attached youtube link is a simplified version of it that I did on a dash panel. Form a tuck, hammer the high spots back into themselves... A large piece of pipe with a matching radius would help out to use as an anvil... Trimming any excess you don't need will make easier work of it...


https://www.youtube.com/watch?v=L2jzqhR6zdI


For O/A gas welding, I'd say to start with good fitup, tight gaps, and tack the panel from one end to the other like David Gardiner shows toward the end of this video (the purchase of his DVD is well worth the money btw):


https://www.youtube.com/watch?v=IGElSHzm0q8&list=UUGfDpMMWH6gSAQFDCmIrHPw&index=4

Once tacked in place, then come back and weld from one end to the other, using no-filler fusion welding if possible..

Robert,

My original pictures didn't clearly show my problem. My hi spot is shown better in the below pictures. In rereading more of your thread l saw where you used the "donut dollys" on that trunk lid that was stretched by blasting. Is that something that would work here?? I did use your method to shrink the tipped flange around the corner to shrink the "tucks".

I do have David Gardiner's DVD. Going through it is why l wanted to use o/a to try to prevent having to do much planishing on the welds.


Some random thoughts....

First, any weld will have shrinking effects, so placement should consider access for hammer and dolly for stretching the weld and HAZ.

Second to that, placement near a body crease will help to hold the panels shape to minimize any distortion from shrinking. So having the seam closer to the crease below your cut would help. Whether the cut was above the crease (crease added to patch) or cut below (crease left on door) either will help the panel to hold it's shape.

Next, refer to the first thought again. Now, with that in mind, any time you have a sharp 90, these shrinking effects will stack or compound at the inside corner, making it a bit more difficult to planish out the distortion. A large sweeping radius where ever possible will help to balance out these shrinking effects on either side of the weld, for an easier job of removing weld distortion. So radius cut=good, sharp 90, not so good.

Next, having a vertical weld in close proximity to the panel edge should be especially cognizant of planishing access, as insufficient stretching of the weld and HAZ's shrinking effects (yellow arrows) may have a tendency of pulling the edge inward (blue arrows), which will give you the wart on nose effect as the gap between panels becomes inconsistent in width.


attachment.php


Because of the shrinking issues inherent in the last two comments, any elimination of perpendicular welds, I.E.: welding in a straight line only where possible, will help to balance out shrinking deformity on either side for the least difficulty in planishing out said defects (all other things considered). So if possible, welding a patch on the bottom of a fender, door, etc. will have less issues to deal with if you can perform the installation using one single horizontal weld. The front edge of that door looks to have a couple folds, so that throws a bit more in the mix, especially if there is no access for planishing.

All in all, you (whomever) should look at a particular job at hand, look at the detractors with each consideration, and pick the least of the group of evils..

Robert,

The Cut l made has a 3/8 radius at the corner. The patch l have started is big enough that l can make it into a 1-1/2 inch radius, if that helps with the vertical welding. Like l said above, l was hoping by using o/a l could avoid having to do much much planishing. There is a stiffener at the front of the door that limits access for planishing.

If it would give me a better repair, I could make the repair panel in sections - make the folds at the front of the door in pieces and weld them together before l weld the panel to the door. This way l think l can planish those welds before the panel is welded to the door.

Robert, l really appreciate the time you take and the effort you make to answer my questions. :thumbup: :thumbup:

Reid
 

Attachments

  • 019.jpg
    019.jpg
    128.9 KB · Views: 50
  • 022.jpg
    022.jpg
    155.8 KB · Views: 45
  • 015.jpg
    015.jpg
    143.2 KB · Views: 43
  • 014.jpg
    014.jpg
    124.3 KB · Views: 48

MP&C

Well-known member
Joined
Oct 21, 2009
Messages
4,404
Location
Leonardtown, MD
Responses in blue...


Robert,

My original pictures didn't clearly show my problem. My hi spot is shown better in the below pictures. In rereading more of your thread l saw where you used the "donut dollys" on that trunk lid that was stretched by blasting. Is that something that would work here?? I did use your method to shrink the tipped flange around the corner to shrink the "tucks".

I do have David Gardiner's DVD. Going through it is why l wanted to use o/a to try to prevent having to do much planishing on the welds.

It appears you have a buckle or tuck at the center of the radius. I feel this may be part of the issue with pushing the panel outward. (high) It's high at the tuck and pulling downward on either side of that. I don't think the "gap" is anything to be concerned with, it appears low because of the high next to it. I would try to flatten out the flange pucker just a bit to see if that releases some of the "push". Then if you feel it isn't responding to that, perhaps a donut dolly would help to bring down the high. Also, once you fold the flange around the inner door, it should help it to "follow" the contour of the door. I.E.: once the flange is folded flat, it won't be pushing outward as it is now. Also, trimming the flange to a width consistent with what was on the original should get rid of some of the excess metal to make the task of shrinking around the radius a bit easier..


Robert,

The Cut l made has a 3/8 radius at the corner. The patch l have started is big enough that l can make it into a 1-1/2 inch radius, if that helps with the vertical welding. Like l said above, l was hoping by using o/a l could avoid having to do much much planishing. There is a stiffener at the front of the door that limits access for planishing.

You may have to resort to a spoon/leaf spring tool to use as a dolly in that tight spot. For a panel like yours, that upper right corner is not serving to remove any rust, so it should be a wide, sweeping radius, like in a 3" radius, not 3/8. That's what will help to equalize the shrinking forces on either side, a 3/8 radius is still small enough that you'll see some stacking effect in the inside corner. The double edge sword here is that if you trim any more to get a larger radius, it will make your vertical seam closer to the edge. The narrower that remaining strip becomes, the more susceptible it is to shrinking and pulling the edge inward, especially given the stiffener that will make that challenging.


If it would give me a better repair, I could make the repair panel in sections - make the folds at the front of the door in pieces and weld them together before l weld the panel to the door. This way l think l can planish those welds before the panel is welded to the door.


Now that I see a better shot of the front of the door, that lower portion of the outer skin also has just a small amount of crown to it. This means that a flange folded there will not be a simple straight bend, but will require a little shrinking along the first flange to maintain the crown of the outer skin. Given the multiple bends, it would take some nice long tuck shrinks like Peter Tomassini does at the door opening of the quarters he makes. Not impossible, but you're in kind of a catch 22 now as the extra work there is a bit more effort than the extra planishing you may be facing at the front vertical seam. If you don't have a heavy duty spoon or leaf spring spoon, you may need one to planish that front seam. But given the O/A, it may go easier than I imagine, and you'll be pleasantly surprised.

Robert, l really appreciate the time you take and the effort you make to answer my questions. :thumbup: :thumbup:

Reid


At this point I would suggest to get the shape as close as you can, fold the radius flange a bit more and see how it fits on the inner. Also, you may wish to re-install the door for final folding of the flange to insure you maintain good door gaps while folding. Then when you're happy with the gaps, mark your final scribe lines for trimming out the hole for the patch. Get the gaps as tight and as consistent as you can. If you can get them perfectly tight you should be able to follow David's instructions on the no-filler weld. Wider gaps will be more filler, more heat, more warping, more planishing. Domino effect if you will. By the time you're done you'll see why I stress consistency from start to finish on a job like this. :thumbup:
 
To avoid these ads, REGISTER NOW!
OP
2

22george

Well-known member
Joined
Jan 26, 2011
Messages
1,637
Location
SW Ohio
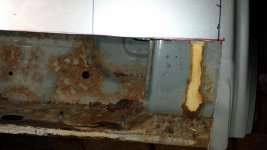
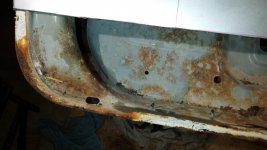
Sandblasted the bottom of the door this weekend and brushed on epoxy primer. Will let it set for a week to harden. It cleaned up better than l thought it would. Looks like the only repair needed on the inner skin is on the lower flange where it wraps around - maybe 6-8 inches long. :)
 

Attachments

  • 024.jpg
    024.jpg
    128.5 KB · Views: 67

MP&C

Well-known member
Joined
Oct 21, 2009
Messages
4,404
Location
Leonardtown, MD
Looking at the pictures in your first post, it looks like (given the parallel lines on the flange) you have a shrinker/stretcher set. You should be able to fab up a repair part for the rusted section rather easily using those.. I'd suggest making a template/pattern of the outer radius to insure it's the same after welding in place..
 
OP
2

22george

Well-known member
Joined
Jan 26, 2011
Messages
1,637
Location
SW Ohio
Thanks Robert. I was thinking the shrinker/stretcher would work. I did make a template of the outer radius.
 

e30bradley

Well-known member
Joined
Aug 3, 2011
Messages
2,725
Location
Don’t have a garage in Arizona USA
You said you brushed on epoxy, do you mean the 2 part activated epoxy intended for spray application? Every tech sheet I have ever read for 2 part paint that says anything about brushing says to not do it. Does it work good? It would be way more convenient that spraying that area.
 
OP
2

22george

Well-known member
Joined
Jan 26, 2011
Messages
1,637
Location
SW Ohio
Yes, that is what l did. Robert (MP&C) gave me the idea. He does that. He mentions it several times in his post here. It cured overnight - even in this "cold" weather. He also said to let it harden a few days before working with it, so that it what l am doing.
 
OP
2

22george

Well-known member
Joined
Jan 26, 2011
Messages
1,637
Location
SW Ohio
update

First picture is patch after 1st bend with tipping wheel on the bead roller

Second picture is after second bend with the tipping wheel before closing the tucks.

Third and fourth are after trimming.

The next step is to practice welding on 19 gauge strips before l remove the paint on the door and weld in the patch.

l won't trim the outer edge until after it is welded in.
 

Attachments

  • 254.jpg
    254.jpg
    141.5 KB · Views: 52
  • 257.jpg
    257.jpg
    129.5 KB · Views: 47
  • 259.jpg
    259.jpg
    140.3 KB · Views: 49
  • 260.jpg
    260.jpg
    141.5 KB · Views: 50
OP
2

22george

Well-known member
Joined
Jan 26, 2011
Messages
1,637
Location
SW Ohio
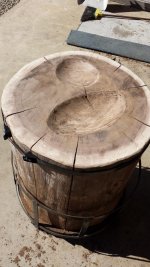
I finally got other projects around the house and barn caught up to where l can get back to metal shaping etc. :)

I just finished shaping my stump. It is walnut 30 inches in diameter. I saw Wray Shelins stump video and made an oblong dish like he did. How deep do you guys make your dishes?? I'm planning on dumping linseed oil on it to help protect it.
 

Attachments

  • 20151018_115005.jpg
    20151018_115005.jpg
    149.2 KB · Views: 30
To avoid these ads, REGISTER NOW!
Top Bottom