To avoid these ads, REGISTER NOW!

My First Braze (Which Kit?)

OP
J

jonathan75

Well-known member
Joined
Mar 27, 2013
Messages
1,451
Location
NC
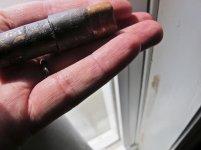
I managed to get the kit set up and tested. Tomorrow I will start brazing. I am trying not to do too much at once because my neck is still recovering from a injury.

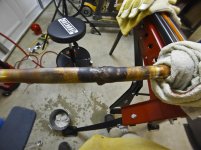
I must admit I was a little nervous the first time I fired it up and heard that loud pop. Good thing I leak tested the connections. Turned out my connection between the regulator and the tank was leaking. After a quarter turn more with my large crescent wrench all was well. The regulator only tells you the incoming pressure and it was showing at about halfway on the gauge. I am not sure where it should show on a full B tank?
 
To avoid these ads, REGISTER NOW!

LS6 Tommy

Well-known member
Joined
Dec 27, 2013
Messages
26,162
Location
Northern NJ
On a Turbotorch the gauge shows tank capacity. It should be pretty much all the way to the "full" mark on a brand new B-tank.

Tommy
 
OP
J

jonathan75

Well-known member
Joined
Mar 27, 2013
Messages
1,451
Location
NC
On a Turbotorch the gauge shows tank capacity. It should be pretty much all the way to the "full" mark on a brand new B-tank.

Tommy

How much difference does it make having the valve open a few turns or all the way? I was a little nervous to keep cranking it open. I know for safety I read to keep it open a 1/4 to 3/4 turn so you can turn it off fast during a emergency. For testing the gauge I turned it around two turns and the gauge did not raise above halfway.
 
OP
J

jonathan75

Well-known member
Joined
Mar 27, 2013
Messages
1,451
Location
NC
I just finished my first braze. It really looks like trash. I believe I got it too hot, I didn't expect it to heat so quickly. So I am not sure if I should use a smaller tip or back it off some? There was also a big clump on the bottom and not a smooth flow all the way around. It does not have that nice silver look to it also because I am using pure copper to save money while I am learning. I will upload a video so I can get some feedback on what I am doing wrong and how to correct it.

attachment.php


attachment.php
 

Attachments

  • IMG_4668-1.jpg
    IMG_4668-1.jpg
    63.7 KB · Views: 97
  • IMG_4670-1.jpg
    IMG_4670-1.jpg
    59.8 KB · Views: 94
OP
J

jonathan75

Well-known member
Joined
Mar 27, 2013
Messages
1,451
Location
NC
Here is the video. Actually it is my second braze on the same piece. My first try on this attempt the video camera was tilted down and nothing showed up on the video. This video you can see the touch up I did to fill the gap on the side. I need some tips on how to do better.


brewchief

Well-known member
Joined
Sep 20, 2008
Messages
2,370
Location
Michigan
Looks like way more heat then needed.

I start heating the joint and start bringing the rod in after just a few seconds, lets the rod preheat a bit and as soon as it will melt on contact I'll start working it around the joint.

Focus you heat on the part of the joint where it overlaps or is the heaviest, the heat there will help draw in the brazing rod.

A little heat on the rod and you can put a nice bend in it so you can reach the back and bottom easy.

I would lose the gloves or at least switch to something more like a mechanics wear type.


When you think you are doing good then try brazing a joint laying on your side under a rosebush with a fan on high blowing in your face, somebody squirting you with a hose now and then and put a nice carpet of dry oak leaves right under your work, that's real world brazing.:D
 
OP
J

jonathan75

Well-known member
Joined
Mar 27, 2013
Messages
1,451
Location
NC
Looks like way more heat then needed.

I start heating the joint and start bringing the rod in after just a few seconds, lets the rod preheat a bit and as soon as it will melt on contact I'll start working it around the joint.

Focus you heat on the part of the joint where it overlaps or is the heaviest, the heat there will help draw in the brazing rod.

A little heat on the rod and you can put a nice bend in it so you can reach the back and bottom easy.

I would lose the gloves or at least switch to something more like a mechanics wear type.


When you think you are doing good then try brazing a joint laying on your side under a rosebush with a fan on high blowing in your face, somebody squirting you with a hose now and then and put a nice carpet of dry oak leaves right under your work, that's real world brazing.:D

Thanks for the tips. I will give that a try tonight and use the smaller tip for less heat. As for the real world stuff, that will have to wait. When I was working on my condensing unit beside my house it was very tight quarters when I was charging it up. I couldn't imagine brazing there. Do you ever ask customers to trim the bushes so you can get in better? Or do you keep some gardening equipment with you?
 

brewchief

Well-known member
Joined
Sep 20, 2008
Messages
2,370
Location
Michigan
Thanks for the tips. I will give that a try tonight and use the smaller tip for less heat. As for the real world stuff, that will have to wait. When I was working on my condensing unit beside my house it was very tight quarters when I was charging it up. I couldn't imagine brazing there. Do you ever ask customers to trim the bushes so you can get in better? Or do you keep some gardening equipment with you?

I'll trim bushes back somewhat as needed, PVC cutters work almost as good as pruning shears, still have to respect the customers property however, some want stuff trimmed as little as possible.
 
OP
J

jonathan75

Well-known member
Joined
Mar 27, 2013
Messages
1,451
Location
NC
I just got back from the garage. The smaller tip made everything worse. It does not get hot enough and the brazing rod keeps sticking too it and it does not flow well. It looks like the other tip is better for 5/8 pipe. Just I am not sure why the copper keeps turning black and charred even at the lower temps. Does import soft copper that came with my mini split react different then other types of copper?

I will upload the video soon.
 

Attachments

  • GOPR0060-1.jpg
    GOPR0060-1.jpg
    93 KB · Views: 16
  • GOPR0061-1.jpg
    GOPR0061-1.jpg
    90.4 KB · Views: 15
Last edited:

brewchief

Well-known member
Joined
Sep 20, 2008
Messages
2,370
Location
Michigan
Go back to the bigger tip but spend less time preheating.

You will get some of the black no matter what, rod with silver in it will look a little different. The black oxide that flakes off is just as bad on the inside and is the reason that flowing nitrogen through the lines while brazing is done. Nitrogen won't completely eliminate it but it will greatly reduce it.
 
OP
J

jonathan75

Well-known member
Joined
Mar 27, 2013
Messages
1,451
Location
NC
Go back to the bigger tip but spend less time preheating.

You will get some of the black no matter what, rod with silver in it will look a little different. The black oxide that flakes off is just as bad on the inside and is the reason that flowing nitrogen through the lines while brazing is done. Nitrogen won't completely eliminate it but it will greatly reduce it.

Thanks for the tips again. I will buy some couplers since my swagging tool is ****. My nitrogen kit is stuck in Colorado right now.
 

zmaxmotorsports

Well-known member
Joined
Jan 11, 2013
Messages
11,948
Location
South of omaha
Looks like way more heat then needed.

I start heating the joint and start bringing the rod in after just a few seconds, lets the rod preheat a bit and as soon as it will melt on contact I'll start working it around the joint.

Focus you heat on the part of the joint where it overlaps or is the heaviest, the heat there will help draw in the brazing rod.

A little heat on the rod and you can put a nice bend in it so you can reach the back and bottom easy.

I would lose the gloves or at least switch to something more like a mechanics wear type.


When you think you are doing good then try brazing a joint laying on your side under a rosebush with a fan on high blowing in your face, somebody squirting you with a hose now and then and put a nice carpet of dry oak leaves right under your work, that's real world brazing.:D
:thumbup:
My dad the retired railroad blacksmith would always say anybody can weld something laying on the bench.
Try welding up a busted frame on a locomotive sitting there idling rattling/shaking with a load of cars attached ready to head out of town,now that's when youre a welder!:lol:
Go to your local box store and buy 20' of 1/2" m copper and 20-30 couplings.
Practice silver soldering them on,cut it off and solder on the next one.
Nothing like practice.
You also might want to pick up a roll of stay brite 8 solder to practice with,you don't always need the stick solder.;)
 
OP
J

jonathan75

Well-known member
Joined
Mar 27, 2013
Messages
1,451
Location
NC
:thumbup:
My dad the retired railroad blacksmith would always say anybody can weld something laying on the bench.
Try welding up a busted frame on a locomotive sitting there idling rattling/shaking with a load of cars attached ready to head out of town,now that's when youre a welder!:lol:
Go to your local box store and buy 20' of 1/2" m copper and 20-30 couplings.
Practice silver soldering them on,cut it off and solder on the next one.
Nothing like practice.
You also might want to pick up a roll of stay brite 8 solder to practice with,you don't always need the stick solder.;)

Good point on the big box store. I was thinking about going all the way to the HVAC supply house. I forgot that plumbing pipes are probably the same.

I don't have any sticks with silver in it. Mine is just copper and phosphorus rods. Silver is very expensive right now. I want to stick brazing and not soldering since that is the method I want to master.
 
OP
J

jonathan75

Well-known member
Joined
Mar 27, 2013
Messages
1,451
Location
NC
Here is the video link of my second braze that turned out even worse.

 
Last edited:
To avoid these ads, REGISTER NOW!

Engine

Well-known member
Joined
Jan 9, 2014
Messages
646
Location
Kentucky
In your first vid the heat looked right. The second looked too cold. I think you might need to use the first tip and preheat a little less time, then get the rod down into the flame tip sooner to heat it up earlier. I noticed that on the first braze the copper pipe was already glowing red before you put the rod into the flame. The joint was overheated by the time the rod had begun to melt. When the rod finally did melt it flowed out and puddled up on the bottom because the pipe was too hot by then.

You're doing fine for your first attempts -- you're on the right track. Don't get frustrated. Be patient and keep practicing.
 

joel63

Well-known member
Joined
Oct 9, 2012
Messages
1,907
Location
Central FL
Thanks for the tips again. I will buy some couplers since my swagging tool is ****. My nitrogen kit is stuck in Colorado right now.

Maybe I'm too old fashioned in my methods, but I don't go to any air cond/refrig job without swaging tools.

I like to make the least number of joints whenever possible.

:thumbup:
 
Last edited:
OP
J

jonathan75

Well-known member
Joined
Mar 27, 2013
Messages
1,451
Location
NC
In your first vid the heat looked right. The second looked too cold. I think you might need to use the first tip and preheat a little less time, then get the rod down into the flame tip sooner to heat it up earlier. I noticed that on the first braze the copper pipe was already glowing red before you put the rod into the flame. The joint was overheated by the time the rod had begun to melt. When the rod finally did melt it flowed out and puddled up on the bottom because the pipe was too hot by then.

You're doing fine for your first attempts -- you're on the right track. Don't get frustrated. Be patient and keep practicing.

Thanks for the advice and encouragement, I will give your recommendations a try.
 

joel63

Well-known member
Joined
Oct 9, 2012
Messages
1,907
Location
Central FL
In your first vid the heat looked right. The second looked too cold. I think you might need to use the first tip and preheat a little less time, then get the rod down into the flame tip sooner to heat it up earlier. I noticed that on the first braze the copper pipe was already glowing red before you put the rod into the flame. The joint was overheated by the time the rod had begun to melt. When the rod finally did melt it flowed out and puddled up on the bottom because the pipe was too hot by then.

You're doing fine for your first attempts -- you're on the right track. Don't get frustrated. Be patient and keep practicing.

Try doing some joints in the vertical position.
That way you will have more control over the flow of the brazing material.
This will give you a chance to see how the flow acts at the different temperates and heat conditions.

You are learning. ;)
 
OP
J

jonathan75

Well-known member
Joined
Mar 27, 2013
Messages
1,451
Location
NC
Maybe I'm too old fashioned in my methods, but I don't go to any air cone./refrig job without swaging tools.

I like to make the least number of joints whenever possible.

:thumbup:

I think swaging is good with the right tool. I just don't like my tool. It is a very long cone that gets stuck in the pipe if a slight bend and is hard to drive in.
 
OP
J

jonathan75

Well-known member
Joined
Mar 27, 2013
Messages
1,451
Location
NC
Try doing some joints in the vertical position.
That way you will have more control over the flow of the brazing material.
This will give you a chance to see how the flow acts at the different temperates and heat conditions.

You are learning. ;)

I can try that, I guess I was trying to do more real world but I will try vertical for practice also. That would be nice to see it up close, maybe I will move to the bench so I can stand up. It would be easier on my neck which is bothering me right now.
 
OP
J

jonathan75

Well-known member
Joined
Mar 27, 2013
Messages
1,451
Location
NC
Here is the video of my third braze. I did it in higher quality this time so you can see it better. You can even set it to 1080p if your internet is fast enough.


Engine

Well-known member
Joined
Jan 9, 2014
Messages
646
Location
Kentucky
Here is the video of my third braze. I did it in higher quality this time so you can see it better. You can even set it to 1080p if your internet is fast enough.


That looks a lot better than your first two attempts. You are starting to get a feel for controlling the heat on the copper tubing and the rod. Notice how the rod melted and flowed right out when the temperature was right on both. It wicked right into the joint almost instantly. That's where the bond between the fitting and the tube occurs, not at the end of the fitting. If everything is right, the melted metal should (but is not required to) flow completely through to the other end of the fitting.

According to the American Welding Society (AWS), it is suggested that the brazing filler metal penetrate the capillary space at least three times the thickness of the thinnest component being joined, which is usually the tube. This is known in the industry as the AWS 3-T Rule.

Also, concerning the fillet reinforcement at the end of the fitting:

Because of the increased strength of brazing alloys, even this rather small amount of fill penetration will result in a properly fabricated brazed joint stronger than the tube and or fitting themselves. However, unlike a solder joint, where the cap or fillet provides minimal additional strength, a brazed joint should be fabricated so that a well-developed fillet or "cap" of filler metal is provided between the tube and fitting on the face of the fitting. This fillet, or cap as it is often referred to in the trade, permits the stresses developed within the joint (by thermal expansion, pressure or other cyclic reactions such as vibration or thermal fatigue) to be distributed along the face of the fillet. In a brazed joint fabricated without the well-developed concave fillet, all stress would be concentrated at the sharp point of contact between the tube, braze alloy (filler metal), and the fitting, possibly leading to development of a stress fracture in the tube at that point. Creation of the fillet when fabricating the brazed joint greatly minimizes this possibility.

The following picture explains it better:
http://www.copper.org/applications/plumbing/techcorner/images/aws_3trule3.jpg

You are just beginning to develop your skills, but at some point you will want to read this article to get an overview of how to reach your objectives when brazing these copper connections:
http://www.copper.org/applications/plumbing/techcorner/soldering_brazing_explained.html

Keep going. You're making progress.:eek:
 

joel63

Well-known member
Joined
Oct 9, 2012
Messages
1,907
Location
Central FL
I can try that, I guess I was trying to do more real world but I will try vertical for practice also. That would be nice to see it up close, maybe I will move to the bench so I can stand up. It would be easier on my neck which is bothering me right now.

Another tip for you:

Take a piece of copper without a fitting and just play around with the heat by moving the flame around.
This way you can see how the position of the flame tip affects the temperature of the copper (joint).
Practice moving the flame in and out to see how the copper reacts the distance of the flame to the copper.
See what happens when the copper get cherry red and you back off quickly so you won't melt the copper.

All this will help give you a "feel" for how to apply the heat without having to worry about making a joint.
 
OP
J

jonathan75

Well-known member
Joined
Mar 27, 2013
Messages
1,451
Location
NC
Thank you Engine and Joel. I like that picture you linked, that really shows what my goal is. I think I need to start dissecting the joints after I get more practice.

And great tip about playing with the pipe, I will check at what point I get to the black and charred stage.

I actually did three brazes last night. I still need to convert and upload the other two videos.
 
OP
J

jonathan75

Well-known member
Joined
Mar 27, 2013
Messages
1,451
Location
NC
Here are some pictures of my three brazes yesterday night.
 

Attachments

  • IMG_4674-1.jpg
    IMG_4674-1.jpg
    65.2 KB · Views: 10
  • IMG_4678-1.jpg
    IMG_4678-1.jpg
    69.2 KB · Views: 11
  • IMG_4680-1.jpg
    IMG_4680-1.jpg
    64.4 KB · Views: 11
  • IMG_4681-1.jpg
    IMG_4681-1.jpg
    62.5 KB · Views: 11
OP
J

jonathan75

Well-known member
Joined
Mar 27, 2013
Messages
1,451
Location
NC
Here is video 4 and 5. You can also watch in HD if your internet connection can support it.

My Forth Braze

My Fifth Braze
 
OP
J

jonathan75

Well-known member
Joined
Mar 27, 2013
Messages
1,451
Location
NC
How are you doing with practicing how to apply the heat to the copper?

I didn't get around to it last night. Those videos are from the night before. Hopefully tonight I can play with it more.
 
To avoid these ads, REGISTER NOW!
Top Bottom