To avoid these ads, REGISTER NOW!

My first drill press. How did I do? (Vintage Delta)

KFBR392

Well-known member
Joined
Feb 4, 2025
Messages
142
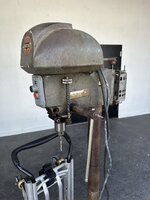
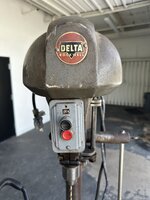
I grabbed this Delta Rockwell 14-000 press on marketplace. It kept dropping in price slowly from $300 over the past couple of weeks, calling out to me. I tried to ignore it when it hit $90. I couldn’t. I love Art Deco. It just looks too cool.

I am a complete noob to drill presses. I have zero knowledge of these, no idea what’s missing on it. No idea if it has any cool extra stuff on it. I just know it runs very smooth and quiet and it was a dangerous job trying to unload it by myself since it weighs as much as a house.

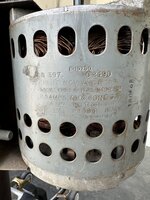
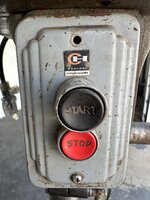
So… how did I do? Is it a turd? A good one? Anything that needs immediate attention aside from the power cord?IMG_2724.jpegIMG_2725.jpegIMG_2723.jpegIMG_2726.jpegIMG_2728.jpegIMG_2722.jpeg
 
To avoid these ads, REGISTER NOW!

Davefr

Well-known member
Joined
Jan 7, 2010
Messages
11,848
Location
OR
I love the style and I suspect those are pretty scarce. Any machine this old is due to have the bearings replaced or serviced. The grease is usually all dried up. Continuing to run it probably won't hurt anything. A drill press is usually a low duty cycle machine that runs at low speeds so bearings are almost never really worn out.

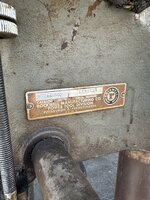
I think your machine was made in 1961.
 

Whitworth

Well-known member
Joined
Dec 26, 2011
Messages
2,100
Motor is from something like a dryer or washing machine, and has a single sheave pulley improvised setup. (Only one speed)
Otherwise a fine addition to your shop.
 

OldnSlo

Well-known member
Joined
Sep 18, 2011
Messages
219
Location
Arizona
Start expecting your drill bits to be lasting longer (vs jamming on bits with a hand drill).
 
OP
K

KFBR392

Well-known member
Joined
Feb 4, 2025
Messages
142
Motor is from something like a dryer or washing machine, and has a single sheave pulley improvised setup. (Only one speed)
Otherwise a fine addition to your shop.
Is this common with old drill presses? Is it a okay setup or a redneck hackjob that should be addressed for safety or reliability reasons?
 

wantedabiggergarage

Member Emeritus
Joined
Feb 25, 2006
Messages
3,897
Location
Independence, MO, USA.
Some of the places used to do that where they put just the one size pulley on it, because they always used the one speed and did the same material (production).
Then you have others where they even put a multiple pulley setup on the pipe, to bring the speed down for thicker metal work.

Sometimes a speed chart was underneath (or someone marked it), and that can tell you if it is alright for what your doing or if you want to go ahead and change pulleys. Me personally, I want the metal pulley setup, but have never done it, because I don't deal with thick enough metal to justify it, I am more of a woodworker with it.
 

Cruzan80

Well-known member
Joined
Jul 22, 2015
Messages
4,309
Location
Denver, CO
As has been said, it originally came with a 4-step pulley, so the belt could be adjusted for different speeds by moving it up/down (front pulley looks like /\, back pulley like \/). Finding one that fits the same shaft size on the motor will immediately add more options for you to use. If it were me, I would definitely replace the pulley on the motor (and possibly motor, if required).

In the "Nice but not required" area, an original Delta motor or a third/middle pulley would be options (the extra pulley allows for both a higher and lower overall range).

In the "I want every option" camp, they also made a foot feed lever, a table lifting mechanism, and a larger production table.

Overall, if it runs well without any noise or visible runout (the drill looks to spin essentially straight), I think you will be happy with it. Depending on wear, changing the drive belt is cheap, and easy to do (especially if it has a "set" where it doesn't flex well anymore). The table doesn't appear to have any extra holes accidentally drilled in it. The slightly crooked power box may make me wince, though.
 
OP
K

KFBR392

Well-known member
Joined
Feb 4, 2025
Messages
142
As has been said, it originally came with a 4-step pulley, so the belt could be adjusted for different speeds by moving it up/down (front pulley looks like /\, back pulley like \/). Finding one that fits the same shaft size on the motor will immediately add more options for you to use. If it were me, I would definitely replace the pulley on the motor (and possibly motor, if required).

In the "Nice but not required" area, an original Delta motor or a third/middle pulley would be options (the extra pulley allows for both a higher and lower overall range).

In the "I want every option" camp, they also made a foot feed lever, a table lifting mechanism, and a larger production table.

Overall, if it runs well without any noise or visible runout (the drill looks to spin essentially straight), I think you will be happy with it. Depending on wear, changing the drive belt is cheap, and easy to do (especially if it has a "set" where it doesn't flex well anymore). The table doesn't appear to have any extra holes accidentally drilled in it. The slightly crooked power box may make me wince, though.
This is great information. Thank you!
 

nadogail

Well-known member
Joined
Jan 23, 2009
Messages
32,049
Location
Coronado, CA
May you enjoy Good Health and this classic Drill Press for many years. Stepped Pulleys are available and easily fitted to allow multi speed opperation..
 

RoninB4

Well-known member
Joined
Jul 22, 2020
Messages
3,618
Location
Under My House
-If it's smooth and quiet when running then you did just fine. Since you're stated that you've new to drill presses I'd like mention safety as your top priority because machinery doesn't care if you get cut, hurt, or maimed.

1) Do NOT leave the key in the chuck, even for a moment. The starting of the drill press will sling the chuck key across the room, damaging anybody or anything in the way (car window?). Leaving a key in a chuck will get you fired on the spot in machine shops. That's how serious they regard the offense.

2) Wear no rings, watches, gloves, long sleeves, or long hair that can get caught in rotating machinery. If any of these get snagged it will pull you in where bones can break, flesh can be cut, and it happens too fast to react to.

3) If you're drilling metal the wad of metal that spirals up out of the hole will resemble a bird's nest. Do NOT grab those while the machine is running. They will get pulled through your grasp and lacerate you to the bone. Stop the machine and use pliers to clear the stringy chips. Using a "hook" while the machine is running is also a bad idea as it can get caught, becoming a danger to your hands as it spins.

4) A drill press like yours is a bit top heavy and prone to tipping over when you're moving it around. Be wary.


The rest of my long winded post suggestions have been posted by others already. You'll have to decide whether you intend to drill just wood or include metal. Your single speed may be ok for soft woods, you'll find out by whether it smokes the wood or not. It may be ok as is. For metal you'll want more than one speed because using too fast a speed will burn up and ruin your drill bits. I have many industrial level machines and if I'd be happy with the deal you got. Congratulations.
 
To avoid these ads, REGISTER NOW!
OP
K

KFBR392

Well-known member
Joined
Feb 4, 2025
Messages
142
That table looks clean. Are there any apprentice marks in it?
The table is perfect. I didn’t even look at it for damage when I bought it. Whoever had this machine used the hell out of it but kept the table unmarked. There’s zero sawdust anywhere, so I think it must’ve lived in a good machine shop.
 

Packard V8

Well-known member
Joined
Mar 16, 2009
Messages
7,380
Location
Spokane, WA
For $90, you did OK. The motor, pulley and belt should be replaced, but those aren't difficult to find.

jack vines
 

lilredex

Well-known member
Joined
Apr 29, 2006
Messages
5,956
Location
Toronto
That motor will be just fine, add a four step pulley and you will be all set to go. If drilling steel you might find it runs too fast and needs the middle pulley.

In the very early days import DPs came without motors because the manufacturers couldn't get CSA approval. My first DP ran a dryer motor just like yours and did fine for many years.
 
OP
K

KFBR392

Well-known member
Joined
Feb 4, 2025
Messages
142
I’ve ordered a 4 step motor pulley to fit the arbor of this motor, and also ordered a head clamp screw/handle since this press is missing one. Cannot believe how readily available used parts are for these, and how affordable they are. They must have sold millions and millions of these things over the years. I used to own a 1973 Oldsmobile Cutlass, which was the best selling and most popular car GM made all throughout the Colonnade era, and there are like, next to zero parts for those by comparison.
 

Davefr

Well-known member
Joined
Jan 7, 2010
Messages
11,848
Location
OR
There were a gazillion cool old DP's but once you venture out beyond CM, Delta and WT, availability of parts and the associated pricing becomes an issue.
 
OP
K

KFBR392

Well-known member
Joined
Feb 4, 2025
Messages
142
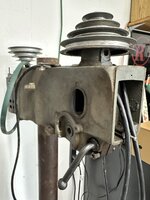
Thought I'd bump the thread with some progress pics. This is not going to be a cosmetic restoration--that is going to be way too time consuming given how filthy this machine is. For now, it's a teardown, thorough internal cleaning, brand new wiring, and put back into use.

The old grease in this machine had long since separated out, with all the oil being long gone and the thickeners/additives being left stuck inside of the machine. It was a thick, tacky waxlike coating over every single moving part. The whole inner workings were completely gummed up. I had to really pull hard on the quill just to get it out after removing the raise/lower gear. It was essentially glued in place.
IMG_3465.JPG

Weirdly enough, the original 37 inch belt size doesn't want to fit on here. I had to get a 40 inch belt. I liked the look of this green Gates automotive belt, so I paid a couple bucks more for it instead of the standard black.
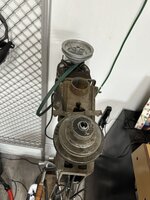
IMG_3466.JPG

I found a couple of ancient mud dauber nests inside here that the Shop Vac sucked out. It tells me that despite there being no rust or water damage, this machine must've sat outside for a long time. Ironically, I think the original grease/lack of cleaning saved this machine from the elements. You'd never know it was sitting out by looking at it, there's no rust anywhere and all the friction surfaces are in great condition.

IMG_3467.JPG

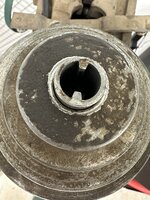
The front pulley for the quill was completely seized up inside the drill press from all the old grease wax. I had no choice but to hammer it out with a dead blow. It took a few whacks, but it came out. The original bearing is in perfect condition and feels great, so I removed it and sent the other parts through the ultrasonic cleaner. I don't have after pictures yet, but here's what it looked like in situ.
IMG_3468.JPG

All the grease caked up inside the spring cutout was Brakleened out after this pic was taken.

IMG_3469.JPG

After getting everything stripped out of the machine, I let it all soak in Simple Green for a few days before running it through the ultrasonic cleaner. It all came out really nice. I had to remove the tension spring from the housing--it was so gummed up between the layers of the wound spring that it would've never been able to get properly cleaned. It was a bit of a chore getting it wound back into the housing, but if you just put the outer hook into the little cutout in the housing and keep tension on the spring as you go around the rim of the housing slipping the spring in, it'll go in fine. Wear eye protection, a face shield, and heavy clothing for this job. You can easily lose an eye or get a nasty laceration if you lose the spring and it busts out on you.

IMG_3470.JPG

I opted to leave all the original bearings in. The quill bearings I actually tried to get out, but all I was doing was chewing up the retention hardware and decided to quit before I went too far and messed them up. This meant that the quill couldn't be soaked and had to be cleaned by hand. It was absolutely caked in grease wax. It took half a can of Brakleen, a heavy bristle brush, and a pick to scrape everything out of all the grooves and get the surface cleaned up. No wonder it was completely seized up.

IMG_3472.JPG

Perhaps the crown jewel is this beautiful old GE motor I grabbed at an estate sale this past weekend for $13. It runs buttery smooth and dead quiet, and the centrifugal switches are nice and snappy inside. It weighs about as much as Honda Civic and probably has enough mass to have its own gravitational orbit. I see no reason to tear it down or do anything to it other than clean up the contact surfaces for the wiring and maybe give it a quick wipe down. I did flip open each of the oil ports and add a nice helping of fresh 3-in-1 (the 20 weight stuff made for electric motors that comes in the blue label bottle).

IMG_3526.JPGIMG_3527.JPG

The only issue is that the new motor has a 5/8" arbor, whereas the motor it came with has a 1/2" arbor, so the original Delta pulley I bought for the other motor no longer fits. I'll hold onto it in case I came across a speed reduction mechanism that can use it, or I might just sell it to recoup some costs. For now, a new 5/8" 4-step pulley is on order.

IMG_3528.JPG


I'll update this thread with more pictures once I get everything back together.
 
OP
K

KFBR392

Well-known member
Joined
Feb 4, 2025
Messages
142
Getting there. Switch wired in, continuity tested for good ground from motor chassis to drill and to switch. Verified no shorts from hot and neutral wires to each other or to ground. I cleaned up the front spindle shell/cover just to see what it would look like. Turns out it had about a millimeter thick layer of nicotine residue on it, as does every other external surface. Fun.


IMG_3667.jpegIMG_3668.jpeg
 
OP
K

KFBR392

Well-known member
Joined
Feb 4, 2025
Messages
142
Picked up some 7/16" steel bar stock at Ace Hardware, and used it as an excuse to try cutting threads with a die for the first time. The results were workable but pretty sloppy, but it was all in the name of threading some 3D printed ball knobs onto the ends and using it as a longer handle for the drill press to cap off this quick and dirty teardown/restoration. The original handle is only 11 inches long from end to end. It works perfectly fine, I just wanted a longer handle since it just felt too short and small for such a large machine. The knobs were just CAD files downloaded from McMaster Carr, split in half for easier printing, then sandwiched back together with clear acrylic weld adhesive. They look good from 6 feet away.
IMG_3891.JPGIMG_3893.JPGIMG_3894.JPG

I'm calling it done. The drill press works nicely now and is a lot of fun to use. Externally it's still dirty, but all the surfaces that are regularly touched either by me or the workpiece are all nice and clean. One of these days, it'll come apart again for a proper shiny deep clean, but I don't want to repaint it because it has a perfect rat rod patina and I like how it looks.

I've learned a lot about these deceptively simple machines after having gone through one, and I now understand why they are so collectible and why so many of you guys on here are always buying and restoring them--they're such a joy to work on, use, and look at.
 

Skyman

Well-known member
Joined
Nov 9, 2021
Messages
1,225
Location
Central Maryland
Congrats for completion of the successful rehabilitation project. I've been doing a similar non-cosmetic rehab on a smaller Delta Rockwell unit. It's nearing completion.
 

Nick Rivers

Well-known member
Joined
Mar 19, 2024
Messages
261
Location
USA
A few things you may want to do:

1. Go with a keyless chuck. These can be found on the web for <40 bucks. You don't need an Albrecht or expensive one. If you want to keep the keyed chuck, get a strong magnet to hold the key.
2. Get some table clamps and a drill press vise
3. A momentary footswitch is great hands free feature besides the safety aspect. It will help preserve that Cutler- Hammer switch.
4. Add a LED task light
5. Clamp a table or simple piece of plywood, or even a sheet of 1/4" plate (aluminum or steel) over the metal table. This will preserve the factory table and you can make the worksurface larger or even add a rear fence. I put an old pie pan under stock to be drilled to catch the debris. The pie pan has a circular scrap of wood inside for a sacrificial drill surface.
6. For drilling metals, set the speed low and pick up some 135 degree cobalt drill bits cheap from HF.

Fun add on stuff:

An X-Y table for precise drilling
Laser cross hair attachment
VFD for variable speeds
Old lathe chuck for holding round stock on the table centered below the drill chuck
Assortment of Drum Sanders
DIY Shop Vac hose holder clamped to the table to **** up chips
Your drill chuck will hold any 1/4" die grinder accessories


Not sure if your table has a clamping collar under it to prevent it from dropping to the floor. I'd get two. One for under the head if your going to raise or lower it, the other for under the table.
 
OP
K

KFBR392

Well-known member
Joined
Feb 4, 2025
Messages
142
A few things you may want to do:

1. Go with a keyless chuck. These can be found on the web for <40 bucks. You don't need an Albrecht or expensive one. If you want to keep the keyed chuck, get a strong magnet to hold the key.
2. Get some table clamps and a drill press vise
3. A momentary footswitch is great hands free feature besides the safety aspect. It will help preserve that Cutler- Hammer switch.
4. Add a LED task light
5. Clamp a table or simple piece of plywood, or even a sheet of 1/4" plate (aluminum or steel) over the metal table. This will preserve the factory table and you can make the worksurface larger or even add a rear fence. I put an old pie pan under stock to be drilled to catch the debris. The pie pan has a circular scrap of wood inside for a sacrificial drill surface.
6. For drilling metals, set the speed low and pick up some 135 degree cobalt drill bits cheap from HF.

Fun add on stuff:

An X-Y table for precise drilling
Laser cross hair attachment
VFD for variable speeds
Old lathe chuck for holding round stock on the table centered below the drill chuck
Assortment of Drum Sanders
DIY Shop Vac hose holder clamped to the table to **** up chips
Your drill chuck will hold any 1/4" die grinder accessories


Not sure if your table has a clamping collar under it to prevent it from dropping to the floor. I'd get two. One for under the head if your going to raise or lower it, the other for under the table.
Awesome tips. Thank you
 
To avoid these ads, REGISTER NOW!
Top Bottom