To avoid these ads, REGISTER NOW!

My First garage (re)build

Iamkar33m

Well-known member
Joined
Jun 7, 2014
Messages
54
Location
Placentia, CA
Hello all,

I figured I'd start a thread documenting the (re)build of the garage attached to my first home. Some of you may have seen these pictures before in other threads, but I'm trying to get them all into 1 thread.

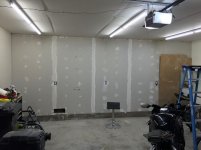
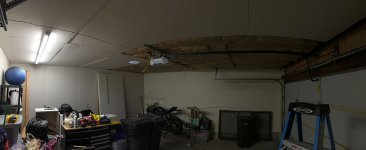
Here is what I am trying to accomplish:

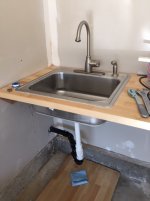
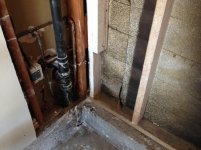
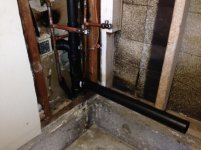
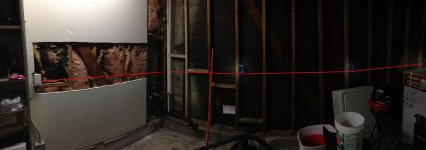
1) Plumbing for sink in the inside-left corner (sink will mount in workbench).
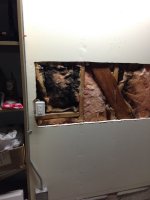
2) Electrical for the back (bare) wall.
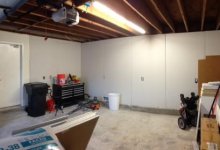
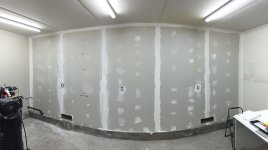
3) Insulate the back wall & ceiling, then hang drywall.
4) Paint the walls.
5) Build workbench & hang cabinets along the back wall.
6) Build shelving/storage along left and right walls.
7) Finish the floor (Epoxy or RaceDeck, still evaluating my options).

I've already completed item #1 and am working on item #2.

- Kareem
 

Attachments

  • IMG_1535.jpg
    IMG_1535.jpg
    144 KB · Views: 105
  • IMG_1635.jpg
    IMG_1635.jpg
    73 KB · Views: 89
  • IMG_1643.jpg
    IMG_1643.jpg
    63.6 KB · Views: 88
  • IMG_1648.jpg
    IMG_1648.jpg
    131.6 KB · Views: 93
  • IMG_1649.jpg
    IMG_1649.jpg
    139.2 KB · Views: 78
  • IMG_1650.jpg
    IMG_1650.jpg
    60.5 KB · Views: 101
To avoid these ads, REGISTER NOW!
OP
I

Iamkar33m

Well-known member
Joined
Jun 7, 2014
Messages
54
Location
Placentia, CA
Does anyone know what it means when pink insulation turns black, like in picture #4 I posted? Could it be mold?

- Kareem
 
OP
I

Iamkar33m

Well-known member
Joined
Jun 7, 2014
Messages
54
Location
Placentia, CA
Sorry for the late update, but I've got quite a bit work done.

I've torn out the moldy insulation and took out an 8ft x 8ft section of the wall to check for more mold. I figured better safe than sorry. Bleached the area, completed the electrical in the wall, insulated and hung 5/8" fire code drywall. Still have to clean up the wiring in the ceiling before I insulate and drywall that. I've gotta rent a drywall jack too because it was painful enough doing the walls with my hands. :lol_hitti

Any advice on dealing with the garage door opener and track brackets? Take them down completely or just unbolt one at a time while sliding the new drywall in?
 

Attachments

  • image_4.jpg
    image_4.jpg
    17.1 KB · Views: 43
  • image_3.jpg
    image_3.jpg
    25.3 KB · Views: 45
  • image_2.jpg
    image_2.jpg
    13.5 KB · Views: 49
  • image_1.jpg
    image_1.jpg
    18.5 KB · Views: 46
  • image.jpg
    image.jpg
    14.8 KB · Views: 45
To avoid these ads, REGISTER NOW!

1/2 Cup

Member Emeritus
Joined
Apr 28, 2012
Messages
19,283
Location
Shepparton. Victoria. Australia
IMHO it would be a pain in the **** if you left them there whilst you were trying to fit the dry wall, that said depending where your sheets end up in relation to the brackets it would not be impossible to work around them. Do you have anyone to lend a hand?

Regards.
 
OP
I

Iamkar33m

Well-known member
Joined
Jun 7, 2014
Messages
54
Location
Placentia, CA
IMHO it would be a pain in the **** if you left them there whilst you were trying to fit the dry wall, that said depending where your sheets end up in relation to the brackets it would not be impossible to work around them. Do you have anyone to lend a hand?

Regards.

I was going to attempt to use a drywall jack to help me get the peices in place and simply unbolt 1 bracket at a time while sliding the drywall between it and the joists. While it sounds good in theory, I would imagine it wouldn't work out that well in practice.

How difficult is it to re-install a garage door if everything is taken down during the drywalling?
 
OP
I

Iamkar33m

Well-known member
Joined
Jun 7, 2014
Messages
54
Location
Placentia, CA
So it's been a while since I've posted an update. I've managed to complete all the insulation of the walls and ceiling, and hang all the drywall. Now I'm working on the part I've dreaded most, the mudding. I absolutely hate this process and would not wish it upon my most mortal enemy. :lol_hitti

Any advice on mudding the ceiling? Should I expect to be on the receiving end of many lovely mud facials? :willy_nil

Oh, and you'll notice too, I've installed four quad-bulb T5HO light fixtures to help make my garage brighter than the sun. ;-)
 

Attachments

  • IMG_0236.JPG
    IMG_0236.JPG
    114.7 KB · Views: 25
  • IMG_0235.jpg
    IMG_0235.jpg
    93.6 KB · Views: 23
  • IMG_0234.jpg
    IMG_0234.jpg
    97.8 KB · Views: 27
  • IMG_0232.JPG
    IMG_0232.JPG
    63.4 KB · Views: 22
  • IMG_0230.JPG
    IMG_0230.JPG
    96.2 KB · Views: 22

mountainman72

Well-known member
Joined
Nov 12, 2011
Messages
117
Location
Upstate, New York
Nice and bright!

Re: mud...based on the pictures I'd say run a full stripe down to cover screws rather than one screw at a time. It will be faster and smoother in the end. Put less mud on the seam in terms of thickness, but build it wider. On your third coat, get it out to 12-18" wide and you won't see the seams. I've mudded a bunch of repairs, and a few small rehabs, but I'm no pro. To see pros mud is just amazing - fast, no mistakes. It's like watching art being made. Don't get discouraged - you can always sand it down and try again. :)

Brett
 
OP
I

Iamkar33m

Well-known member
Joined
Jun 7, 2014
Messages
54
Location
Placentia, CA
Nice and bright!

Re: mud...based on the pictures I'd say run a full stripe down to cover screws rather than one screw at a time. It will be faster and smoother in the end. Put less mud on the seam in terms of thickness, but build it wider. On your third coat, get it out to 12-18" wide and you won't see the seams. I've mudded a bunch of repairs, and a few small rehabs, but I'm no pro. To see pros mud is just amazing - fast, no mistakes. It's like watching art being made. Don't get discouraged - you can always sand it down and try again. :)

Brett

Brett,

Thanks for the advice, I'll keep that in mind. I've only done the first pass on the screws/seams. I will be doing 2 more passes with the 8" and 12" blades respectively. I'm trying to get the back wall done so I can build my bench/cabinets and get all that **** off the floor and into their final resting places.

- K
 
OP
I

Iamkar33m

Well-known member
Joined
Jun 7, 2014
Messages
54
Location
Placentia, CA
Been another while since I've posted. My wife has been getting antsy about starting the kitchen/bathroom projects, so I decided to make the garage functional for now. I will go back and make it nice looking once the house is all done inside. Here are some pictures for your enjoyment... :pimpflash

I'm currently coating the workbench with polyurethane to protect the finish a bit better. Once that's done I'll be putting my stuff away and starting on the kitchen remodel. :eyecrazy:
 

Attachments

  • 1.jpg
    1.jpg
    57.6 KB · Views: 11
  • 2.jpg
    2.jpg
    57.1 KB · Views: 13
  • 3.jpg
    3.jpg
    62.4 KB · Views: 15
  • 4.jpg
    4.jpg
    68.8 KB · Views: 17
To avoid these ads, REGISTER NOW!
Top Bottom