To avoid these ads, REGISTER NOW!

My first MIG beads

iScream

Well-known member
Joined
Apr 8, 2014
Messages
777
Location
Middle TN
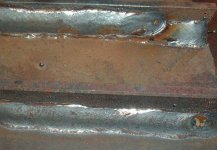
Started practicing with my MIG welder tonight so I can hopefully weld up some frame notches on my project truck soon. Just a couple pieces I cut out of my cross member so about 1/8" thick.

I know I should have cleaned the metal a little better and there was a breeze coming through the garage door so I think my shielding gas was blowing out just a little. Still messing with the darkness setting on my helmet to get the best view of the puddle.

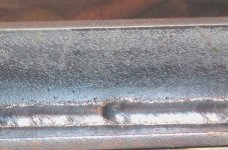
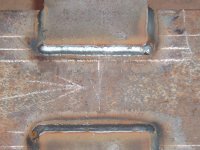
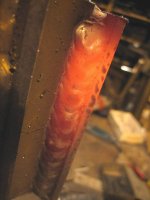
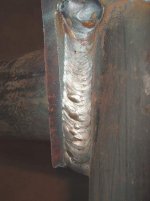
Can you guys tell anything by looking at them though? I'll try to cut across them tomorrow evening to see what it looks like underneath. The first ones are on the bottom then later as you go up.


23978626237_1690a02cf6_b.jpg
 
Last edited:
To avoid these ads, REGISTER NOW!

Kaizen

Well-known member
Joined
Jan 9, 2015
Messages
6,948
Location
New England
Hard to tell from the pic. Looks like you were either moving to slow or had too much wire feed. They look fat.


Sent from my iPhone using Tapatalk
 
OP
I

iScream

Well-known member
Joined
Apr 8, 2014
Messages
777
Location
Middle TN
Thanks. I was definitely moving too slow on the first few. I know it's hard to tell from the pics but the last couple beads aren't as tall.
 

bradleykd

Well-known member
Joined
Apr 6, 2010
Messages
547
Location
Georgetown, KY
You're getting better already.

I'd definitely turn up the voltage or slow down the wire feed. I'd lean more towards more voltage since you aren't going to blow through that metal.

You are going to want to practice with cut pieces so you can get good at holding your line and you'll also want to practice vertical welds before the real project starts because you won't have the luxury of laying it on a bench.

When you weld the bottom of the notch (overhead) I like to form a puddle, let off the trigger, move to the edge of the weld and do it again. It lets you weld for a couple of seconds, gather yourself, then weld for a couple of more. It'll keep your line straighter under there.
 

Kaizen

Well-known member
Joined
Jan 9, 2015
Messages
6,948
Location
New England
I will add that you should keep scraps around to get your setting right on in the future. Welding flat like that is tough. Remember what the welder giveth the grinder taketh away. Keep up the practicing. I love Welding. Painting with molten steel. If you are a diy type it opens up so many possibilities


Sent from my iPhone using Tapatalk
 

Bretny

Well-known member
Joined
Jul 31, 2017
Messages
3,918
Location
Dutchess county NY
Not to bad at all. Alot of welding after the correct settings is being comfortable. Sit down, rest at least one of your arms on something and relax.
 

joseph.a.owens.9

Well-known member
Joined
Oct 22, 2014
Messages
279
Not to bad at all. Alot of welding after the correct settings is being comfortable. Sit down, rest at least one of your arms on something and relax.
+1 on alot of it is needing being comfortable. If your not at least half *** comfortable and you really have to try and strain to hold your position to weld it wont be a good weld. Another thing like stated above welding with a mig it's ok to stop and go as long you long enough to puddle the steel.

Sent from my XT1031 using Tapatalk
 
OP
I

iScream

Well-known member
Joined
Apr 8, 2014
Messages
777
Location
Middle TN
Thanks to everyone for the feedback. In a previous life I did some MIG on sheet metal in my old man's body shop. But that was 25 years ago and I really didn't know what I was doing. So I'm pretty much starting from scratch. I'm taking the Youtube video self training approach.

Getting in a comfortable position where I can steady my hands is something I'm really trying to do. Makes it much easier to do the cursive E thing. And having an auto darkening helmet is amazing compared to what little I remember.

I think the only real benefit I'm getting from the old experience is not being nervous or feeling overwhelmed by the whole thing. Makes it easier to focus on trying to apply an actual technique.

I've got a chunk of frame I cut out to clear my AC compressor so I'm going to cut that up and practice different joints and orientations. I'll mess around some with slower wire speed and or more juice, as you guys suggest. I definitely felt rushed putting those beads down, like I was having to move too fast to keep up with the welder.
 

sberry

Banned
Joined
Jun 18, 2005
Messages
35,747
Location
Brethren, Michigan
The E works but I rarely use it. I turn the machine up hot enough, wire speed equals heat, that I can keep the arc in the root of the joint, especially on heavier material and let the machine do the work.
 

bradleykd

Well-known member
Joined
Apr 6, 2010
Messages
547
Location
Georgetown, KY
The E works but I rarely use it. I turn the machine up hot enough, wire speed equals heat, that I can keep the arc in the root of the joint, especially on heavier material and let the machine do the work.

Yup. A lot of people always talk about little shapes or letters, but in reality, that just makes it look different. You can get just as good of a weld by pushing a straight line.
 

sberry

Banned
Joined
Jun 18, 2005
Messages
35,747
Location
Brethren, Michigan
I wiggle more than a real e. Wiggle with a pause on the sides sometimes. You can see where there was a stop in the center of the middle pic, changed a volt to try to reduce spatter.
 

Attachments

  • Hob set test.JPG
    Hob set test.JPG
    79.7 KB · Views: 139
  • Hobart single pass.JPG
    Hobart single pass.JPG
    61.9 KB · Views: 140
  • hobart wire.JPG
    hobart wire.JPG
    52.6 KB · Views: 145

MarkG

Well-known member
Joined
May 23, 2012
Messages
1,219
Location
Elgin, IL
Practice LONGER beads! A lot of guys do these short little worms because they are so anxious to see what they are doing! A quick little weld, flip up the helmet :S In real life, you need to do a continuous bead for both structural and cosmetic reasons and making 1" worms won't tell you anything about your consistency because you aren't welding long enough to establish any!

I welded at both Elgin Sweeper (street sweepers) and Knaack and they expect welds to be continuous. It's more sound, more visually appealing, and more efficient. Just try to get used to welding long beads without stopping to continually 'inspect' your work! You should be able to tell how the weld is going while you are welding.

Keep up the practice! Just do LOOOOONG beads without stopping and follow either a joint or a soapstone line or something too-----not just a random, free-form worm in the middle of a plate. If you do these things, you will dramatically improve!
 
Last edited:
To avoid these ads, REGISTER NOW!

sberry

Banned
Joined
Jun 18, 2005
Messages
35,747
Location
Brethren, Michigan
Yup. A lot of people always talk about little shapes or letters, but in reality, that just makes it look different. You can get just as good of a weld by pushing a straight line.

Yes, you can push solid wire as well as pull. Sometimes it keeps the arc in the root better. On thin sheet this isn't such a problem but heavier it is. These little welders are often used wide open too. They are small enough its a deal to get every drop wringed out. One can use the settings for thicker on thinner if travel speed is taken in to consideration. In the real world I often sacrifice a little appearance for ease of use and fusion, I am so hot its all I can do to avoid burning thru.
These are not picture perfect but no doubt its well melted in and a little hot for real great control. In back of the second pic can see a first pass blazed in and the second being well melted over the first. A good way to do thick pieces with a small machine.
Last pic has the machine dialed in a bit better for appearance, it wasn't critical but on lifting equipment where we don't want doubt at first glance about the welding, it was getting painted.
 

Attachments

  • hot vert.JPG
    hot vert.JPG
    32.7 KB · Views: 78
  • Hot vert 2.JPG
    Hot vert 2.JPG
    35.4 KB · Views: 80
  • hob hot.JPG
    hob hot.JPG
    39.5 KB · Views: 72
  • hobart wire 3.JPG
    hobart wire 3.JPG
    47 KB · Views: 71
Last edited:
OP
I

iScream

Well-known member
Joined
Apr 8, 2014
Messages
777
Location
Middle TN
There are definitely a lot of different opinions on how to move the wire but most do seem to suggest some side to side movement is needed. Except maybe getting deep in the corner of a fillet type weld. I kind of like the cursive e because it gives me something well defined to focus on right now. But I still need to practice and get a better feel for how much to push ahead of the puddle and how much to loop back over it with each circle.

While I'm obviously not speaking from experience it does seem to me that common sense is important. There's a thing called gravity and it's going to affect the puddle whenever there's non horizontal surface involved.

I'm planning to pretty much stick with 1/8" material for my practicing the next 2 or 3 weeks. That's what I'll be welding on my frame so hopefully I can get really get my machine dialed in for it and get the different joints down well enough to tackle my notches. Then I will need lots more practice on different metal/wire gauges and on finding the right welder settings. Although the chart stuck inside my welder seems to be pretty close.

Do you guys have any suggestions for checking my progress on my own? I'm not sure how to say when I'm actually getting decent enough results to tackle my truck frame. Would the best thing be to cross cut some of my practice welds after actually joining two pieces together, sand it and them hit it with petroleum jelly like I've seen on some videos? Then just lock one side in a vise and knock the **** out of the other with a BFH?
 
OP
I

iScream

Well-known member
Joined
Apr 8, 2014
Messages
777
Location
Middle TN
I just ordered 10 of these metal kits after seeing them on Youtube. Still planning to hit a local scrap yard before long but I like the idea of having some, hopefully, clean and well cut metal delivered to my door.
 

Kaizen

Well-known member
Joined
Jan 9, 2015
Messages
6,948
Location
New England
Funny all of these long bead comments. I learned to do bodywork and the first 60 hours of work was only single tack welds. So really depends on the need.


Sent from my iPhone using Tapatalk
 

Lelandwelds

Well-known member
Joined
Sep 6, 2017
Messages
2,443
Location
Central Texas
My big problem is vision. Four years ago I had to start using cheater lenses. I have not adjusted well.

I usually run straight stringer beads and push the wire (.035 S6) and use 75/25 mix. I dont really care for pulsed mig much. When I worked at a welding supply, I used to ask the pumper to put about 3% helium in my argon/co2.

For heavy stuff, I would use an old CP 300 with .045 S6 and 98 argon/ 2% oxygen. Cheap to run and great penetration.

Kobelco flux cored is my favorite dual shield. Esab 7100 ultra is pretty good. Hobart has some nice flux cored.
 
OP
I

iScream

Well-known member
Joined
Apr 8, 2014
Messages
777
Location
Middle TN
Did some more practicing this afternoon. Took a piece of frame and sliced it up then **** welded it back together. Probably wasn't the greatest piece to work with since it had a bunch of compound curves. While I was casually beveling the edges with my bench grinder I was wondering if the fact that I wasn't putting on a consistent angle would cause a problem. And it did in some places where I got it too thin.

After the first couple beads I started trying harder to make a full pass without stopping and restarting. When I get the practice metal I ordered I'm going to do some more **** welds on flat stock with better bevels before I move on to other joint types.


I numbered the beads in the picture from the first one I did to the last. Second picture is the back side. It isn't very pretty but it does seem nice and strong.


24105434007_82bd93ec04_b.jpg


25099079758_94b726da59_b.jpg
 

sberry

Banned
Joined
Jun 18, 2005
Messages
35,747
Location
Brethren, Michigan
A big plus here is yours are well melted. A lot of people are scared to burn a hole. Once you get some practice you can do this without bevels.
The first pic is the front. The second is the backside. I stopped and left a little spot so you could see the joint design and I was going to break test it and needed to have a spot where a break would start. This is 3/16, maybe 1/4, I don't recall.
 

Attachments

  • wire feed ****.JPG
    wire feed ****.JPG
    97.4 KB · Views: 56
  • wire feed **** back.JPG
    wire feed **** back.JPG
    101.2 KB · Views: 54
Last edited:
OP
I

iScream

Well-known member
Joined
Apr 8, 2014
Messages
777
Location
Middle TN
A big plus here is yours are well melted. A lot of people are scared to burn a hole. Once you get some practice you can do this without bevels.
The first pic is the front. The second is the backside. I stopped and left a little spot so you could see the joint design and I was going to break test it and needed to have a spot where a break would start. This is 3/16, maybe 1/4, I don't recall.

Are those pieces just just butted against each other with no bevel and no gap?

You only welded one side, right?
 

sberry

Banned
Joined
Jun 18, 2005
Messages
35,747
Location
Brethren, Michigan
They were not butted, there was a gap. You can see on the back. I left a little spot. Yes, welded from one side. I had some more somewhere where the back was more flush. This was a demo piece to explain technique more than perfection.
 
OP
I

iScream

Well-known member
Joined
Apr 8, 2014
Messages
777
Location
Middle TN
Grabbed some 1/8" bar from Lowes last night and did some more tonight. Cut it into 4" sections and fillet welded them together then **** welded those together. I bought a cheap Eastwood welding table and I'm having trouble getting into good position on it. Don't have anything the right height to sit on and standing doesn't work very well when I'm trying to get into the side of a joint.

For some reason tack welds are kinda hard for me. I either don't get a connection between pieces or I lay in a bigger glob than I want.


First Fillets
25126489498_468a847ab0_b.jpg


**** Weld
25126490198_4c404fdc00_b.jpg


One more fillet. It doesn't actually grow from one end to the other like it appears in the picture. I put a lot more metal into the last section when I went back and did it.
24133414027_b1ed6e62b6_b.jpg
 
OP
I

iScream

Well-known member
Joined
Apr 8, 2014
Messages
777
Location
Middle TN
They were not butted, there was a gap. You can see on the back. I left a little spot. Yes, welded from one side. I had some more somewhere where the back was more flush. This was a demo piece to explain technique more than perfection.

That's a MIG bead?
 
OP
I

iScream

Well-known member
Joined
Apr 8, 2014
Messages
777
Location
Middle TN
So I'm feeling pretty confident about going at the frame notches on my truck now. I know you can only tell so much from pictures but are you guys seeing any obvious problems with my welds that should stop me?

It seems like I'm getting very strong joints, even if they aren't the most visually appealing.
 

Furious Filipino

Well-known member
Joined
May 25, 2016
Messages
85
Location
San Francisco East Bay
What orientation will you be welding on your truck? Reason I ask is that I could be running 220 at 22 volts on a flat mild steel weld on a bench, but on the same material running vertical, I would run 170 at 21 volts. I would practice a few runs in the same orientation you will be welding just to make sure my settings work.
 
OP
I

iScream

Well-known member
Joined
Apr 8, 2014
Messages
777
Location
Middle TN
What orientation will you be welding on your truck? Reason I ask is that I could be running 220 at 22 volts on a flat mild steel weld on a bench, but on the same material running vertical, I would run 170 at 21 volts. I would practice a few runs in the same orientation you will be welding just to make sure my settings work.

Thanks. I will definitely be practicing some vertical welds before I touch my truck.

The main thing I need to do is fill in the cut out section below for clearing my AC compressor. So several different orientations will be needed. Most of the original frame is still there though.

38789412982_7a9688f671_b.jpg
 
To avoid these ads, REGISTER NOW!
Top Bottom