To avoid these ads, REGISTER NOW!

My First Mini-Split Install - Daikin KE 9000-BTU

Trey T

Well-known member
Joined
Aug 3, 2011
Messages
3,749
Location
Houston, TX
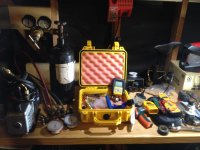
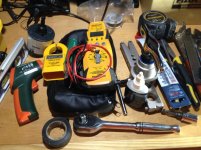
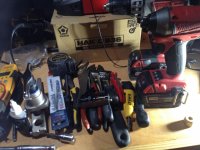
I bought and installed a mini-split for a family member on Saturday. I'm not a licensed contractor but I do service my own HVAC and this was my first mini-split install. Below are some detail of the unit and photos of install and tools I used.
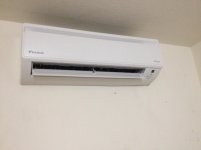
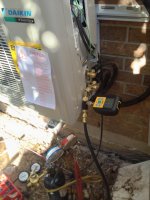
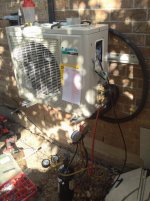
Brand - Daikin
Model - KE Series
SEER rating - 18
Heat/Cooling Capacity - ~9000BTU
Wall Bracket - 100lbs capacity
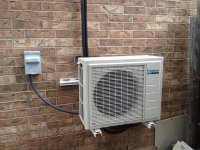
Line Set length - 30ft (shorted to 25ft, by design)
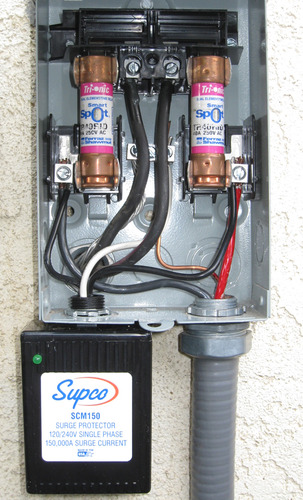
Wire - 14guage
Cost - $1200 TOTAL

Total labor hours - 5hrs

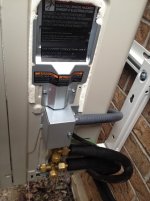
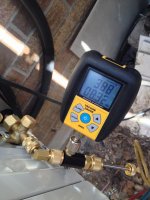
It was fairly straight forward. I hung the indoor unit w/ the 3.5" hole to exterior (sloped down a bit). Measured and cut the copper line-set to 25ft and fastened the flare nuts to the indoor unit. Hung the bracket and set the outdoor unit. coil up the excess line-set and connected the flared nut. Pressure test to 150psi for 15min and hold. vacuum the line w/ "core removal tool" and see if the vacuum hold (2.5CFM pump vacuum down to about 1000micron-Hg less than a minute and purge it w/ nitrogen; pump again to 250micron-Hg in about 30min; closed the valve and held at 388 for over 5min).

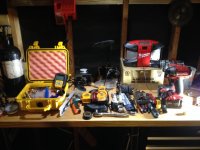
I know I didn't go into detail but I don't like making this post any longer than it is. If you have questions, please ask and I'll answer but it's all covered on youtube. Tough work (sored body) but it's fairly easy to DIY. With the right tools, I highly recommend you install it yourself to save money.

If you wanted to improve this install, shorten the line-set and take out the appropriate R410a amount (0.22oz/ft for this unit) via recovery and digital scale. I didn't have the proper tool for this so I rolled up about 8ft of the line-set.
 

Attachments

  • IMG_2224.jpg
    IMG_2224.jpg
    177.2 KB · Views: 240
  • IMG_2226.jpg
    IMG_2226.jpg
    149.2 KB · Views: 261
  • IMG_2225.jpg
    IMG_2225.jpg
    138.7 KB · Views: 252
  • IMG_2221.jpg
    IMG_2221.jpg
    133.4 KB · Views: 249
  • IMG_2219.jpg
    IMG_2219.jpg
    134.6 KB · Views: 253
  • IMG_2216.jpg
    IMG_2216.jpg
    140.5 KB · Views: 264
  • IMG_2215.jpg
    IMG_2215.jpg
    144.6 KB · Views: 271
Last edited:
To avoid these ads, REGISTER NOW!
OP
T

Trey T

Well-known member
Joined
Aug 3, 2011
Messages
3,749
Location
Houston, TX
Tools I used. The tools are relatively inexpensive and I have own most of the tools over the years.
 

Attachments

  • IMG_2232.jpg
    IMG_2232.jpg
    130.7 KB · Views: 199
  • IMG_2233.jpg
    IMG_2233.jpg
    133.6 KB · Views: 169
  • IMG_2234.jpg
    IMG_2234.jpg
    141.9 KB · Views: 166
  • IMG_2235.jpg
    IMG_2235.jpg
    144.9 KB · Views: 147
  • IMG_2236.jpg
    IMG_2236.jpg
    134.4 KB · Views: 140

CWO4GUNNER

Well-known member
Joined
Aug 17, 2014
Messages
229
Location
BHC AZ
Nothing worse then a DIY homeowner hacking a traditional trade effectively and achieving major cost avoidance....how dare you LOL :D. All kidding aside, I'm proud of you! Congratulations on a job well done.
 
OP
T

Trey T

Well-known member
Joined
Aug 3, 2011
Messages
3,749
Location
Houston, TX
Lol... that's a good way of putting it. I always encourage DIY but in a responsible manner. I think many people on this board have the skill-set to install on of these. The idea of sweating/brazing copper can be very daunting to many people and these flaring connection makes it a breeze.

As always, having the right tools make the job less daunting or nervous; and bench-test all of your tools prior installation was a key to this success.
 
Last edited:

Gerald O

Well-known member
Joined
Mar 5, 2013
Messages
1,884
Location
NC
That looks really close to the wall. Were you able to get the manufacturer's recommended spacing using that wall mount?
 
OP
T

Trey T

Well-known member
Joined
Aug 3, 2011
Messages
3,749
Location
Houston, TX
Leak test and vacuum procedure:

1. Pressurize the system to about 150psi w/ nitrogen. If it holds for at least 30min (just my guess), start vacuum out the moisture.
2. Vacuum w/ core removal tool and guage to about 1000micron-Hg
3. Pressurize the system again to about 150psi w/ nitrogen for moisture absorbing.
4. Vacuum the second time to about 500micron-Hg or lower.
5. Close the valve on the core removal tool and watch the guage. The guage will rise and fall. Once it's stable, look at the changes and if more than 100micron-Hg/min, you may have too much moisture. Another word, HVAC guys will tell you to vacuum down to 500micron-Hg and if it rises to 1000micron-Hg in less than 5min, you may have too much moisture in the system (or even leak).
6. KEEP THE SYSTEM IN VACUUM AT ALL TIME AND THEN RELEASE THE REFRIGERANT VALVES BEFORE YOU REMOVE THE TOOL. Just stick to this rule for DIY purpose!!!!

For my vacuum case, It went down to about 250micron-Hg and it went up to 388micron-Hg w/in 9min (see photo). Mine has a rate of about 16micron-Hg/min, much lower than industry standard. ALso you don't have to pull vacuum down to as low as mine but I left mine like that for over 30min while I button up the wirings. I used a 2.5CFM HF pump and I think it's more than enough; I think 1CFM pump can even do the job for these system.
 
Last edited:
OP
T

Trey T

Well-known member
Joined
Aug 3, 2011
Messages
3,749
Location
Houston, TX
Yep. ...

Edit: install manual stated 3-15/16" away from the wall. I was able to get my arms back there w/o any problem.
That looks really close to the wall. Were you able to get the manufacturer's recommended spacing using that wall mount?
 
Last edited:
OP
T

Trey T

Well-known member
Joined
Aug 3, 2011
Messages
3,749
Location
Houston, TX
Can't remember exactly.... Around 12ft by 15ft by 8ft tall, one window faces south.

Inverter unit. Whispering quiet, indoor unit and outdoor unit .... Unbelievable
 

CWO4GUNNER

Well-known member
Joined
Aug 17, 2014
Messages
229
Location
BHC AZ
My ID/OD unit arrived 2 weeks ago and have been waiting for a few special order parts. A 30 amp fused disconnect becasue rather than running a dedicated 30 amp 120V circuit from the other side of the house 60 feet away where the breaker box is located, Im going to use 1 leg off an existing 50A 220V circuit which is a few feet from the install location in the garage. I will also be installing a 20a 120v surge suppressor inline to protect the board electronics, something that seems to be a failure trend with these mini splits. I will also not be boring a hole but rather using the knock-out to run the lineset, control wires and condensate line strait down to an existing cat door that is no longer used but very convenient. So instead of having the lineset/controls cover outside, it will be inside the garage. These parts have arrived so I will start work tomorrow. But I plan to take my time a little each day till its done. Being retired their is certainly no hurry.

**Correct my last in bold should read: A 30 amp max rated fused disconnect box, using 20a delay mini brakes...sorry
 
Last edited:
OP
T

Trey T

Well-known member
Joined
Aug 3, 2011
Messages
3,749
Location
Houston, TX
Do it!! You can have the ugly line-set b/t the walls.
I can't wait to get mine installed. Got to build the shop first though. Lol

What's the heat/cool capacity or your 120V unit? Surge suppressor. That's a great idea.

If it's a single story, I would knock out the drywall and run the line-set b/t 2x4 frame. I still have to come back and cover the line-set since I had to special order the 3" track/cover.
My ID/OD unit arrived 2 weeks ago and have been waiting for a few special order parts. A 30 amp fused disconnect becasue rather than running a dedicated 30 amp 120V circuit from the other side of the house 60 feet away where the breaker box is located, Im going to use 1 leg off an existing 50A 220V circuit which is a few feet from the install location in the garage. I will also be installing a 20a 120v surge suppressor inline to protect the board electronics, something that seems to be a failure trend with these mini splits. I will also not be boring a hole but rather using the knock-out to run the lineset, control wires and condensate line strait down to an existing cat door that is no longer used but very convenient. So instead of having the lineset/controls cover outside, it will be inside the garage. These parts have arrived so I will start work tomorrow. But I plan to take my time a little each day till its done. Being retired their is certainly no hurry.
 
Last edited:

CWO4GUNNER

Well-known member
Joined
Aug 17, 2014
Messages
229
Location
BHC AZ
Mine is a 12000BTU 120V non-inverter 13 seer heat pump. Most industrial serg suppressors are to expensive except for the plug in type like this
https://www.google.com/shopping/product/4615804381528634273?q=120v+20+amp+surge+recepticle&client=ms-android-huawei&espv=1&nfpr=1&biw=360&bih=523&sboxchip=Shopping&ei=catGVKPJB8izyAT_sILwAg&ved=0CJ0DENAvMA4. These type surge protectors are affordable and very effective use in machine shops to power sensitive equipment. If your going to ask me how I make it work legally you'll need to PM me.
 

jad3675

Well-known member
Joined
Jul 12, 2010
Messages
52
Mine is a 12000BTU 120V non-inverter 13 seer heat pump. Most industrial serg suppressors are to expensive except for the plug in type like this
https://www.google.com/shopping/product/4615804381528634273?q=120v+20+amp+surge+recepticle&client=ms-android-huawei&espv=1&nfpr=1&biw=360&bih=523&sboxchip=Shopping&ei=catGVKPJB8izyAT_sILwAg&ved=0CJ0DENAvMA4. These type surge protectors are affordable and very effective use in machine shops to power sensitive equipment. If your going to ask me how I make it work legally you'll need to PM me.

Why not do it right, and use a supco scm150? They're not that much more expensive than the outlet you linked to, and no need for wiring shenanigans.

John
 

CWO4GUNNER

Well-known member
Joined
Aug 17, 2014
Messages
229
Location
BHC AZ
Why not do it right, and use a supco scm150? They're not that much more expensive than the outlet you linked to, and no need for wiring shenanigans.
John

I never seen that one. Although a bit pricier certainly mounts nicely to the outside disconnect knockout, nice and clean. I was reading that the only problem is that it is rated pretty low rating of only 10ka for repeated hits compared to most other 75ka. There were also concerns about it being mounted outside where it is much more vulnerable. Still it does look like an easy and clean wiring and mount solution. Thanks for the tip, I will research it more compared to mine and seriously consider it. I can always use my wall receptacle surge suppressor to replace a standard 20a receptacle near a window for a window AC application.
61bMI9-+PnL._SL1600_.jpg
 
Last edited:

stroked89coupe

Well-known member
Joined
Oct 8, 2014
Messages
83
Location
Georgia
Do it!! You can have the ugly line-set b/t the walls.


What's the heat/cool capacity or your 120V unit? Surge suppressor. That's a great idea.

If it's a single story, I would knock out the drywall and run the line-set b/t 2x4 frame. I still have to come back and cover the line-set since I had to special order the 3" track/cover.


Yep. Planned to put it out of sight between the studs. :)


Just started on the foundation today.
 

CWO4GUNNER

Well-known member
Joined
Aug 17, 2014
Messages
229
Location
BHC AZ
Wow after reading a couple papers on surge protection application and their discharge current ratings, it turns out that type3 point of use 3-6kA (the one I bought) is really not much use over time and can fail unexpectedly placing the equipment at risk...Hmmmm

Although the Supco 150 is a Type 2 hard wired for use between load side of the equipment and protection device, at 10kA its at the lowest end of type 2 protection. It turns out that serious surge protection doesn't start until your at least at 20kA the minimum for lightning strike protection. Nevertheless they have been in business for a while and their product designed is geared exclusively toward HVACR application. In addition they have a 3 year $500 equipment protection grantee that if the their surge protector fails resulting in protected equipment damage, provided that their suppressor is located in the immediate vicinity of the protected equipment "at the disconnect".
http://www.supco.com/images/pdfs/SCM60%20&%20SCM150%20Product%20Sheet%20185%20%20for%20print%202.pdf

Im trying to find out what the Supco 160 kA rating is, perhaps 20kA
 
Last edited:
To avoid these ads, REGISTER NOW!

CWO4GUNNER

Well-known member
Joined
Aug 17, 2014
Messages
229
Location
BHC AZ
Tray- hope you don't mined I hijack a couple more questions on surge protectors, as I think you were also interested..

OK! I think maybe I may have found the easiest and simplest surge protection solution for myself. As I posted I will be using 1 leg off a dedicated 240V 50a source at the location of the install, by using a 20a 120v fused disconnect.

So why not just spend a little more $100 and replace the double pole 50a breaker for that circuit with an Eaton double pole 36kA surge protector which doubles as a 50a breaker #BR250SUR. This eliminates additional wiring in allot more ways then one right?
http://www.homedepot.com/p/Eaton-Type-BR-50-Amp-Double-Pole-Surge-Breaker-BR250SUR/205476005
6c8d23c5-2f18-4b65-91ea-d84cc29ef4d0_400.jpg
 
Last edited:

CWO4GUNNER

Well-known member
Joined
Aug 17, 2014
Messages
229
Location
BHC AZ
Well since I can't get any information on how using just one 120v leg of that 220v circuit would affect the performance of that 50a double pole surge protector/breaker (still work?), I may go back to a "point of use" protector at the disconnect.

Nevertheless, the concept of replacing tradition dedicated circuit breakers for mechanicals with sensitive boards I.e. the indoor central unit, may be a great investment without having to tap into the circuit nor any rewiring.
 
Last edited:

CWO4GUNNER

Well-known member
Joined
Aug 17, 2014
Messages
229
Location
BHC AZ
Great info guys. Keep 'em coming.

You forget being an acomplihed DIY hacker your calling out to "the choir". But from one hacker to another I think as part of my annual maintenance I will invest in these breaker box protectors for my rental indoor central units, according to specifications 37kA is more then enough to protect even against lightning. Also I believe (must check) that indoor 4 ton unit breaker is only 20 or 30 amps max. So the cost of the protector is less eexpensive.
 

CWO4GUNNER

Well-known member
Joined
Aug 17, 2014
Messages
229
Location
BHC AZ
FAQ answer provided by almost every "Industry" mini-split ductless brand name website:


What do I do with the extra line set?

If there is extra refrigerant line set, simply coil it in a convenient manner. As a precaution, take care to prevent it from damage by lawn care activities, or from being covered in water or by soil.
 

CWO4GUNNER

Well-known member
Joined
Aug 17, 2014
Messages
229
Location
BHC AZ
I installed two of these in a new home we moved to last year. I used the Fredrich units, that come with fully charged lines. All you need to do is mount the unit inside. Drill the 3" hole, route the lines to the outside and then hook them up. The ones I installed plug into a 115 outlet and they work great.
http://www.friedrich.com/products/residential/window/breeze

Hay watch it now! Its not suppose to be that easy, you almost ran over my toes LOL. I couldn't help noticing the link add coined the phrase "Revolutionary".... Hmmm?
 

pseudorealityx

Well-known member
Joined
Nov 10, 2009
Messages
999
Location
USA
OP - I thought loops on the line sets was bad? (sorry, perhaps a common misconception on my part).

In general, loops are bad when you have long line lengths and/or big height differences. That's when you can get a slug of condensed liquid. For these little 25' runs, it's not a big deal.
 
OP
T

Trey T

Well-known member
Joined
Aug 3, 2011
Messages
3,749
Location
Houston, TX
Well, it depends how you loop it. If you have a tight radius loop, that can be a problem. Tight radius (i.e. 2") can have a high friction flow. However, if you compare the loop vs going upward against gravity, I think they're "equally bad".

I installed this for a family member so I'll monitor the current draw once in a while. I think that's the best I can do. For my setup (Daikin also), I'll shorten it and recover the R410a for the lineset length.

I just got an update that everything is function well.
OP - I thought loops on the line sets was bad? (sorry, perhaps a common misconception on my part).
 

CWO4GUNNER

Well-known member
Joined
Aug 17, 2014
Messages
229
Location
BHC AZ
Manufacturers should have a bracket on the top of the outside unit where excess of a few loops can be secured in a flat oval racetrack position. In my case my lineset length is only 16' so measured a few times and may have 18 inches left over and may make a bracket to make one flat loop on top.. But if necessary have my flair tool to customize the length.
 
Last edited:

Trollaltdelete

New member
Joined
Nov 12, 2012
Messages
3
Hay watch it now! Its not suppose to be that easy, you almost ran over my toes LOL. I couldn't help noticing the link add coined the phrase "Revolutionary".... Hmmm?

Not trying to step on your toes, just trying to share an alternative. I got a quote to install a single unit and it was over 3K. Tried several contractors. Then I came across these and for 1200 each, I was able to get them both installed in a single day, without having any ability to draw a vacuum or charge a line.

Just an alternative for those of us who don't have the ac tools required to "Do it right"
:bounce:
 

CWO4GUNNER

Well-known member
Joined
Aug 17, 2014
Messages
229
Location
BHC AZ
Not trying to step on your toes, just trying to share an alternative. I got a quote to install a single unit and it was over 3K. Tried several contractors. Then I came across these and for 1200 each, I was able to get them both installed in a single day, without having any ability to draw a vacuum or charge a line.
Just an alternative for those of us who don't have the ac tools required to "Do it right"
:bounce:

Oh I know that, and sorry my sarcasm in an attempt to congratulate your DIY achievement was misunderstood, I'm on your side lol. Its actually great to hear that particular system requiring no special tools worked so well for you. Even though I have my HVAC college cert, EPA cert, and cornucopia of HVAC tools to support my own clutch of central AC units I landlord over, I would welcome complete R410a central indoor/outdoor/blower/gas furnace matched combination sales to the public that included pre-charged lines with no-loss quick connect fittings just like that. I mean just one less unnecessary proprietary circus hoop to jump through and environmentally safe right, two birds with one stone taken care of using precharged no-loss line sets. By the time I'm forced to DIY replace my aging R22 Goodman
systems I sure hope they are common use.
 

AndyCBR

Well-known member
Joined
Jun 22, 2014
Messages
396
Location
Baton Rouge, LA
Looking at a Daikin and followed your thread with great interest.

I'll end up with about a 10 foot line set when installed for my application (12k BTU KE series).

The installation manual specifies a minimum length (4.92 ft) which I will be above. The manual doesn't call for adding any refrigerant up to 33 ft. They also don't call for taking out any refrigerant for anything less than that.

Any thoughts on charge vs line set length and is it that critical? It seems based on the manufacturers recommendations anywhere between 5 and 33 feet the unit has the proper amount of refrigerant from the factory.
 

Jackfre

Well-known member
Joined
Dec 26, 2010
Messages
4,408
Location
N CA
I don't understand why you looped the line set as opposed to simply cutting it to length. I am not sure of Daikin's specs, but a 12' lineset would be sufficient for a 9-12 unit. Fujitsu will not allow a loop. They feel it does trap oil and therefore does impact performance and system longevity. If there is excess, it must be laid off in a serpentine fashion.
 
To avoid these ads, REGISTER NOW!
Top Bottom