To avoid these ads, REGISTER NOW!

My first patch panel.

Mr9two9

Active member
Joined
Dec 30, 2010
Messages
41
Location
Jamaica, NY
Hi guys, I've been lurking for awhile, This is a good site to learn stuff. I'm rebuilding a 1971 Buick skylark, and decided to do as much of the work as I can. This includes welding new metal into the problem areas. I'm a decent mechanic on either bikes or cars, newb to welding - took a few classes last year. I just wanted to share what I'm doing, and welcome input.

Being as I have no formal training, my soloutions are uh.. unorthadox at best so here's my patch of the a - pillar area on my skylark. Currently I'm using a millermatic 211, 75/25 shielding gas, and .023 wire.


DSCN0771.jpg

the damaged area.

DSCN0772.jpg

different angle

DSCN0776.jpg

cutting out rust

DSCN0777.jpg

more cutting
 
To avoid these ads, REGISTER NOW!
OP
M

Mr9two9

Active member
Joined
Dec 30, 2010
Messages
41
Location
Jamaica, NY
DSCN0781.jpg

the patch panel I made from 18 ga metal. I put those cuts in it as to help it make the curve a lilttle eaiser

DSCN0782.jpg

DSCN0783.jpg

looks like it might work.
 

240sxguy

Well-known member
Joined
Jan 6, 2009
Messages
1,157
Location
Madison, wi
Not bad at all! If you are going to clean that up with a grinder don't remove too much material. I am sure that's a structural area. good job.
 

Captain-Matt

Member
Joined
Apr 7, 2012
Messages
16
So far so good. You've got the right idea.

Tell you what you've not got though, a gas sheild :p

Shelter yourself from any wind that will blow away your sheilding gas and you'll start putting in proper welds :)
 

koditten

Well-known member
Joined
Apr 10, 2008
Messages
5,528
Location
Midland, Michigan
Are you outside? I looks like the wind might be blowing your shielding gas away from the weld. Or, like I do, you forgot to open up the gas valve.

Show us more. You got the right idea.

KO
 

383 240z

Well-known member
Joined
Dec 4, 2006
Messages
4,295
Location
Findley Twp. Allegheny Co.
That is a structure area, cut it back out. your doing it correctly, however those welds are sub-par. Your either not running enough shielding gas or the parent metal has contaminates on it. set up a panel to block the breeze if your outside and you will be very proud of the work your doing. Keith
 
OP
M

Mr9two9

Active member
Joined
Dec 30, 2010
Messages
41
Location
Jamaica, NY
Yes I'm welding outside. My garage is waay small, but maybe ill try the do-over in there. I'm runnng about 20 cfh of shielding gas. The backside of the original metal has surface rust. the metal I used for the patch is clean, I wire brushed it, then wiped it clean with acetone.
 

K13

Well-known member
Joined
Oct 24, 2007
Messages
2,222
Location
St. Albert, AB Canada
Your gas is set about right. This might sound like a dumb question but can you hear the gas coming out when you weld?

Backside rust shouldn't be causing that much porosity in your welds.

You don't need to be inside to MIG weld. I never use my mig inside becuase like you I have a very small garage to work in and I am scared shitless of a fire starting from the sparks. I try not to weld if it is too windy but if I have to get something done it can be a simple as your body positioning. As in use your body as a barrier between the wind and your weld area.

Good luck.
 

MP&C

Well-known member
Joined
Oct 21, 2009
Messages
4,396
Location
Leonardtown, MD
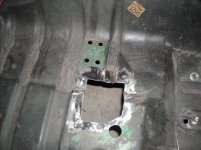
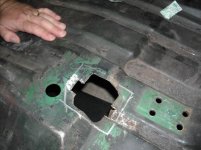
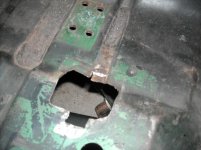
There are many variables that go into welding in patch panels, and it starts with the basics of panel fitment. You want the panel to fit tightly to the opening cut out, with minimal, if any gap. The contour should closely match the adjacent panel to promote the "minimal gap" concept. In the interest of perhaps providing some guidance, I've made "notes" on some of your pictures to highlight areas of concern that I would be looking for in making a similar patch panel.


Although it is hard to tell in the picture, the red line simulates the contour of the panel when viewed from the side, which has a slight arc to it.

attachment.php


So when bending over a flange to form this profile, the flange will need to be stretched to provide this arc. This is the detail you were adding by slitting the flange to allow the patch to follow the contour. Where this is one method of providing this detail, there are other methods of stretching a flange that will not need the slits, and thus the welding of the slits. The better the patch fits before welding occurs, the easier the install will go.

Looking at the same area from the rear profile, you can see that there appear to be two consecutive arcs (green lines), and not a straight line bend as you have done.

attachment.php


This detail would make this fabrication a better candidate for hammer forming, and not the straight bend in the vise. Now, looking at the bend of your patch (blue line) and comparing to the bend of the adjacent panel (yellow line), you can see that the factory piece has a gradual radius on the bend (approx 1/4" radius) where yours is a tighter radius from using the vise.


attachment.php


Also, the factory part appears to be slightly more of an obtuse angle, where yours is closer to a 90 degree bend. By having a sharper angle on the patch, it will require a bit more grinding on the outside corner to better match the adjacent piece, which will give you thinner metal on the corner for a weak spot in an area that is very much structural in nature. I bring these factors up not to pick on your work (I've been through the same learning curve) but to hopefully show how a little more work in the fitment/fabrication part will make the welding in part about 90% easier.

For forming the (green line) arcs and contour (red line) on your patch, here is a thread where I posted a response for a gentleman trying to make some windsield corner repairs. Where his pictures are no longer visible, they were similar to what I showed in my post, only with much rust. The process should be similar to what you need to accomplish here, and will show the basics of how you can perform some shrinking/stretching of a flange to control the contour of the panel with simple hand tools.

http://www.ford-trucks.com/forums/896657-replacement-steel.html


You may want to lean toward hammer forming in fabricating this part. Probably the best tutorial I have seen online (and what convinced me I might have a chance at pulling off similar repairs) is found here on some Divco repairs/fabrications. (be sure to continue on to his links for "metalworking #2 and #3")

http://heritagesonline.homestead.com/metalworking.html


....or here is an inner tailgate repair I did on a 55 wagon that shows the hammerforming process as well....


http://www.jalopyjournal.com/forum/showthread.php?t=550803


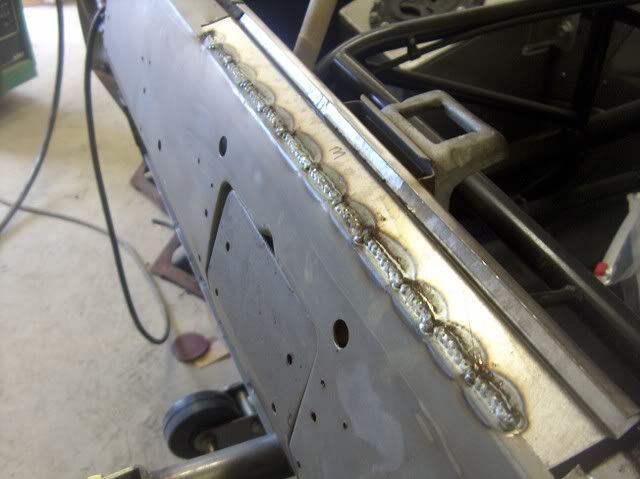
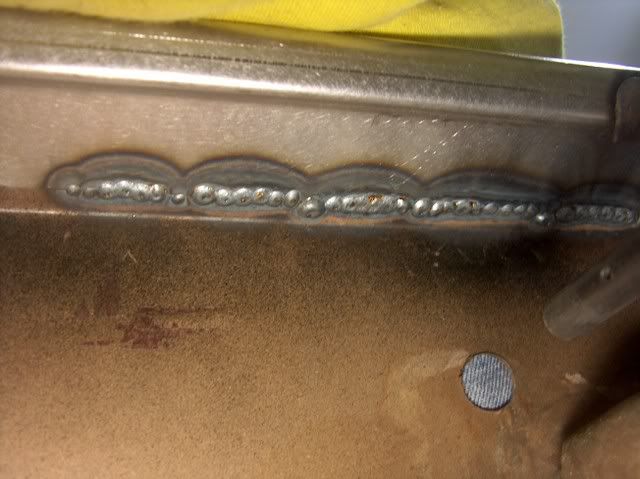
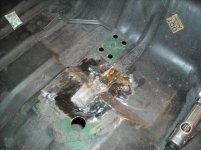
Next, the welding. As others have stated, you have what appears to be what happens when the shielding cloud has been displaced by wind, for a weak, porous weld. If you were to look at the back side, I would surmise there would be no weld penetration at all. I would give this repair a year or two of road travel and you would start to see cracks forming at the joints of your weld. IMO you should cut out this repair and have another go at it.

For welder setup, I always suggest to practice on some scrap pieces (same thickness as you are using on the car) to insure the machine is properly adjusted to give you a full penetration weld for a structurally sound repair of the area. Here are some samples, front side of the repair and rear side to show weld penetration:

Picture174.jpg


Picture178.jpg


Lastly, you've likely already seen it, but we also have a thread here on GJ discussing welding in patch panels, a pretty good "training" resource....


http://www.garagejournal.com/forum/showthread.php?t=53534
 

Attachments

  • 929-1.jpg
    929-1.jpg
    48.2 KB · Views: 950
  • 929-2.jpg
    929-2.jpg
    36.4 KB · Views: 948
  • 929-3.jpg
    929-3.jpg
    46.5 KB · Views: 945
Last edited:
OP
M

Mr9two9

Active member
Joined
Dec 30, 2010
Messages
41
Location
Jamaica, NY
Wow lots to read. Ill try to cut it out and start again. Hammer forming feels tricky, but I might give it a shot. Dont know if I have all the necessary tools tho. Hammers and dollys I have. No pillow and a length of train track for an anvil.
 

Kevin54

MEMBER EMERITUS
Joined
Jan 12, 2005
Messages
29,341
Location
Urbana, Ohio
Wow lots to read. Ill try to cut it out and start again. Hammer forming feels tricky, but I might give it a shot. Dont know if I have all the necessary tools tho. Hammers and dollys I have. No pillow and a length of train track for an anvil.

You don't need any train track. Look around the garage and you'll find everything you need. If you have a vise, then you are good to go. Use it. You can clamp up a piece of pipe to use as an anvil. Look around outside. A good piece of cut up tree also works to pound on. Some of the best bodywork guys that you always read about, Darrel Starbird, Dean Jeffries, George Barris, have used some of the most unorthodox things to pound out some metal.
 

b-body-bob

Well-known member
Joined
Oct 10, 2011
Messages
1,621
Location
Almost Heaven
Any chance of finding the same body type in a yard without damage there, and cutting the patch from that? 71 Skylark means any Chevelle, Cutlass, Tempest 2 door or 4 door from 68 - 72 would probably work for you and save you a bunch of fab trying to get the piece bent. (I might be wrong about the years that would work, but I promise you it will save you some time.)
 
To avoid these ads, REGISTER NOW!

b-body-bob

Well-known member
Joined
Oct 10, 2011
Messages
1,621
Location
Almost Heaven
To follow up ... I could've spent hours if not days making this piece in the attachments with my non-existent skills but instead my parts car floor was rotted everywhere else so I cut out just what I needed and it came with all the contours already in it ... Another thought for you would be to try to find where you can take the part out at the spot welds so you don't have so much **** welding to do.

No matter what you decide, keep after it man, you'll get it :thumbup:
 

Attachments

  • DSCN0812.jpg
    DSCN0812.jpg
    105 KB · Views: 99
  • DSCN0811.jpg
    DSCN0811.jpg
    96.1 KB · Views: 77
  • DSCN0809.jpg
    DSCN0809.jpg
    100.5 KB · Views: 74
  • DSCN0804.jpg
    DSCN0804.jpg
    98.8 KB · Views: 80
  • DSCN0802.jpg
    DSCN0802.jpg
    98.7 KB · Views: 87
  • DSCN0800.jpg
    DSCN0800.jpg
    81.4 KB · Views: 89
  • DSCN0814.jpg
    DSCN0814.jpg
    117 KB · Views: 98

sberry

Banned
Joined
Jun 18, 2005
Messages
35,747
Location
Brethren, Michigan
Clean it up some and weld over it, use backstep like we see in one of the pics. I often fit the patch about an eight'th bigger than the cut out, reach inside with my finger and a little sandpaper, clean a bit near the edge, put the patch inside, pull tight and the weld is a semi lap with most of the backing consumed vs a **** weld.

I tack it up tight, every inch or so, take grinder and feather tacks and any splatter, start between tack, run over one and stop in between and make welds vs a series of tacks.
 
Last edited:
OP
M

Mr9two9

Active member
Joined
Dec 30, 2010
Messages
41
Location
Jamaica, NY
@ b-body bob. I could cut it out of a donor car, But I wouldn't learn anything... Pulling my setup out of the garage now, I'll take pix of other areas on the car I'm working on as well.
 

Kevin54

MEMBER EMERITUS
Joined
Jan 12, 2005
Messages
29,341
Location
Urbana, Ohio
@ b-body bob. I could cut it out of a donor car, But I wouldn't learn anything... Pulling my setup out of the garage now, I'll take pix of other areas on the car I'm working on as well.

Not entirely true. You'd learn how to keep things in place while you cut out a complete post.

If your dash pad is good, I'd recommend taking it out so weld spatter doesn't ruin it, along with getting a welding blanket of some type to keep from splattering up the windshield.
 

b-body-bob

Well-known member
Joined
Oct 10, 2011
Messages
1,621
Location
Almost Heaven
Not entirely true. You'd learn how to keep things in place while you cut out a complete post.

If your dash pad is good, I'd recommend taking it out so weld spatter doesn't ruin it, along with getting a welding blanket of some type to keep from splattering up the windshield.

Kevin I wasn't even talking about taking out a complete post, just using the factory formed metal instead of bending it himself. Was also thinking that if the post has an inside and an outside so it could be disassembled on two sides at spot welds then it'd save welding and finishing there too.

Everybody has their own way of doing things though.
 

Divcod

Well-known member
Joined
Jan 9, 2015
Messages
319
Location
Pacific Northwest
Old metal worker told me all you need are hammers and and basic tools to build anything, additional tools only impact time.
Fittings a qtr panel to my Divco milk truck took 4 hrs of grinding and test fitting with the final welding being done in 45 minutes. Our goal is to have a perfect match before welding.
 

toofart

Well-known member
Joined
Sep 27, 2013
Messages
280
Location
Qc
Yes I'm welding outside. My garage is waay small, but maybe ill try the do-over in there. I'm runnng about 20 cfh of shielding gas. The backside of the original metal has surface rust. the metal I used for the patch is clean, I wire brushed it, then wiped it clean with acetone.

Use flux-core. It's not the child of the devil that everyone makes it out to be, and for the environment you're working in, it will give you much better results.
 

Capt Chrysler

Well-known member
Joined
Mar 6, 2011
Messages
1,160
Location
Middle of nowhere.
Use flux-core. It's not the child of the devil that everyone makes it out to be, and for the environment you're working in, it will give you much better results.

It might not NOW be the "child of the devil". But, sure as Hell is setting at the same table for dinner!

Arg! I'm having flux core welding bad flash backs!!!!!!!

Capt. Chrysler
 

tehach

Well-known member
Joined
Mar 7, 2010
Messages
211
I would cut a piece out of a donor car to get the profile. Spend more time on fitup.

Practice welding technique on some scrap. Should require very little grinding of the weld.

High stress area. Expect backside corrosion in the HAZ.
 
Last edited:

toplessHO

Well-known member
Joined
Oct 20, 2014
Messages
14,007
Location
central florida
I had the same problem on my 78 Seville but it was on the outside of the pillar.
I took a hacksaw to the junkyard and found same model(x body) and in 10 minutes of cutting I had more than enough to repair with. I took it home,cut out just what I needed
and was done in no time.I was even able to peel the very expensive padded top back
and save it too. Also do yourself a favor and get a large sheet of cardboard or masonite
and shove in between the door frame and the dash and cover all else with some old bedsheets. Grinding will ruin good glass and put rust pits in everything it touches,15 ft away even.
Kudos for trying this yourself ,with practice you ll be ready to tackle it all.
 

JonBoehman

Well-known member
Joined
Oct 7, 2011
Messages
364
Location
Philpot, Ky
Is the polarity correct on the power connection? I only ask because I have forgotten to switch mine before and got welds that looked just like that. Once I remembered and switched the leads they turned out great.
 

2nrguy

Well-known member
Joined
Sep 24, 2014
Messages
158
New post/old post, some guy like me comes along that needs to do a bit of burning metal reads all he can, comes here and picks up more pointers to make his patch job a little less of a PITA.
 
To avoid these ads, REGISTER NOW!
Top Bottom