To avoid these ads, REGISTER NOW!

My first time trying electrolysis (large 4 post lift)

fastfalcon94

Member
Joined
Jun 3, 2016
Messages
12
Location
Vermont
A local shop listed their 4 post Rotary Alignment rack for sale. It had air jacks and came with a Hunter 511 alignment machine. It was a little rustier than I wanted, but I had been looking for a 4 post lift for a few years now (actually missed out on 2 others). I pulled the trigger thinking I'd be able to sand blast it and make it work. The price was $2k. Plus it was close to home and the guy said he'd help me take it down and load it on the trailer with his friends forklift.

After getting it home and removing the stainless bottom plate for rear alignment section, I realized it was worst than I thought. I'm actually going to have to cut out and weld in some new steel:/ But that will be a story for a different day. For now I'm trying to get the rust off it. I bought some blast media and soon realized that it's going to take forever and I can't get into all the spaces I need to. Not to mention the media I would chew through at $12 a bag. I had used vinegar before to remove rust, but that would be expensive. I read into molasses but I think my neighbors would not care for the smell.

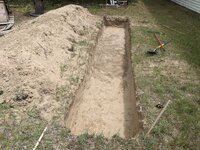
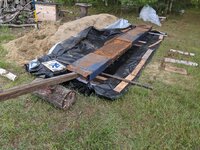
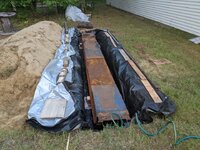
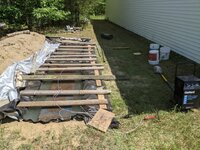
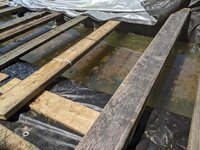
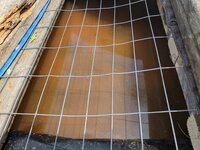
So I decided to try electrolysis. I dug a hole out back and I lined it with a thick harbor freight tarp. I have some wood blocks sitting on the bottom to hold the track up. Beneath the wood I have a towel to make sure it doesn't puncture the tarp. I was able to use some pipe to slide the track over the hole and then some leverage on each end to lower it in. I filled it with water and 4 boxes of washing soda. I have about 10 feet of 2"x4" square tubing hanging all around it as the sacrifice part. It's been running for about 16 hours so far. I just pulled the square tubing and it was awful. I wire brushed it and wiped off the crud.

I think I need to come up with a better system on removing the square tubing to clean. I don't have a lot of slack in the wire and it's all daisy chained together. I'm thinking maybe I can cut the wire and use wing nuts in between each section. Then I could easily pull it aside and clean it up quickly with a wire wheel. Anyways I think this is going to work, but I have no idea how many times I'll need to clean the plates or how long it will take. Also I'm not sure how clean I need to make the sacrifice parts. Do I have to clean them down to shiny bare metal each time or just wire brush the scabby like corrosion off? I'm getting a lot of rust foam on the top. I tried making a skimmer out of a piece of old sheet but it's not working. Curious if anyone has any tips or suggestions. Should I invest in a pool skimmer or is there something homemade I could make for skum on top? My Diebold charger can do 2 amps or 15 amps. The gauge on the charger seems to suggest its really doing 14 amps though when I have it on the 2 amp setting and 25 amps when I have it on the 15 amp setting. I have two older craftsman chargers, but they are smart chargers and shut off after 30 seconds.

Some pics


This is under the rear plates. This is the worst spot on the lift. The rest is very solid.
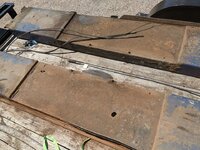
lift1.jpg

lift2.jpg

lift3.jpg

lift4.jpg

lift5.jpg

lift6.jpg

I covered it out with some tarps to make sure no animals get in. In the center I added a piece of chicken mesh so it can still vent.
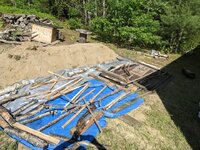
lift7.jpg
 
To avoid these ads, REGISTER NOW!

LXCam

ALLIANCE MEMBER
Joined
Apr 23, 2013
Messages
19,172
Location
AZ
I'm amazed at some of the stuff I see on this forum - including this. Lots of effort and creativity. Hope your project is a success.
Holy ****, what he said!. Best of luck bud, it'll be cool to see if you can pull this off. Personally I'd have just bought a big boy grinder and some wire wheels and gone to town, cussing the entire time.
 

XJSuperman

Well-known member
Joined
Jan 26, 2018
Messages
3,088
Location
Central Iowa
Well....thats different. Digging a hole in my yard to do this would never have crossed my mind. It woulda been wirewheels and flapdisks for me. Or I would have been looking for a used cheap pool to put it in.
 

Jayman17

Well-known member
Joined
Feb 6, 2017
Messages
3,812
Location
Seattle, Wa
When you are finished you can use that hole to roast a pig 🐷. I give you an A for effort, good luck with your project.

Jay
 
OP
F

fastfalcon94

Member
Joined
Jun 3, 2016
Messages
12
Location
Vermont
I think this tarp was 12 mil thick. It was the Extreme tarp. $30 for a 12x20 minus 20% off coupon. I'm hoping it will take a week per ramp. I can already see some clean areas on the top if I scrap the rust away with a stick. I'm wondering how the inside is going though. I read something about it being line of sight, so I may try to add some more steel on the underside. Or maybe wait a few days and then move the side steel to the bottom of the pit. ideally I'd like to try and suspend some so that it pokes up into the bottom of ramp. It's kind of a hollow cavity and I can see there is rust on the inside.
 

58Yeoman

Well-known member
Joined
Oct 1, 2010
Messages
8,999
Location
Central IL
I think I would've bought one of those needle busters and rented a continuous compressor to run it. No way would I dig a hole for that.

EDIT: Sorry, I didn't see the part about getting inside hard to reach area's.
 

Showkey

"MEMBER EMERITUS"
Joined
Aug 9, 2014
Messages
8,638
Location
Wausau WI
How long do you think this will take to get your desired results?
🤔Think two days…….uncover……..the ramp will be completely consumed.🙁

Think it’s also time to kick it up a notch……….break out the 100-200 amp DC a welder let’s get that thing cookin.
 
Last edited:

aka Larry

Well-known member
Joined
May 2, 2012
Messages
8,077
Location
Eastern, NC
I would have never thought of digging a hole (I hate digging period) but it's an interesting concept, and I don't really see a reason it won't work.

Please post more progress pics as you go through the process.
 

captain14

Well-known member
Joined
Dec 19, 2012
Messages
7,059
Location
Near College Park Maryland 20740
You know the rule... it didn’t happen unless there’s photos

Next thing we know someone will be dragging a wreck from a ravine someplace and digging a hole in their backyard and submerging it.
 
OP
F

fastfalcon94

Member
Joined
Jun 3, 2016
Messages
12
Location
Vermont
I'm not too active on the forum. I rarely post, but I do browse it. I thought I had posted about my garage build here, but I guess not. I made a page on my website about it: https://802projects.com/garage.php

Here are some more pics. This is what the water currently looks like:

lift8.jpg

Here is what one of the sacrifice pieces looks like. I had just brushed it off this morning. I'm not sure if I should just hand wire brush it, or if I'm supposed to clean it up with an angle grinder so it's shiny again. Or if I took it out too prematurely and I should have left it in longer.

lift9.jpg

The sacrificial pieces were a pain to pull. tonight I added some screws to my slats and left the head sticking up half an inch. Instead of wrapping wire around the slats, I made a little loop so I can just slip them over the screw head. In between each piece I also cut the wire and added a wire nut. Now I can undo the wire nuts and remove them easier.

I added a smaller piece a metal to my daisy chain and slid it under the lift. I think I want to make some kind of wood bracket so I can get it to sit right in the middle of the ramp. It's hollow underneath. The metal bends inward and there is a 2" lip down the entire ramp on each side. I'm thinking I could cut 2 strips of wood and attach them to a piece of metal that sticks upwards. Then I could finagle the wood so that it sits on the lips and keeps the metal inside the ramp. Every day I could clean it and slide it down a few feet.

Also we are having severe thunderstorms right now and it's really windy. I added some more wood to the tarp. Hopefully everything will be ok.
 

ChefRex

Well-known member
Joined
Jun 1, 2020
Messages
3,741
Location
NJ
That's not very crusty looking compared to what I get (on a much smaller scale of course)
 

johninct

Well-known member
Joined
Dec 21, 2010
Messages
2,598
I read once on a tractor forum about a guy doing his entire trailer. He made an above ground like pool like yours and used his welder.
 

Dan in Pasadena

Well-known member
Joined
Feb 18, 2009
Messages
13,157
Location
Pasadena, CA
I'll contribute to the chorus of praise - ingenious! I should be the last to offer any suggestions (but of course I will anyway, "It's Chinatown, Jake" but here it's GarageJournal Jake!)) Would it have been better to use a load of flap discs to remove everything accessible and possibly even cut out the metal you're going to replace THEN the electrolysis to remove rust in inaccessible areas? Less time, less electricity.

Anyway, how clean do you expect to get it?
 
To avoid these ads, REGISTER NOW!

Jrad235

Well-known member
Joined
Nov 23, 2012
Messages
107
Location
Colorado Springs, CO
I'm just going to leave this here:


And he did the same thing with an entire rear axle in a garbage can. I do believe there was a chemical added other than just water, but I'll let you read the article.
 

Dan in Pasadena

Well-known member
Joined
Feb 18, 2009
Messages
13,157
Location
Pasadena, CA
What do you think the people watching the Wright Brothers thought? Probably thought they were plain crazy....and they were......until they weren't!
 

DocsMachine

Well-known member
Joined
Sep 16, 2006
Messages
1,869
Think it’s also time to kick it up a notch……….break out the 100-200 amp DC a welder let’s get that thing cookin.

-I've found that more amperage doesn't necessarily make it go "faster". You need a certain saturation per square inch, yes, so a bigger part does need more power, but no, you don't need to get it glowing hot or anything. :D

It's been my experience that a lower amperage for longer, gets the part cleaner. Well, both ways will get it clean, but they produce a black ****. I've found that parts "cooked" fast- lots of juice- that **** has to be scrubbed off with brushes, or even wire brushes. While parts "cooked" slower- less juice, for longer- that black **** just rinses off with the hose.

The caveat to that is most of what I've done was cast iron, not plate steel, so I don't honestly know if that makes a difference.

As for the "tub", here's another option for larger parts. Some years ago, I was cleaning up the entire "tree" casting for an old "camelback" drill press. I took some old 2x10s, and screwed them together to make an opening plenty big for the casting:

electrolysis08.jpg

Lined that with plastic, filled it with water, and away we went.

electrolysis10.jpg

And the result:

rockford20.jpg

Doc.
 

Miss the Pontiacs

Well-known member
Joined
Nov 7, 2016
Messages
16,505
Location
Saskatchewan Canada
“WOW” is all can manage to say. “WOW” I managed to say it twice. Holy **** also comes to mind.
You should post more often if this is your content material. I have to go play on the one word that comes to mind thread. This totally too much for me to grasp. “WOW”
 
OP
F

fastfalcon94

Member
Joined
Jun 3, 2016
Messages
12
Location
Vermont
So a little update. I cleaned all the sacrificial metal tonight. It was pretty bad and its starting to pit. I had it running but just turned it off. The amp gauge on my charger is showing 32 amps now even though it's set on 2 Amps. It was around 14 amps one night, then 25 the next, and now 32. I don't now if it's because water is getting rustier. The 12/2 wire I have running to it felt pretty warm too. Last thing I want to do is burn down my garage. I tried a different charger as well which would shut off after a few seconds. Before it shut off, the amp gauge would peg to 10 Amps (max reading on gauge).

So tomorrow I am going to remove all the bolts that connect the wire to the parts, clean surface and try again. If amperage is good I'll know that's the problem. If not; it must be the water. If thats the case I'll probably just drain it and pull the ramp and try to find another solution. I can't keep filling it with water and washing soda every 2-3 days.
 
OP
F

fastfalcon94

Member
Joined
Jun 3, 2016
Messages
12
Location
Vermont
The excessive amperage seems to be related to one of the sacrifice pieces I had made for the underside. If I remove the one on the bottom it drops back down to 20-22 amps. Removing the one on the top made zero difference. So I have the bad one bypassed right now. Maybe my wiring isn't making a good connection here. It's impossible to pull with the other sacrificial pieces in the way, so I'm going to wait until its time to clean them to inspect further.

lift10.jpg

Here is a look at the top if I rub it with a piece of wood. The metal is nice and clean. The worst of it is on the sides and underneath though, and the water is too cloudy for me to see that far down. I'm going to keep the process going through sunday and move the sacrificial pieces lower so I can attack the underside more. Maybe tonight I'll make an attempt to leverage up one side of the lift just to peak at the edges.

lift11.jpg
 
OP
F

fastfalcon94

Member
Joined
Jun 3, 2016
Messages
12
Location
Vermont
I've been taking some videos on my phone. I'll share a video when I'm done. But the first ramp is out and in my garage. Second ramp is coming out tomorrow. All the rust came off. It doesn't magically remove the rust from the part. Its still in place, but is loose. I probably could have pressure washed it clean, but instead I used a hose and took a putty knife to it. Everything came off effortlessly with one swipe. It even got to areas that were not direct line of site. It has since flash rusted some. I took a leaf blower to dry it off once I got it in my garage. For the second ramp I'm going to dry it off as soon as possible. I'll have to quickly go over everything with the wire wheel on my angle grinder before paint, but that shouldn't be bad. Next up will be cutting out 2 sections that need new steel welded in.
 
OP
F

fastfalcon94

Member
Joined
Jun 3, 2016
Messages
12
Location
Vermont
Figured I would come back and update this thread. I did finish restoring the list. Hindsight I would recommend buying one in better shape, but what I did works if you don't value your time:) Here are some pics and a video I put together showing how it progressed.


Before:

rotarylift1.jpg

After:

rotarylift8.jpg

rotarylift9.jpg

rotarylift10.jpg


More pics on my website. I also put together a separate video on what to inspect when buying a 4 post lift now that I know them inside and out.


gmcgeo

Well-known member
Joined
Mar 11, 2019
Messages
3,701
OMG the things i would do to have your car collection :ROFLMAO:


Great job!
 

Viper98912

Well-known member
Joined
Oct 20, 2012
Messages
1,131
Location
GA
WOW! What a great finish to the story. And an extremely well thought out car collection, very nice as well.
 
To avoid these ads, REGISTER NOW!
Top Bottom